
We are pleased to introduce a significant upgrade to the scanning and import process within Practice EHR. With this new update, users now have the flexibility to use any scanner of their choice to scan and import insurance cards and driver’s licenses into Practice EHR. This allows for greater convenience and compatibility with various devices.
Additionally, we have also added the innovative AI-driven scanning and import capabilities that leverages advanced artificial intelligence to automatically read and extract key information from the scanned insurance cards or driver’s licences—such as policy number, provider details, and patient information—and directly populate the relevant fields in Practice EHR. This reduces the need for manual data entry, ensuring faster and more accurate data capture. AI-driven scanning and import option is not available by default and client can get in contact with Practice EHR support to enable this.
With these improvements, users will experience greater flexibility in hardware options, reduced administrative workload, and enhanced data accuracy, all contributing to a more streamlined and efficient workflow. We highly recommend taking advantage of this new feature to improve practice management and patient record handling.
Previously, users were limited to scanning insurance cards using only the Amber scanner. The new "Scanning and Import" feature enhances flexibility by allowing users to utilize any scanner of their choice for scanning insurance cards.
Users can now scan/import an insurance card using the “Scan Insurance Card” / “Import Insurance Card” option in the “New Plan” window when creating a new plan.
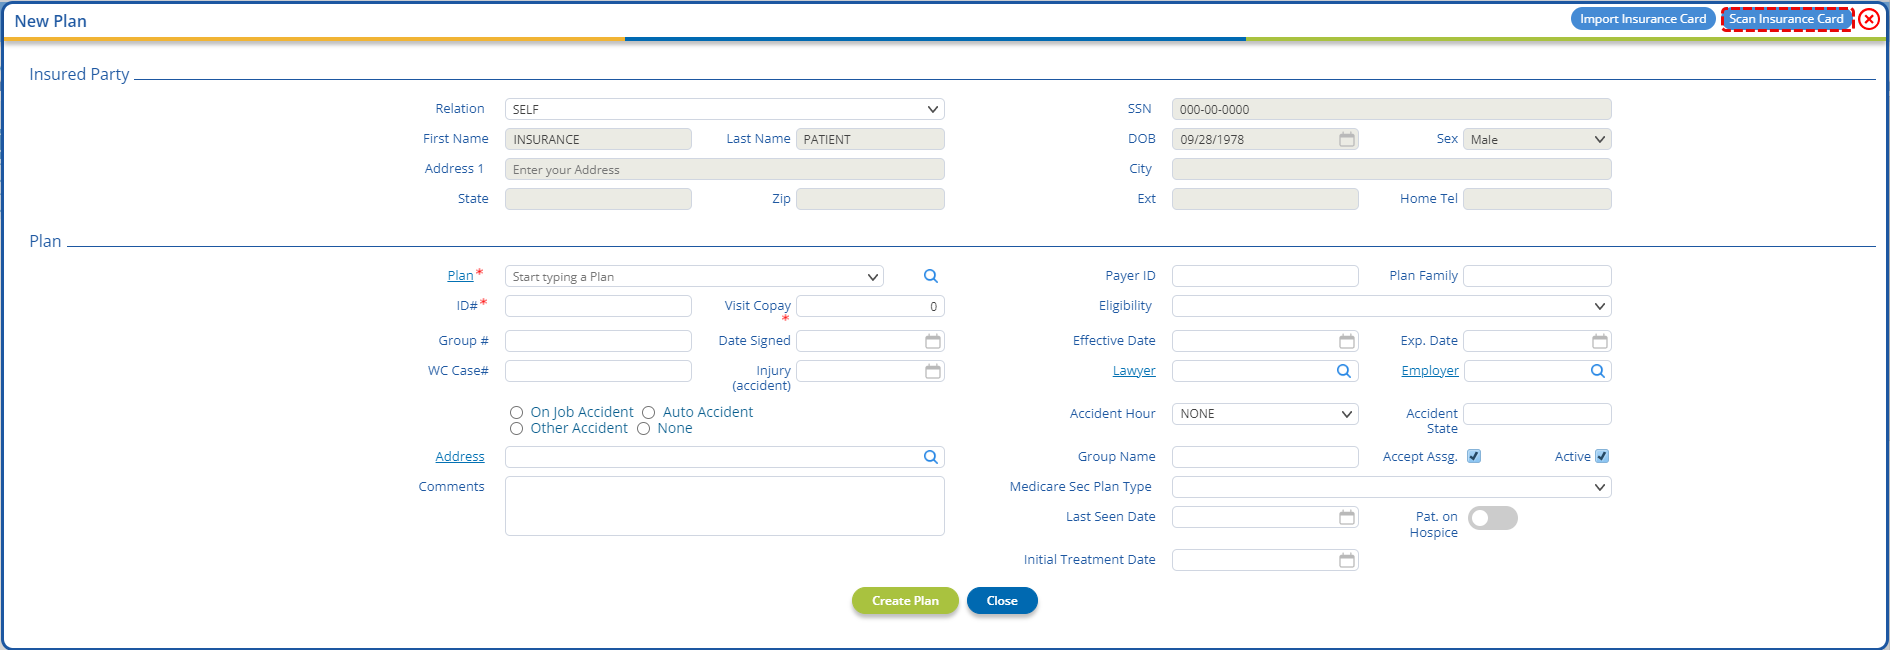
Clicking on the “Scan Insurance Card” option will open the “Scan Document” window. Here users can select the required source and click the “Scan” button to take a scan.
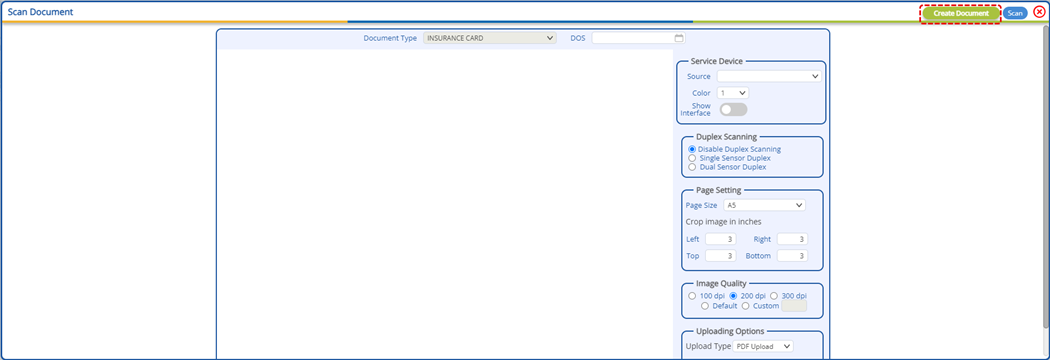
Once satisfied with the scans, users will need to click the new “Create Document” button to create and link the document with the patient's insurance.
Note: Closing the “Scan Document” window without clicking the “Create Document” button will discard the scans and no document will be created.
Upon a successful scan/import, the scanned/imported insurance card will be linked with the insurance and will be available to view on the insurance detail window as show in the screenshot below.

In case the AI-driven scanning and import option is enabled then upon scanning/import the advanced artificial intelligence automatically read and extract key information from the scanned insurance cards—such as policy number, insured party details, and patient information—and directly populate the relevant fields in Practice EHR.

Alternatively, users can also use the “Scan Insurance Card” and “Import Insurance Card” option available in the gear icon dropdown of the “Insurance” sub-tab to link an insurance card with an existing plan. Doing this will link the recent document with the insurance and the old one will be kept in patient documents section.
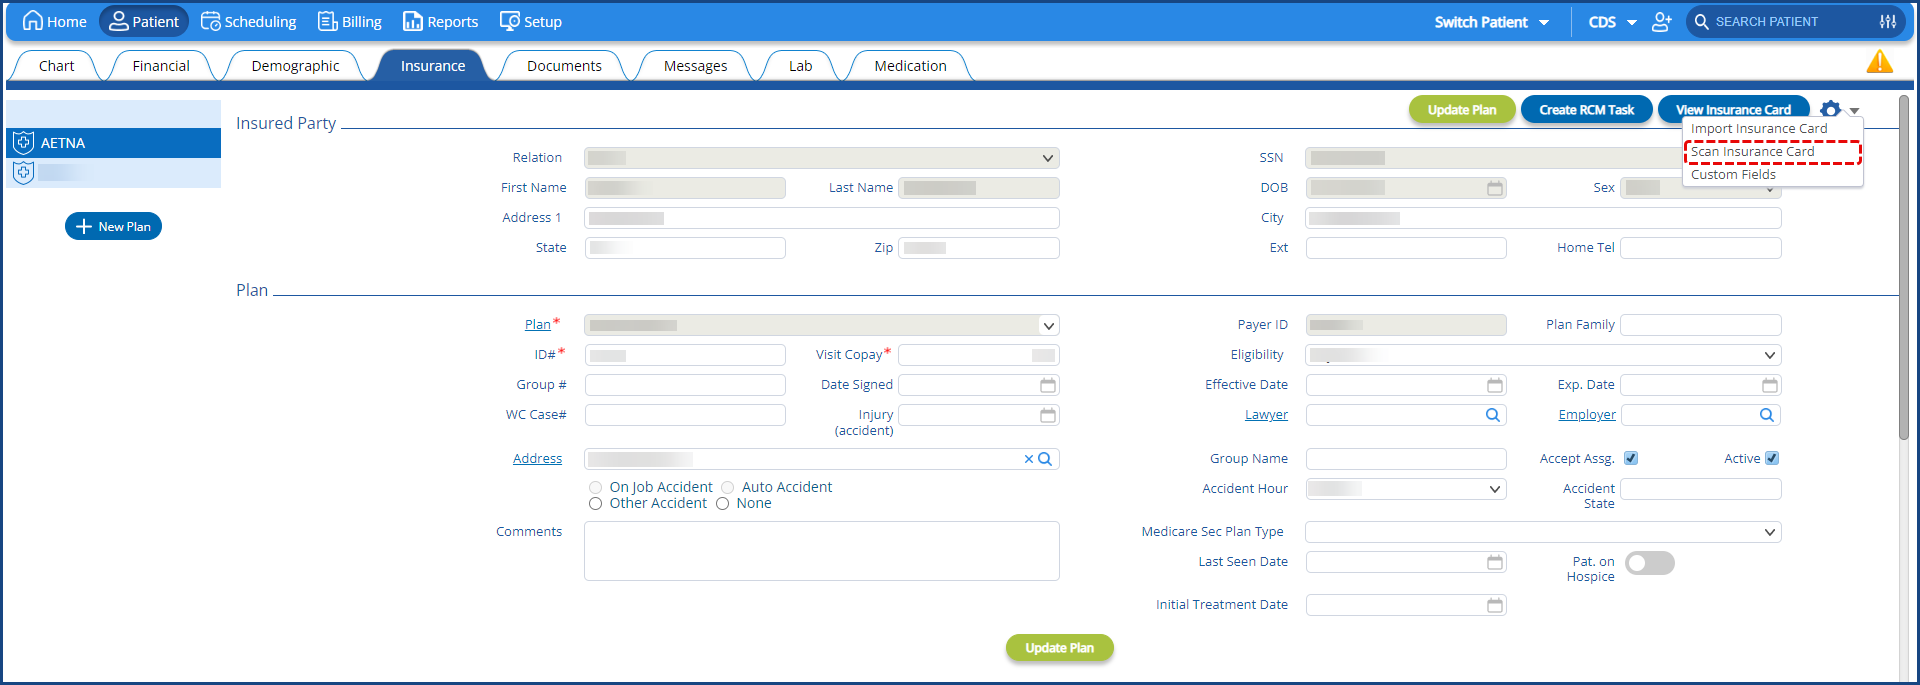
The linked insurance card can be viewed using the “View Insurance Card” button in the “Insurance” sub-tab. The “View Insurance Card” button displays the card most recently linked with the plan.

Previously, users were limited to scanning driver license cards using only the Amber scanner. The new "Scanning and Import" feature enhances flexibility by allowing users to utilize any scanner of their choice for scanning driver license.
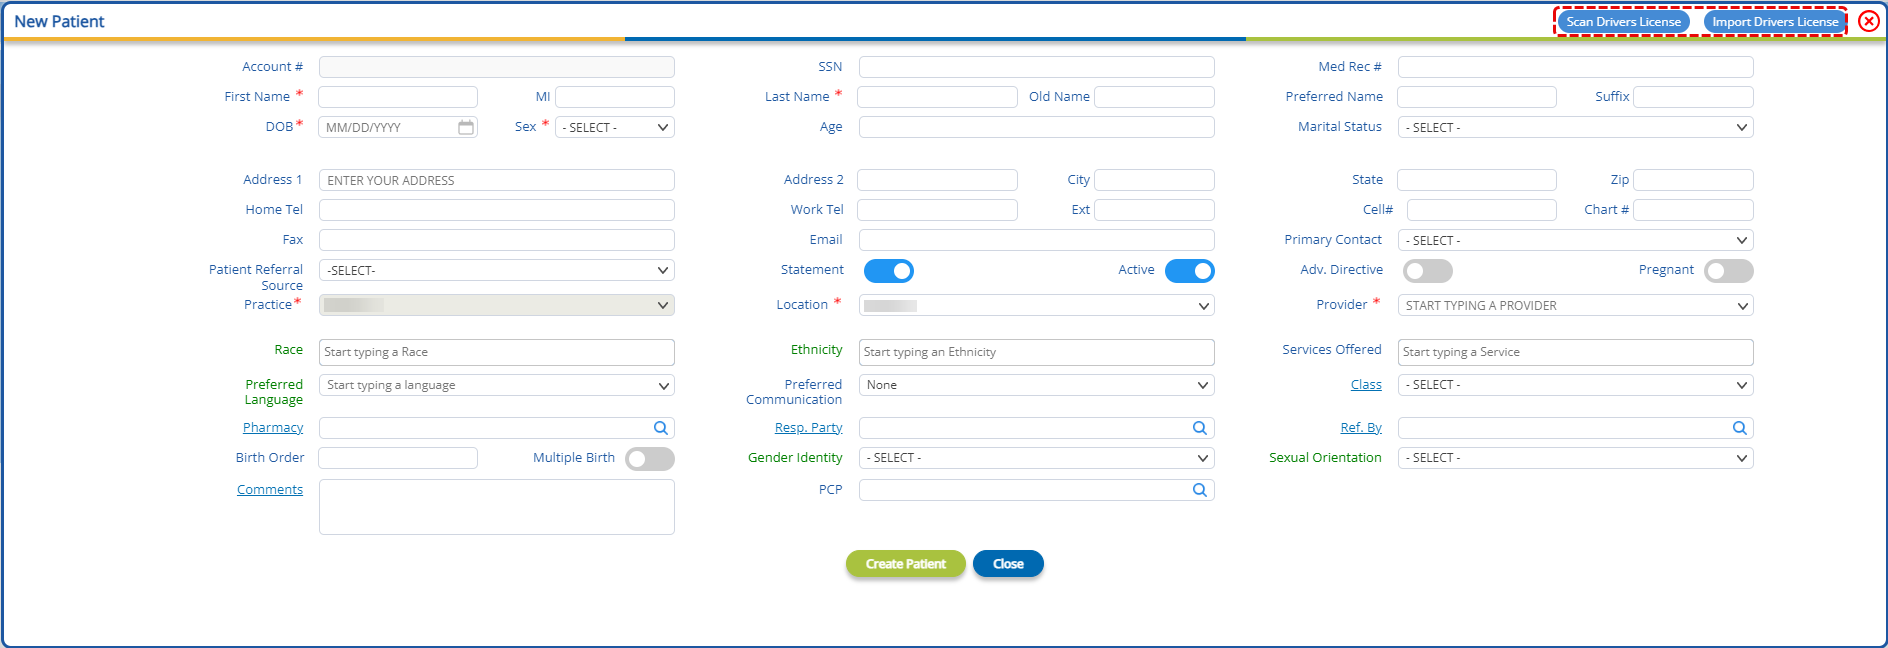
Users can now scan/import a license card using the “Scan license Card” / “Import license Card” option in the “New Patient” window when creating a new patient.
The new "AI Scanning and Import" feature grants the same convenience in scanning and importing driver’s licenses in Practice EHR. When creating a new patient, users can use the “Scan Driver’s License” button in the “New Patient” window, to auto fill patient information and link the driver’s license to the patient.
In a similar manner, users can opt to import the driver’s license using the “Import Driver’s License” button in the “New Patient” window.
In this update, the Plan Profile screen has been enhanced to include new columns that provide detailed information on the electronic transaction readiness of each payer, enabling faster processing and reducing manual effort. This leads to improved operational efficiency, better compliance, and more streamlined workflows for transaction management. The following columns have been added:
These enhancements aim to provide more transparency and up-to-date information on the electronic transaction capabilities for each payer, ensuring a smoother and more efficient workflow.
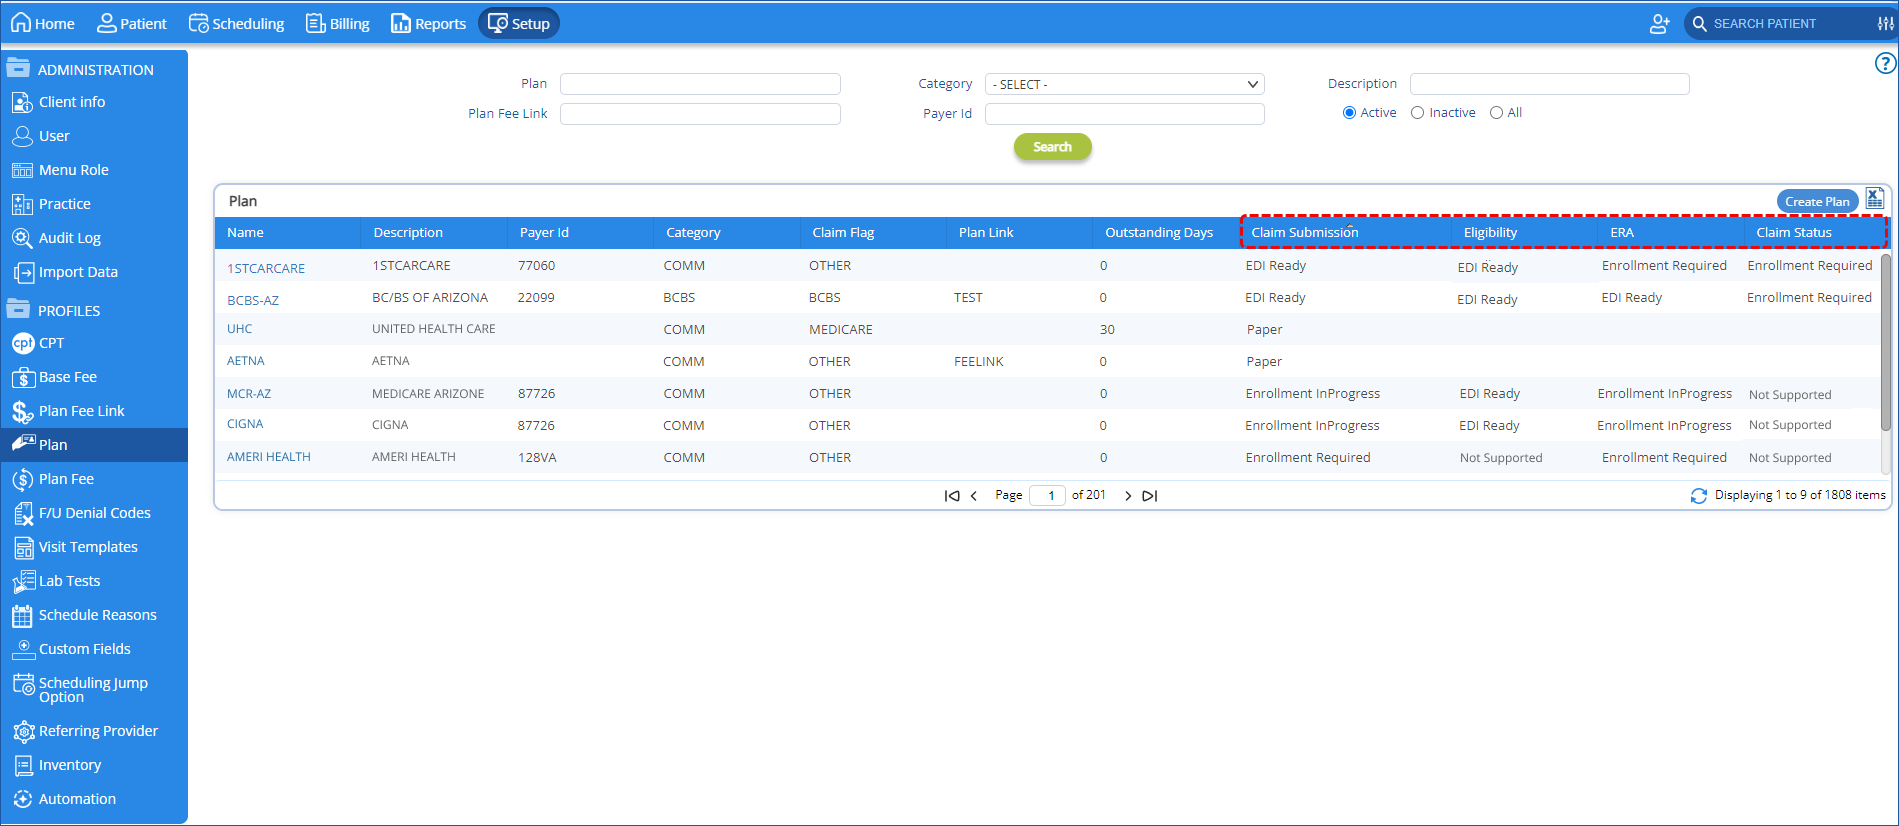
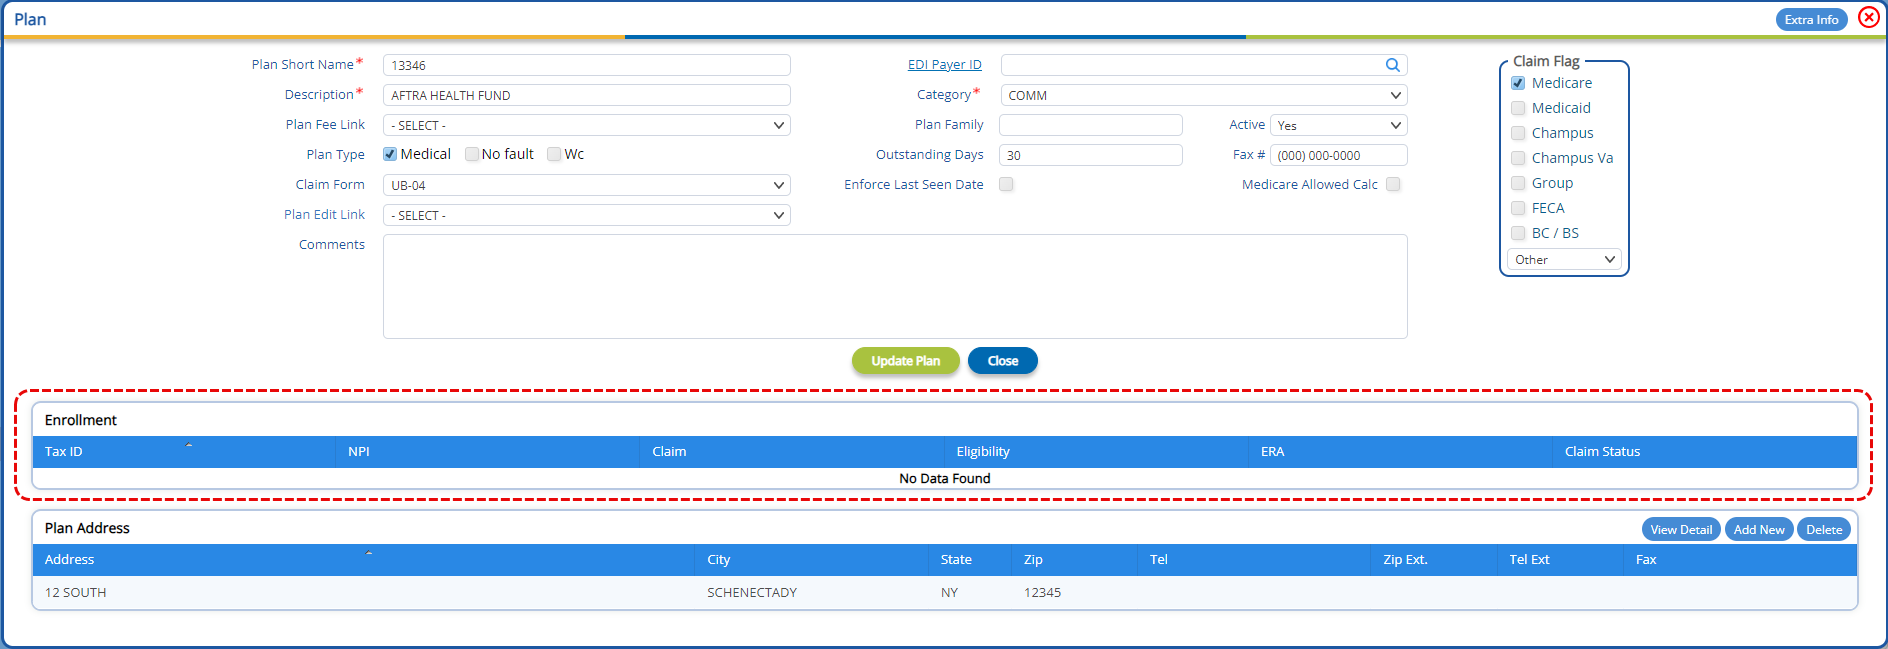
In the “Plan Window”, a new “Enrollment” grid has been added which provides clear, real-time insights into the enrollment status of each plan, enabling more informed decision-making and faster issue resolution. It also improves tracking, enhances reporting capabilities, and helps streamline the management of enrollment processes. This grid contains the following columns:
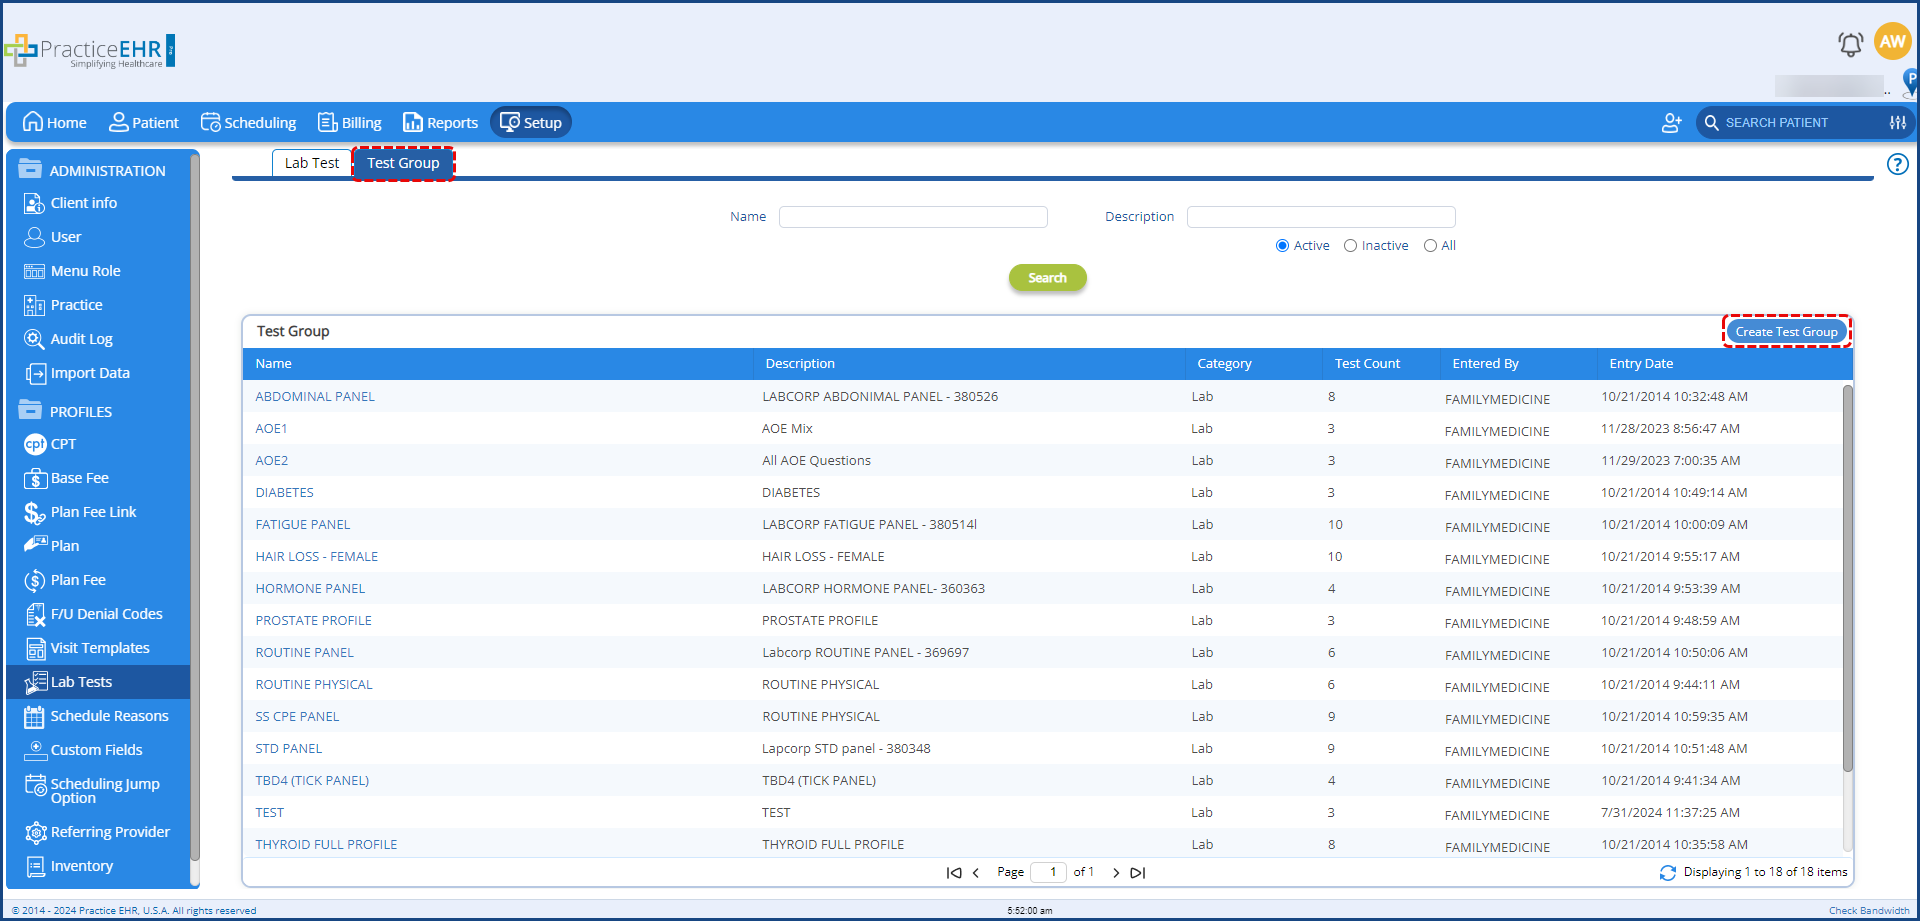
Test groups are essential to the patient visit workflow, enabling users to order multiple individual tests from a single order. To further improve this functionality, users can now create and manage test groups directly within Practice EHR, without the need to contact support.
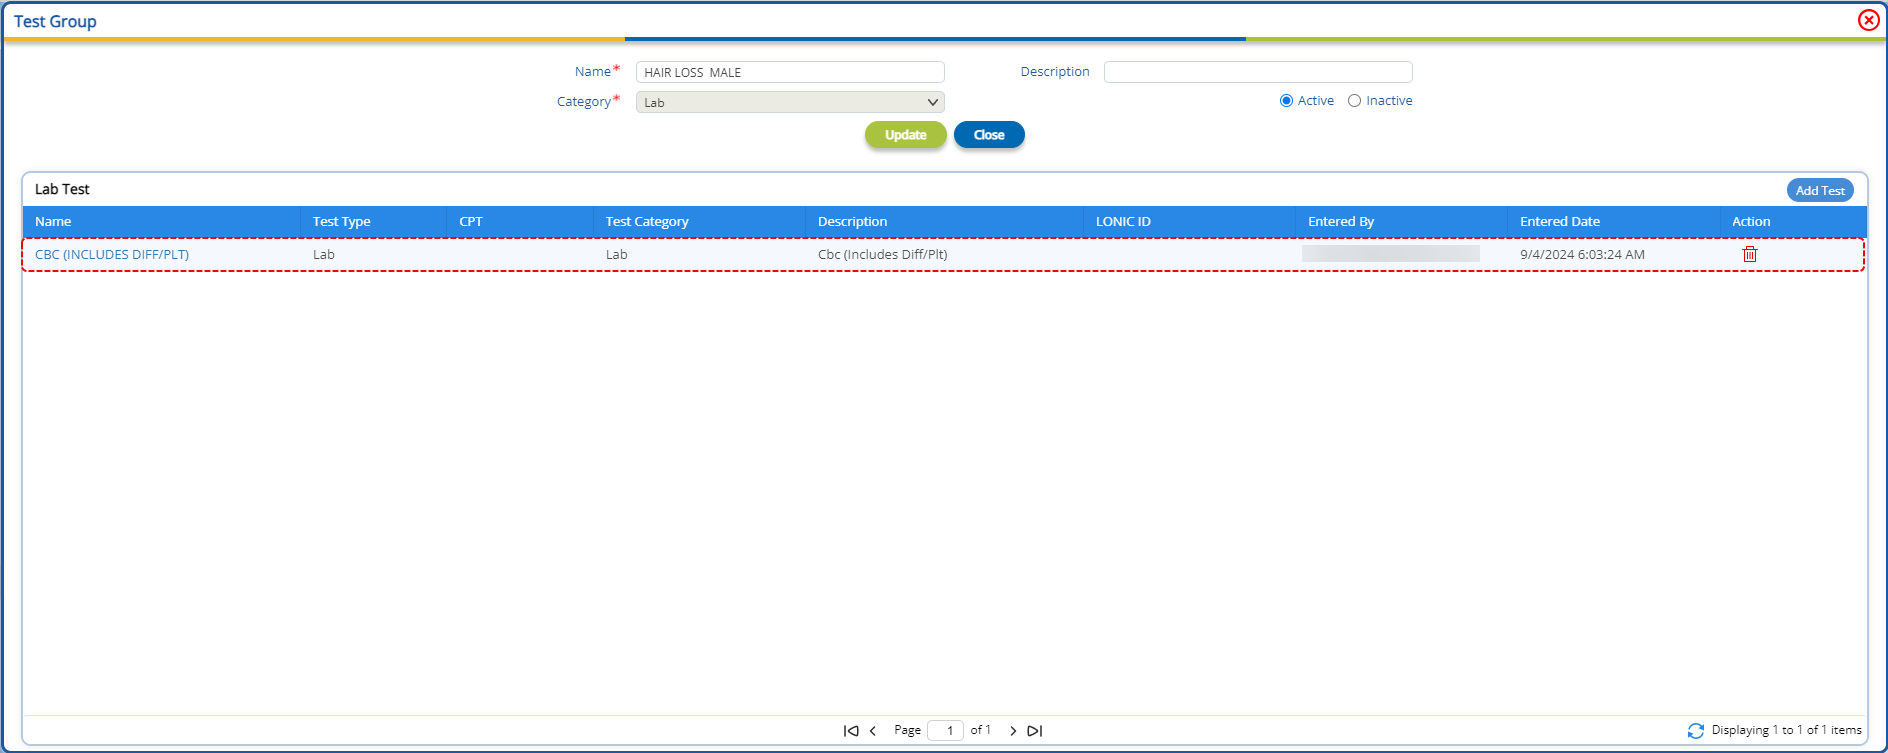
Users can now create test groups from the new “Test Group” sub-tab added in the “Setup” module. Here, users can search for existing test groups or create a new test group using the “Create Test Group” button.
Clicking on the “Create Test Group” button will open the “Add Test Group” window, allowing users to enter the particulars of the test group, namely;

Upon clicking the create button, the test group is created and the test group window updates to display the lab test grid.
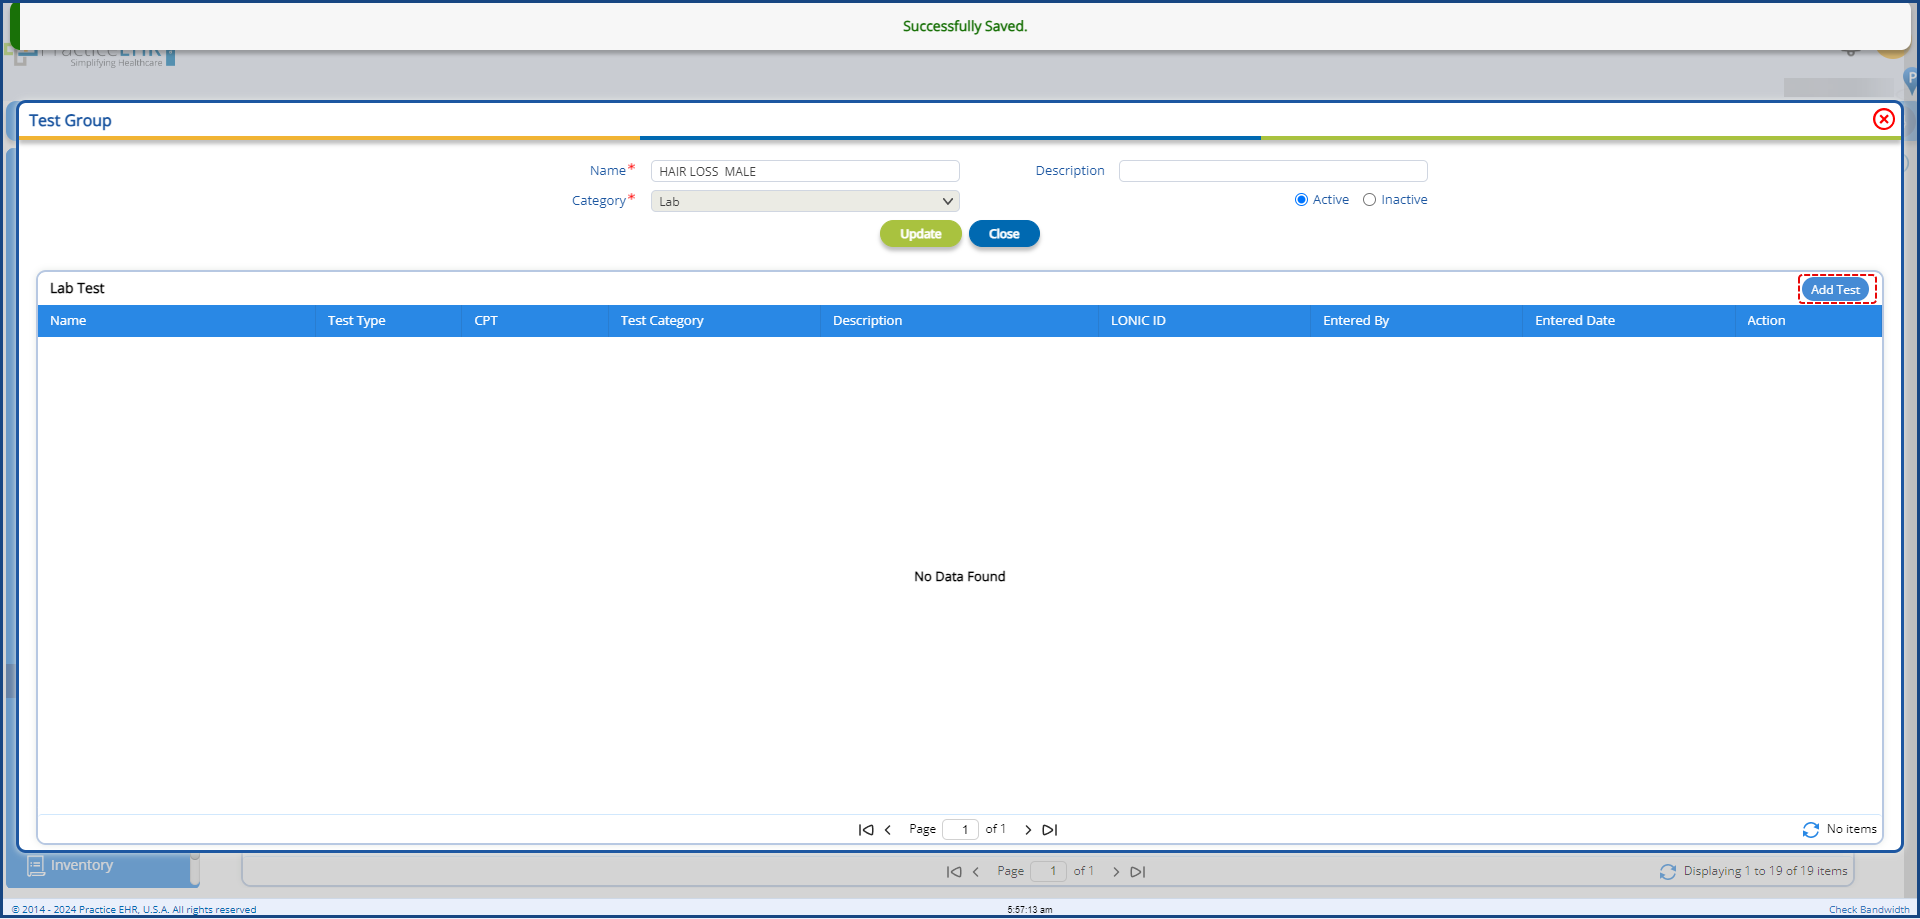
Using the “Add Test” button in the grid header, users can access the “Test” window. On this window, users can:
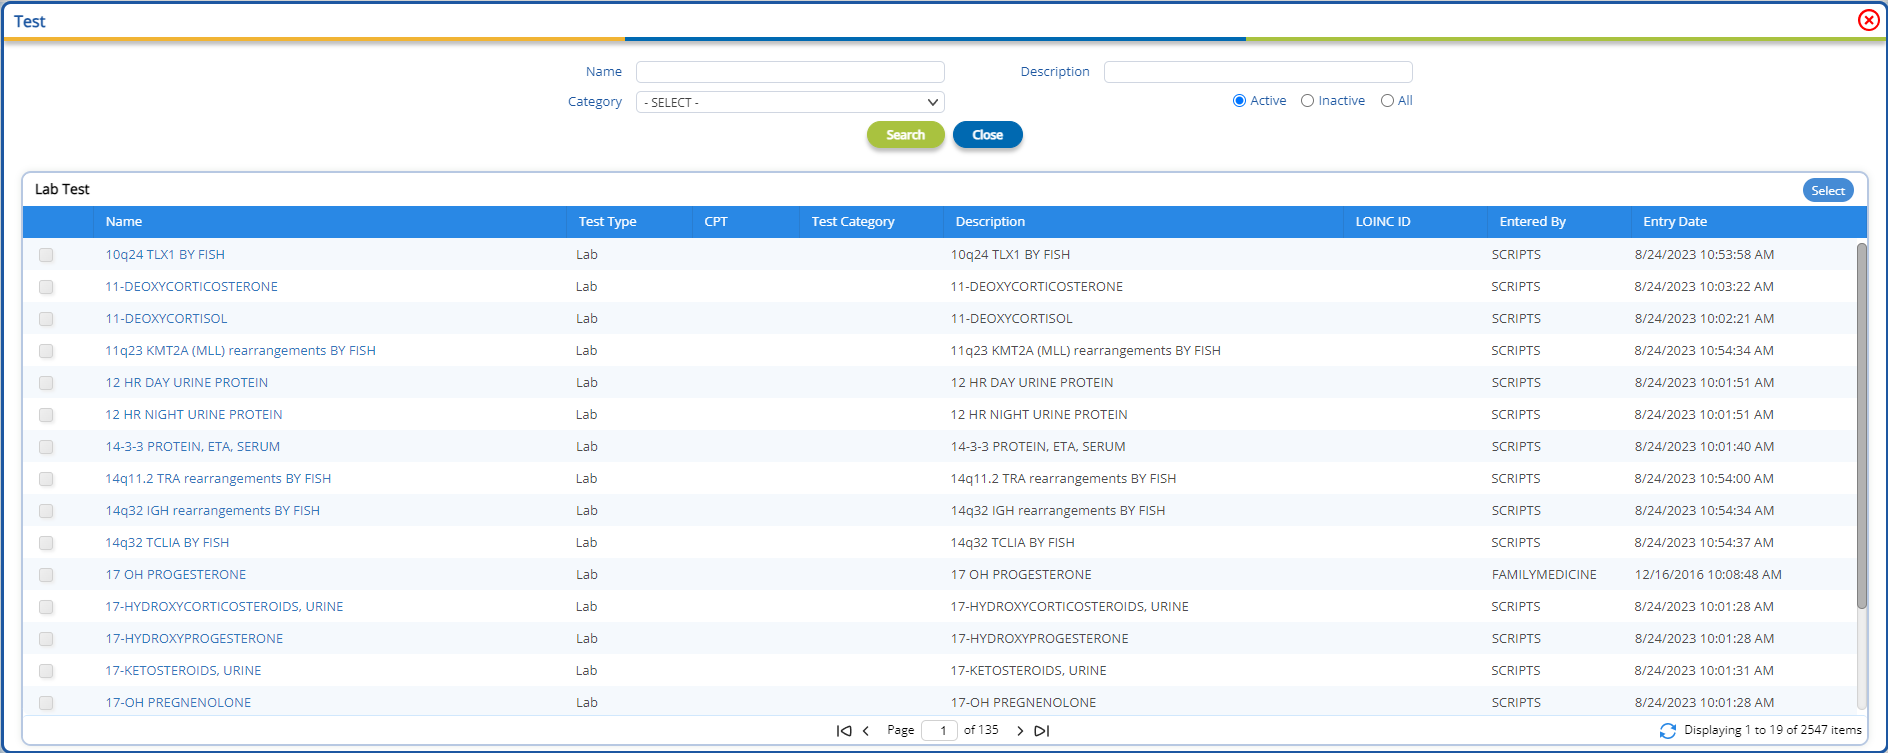
When the user clicks on the "Select" button, all selected tests are added to the test group window grid, as shown below. Users also have the option to delete any lab test from the grid.
Once the test groups have been created, they can be utilized with order sets, allowing users to add all the lab tests within the test group at once. Note: In order to add test groups to order sets, users will have to get in contact with Practice EHR support. We are planning in October release in which users can do it themselves within PracticeEHR.
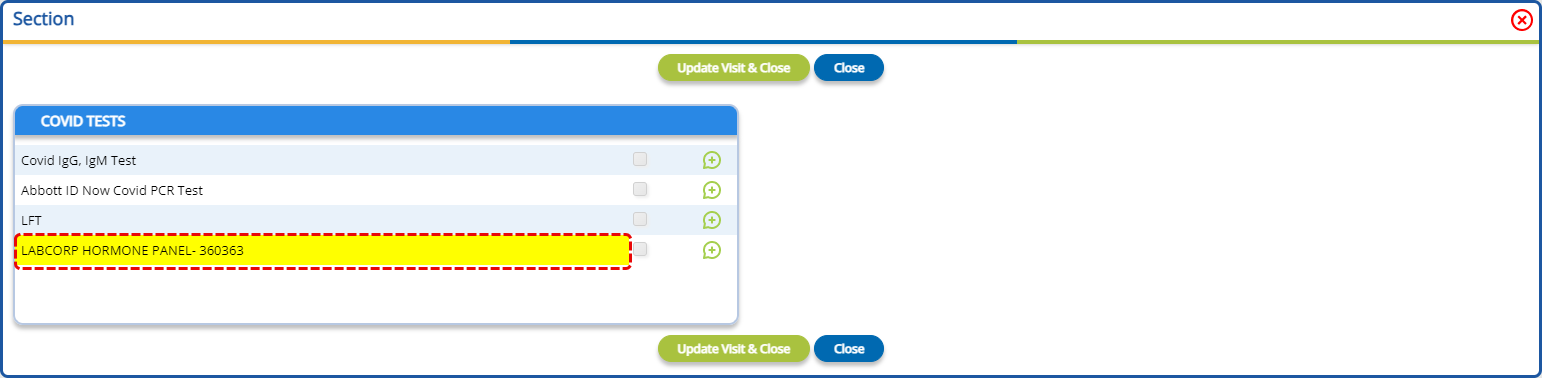
Test groups will appear with a yellow background, differentiating them from other tests. By clicking the checkbox and updating the visit, all lab tests within the test group are added to the lab section of the plan at once.

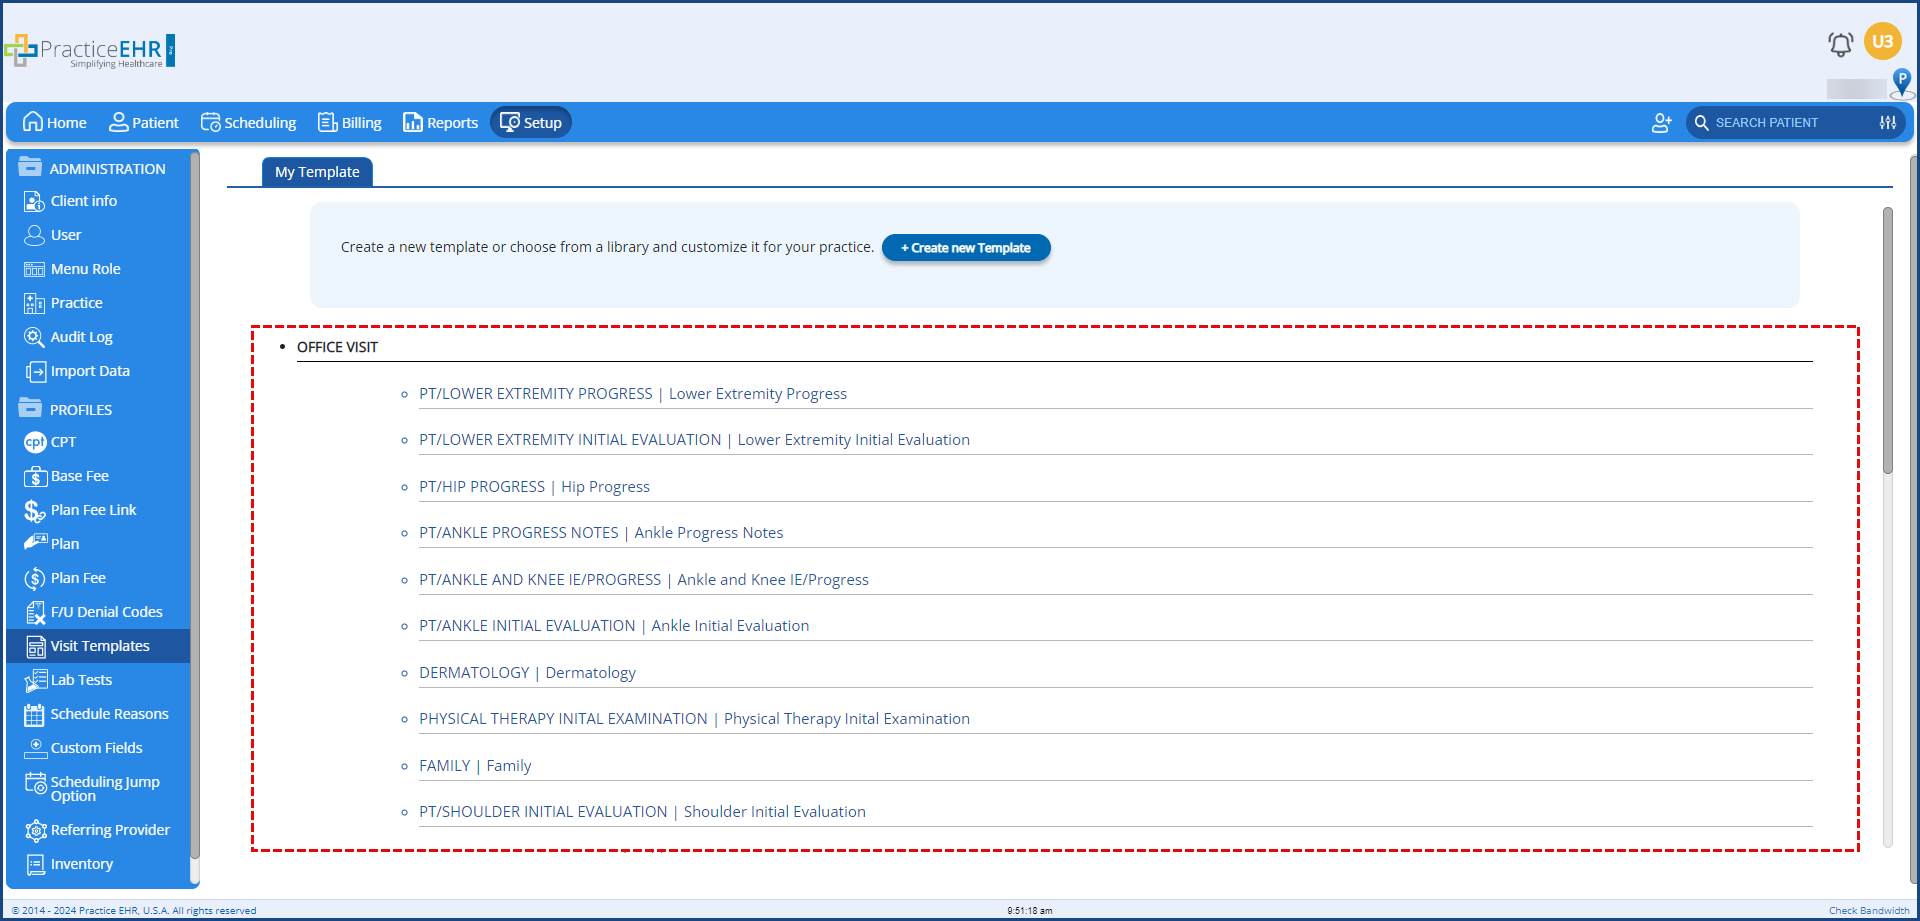
The “Visit Template” profile has been updated to organize the templates by function. Making it easier to browse and locate the required template. We are adding more functionality as we go and planning to add the complete Template Builder by the end of this year.
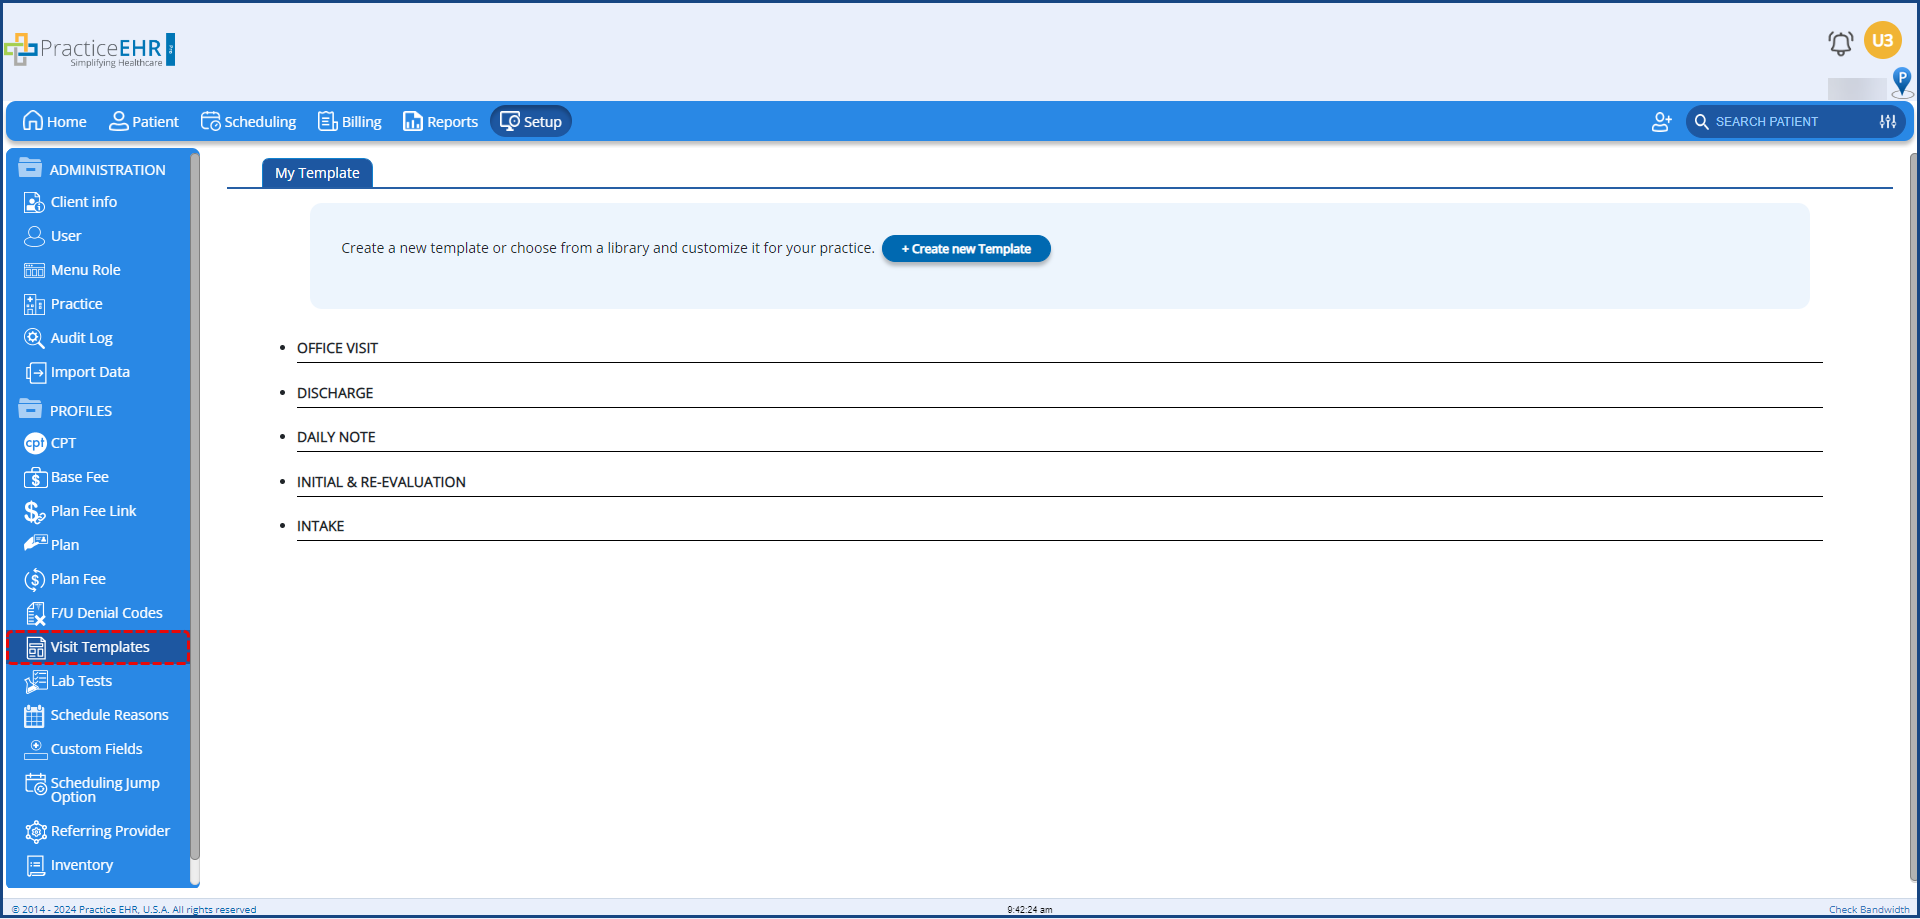
The templates have been organized into five major categories:
Clicking on a template type will display all available visit template of that type.
The following changes have been made to the "Lab Test Detail" window, found in the lab tests profile within the setup module.
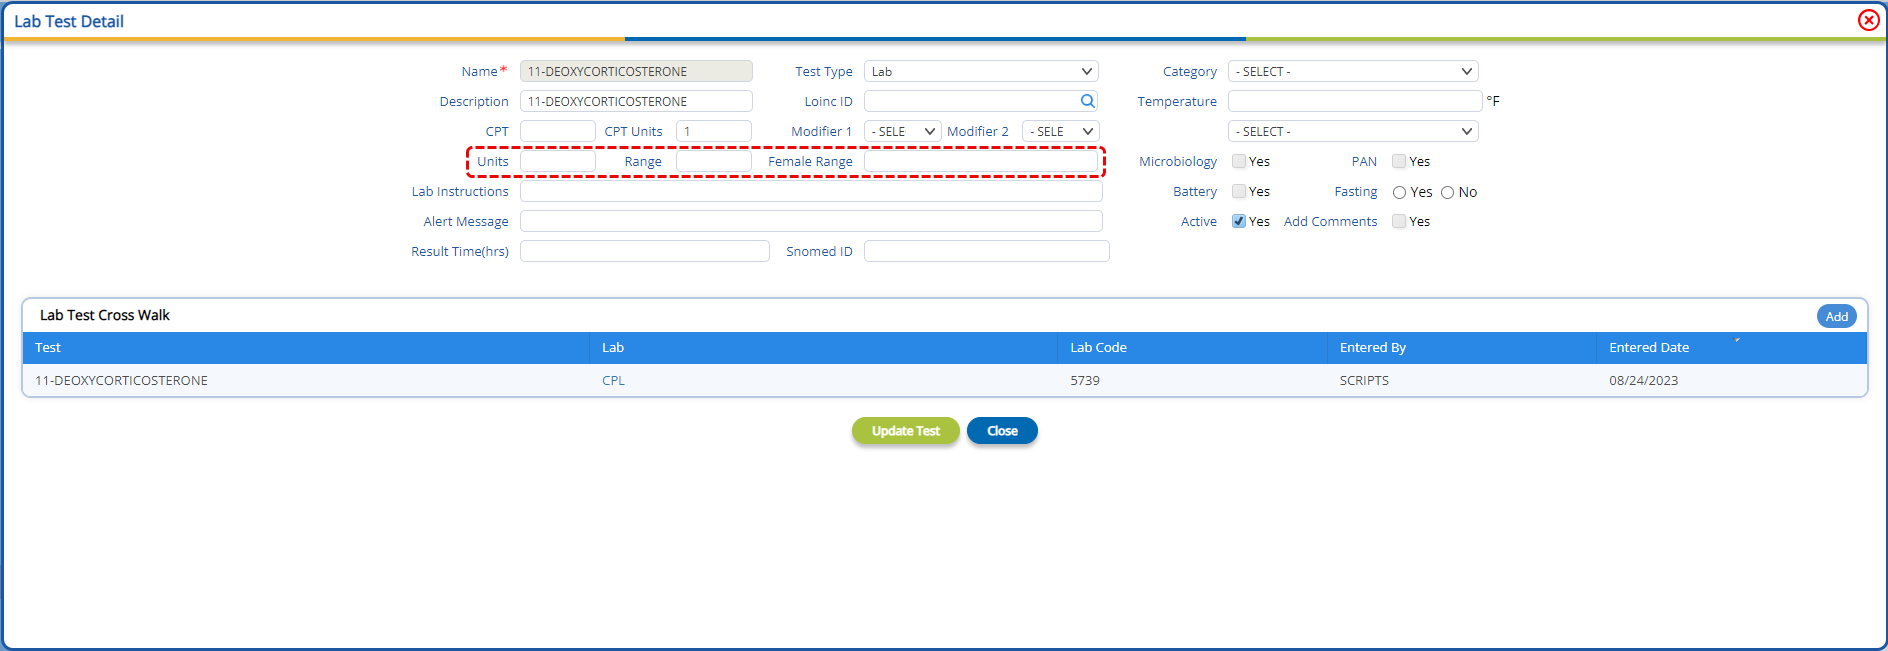
All fields within the window are now editable, with the exception of the “Name” field. The “Unit” input field has been renamed to “CPT Unit”. In addition, three new fields have been added:
Once the values of the test’s unit, range and female range are defined, users will no longer have to manually enter the “Unit” and “Range” for each test result in the test result window.
Note: The “Range” field in the “Test Result” window will be updated with the value:
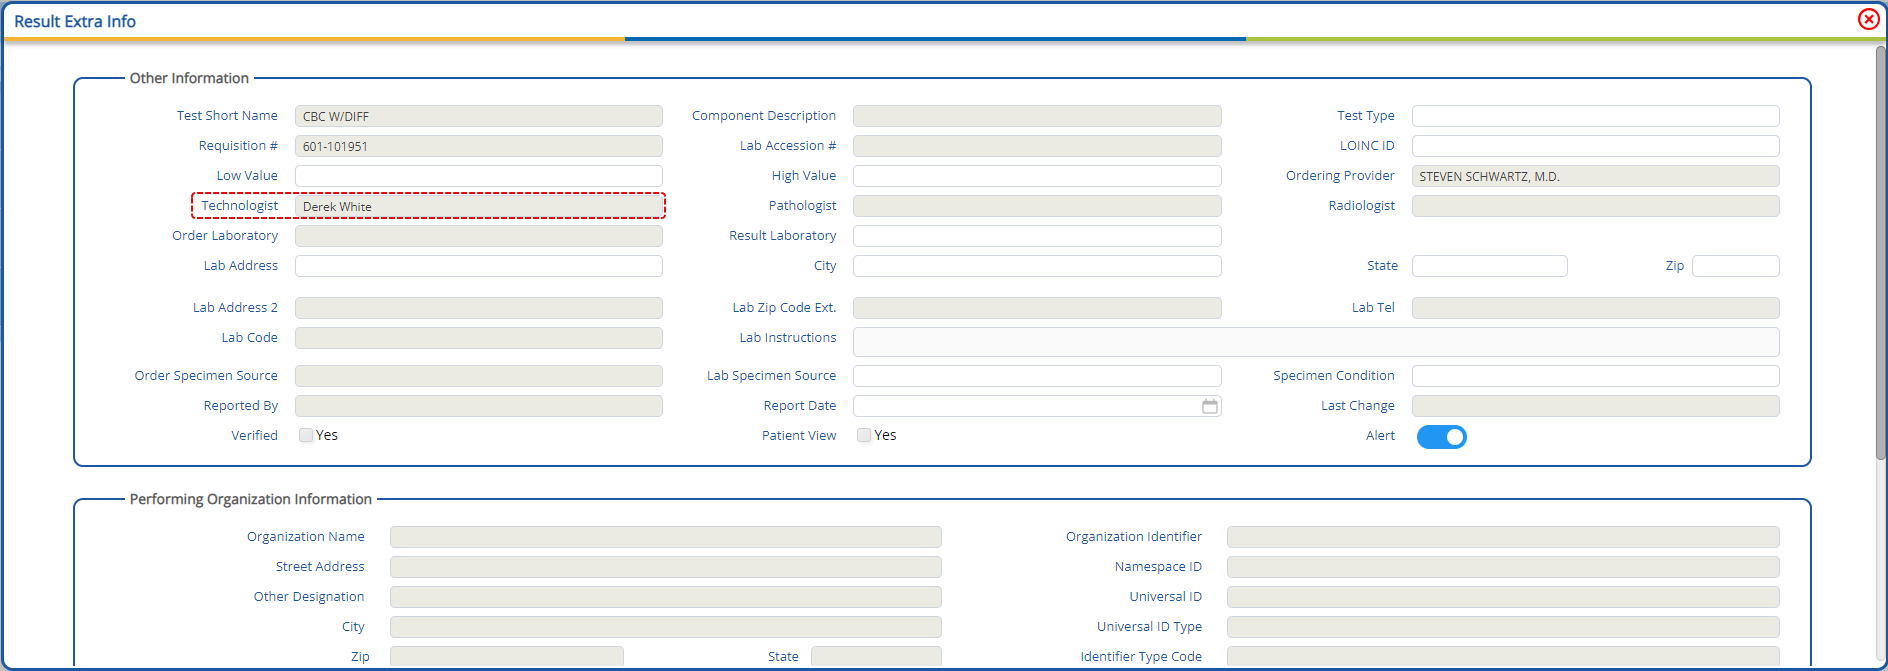
In the “Test Result” window, a new “Testing Personnel” field has been added.
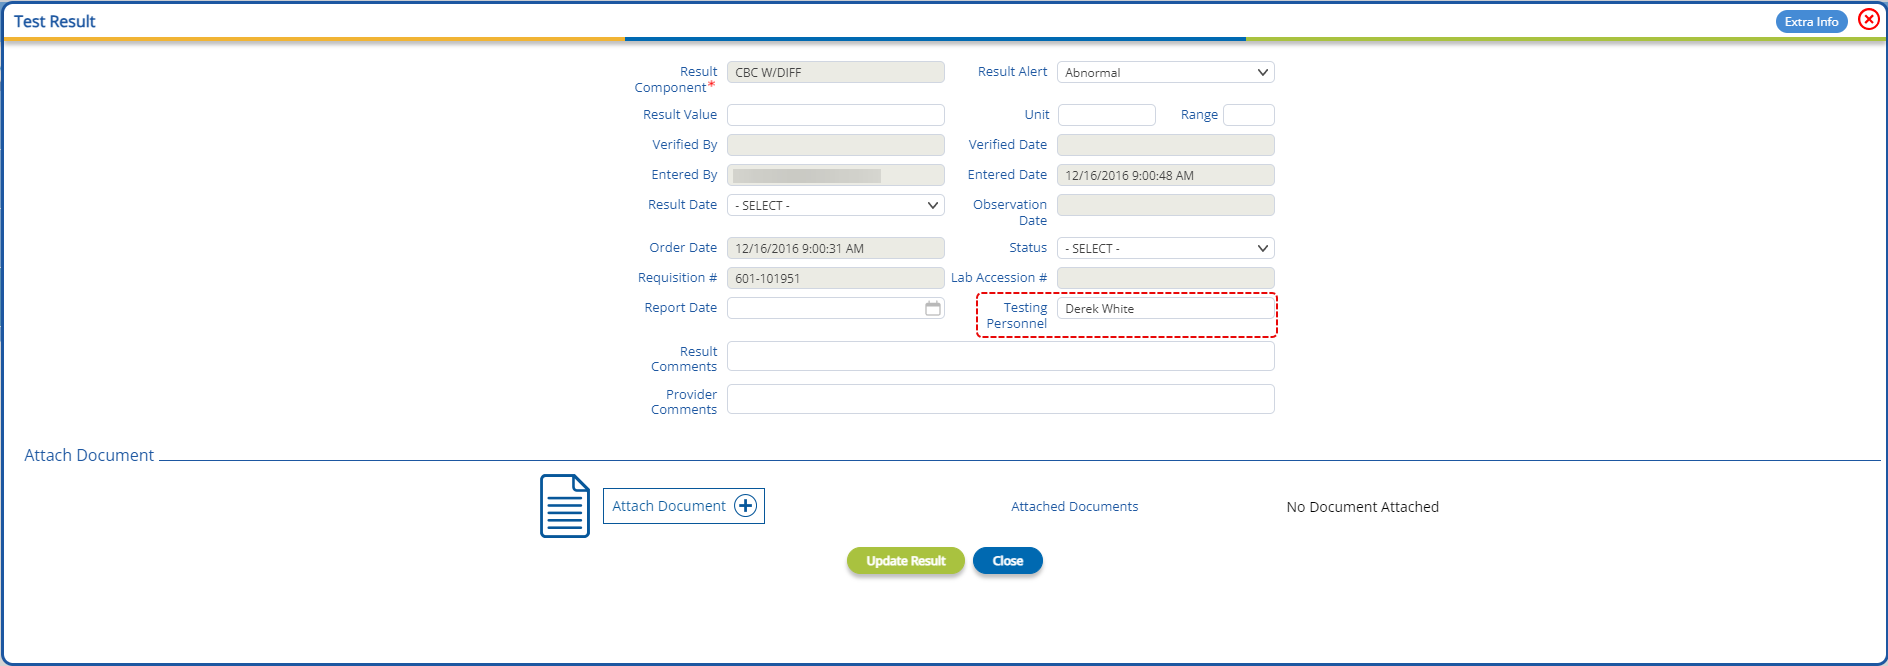
The value specified in this field will be reflected in the “Technologist” field, within the “Result Extra Info” window.
To facilitate the collection of payments, a QR code functionality has been added in patient statements. Scanning this QR code will navigate users to an online page where they can make the payment. Options will be available to the clients who have credit card merchant setup within PracticeEHR.
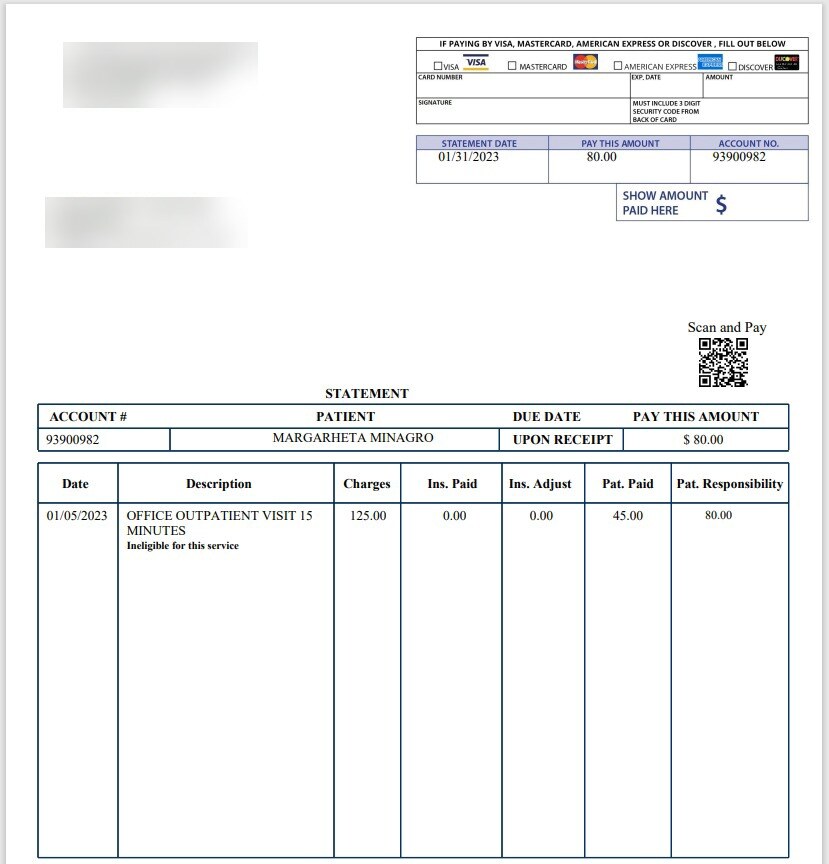
The online payment flow has been updated to present critical information clearly and concisely. Opening a statement URL displays the following screen.
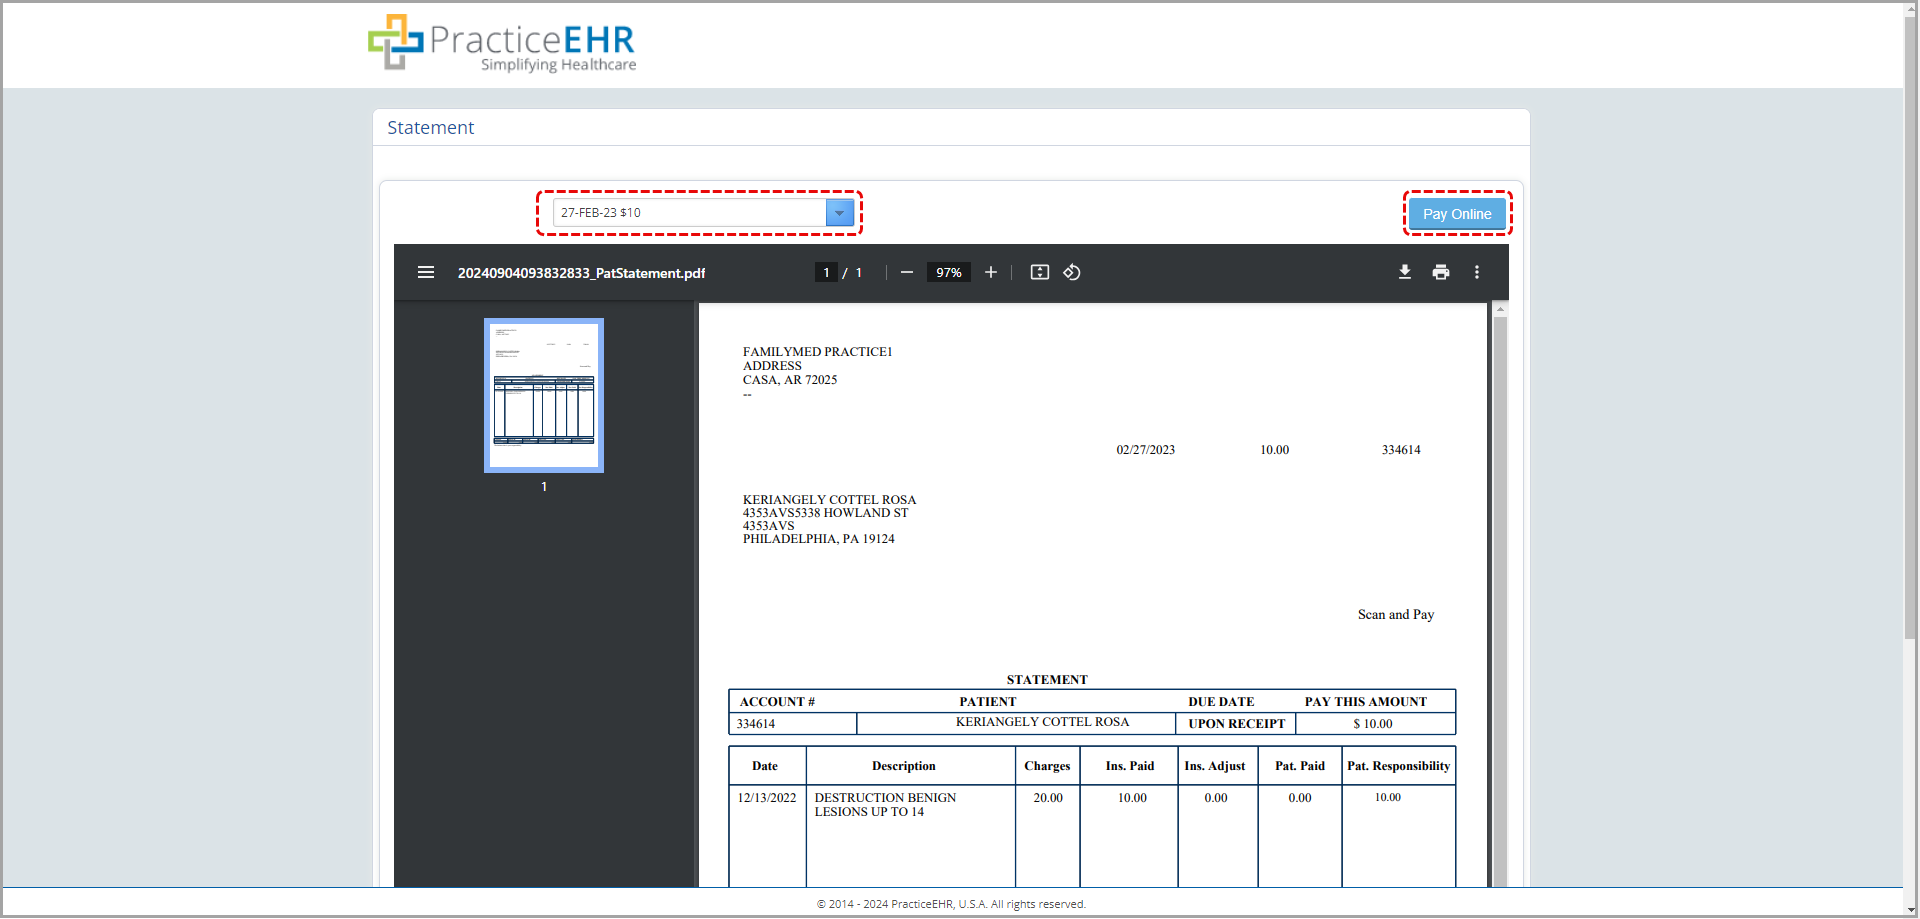
Users can select a statement to view from the dropdown. In addition, users can use the “Pay Online” button to make a payment against the selected statement on the payment screen.
Users have the option to navigate back to the view statements screen using the “View Statement” button.
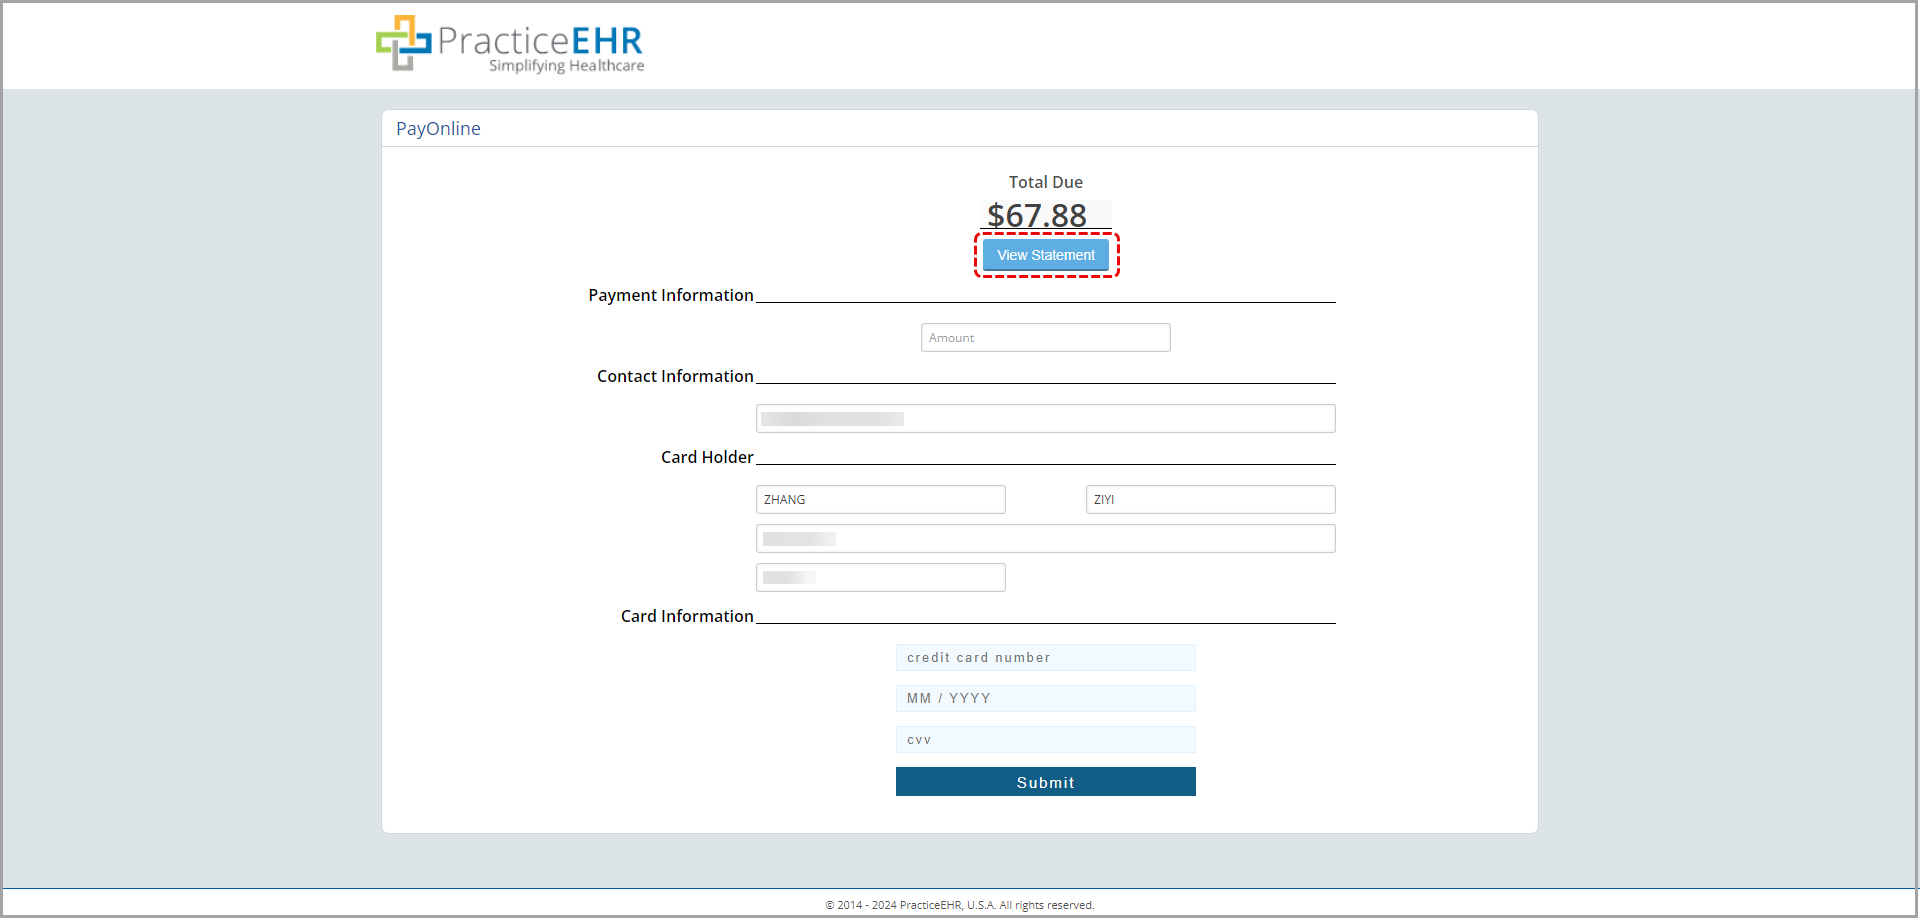
Online Payment UI has been updated as well. Patients can now view the statements from the Pay Online window.

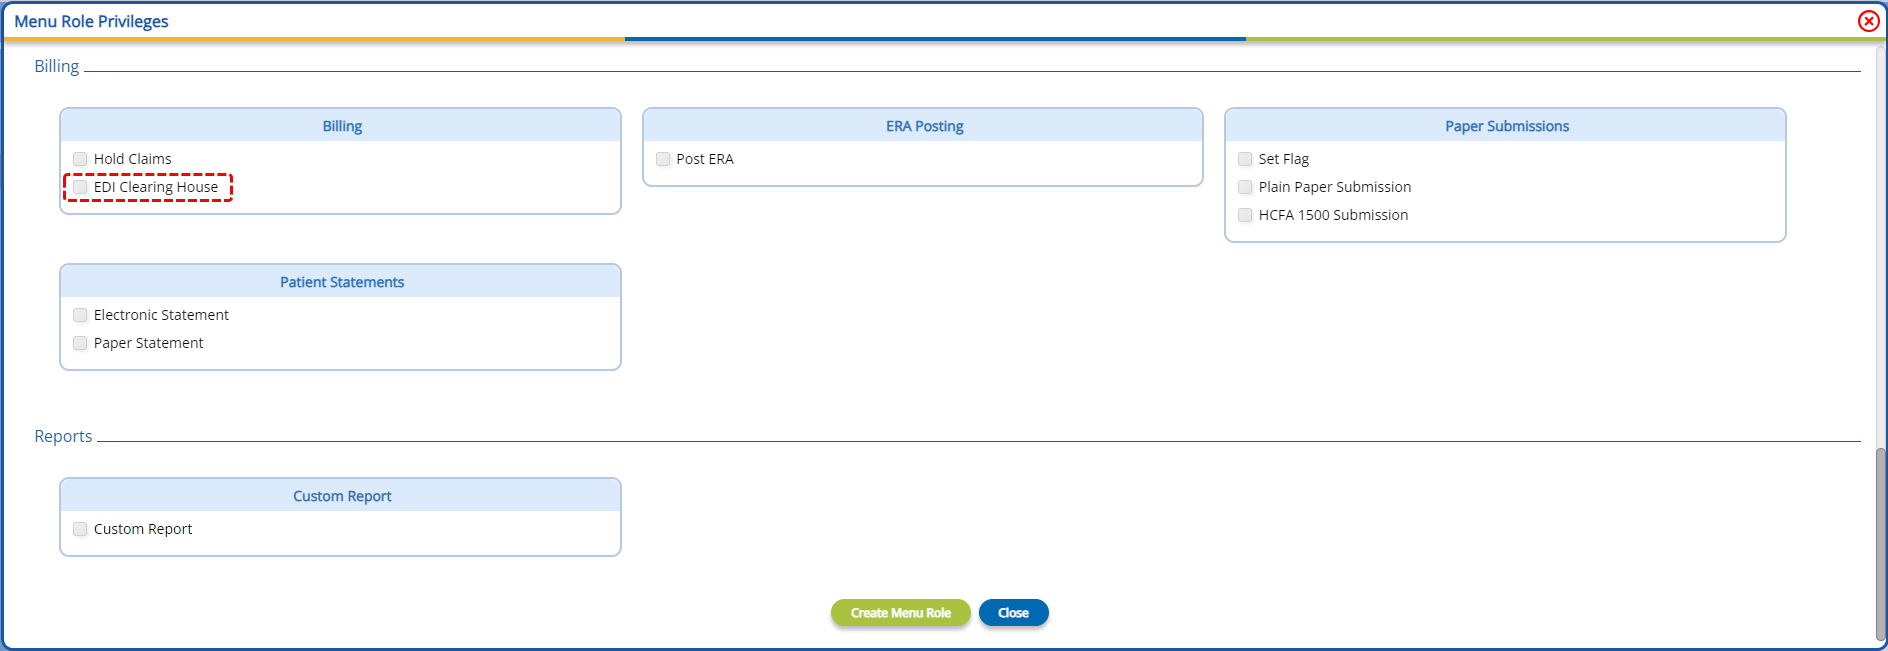
An EDI Portal login has been provided on the home page in Practice EHR. Note: This feature is only available to Practice EHR PM clients.
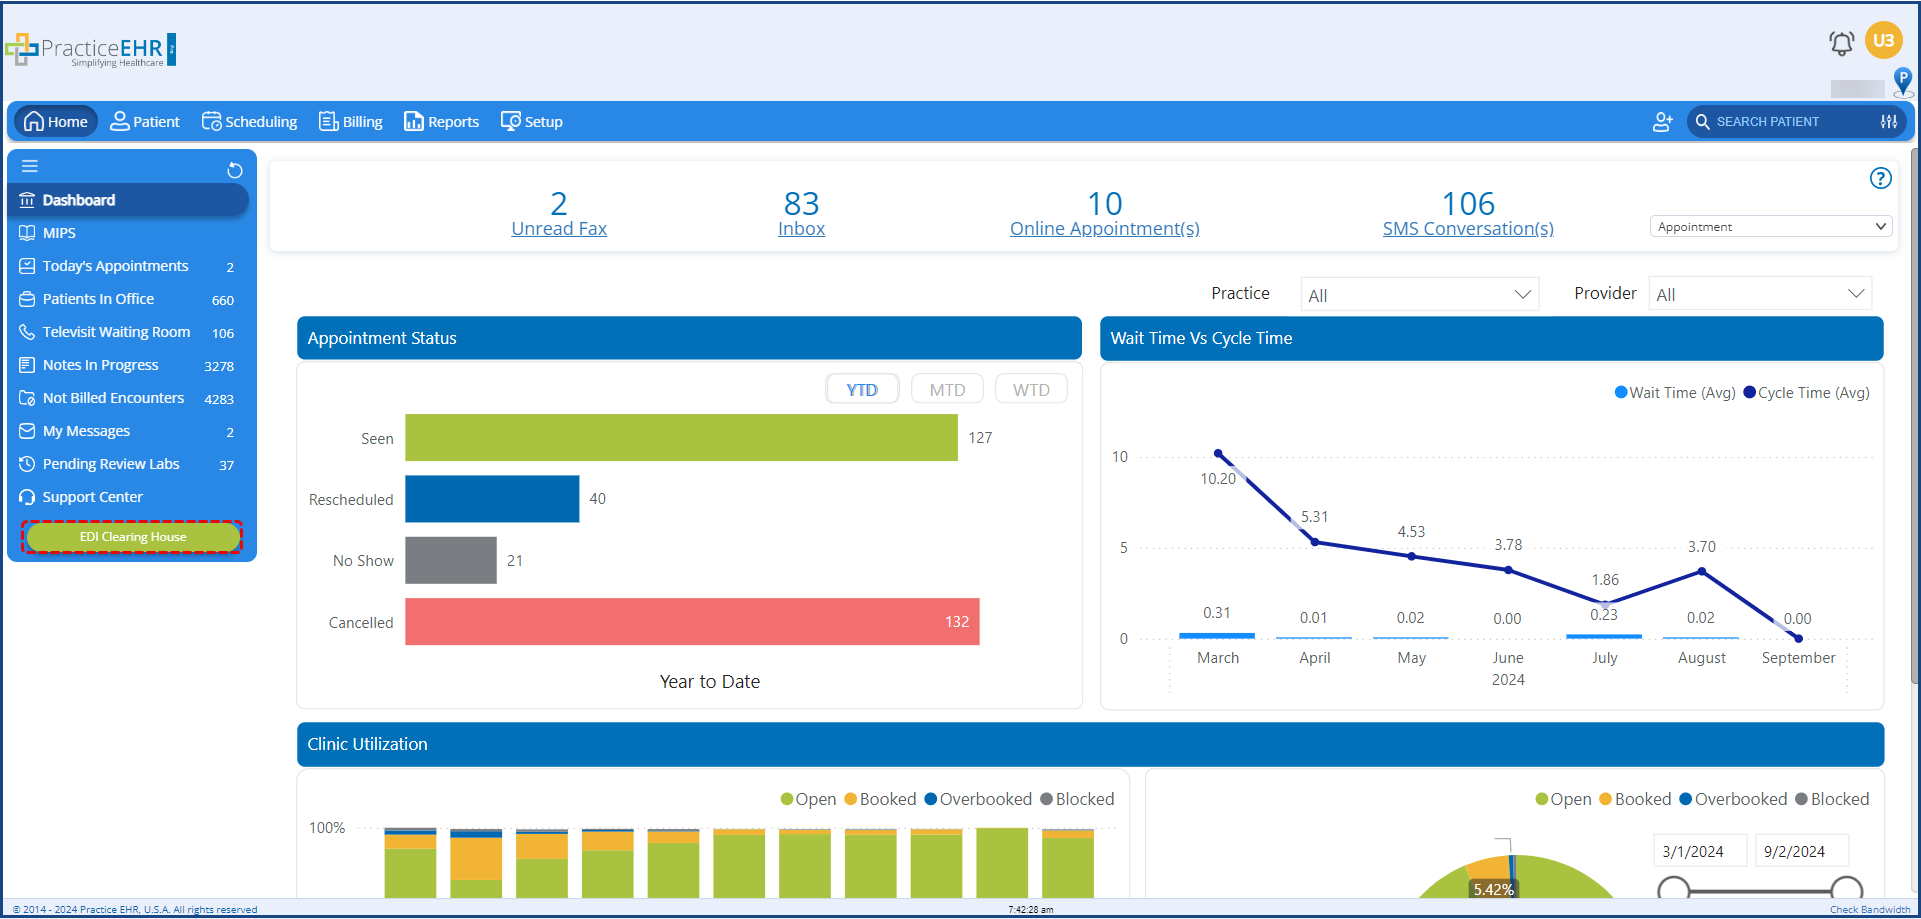
Users now have the ability to login to their EDI Clearing House portal directly from Practice EHR, without having to enter their login credentials.

The “EDI Clearing House” button’s access can be controlled from the “Button Privileges” sub-tab, in the “Menu Privileges” window.
In the “Create Schedule” window, a “# of Patients Allowed” field has been added. This field allows users to limit the number of patients that can be booked per slot on the provider’s schedule. All the existing will have 1 in this field value.
Note: If overbooking is allowed, this limit is ignored.

During a clinical visit in the plan section, users can now attach a workflow to a follow-up directly from the “HM Follow-up”. This eliminates the need to navigate to the “Messages” tab and create a follow-up automation.
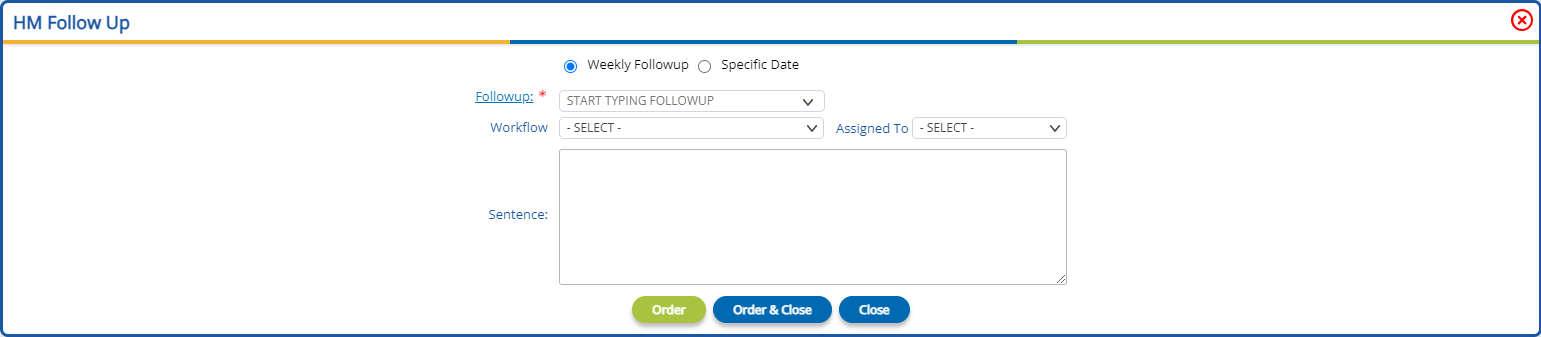
Selecting a follow-up from the “Followup” dropdown will convert the label into a hyperlink. Clicking on the hyperlink will open the follow-up profile, allowing users to update the follow-up profile as required.

If a default workflow is attached with the followup profile it will be automatically populate in the Workflow dropdown upon follow-up selection. Using the workflow dropdown, users can manually change or attach a workflow to the follow-up. If a workflow is selected, then the “Assigned To’ dropdown will become mandatory.
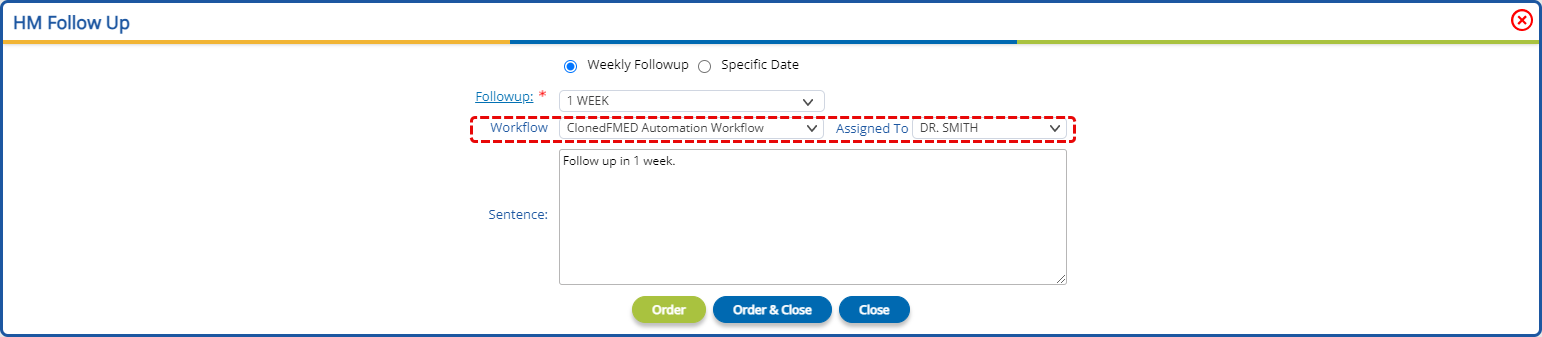
The message generated by the workflow will be visible in the user’s or groups “My Messages” bucket, ensuring relevant personnel are up to date on the patient’s clinical details.
If the user opts for a specific date for the follow-up, then a “Followup Date” date picker field will be displayed. The messages defined in the workflow will be sent on the chosen date.

We are excited to announce the inclusion of TCM (Transitional Care Management) visits in Practice EHR. This new feature allows providers to efficiently manage and document follow-up care for patients transitioning from hospital to home or another care setting. The TCM visit option helps streamline communication, track follow-up care, reduce readmission rates, and ensure better patient outcomes. This addition is designed to improve continuity of care and simplify the documentation process within Practice EHR.
Users now have the ability to link appointments with visits in Practice EHR Pro. Users can create and populate a visit and then in the future, link that populated visit with an appointment. In the “Patients In Office” bucket, the “Start TCM Visit” option can be found in the blue dropdown icon.
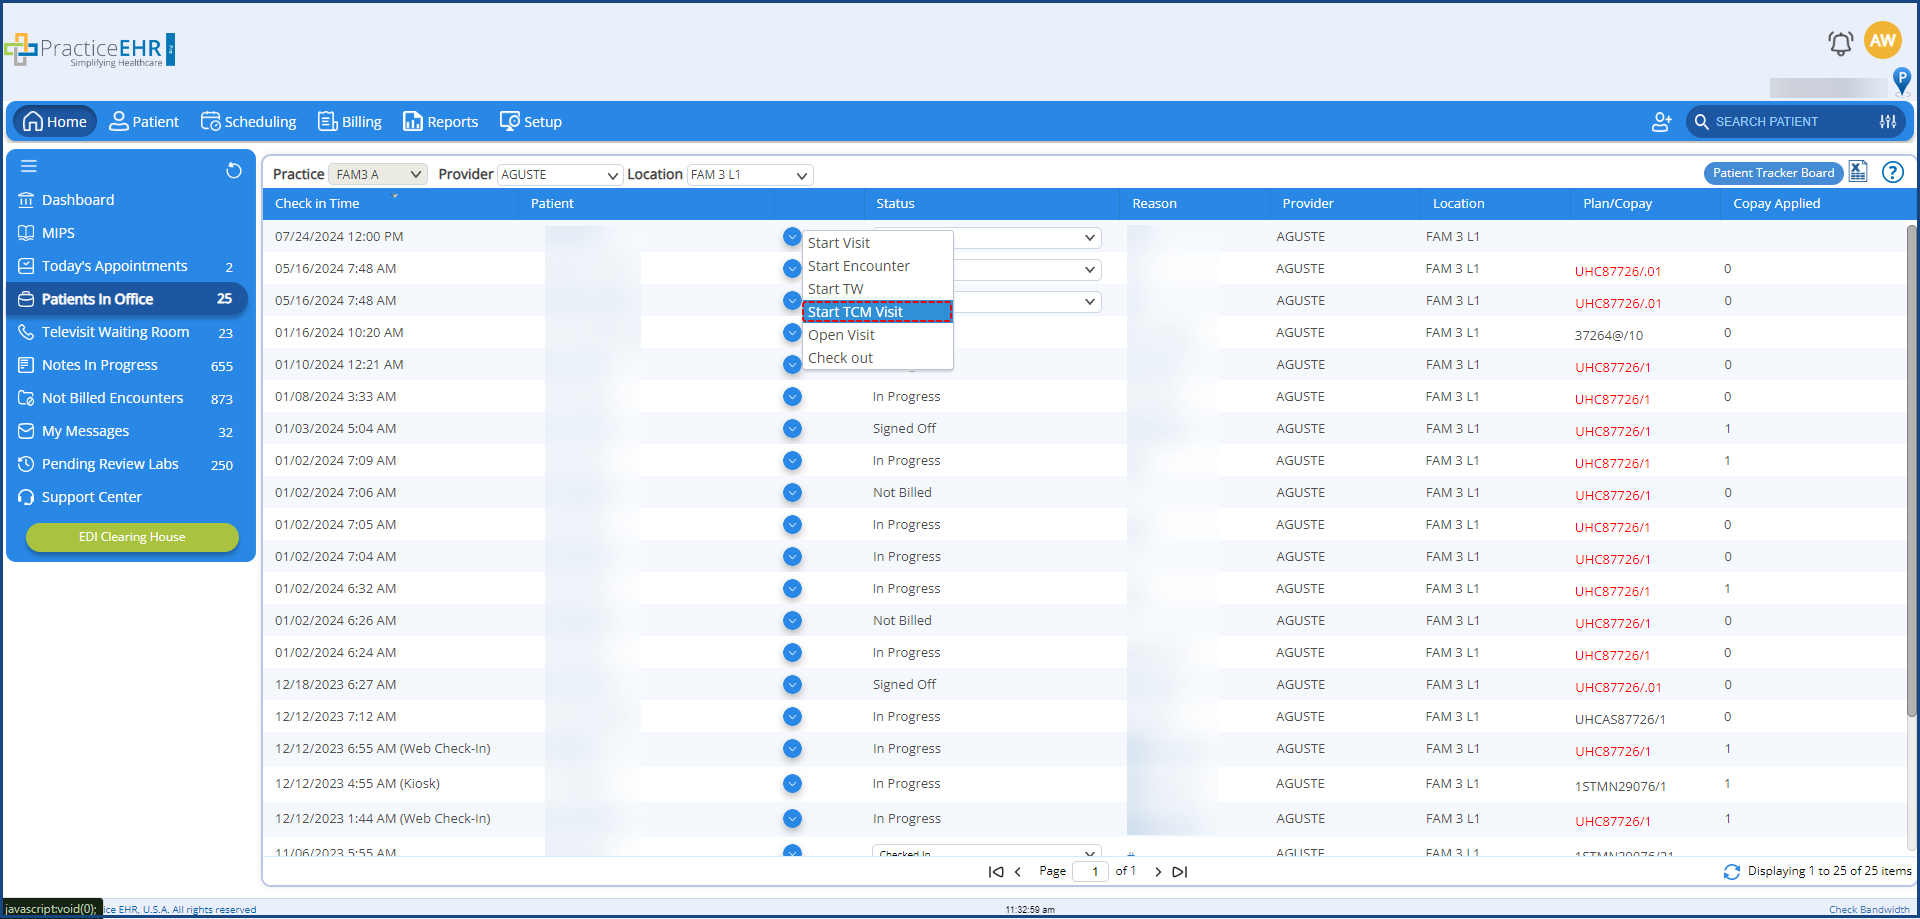
Clicking on this option displays the “Start TCM Visit” window. Here users can link the appointment with an existing visit, by selecting the visit from the select visit dropdown.


![]()
![]()


