
Patient messages are crucial for streamlining communication in the healthcare industry. They help maintain clarity, professionalism, and consistency in every interaction with patients. Within healthcare settings, patient correspondence can take on many instances, such as:
Practice EHR has launched the “Message Automation” feature to facilitate patient communication and empower medical entities with the freedom to adapt any of the above-mentioned use cases.
This feature is designed specifically to streamline patient correspondence and improve patient engagement. With this feature, users can:
To access this feature, users can navigate to the “Messages” sub-tab within the “Patient” module. In the patient messages grid header, an “Automation” button has been added.
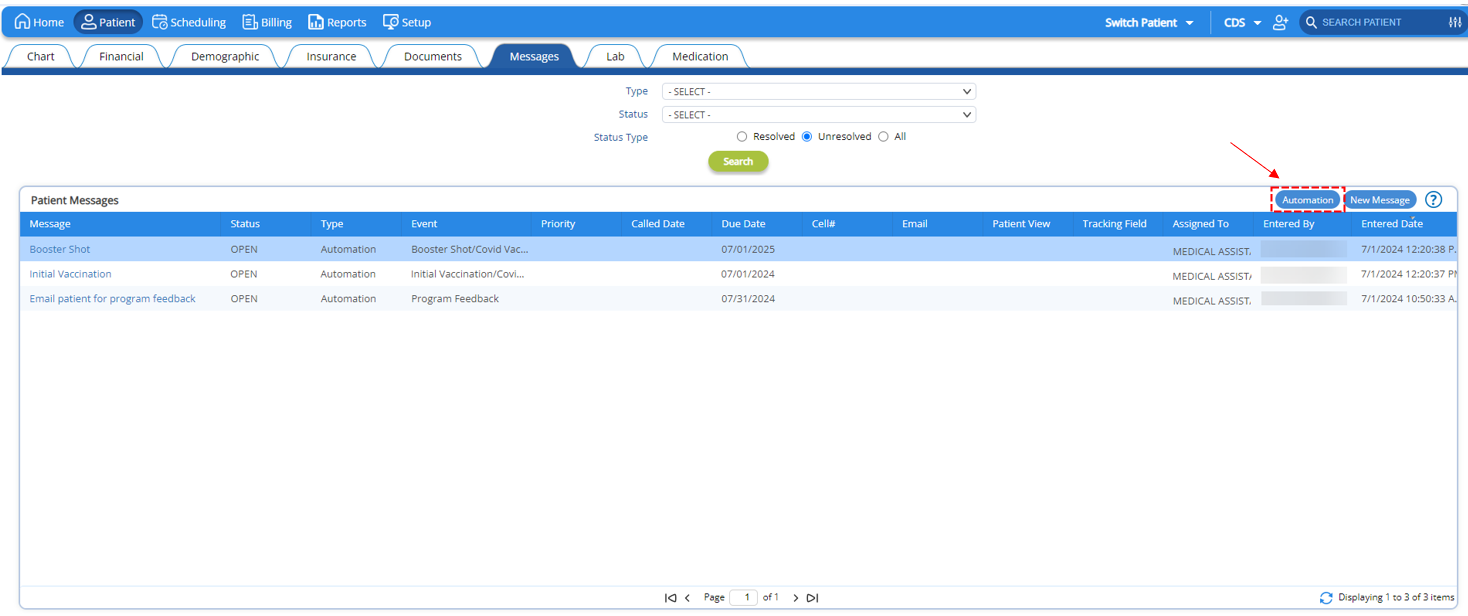
Clicking this button will open the “Select Automation” window, where users can setup the following:
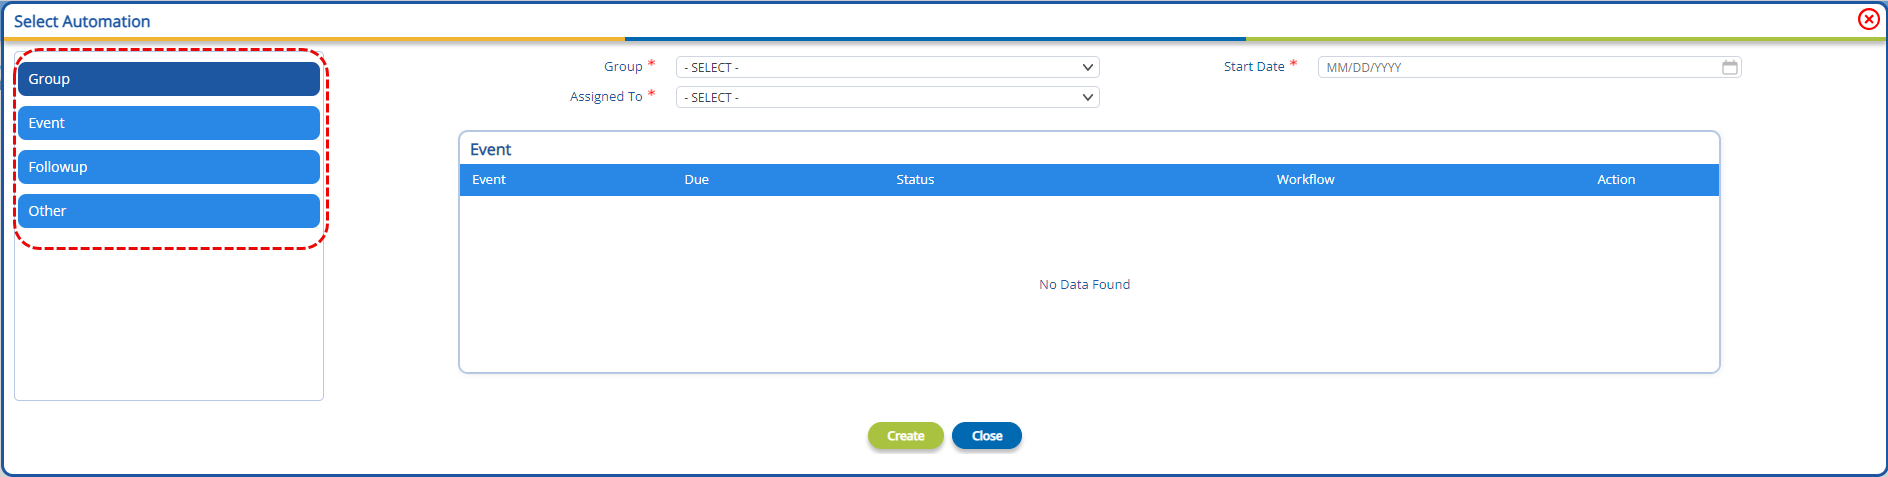
A group represents a collection of events. Users can utilize groups to automate patient correspondence activities for all the events in the group.
For example, clinics offering hormone replacement therapy (HRT) can create a group that corresponds to their pellet plan offerings. The system will automatically send follow up reminders to the patient, reducing manual communications and chances of human errors. Care Coordinator can manage complete process.
Note: Users can have groups created for them as per their requirement by getting in contact with Practice EHR Support. Provision of adding the group and events within Practice EHR will be provided in the upcoming release.
In the “Select Automation” window select the “Group” option in the left menu.
A group automation can be setup using the following steps:
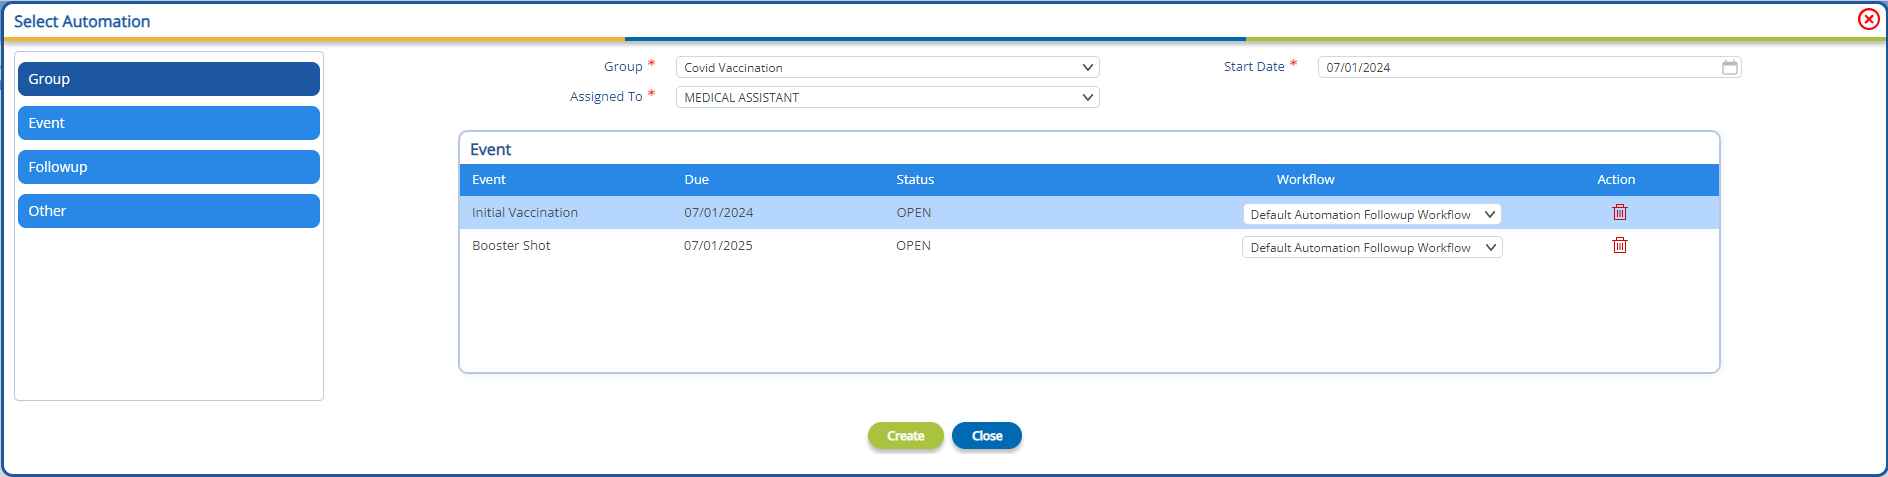
1) Select the group to setup from the “Group” dropdown. Doing this will populate the event grid with the events associated with the selected group
2) Select the “Start Date”. Based on the start date, the due dates of each event will be calculated. The due dates are automatically calculated based on the days associated with each event.
3) Select the user or group of users to whom the messages will be assigned. This can be done from the “Assigned To” dropdown
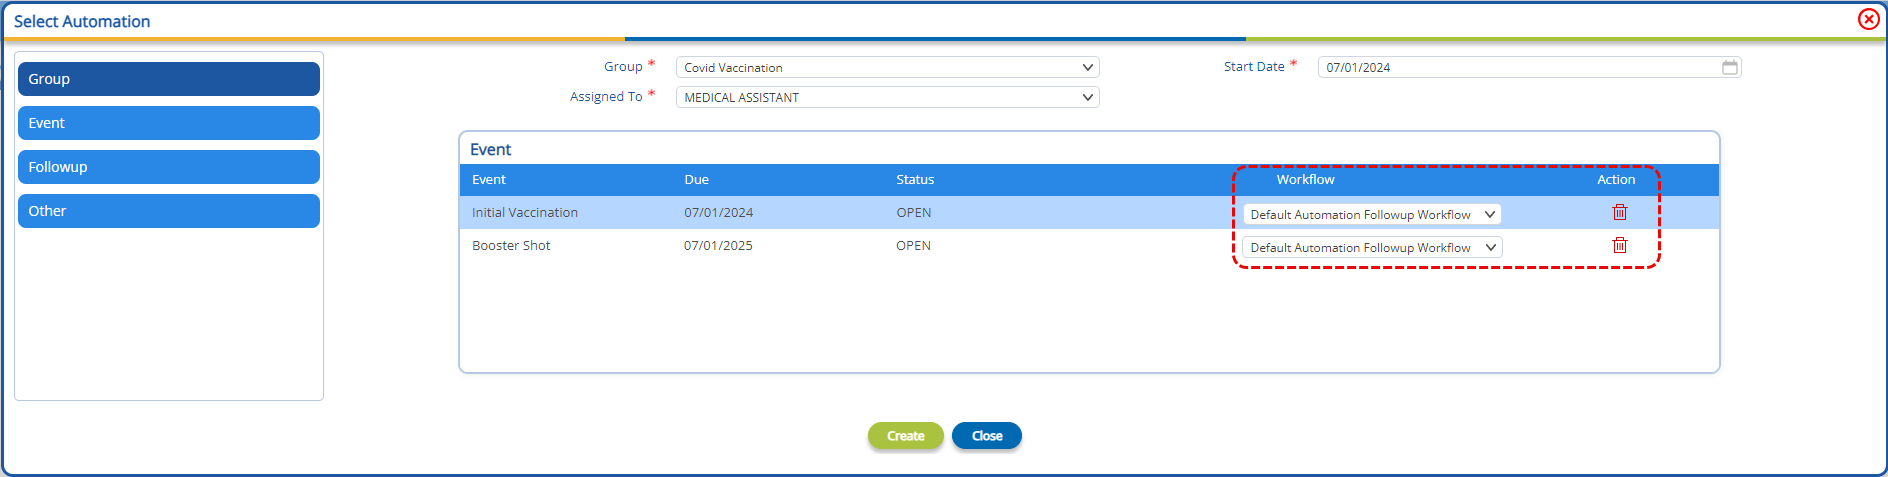
4) Select Workflow. If an automation is required for the events select the required workflow. From the “Event” grid, users have the option to remove an event from the group using the delete icon and select the workflow that will be run for each event from the “Workflow” dropdown.
Each workflow consists of actions that run automatically based on pre-set conditions.
Note: Users can have workflows created for them as per their requirement, by getting in contact with Practice EHR Support. Provision of adding the workflow within Practice EHR will be provided in the upcoming release.
5) Lastly, select the “Create” button to complete the group automation. Upon create all the events will be created as patient messages and will be available in the patient messages bucket and on the My messages bucket on the dashboard. All the actions assigned to the events workflow will be queued up to be sent patients on preset conditions.
An event is a scheduled message, which will be sent to the patient according to the workflow attached to the event, on the due date.
Note: Users can have events created for them as per their requirement by getting in contact with Practice EHR Support. Provision of adding the events within Practice EHR will be provided in the upcoming release.
To automate an event, users can navigate to the event option in the left side menu.

Here, users can automate events via the following steps:
1) Select the event to setup from the “Event” dropdown
2) Select the “Start Date”. Note: The current date will be auto-selected as the start date but users can change the start date as per their requirement.
3) Select the workflow for this event from the “Workflow” dropdown. Each workflow consists of actions that run automatically based on pre-set conditions.
Note: Users can have workflows created for them as per their requirement, by getting in contact with Practice EHR Support.
4) (Optional) Select the “Due Date”. Note: The due date will be calculated and auto-selected, based on the start date and the days associated with the event but users have the provision to change the due date as required.
5) Select the user or group of users to assign this message to.
6) Lastly, select the create button to complete the event automation.
Once the user has setup the event and hit the “Create” button, the message will be added to the “Patient Messages” grid with all the details and workflow associated with the event. Same will be shown on the patient messages dashboard as for the Group Events. All the actions assigned to the events workflow will be queued up to be sent patients on preset conditions.
The provision to automatically send follow-up reminders, instead of sending them manually has been added as part of the “Patient Messaging Automation” feature.
With this automation, users will be able to send custom or predefined messages to patients via text in addition to attaching a workflow for follow-up messages.
The workflow will send messages to the patient via text or email according to the defined workflow and the system will detect whether the patient has booked an appointment. If so, the workflow will not send further messages.
For example, users can send a text message for a follow-up to a patient and attach workflow for subsequent messages. If the patient does not book an appointment, the workflow will send messages to the patient until all the actions are completed or the patient books an appointment.
Note: Users can have automated follow-ups created for them as per their requirement by getting in contact with Practice EHR Support.
To automate a follow-up messaging flow, users can navigate to the “Select Automation” window and select the “Follow-up” option from the left side menu.

Here, users can setup a follow-up via the following steps:
1) Select the follow-up type from the “Follow-up” dropdown.
2) Select the “Start Date”. Note: The current date will be auto-selected as the start date but users can change the start date as per their requirement.
3) Select the workflow for this event from the “Workflow” dropdown. Each workflow consists of actions that run automatically based on pre-set conditions.
Note: Users can have workflows created for them as per their requirement, by getting in contact with Practice EHR Support.
4) Select the “Due Date”. Note: The due date will be calculated and auto-selected, based on the start date and the days associated with the follow-up event but users have the provision to change the due date as required.
5) Select the user or group of users to assign this message to.
6) (Optional) Type-in or select a pre-defined message to send to the patient on the spot. This message is in addition to the workflow and can only be sent via text. To send this message, users need to click the “By Text” toggle and either type a message in to the message box provided or select a pre-defined message from the dropdown
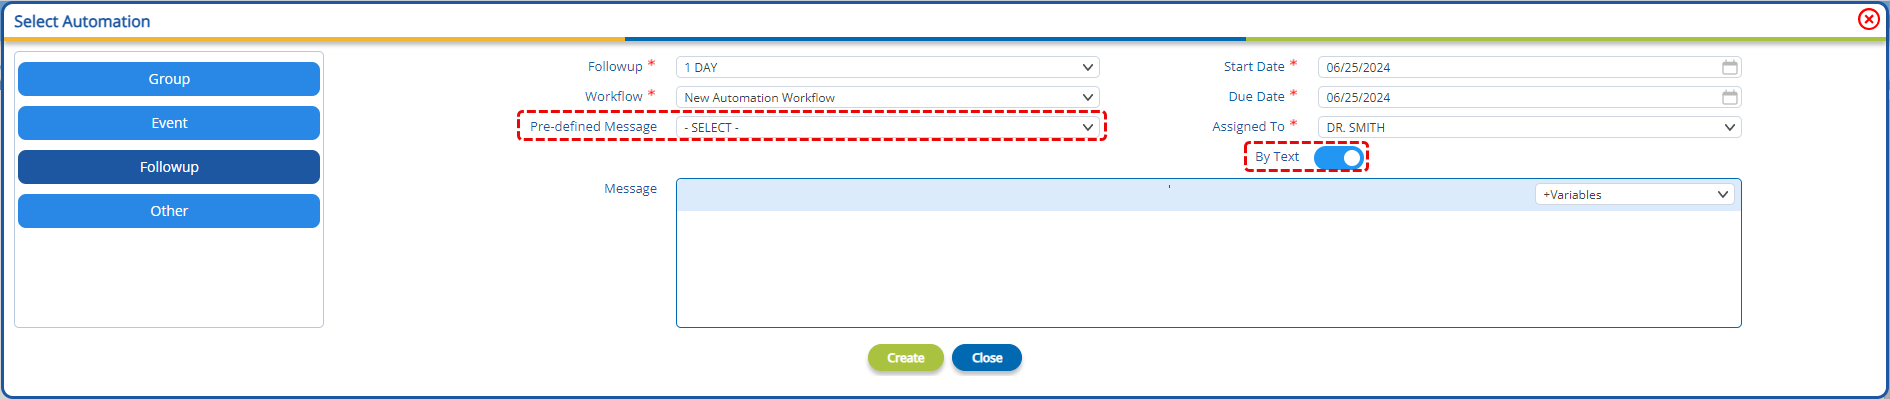
7) Lastly, select the create button to complete the follow-up automation. Once the user has setup the follow-up event and hit the “Create” button, the message will be added to the “Patient Messages” grid with all the details and workflow associated with the event. Same will be shown on the patient messages dashboard as for the Group Events. All the actions assigned to the events workflow will be queued up to be sent patients on preset conditions.
Users can create customer events to facilitate their required patient correspondence. Clinics can setup custom events to prompt existing patients for feedback on their experience or for sending personalized messages.
To automate a custom messaging flow, users can navigate to the “Select Automation” window and select the “Other” option from the left side menu.

Here, users can setup a custom event via the following steps:
1) Type the Event in the Event Text box
2) Select the “Due Date”.
3) Select the workflow for this event from the “Workflow” dropdown. Each workflow consists of actions that run automatically based on pre-set conditions.
4) Select the user or group of users to assign this message to.
5) (Optional) Type-in or select a pre-defined message to send to the patient on the spot. This message is in addition to the workflow and can only be sent via text. To send this message, users need to click the “By Text” toggle and either type a message in to the message box provided or select a pre-defined message from the dropdown

6) Lastly, select the create button to complete the custom message setup. Once the user has setup the follow-up event and hit the “Create” button, the message will be added to the “Patient Messages” grid with all the details and workflow associated with the event. Same will be shown on the patient messages dashboard as for the Group Events.
All the automation events will create patient messages.
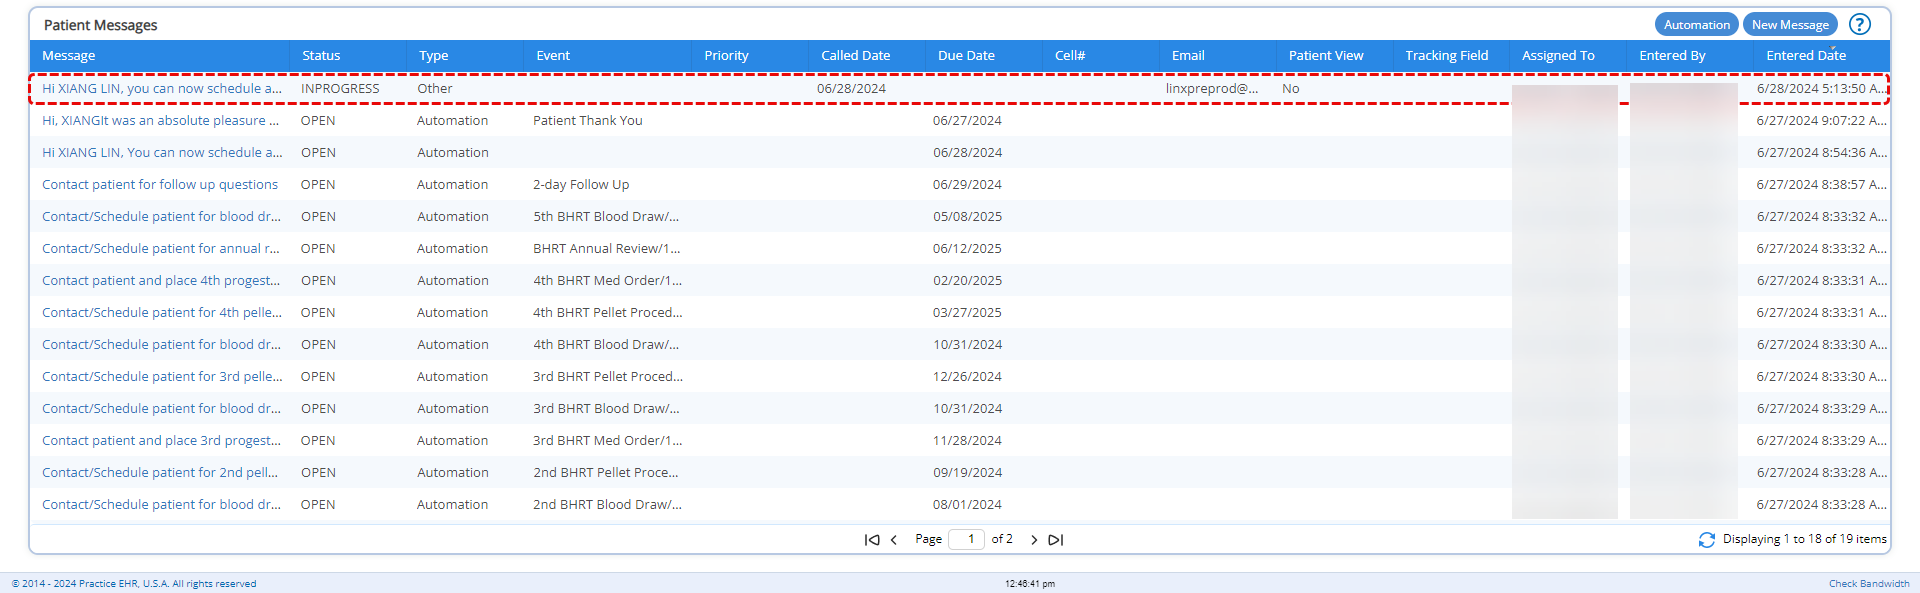
Clicking on the message in the patient messages grid will open the “Message Detail” window as shown below.
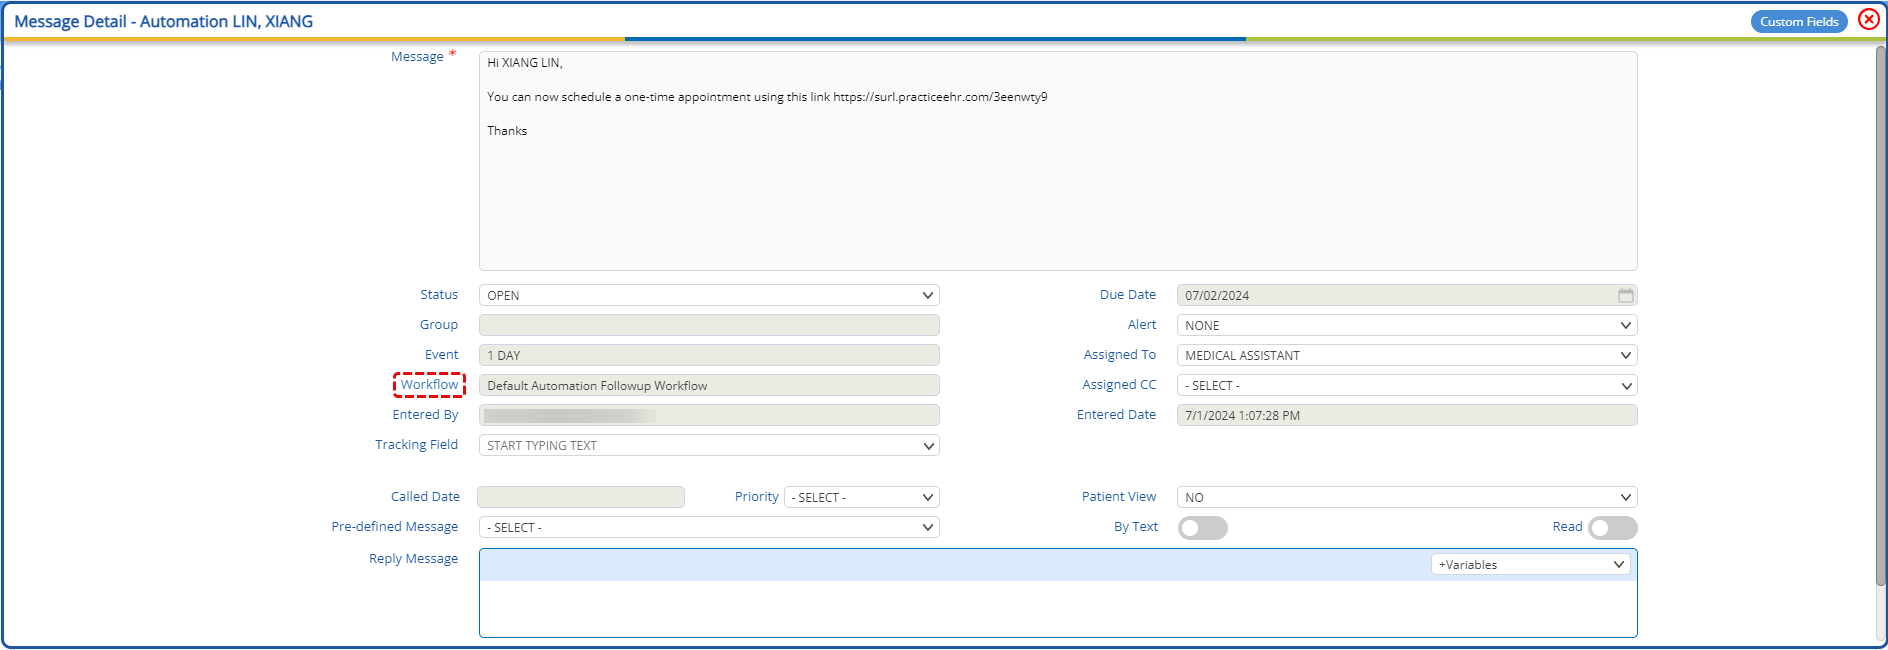
Here, the user will be able to track the following details:
The “Workflow” label will be displayed as a hyperlink on hover. Clicking on the hyperlinked workflow label will display the “Action History” window, detailing the current statuses of each action within the workflow, as shown below:

The action statuses can only be accessed from the action history window and they represent the following:
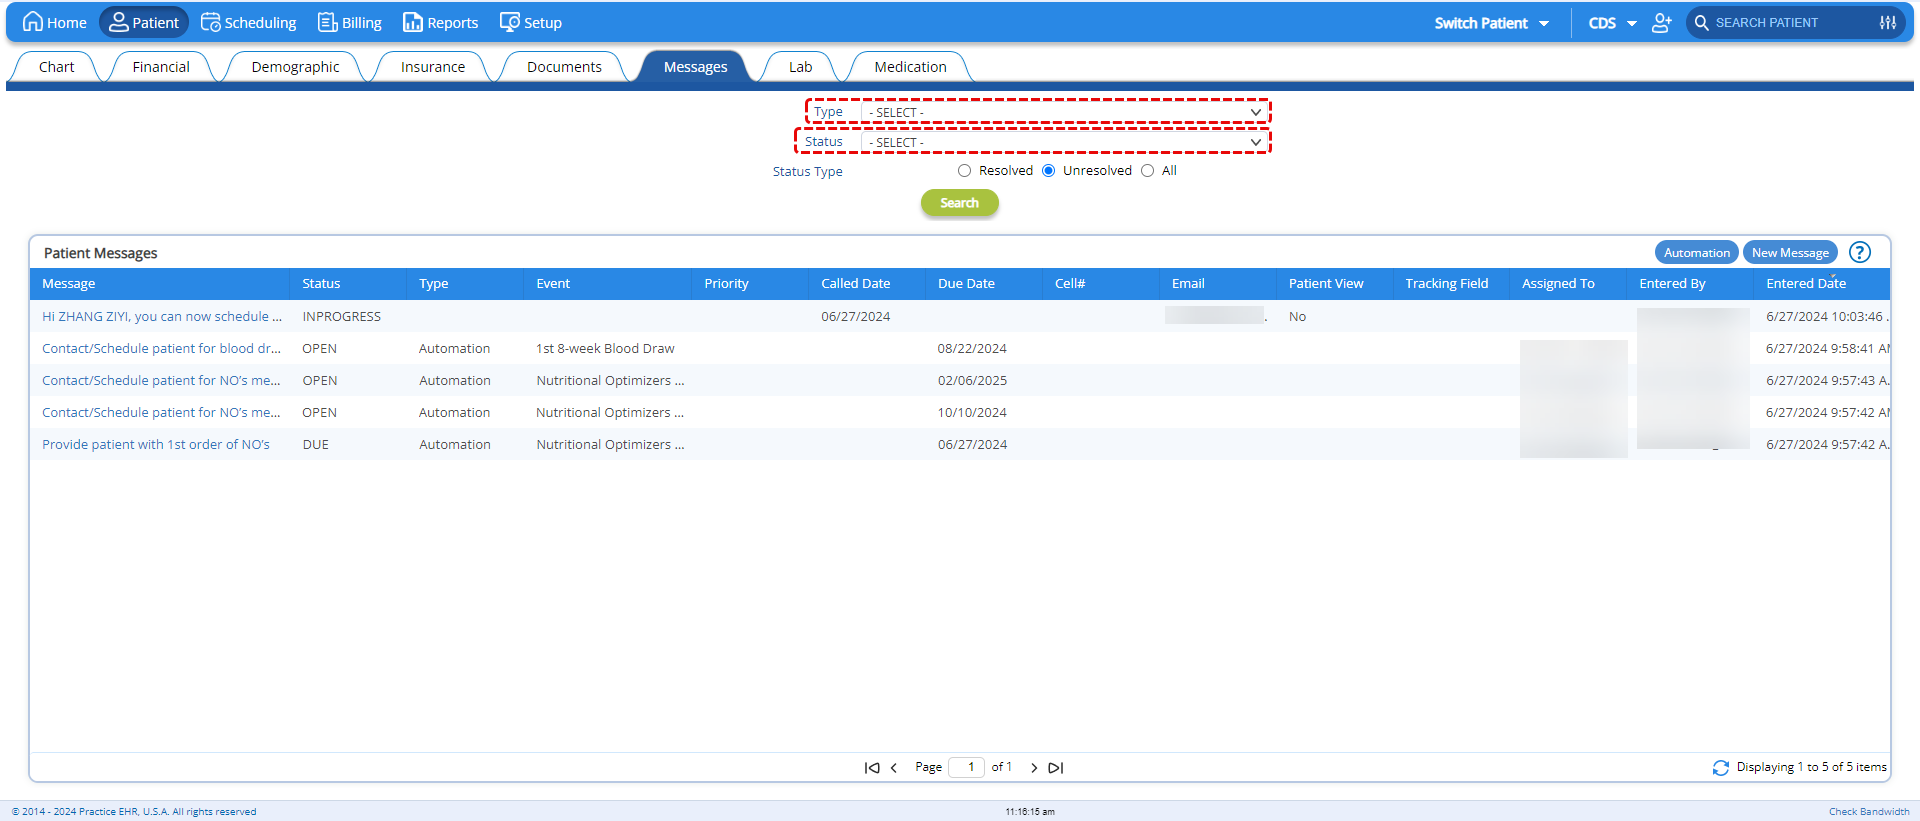
The messages assigned to individual users or group of users will be displayed in the “My Messages” bucket.
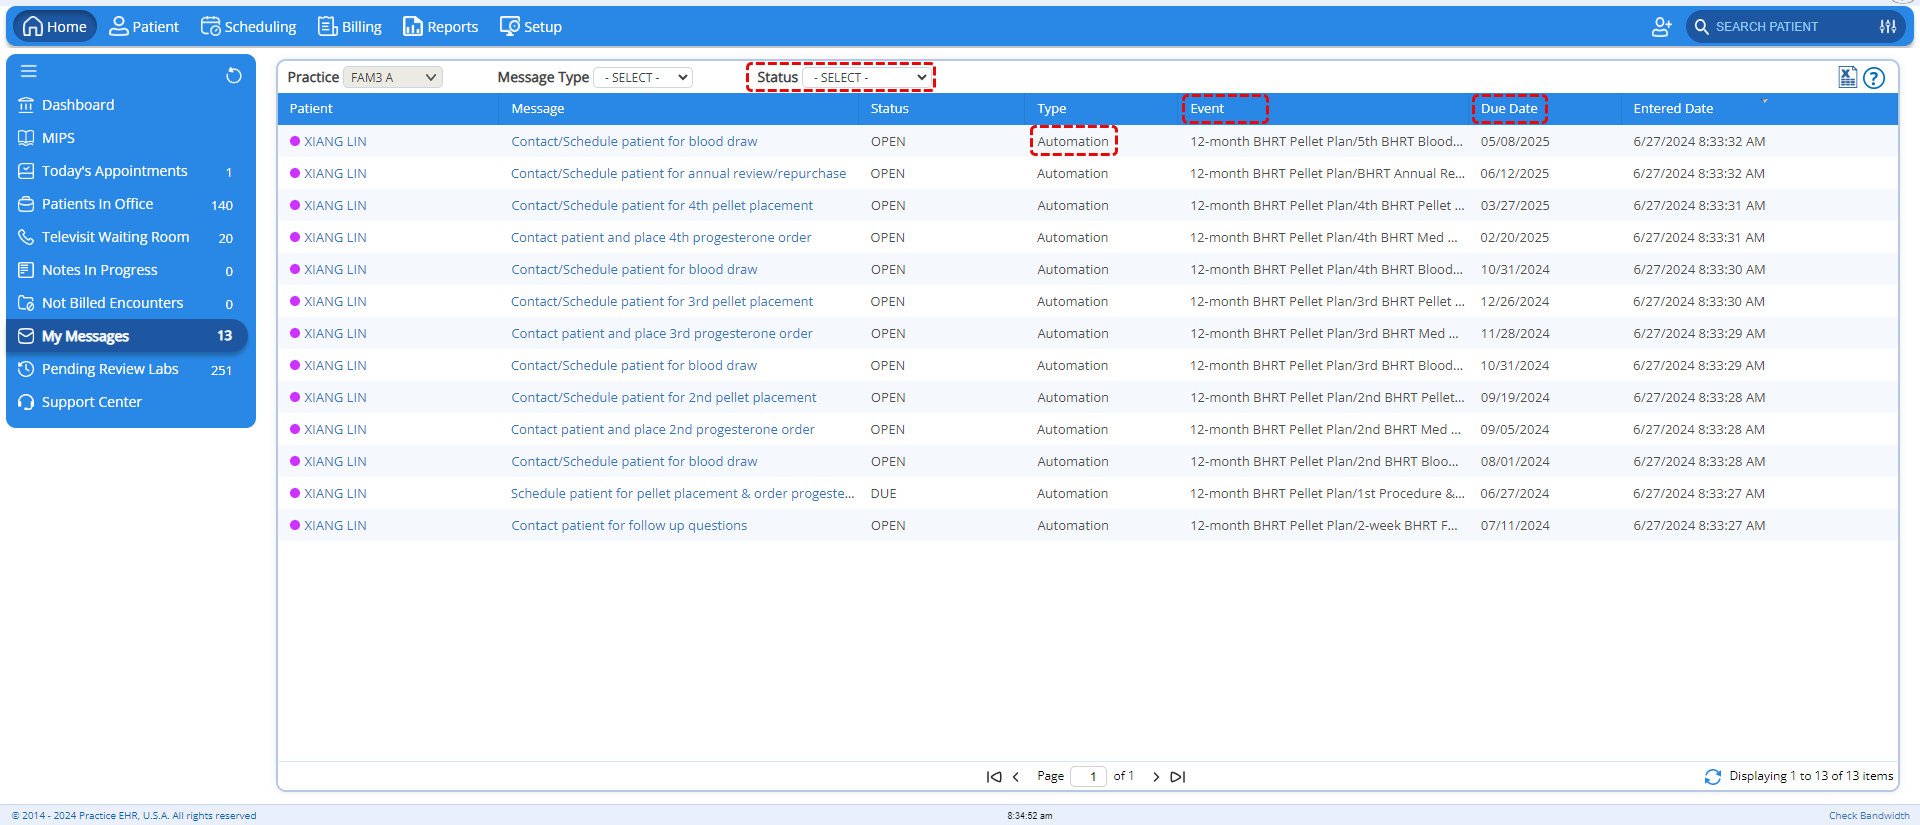
A “Status” dropdown has been added to allow users to filter the messages assigned to them. In addition, the “Event” and “Due Date” columns have been added, to track the event that is waiting to be executed and the date on which the event will be executed.
A new “Status” dropdown has also been added to the “Messages” report within the “Reports Module”, to allow users to filter messages based on the status of the messages.
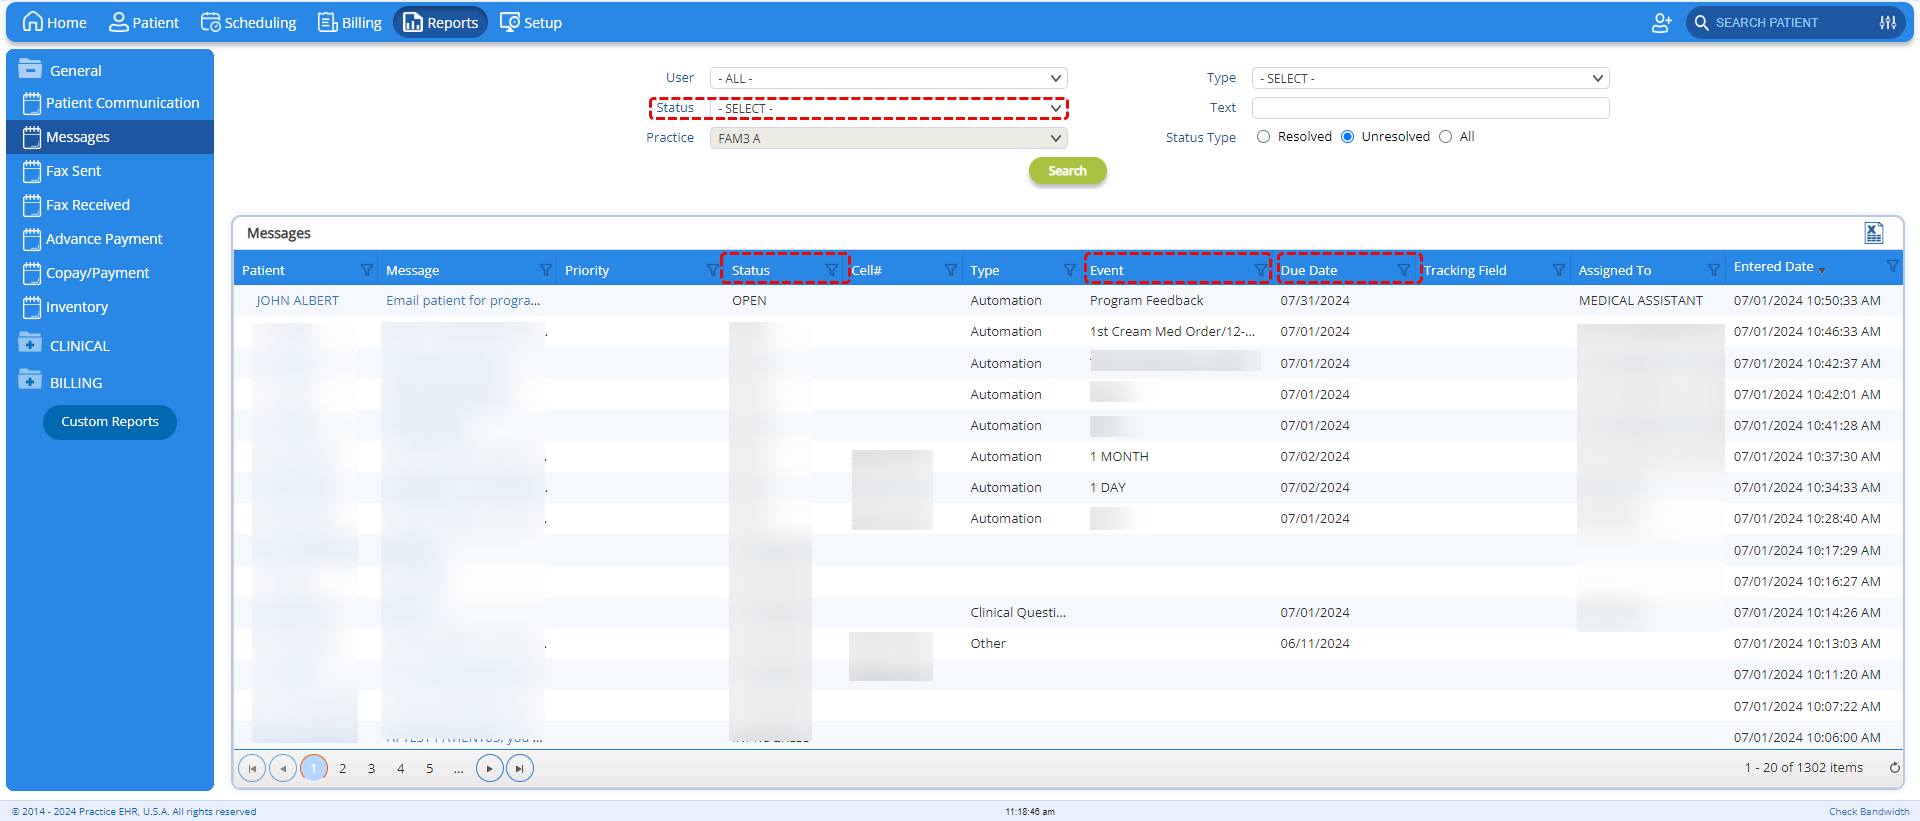
In addition, three new columns have been added to the “Messages” grid, namely:
Note: The “Type” column now has the “Automation” value for messages with automated events or groups attached to them.
Practice EHR is excited to introduce the significant enhancements made to the “Patient Messaging” functionality. The enhancements include:
The “Messages” sub-tab, within the “Patient” module has received quite a few changes to accommodate the new message automation functionality.
A few changes to take notice of:
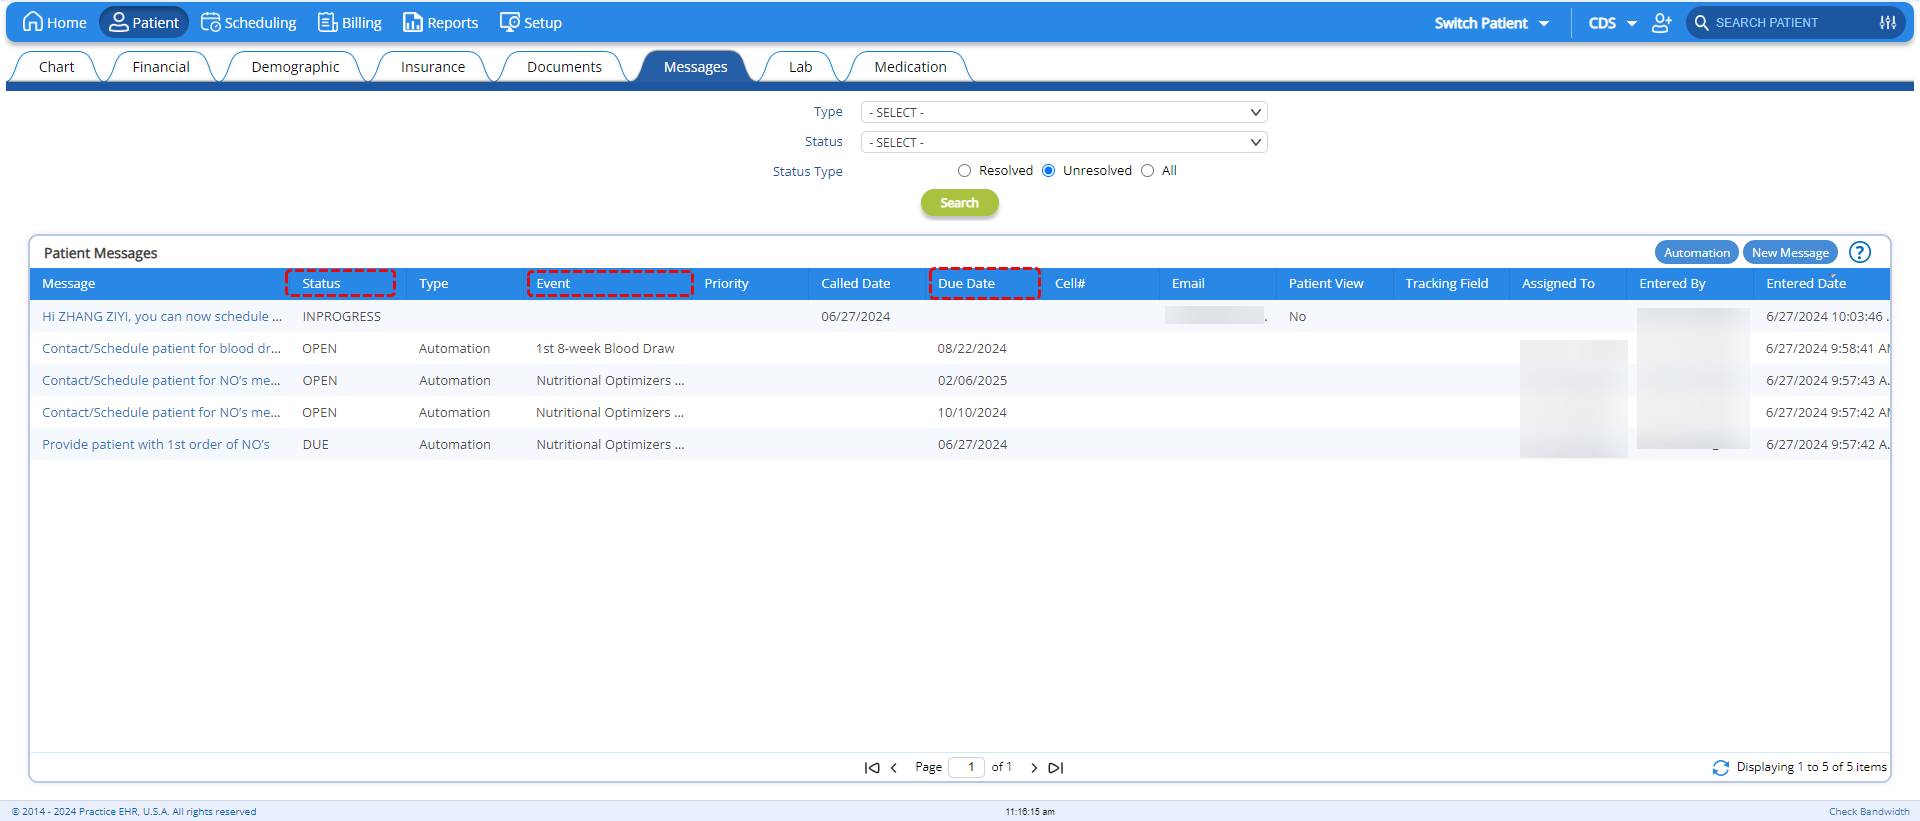
In addition, the following columns has been added to the “Patient Messages” grid to account for the event or group details. These columns include:
Note: The “Type” column now has the “Automation” value for messages with automated events or groups attached to them.
A new custom messaging feature has been introduced in the "New Message" window. Users will now be able to create their own messages to send to patients.
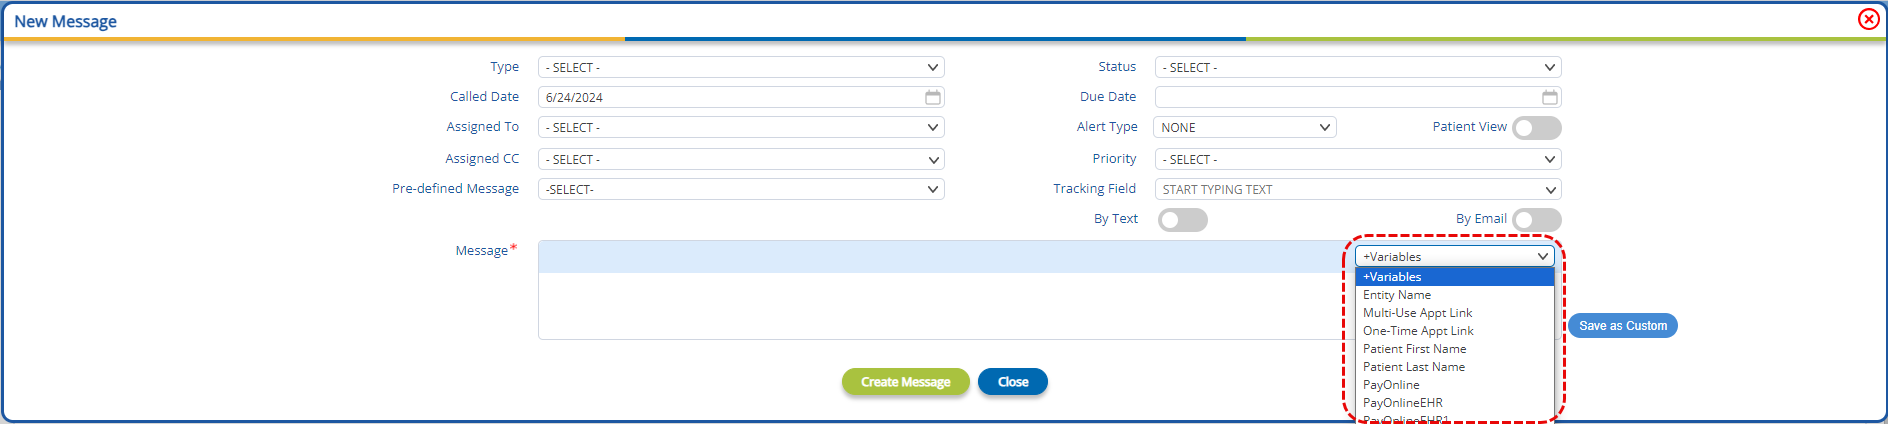
The provision to add variables has been added, allowing users to craft engaging messages. In addition, a “Save as Custom” button has been added beside the textbox, allowing users to save a custom message as a preferred message to be used when needed.
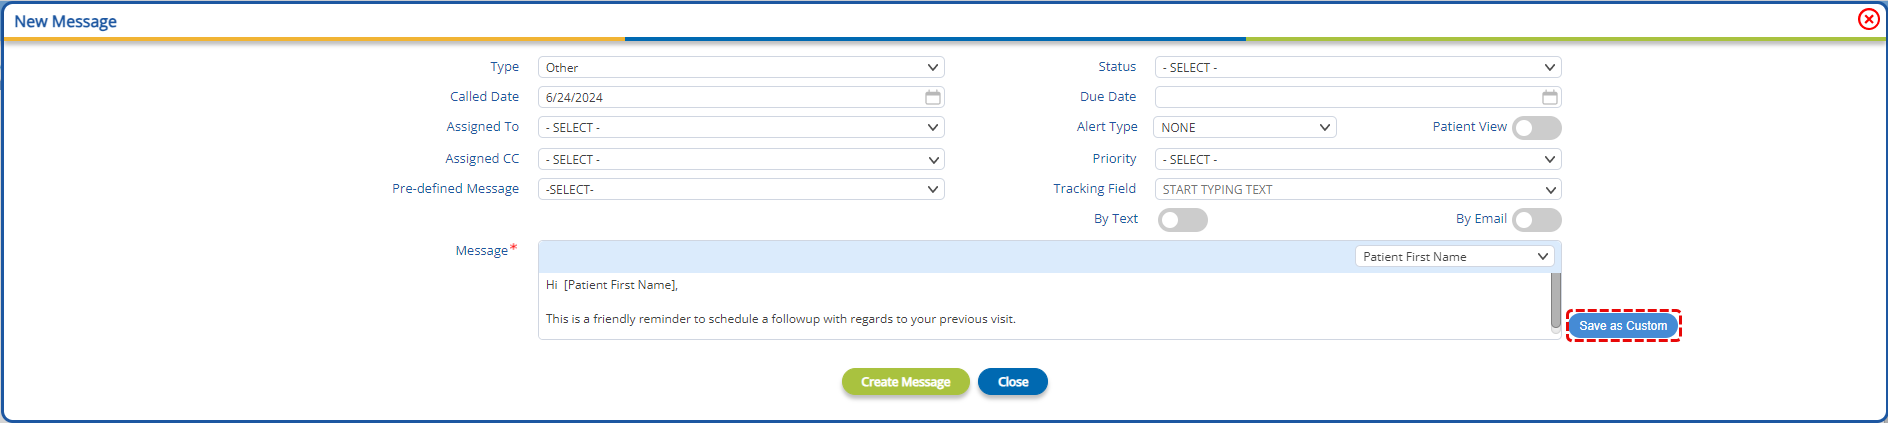
Clicking on the “Save as Custom” button will open the “Custom Message” window and by entering a name for the message and saving it will add the custom message in the “Pre-defined Messages” dropdown.

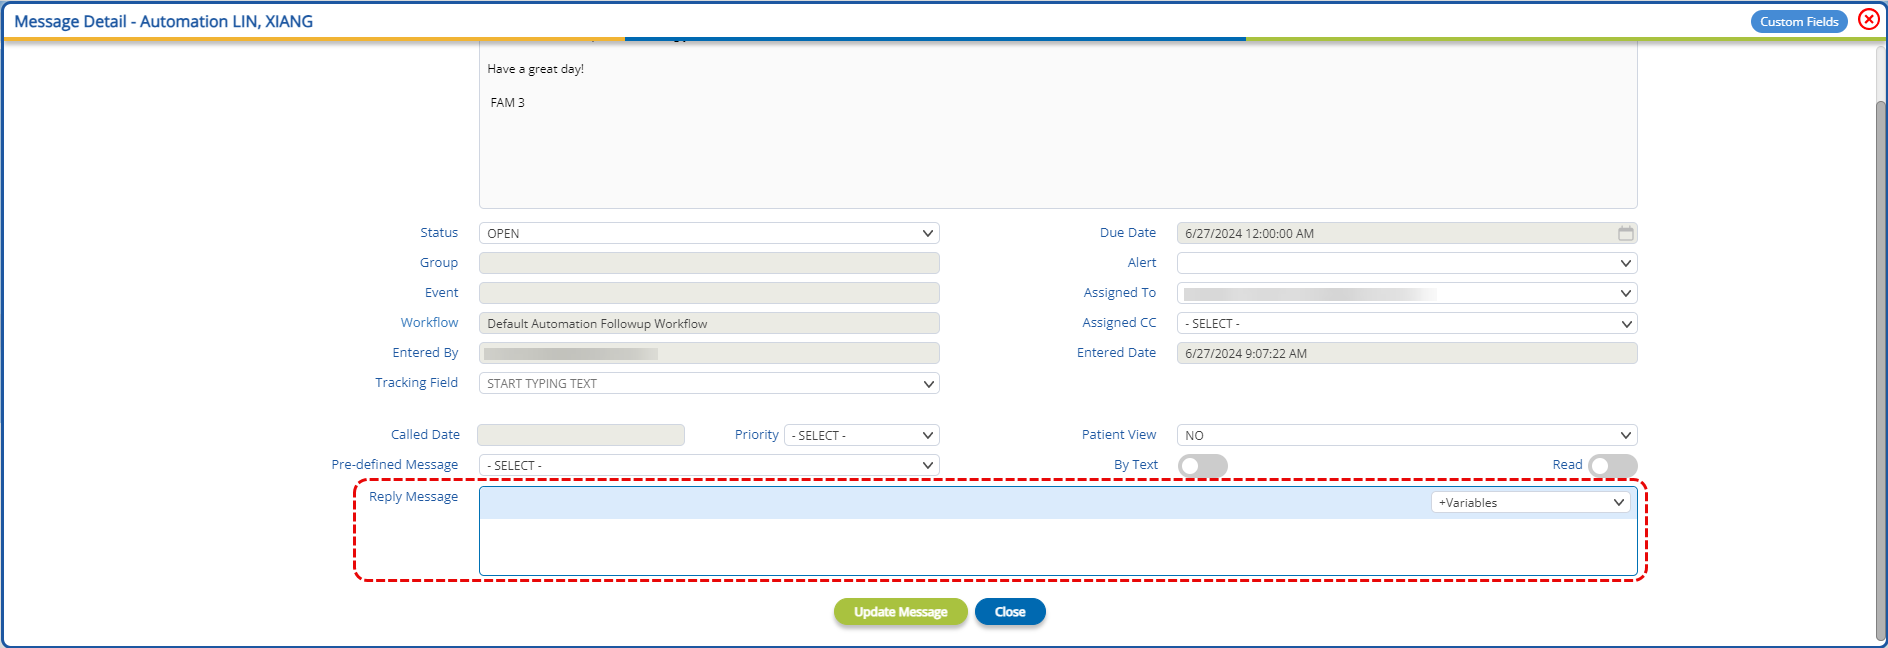
The provision to add variables has also been added to the “Reply Message” field, within the “Message Detail” window. Upon clicking the “Update Message” button, the added variables will be replaced by values.
Note: Custom messages can only be sent via text.
The provision to create and add users to existing user groups has been added in Practice EHR. Within the “User” window, a “User Group” dropdown has been added, allowing users to add the user to an existing user group.
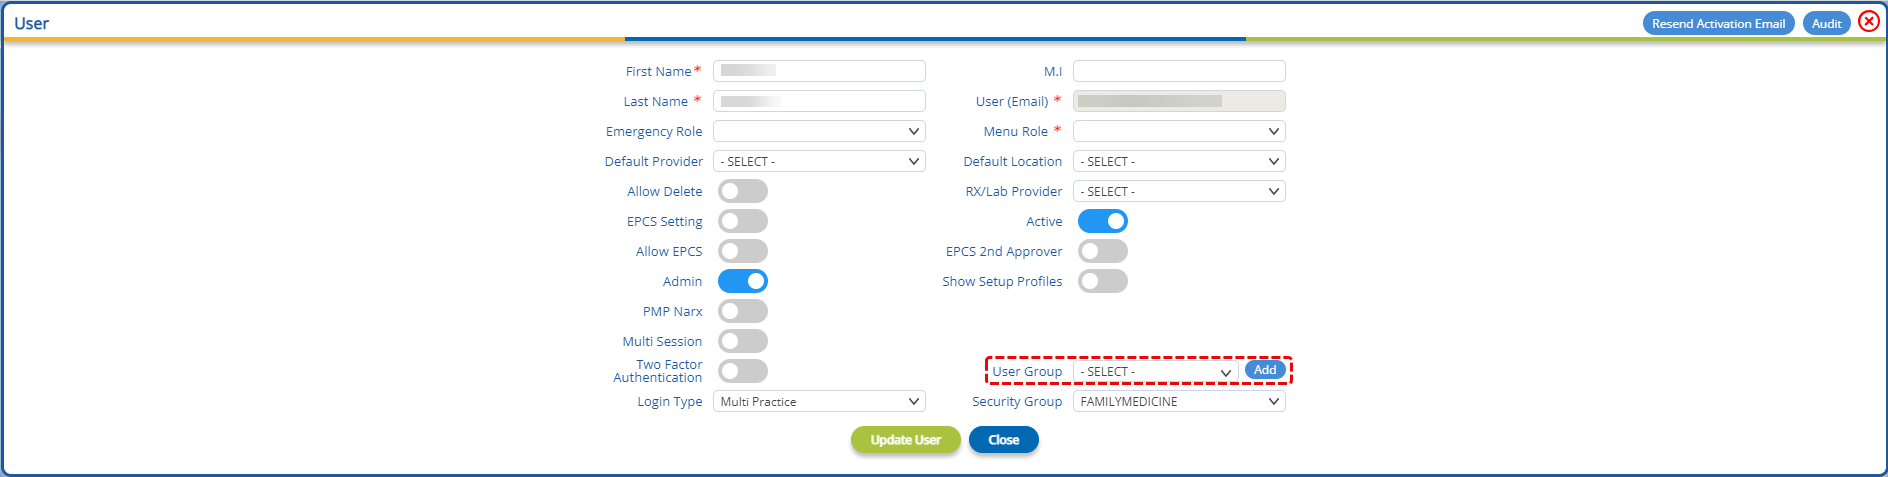
Beside the user group dropdown, an “Add” button has been provided. Clicking on this button will open the “Add Group” window, allowing users to create a new group by giving a name and description, as shown below.

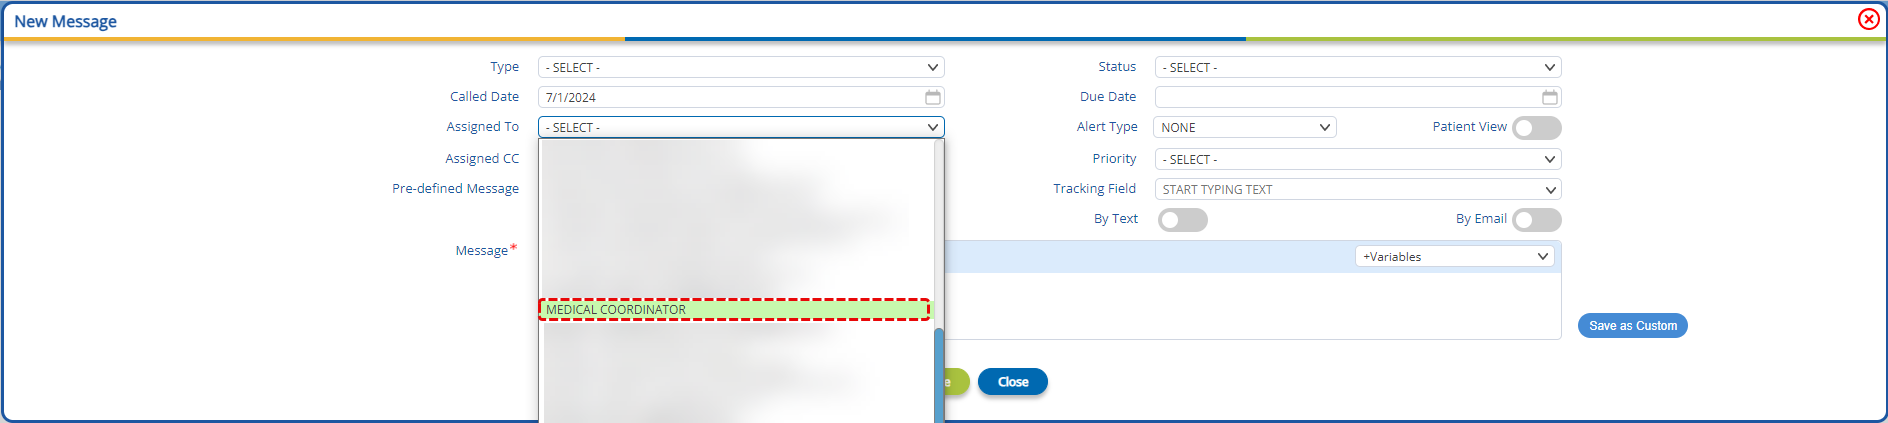
The created groups can be selected from the “Assigned To” and “Assigned CC” dropdowns in all message windows. Groups will be displayed with a green background, as shown below.
In the “Schedule” sub-tab within the “Scheduling Module”, a “Current Schedule” toggle has been added. With the toggle active, only current schedules will be displayed in the provider / resource schedule grid.
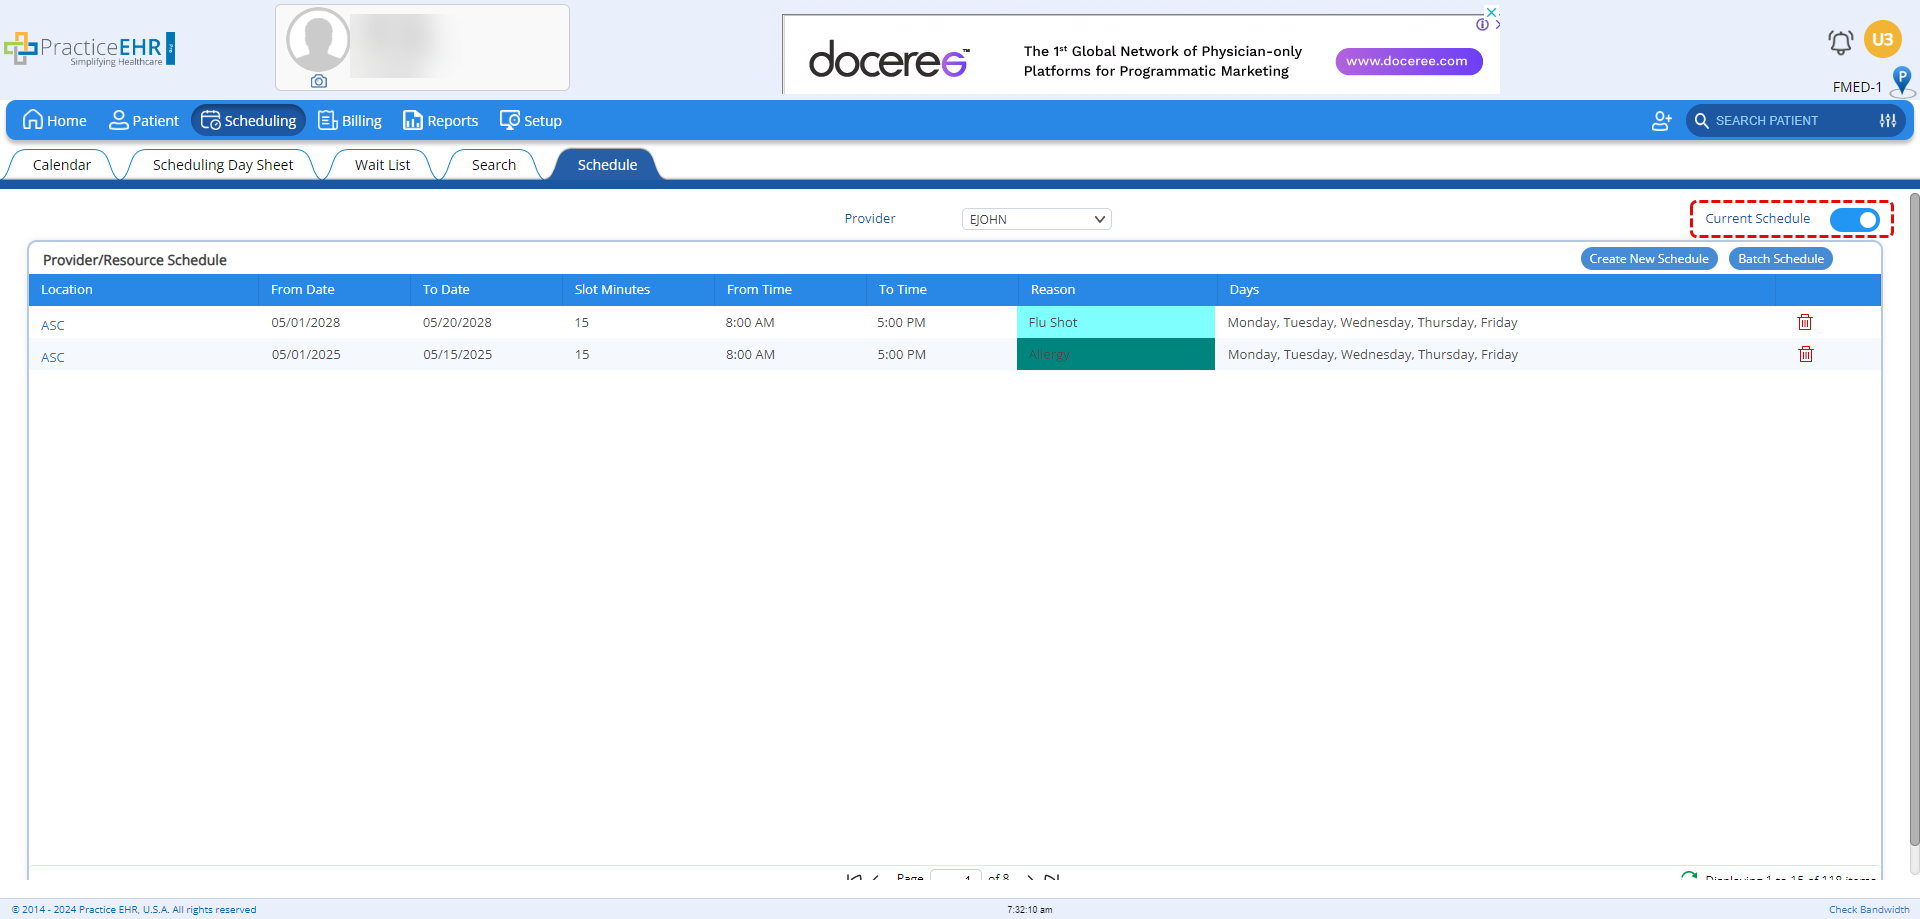
This toggle is active by default.
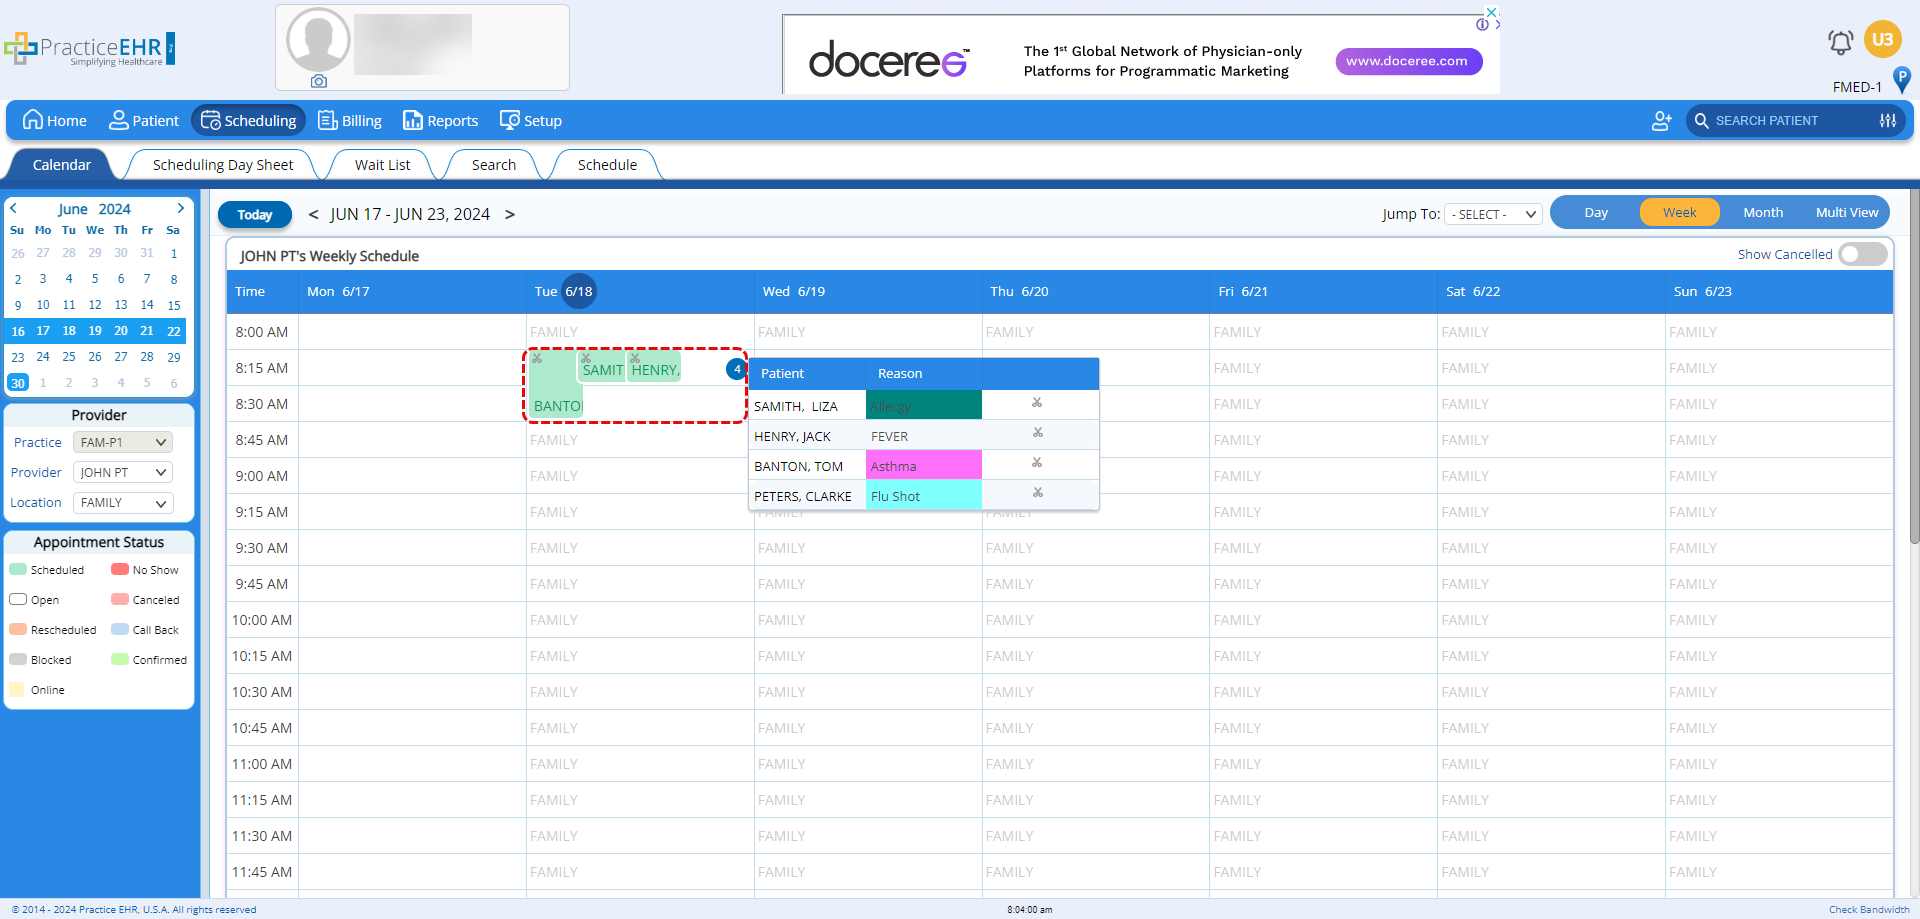
The separate column for the number of bookings in a timeslot has been removed for a cleaner and minimalistic look. The count has been moved to the right end of the slot to make the identification of total bookings more intuitive.
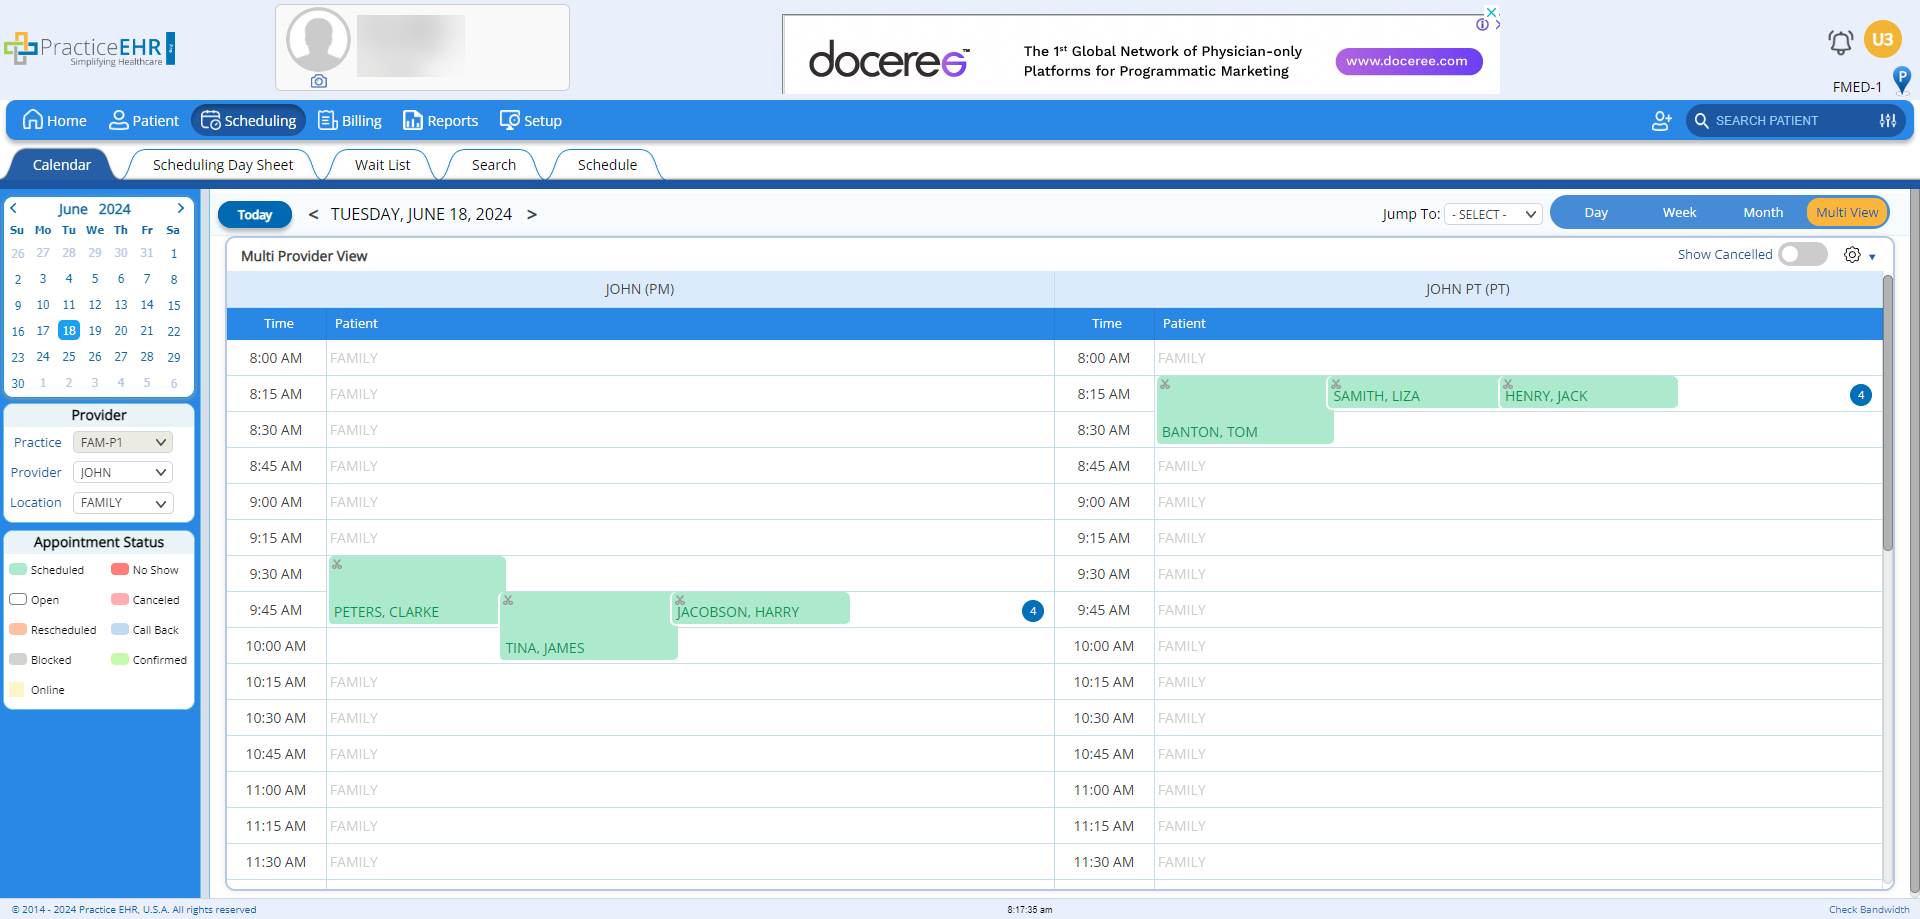
The multi view is now a responsive display that adjusts to the number of providers selected and encompasses the full width of the grid.
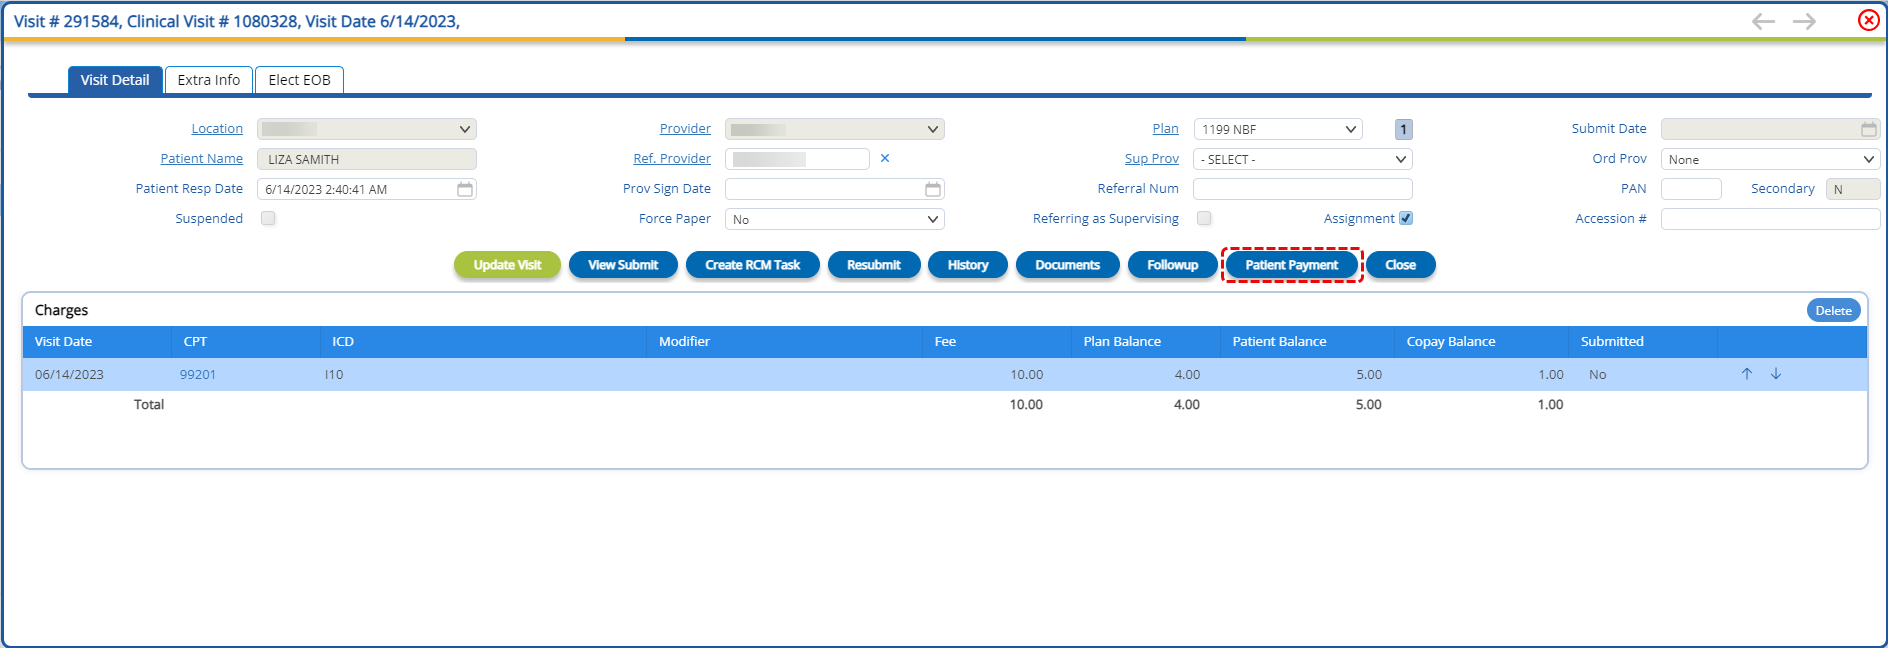
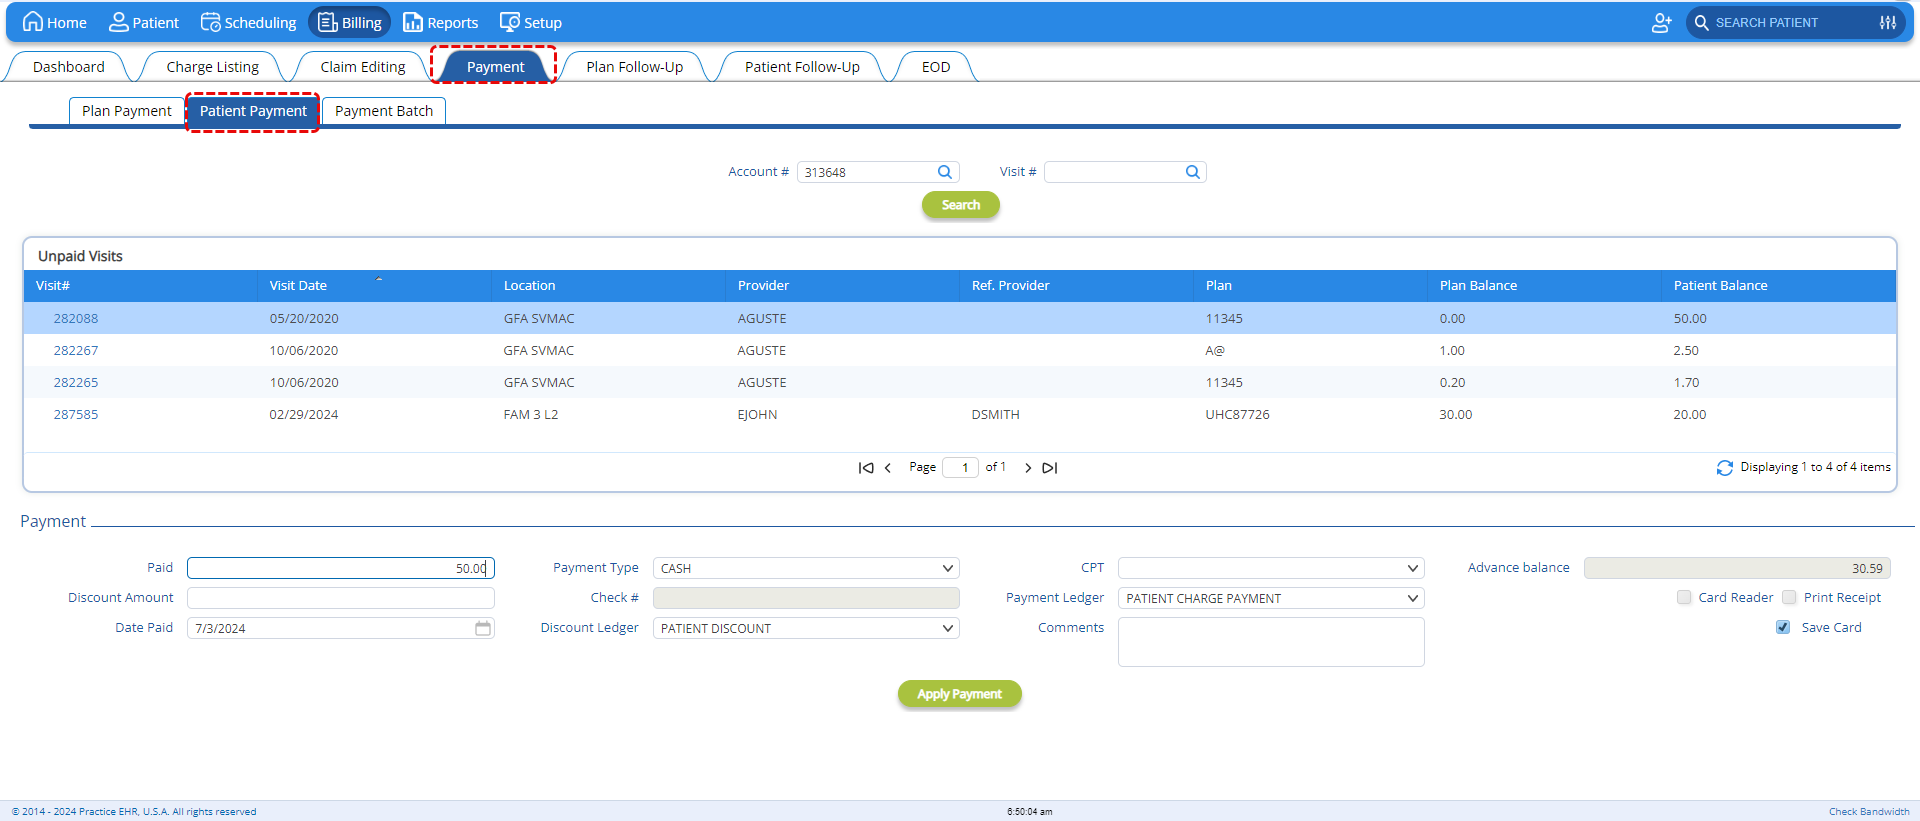
In the “Patient Payment” window, a new “CPT” dropdown has been added to allow users with greater control over applying payments. Now users have the ability to apply payments against specific CPTs within a visit.

In the “Visit Detail” window, a “Patient Payment” button has been added to allow users to add patient payments against visits directly.
In the “Plan Payment” sub-tab, within the billing module, a new “Patient Payment” search functionality has been added. This will allow users to search for patient payments against account and visit numbers.
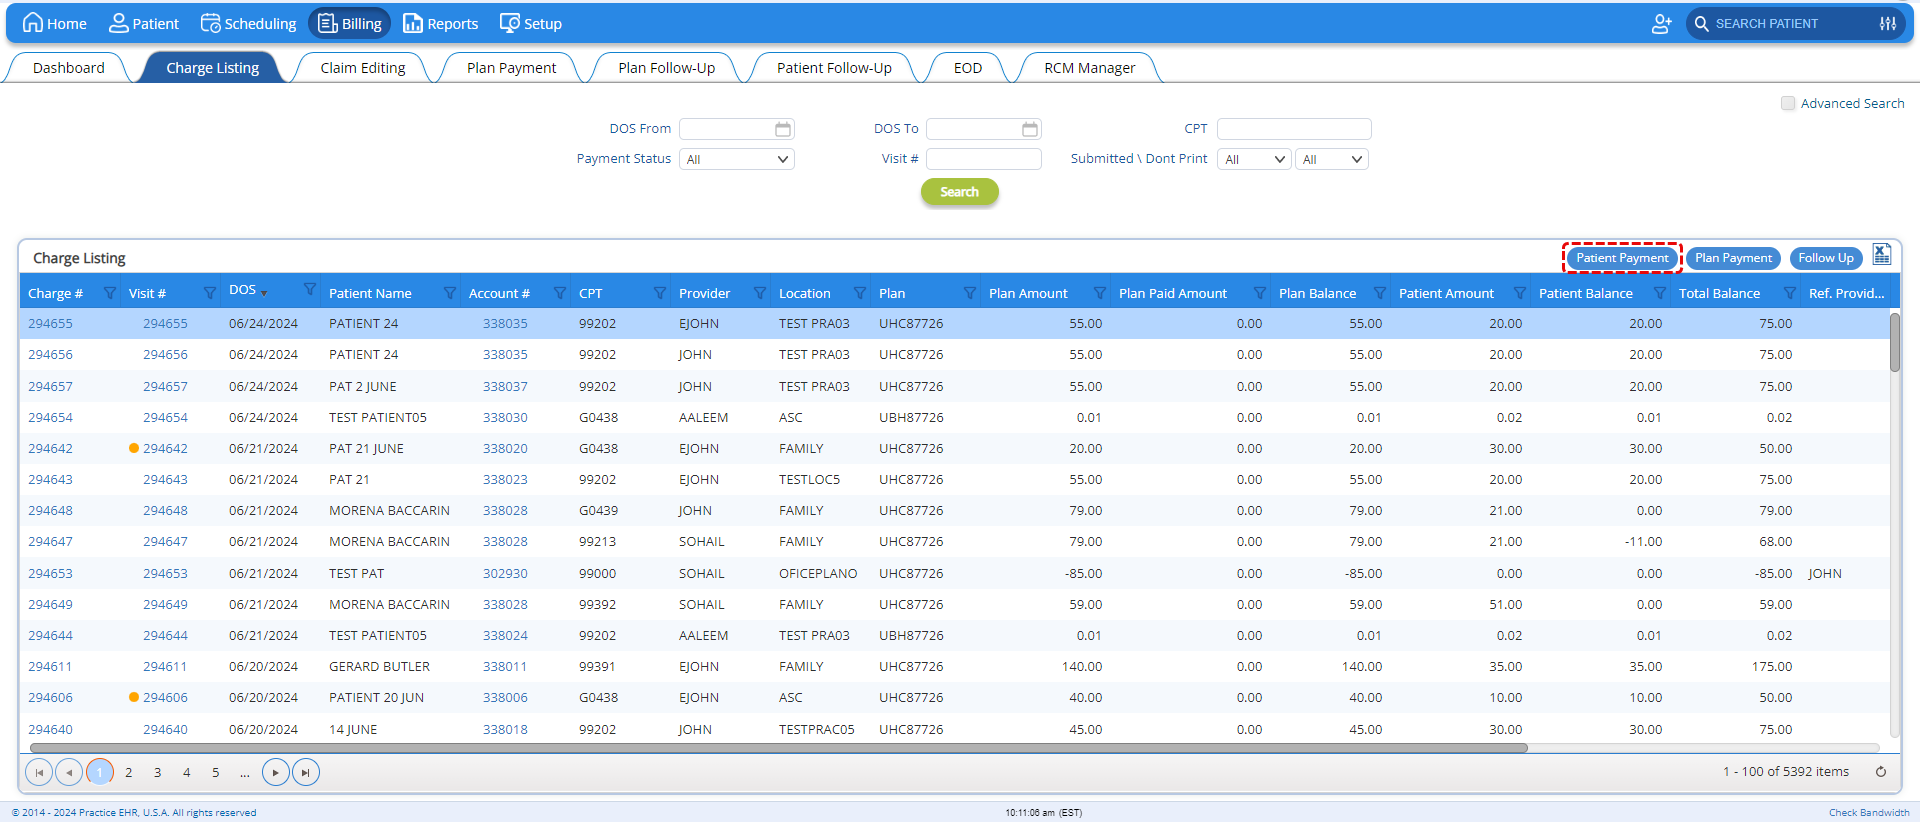
The new “Patient Payment” search feature can also be accessed from the “Charge Listing” tab. Users can access this feature by clicking on the new “Patient Payment” button provided in the charge listing grid header.
The following user interface enhancements have been implemented across Practice EHR, designed to provide an enriching and functional user experience.
Text Fields have been overhauled to provide clearer visual cues and improved accessibility. The roundness of the text fields has been increased with an asterisk indicating a necessary field.
All icons indicating dropdown or search functionality, will be housed within the text fields.
The Textbox Dropdown Menu has been improved for better navigation and selection. Select dropdowns have the ability to search for results based on the user inputs.
The roundness of the text fields has been increased in keeping with the overall UI upgrade.
The File Uploader component has been updated to support drag-and-drop functionality, making it easier for users to upload documents.
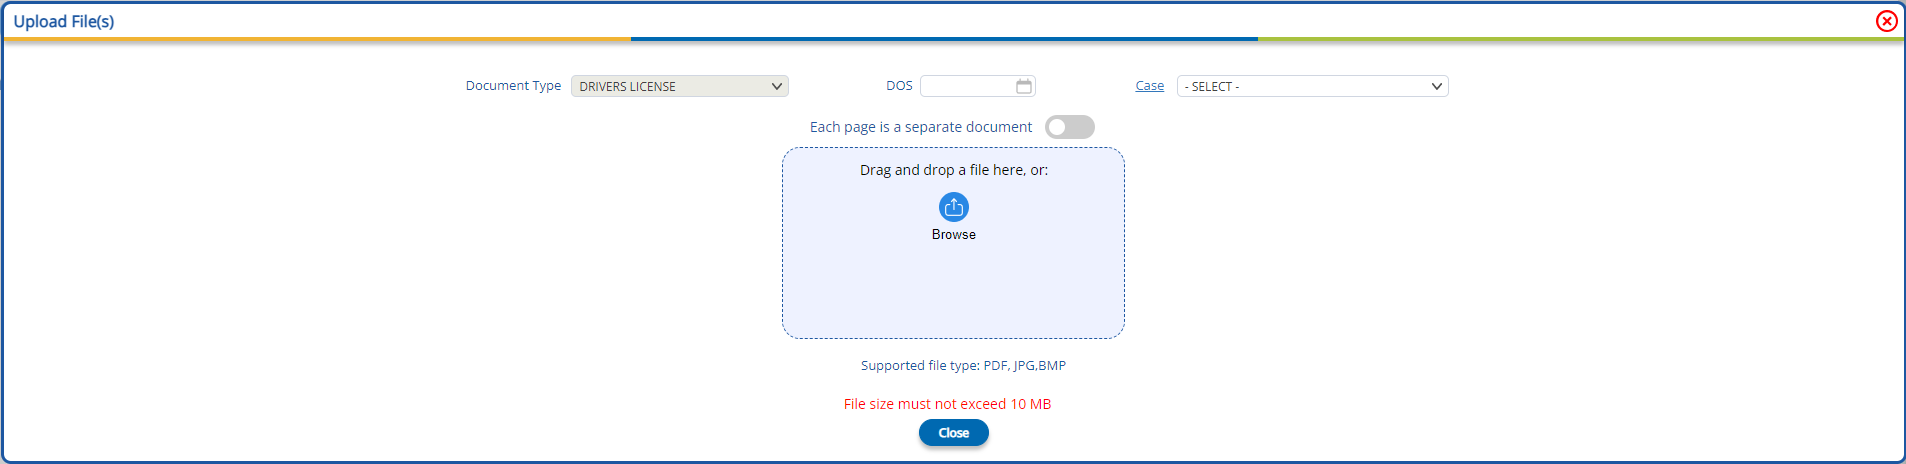
The “Browse” icon functions similarly to the "choose file" button and the time taken to upload the file will also be displayed.
Pagination controls of all table grids have been refined to offer a more streamlined navigation experience across multiple pages of data.
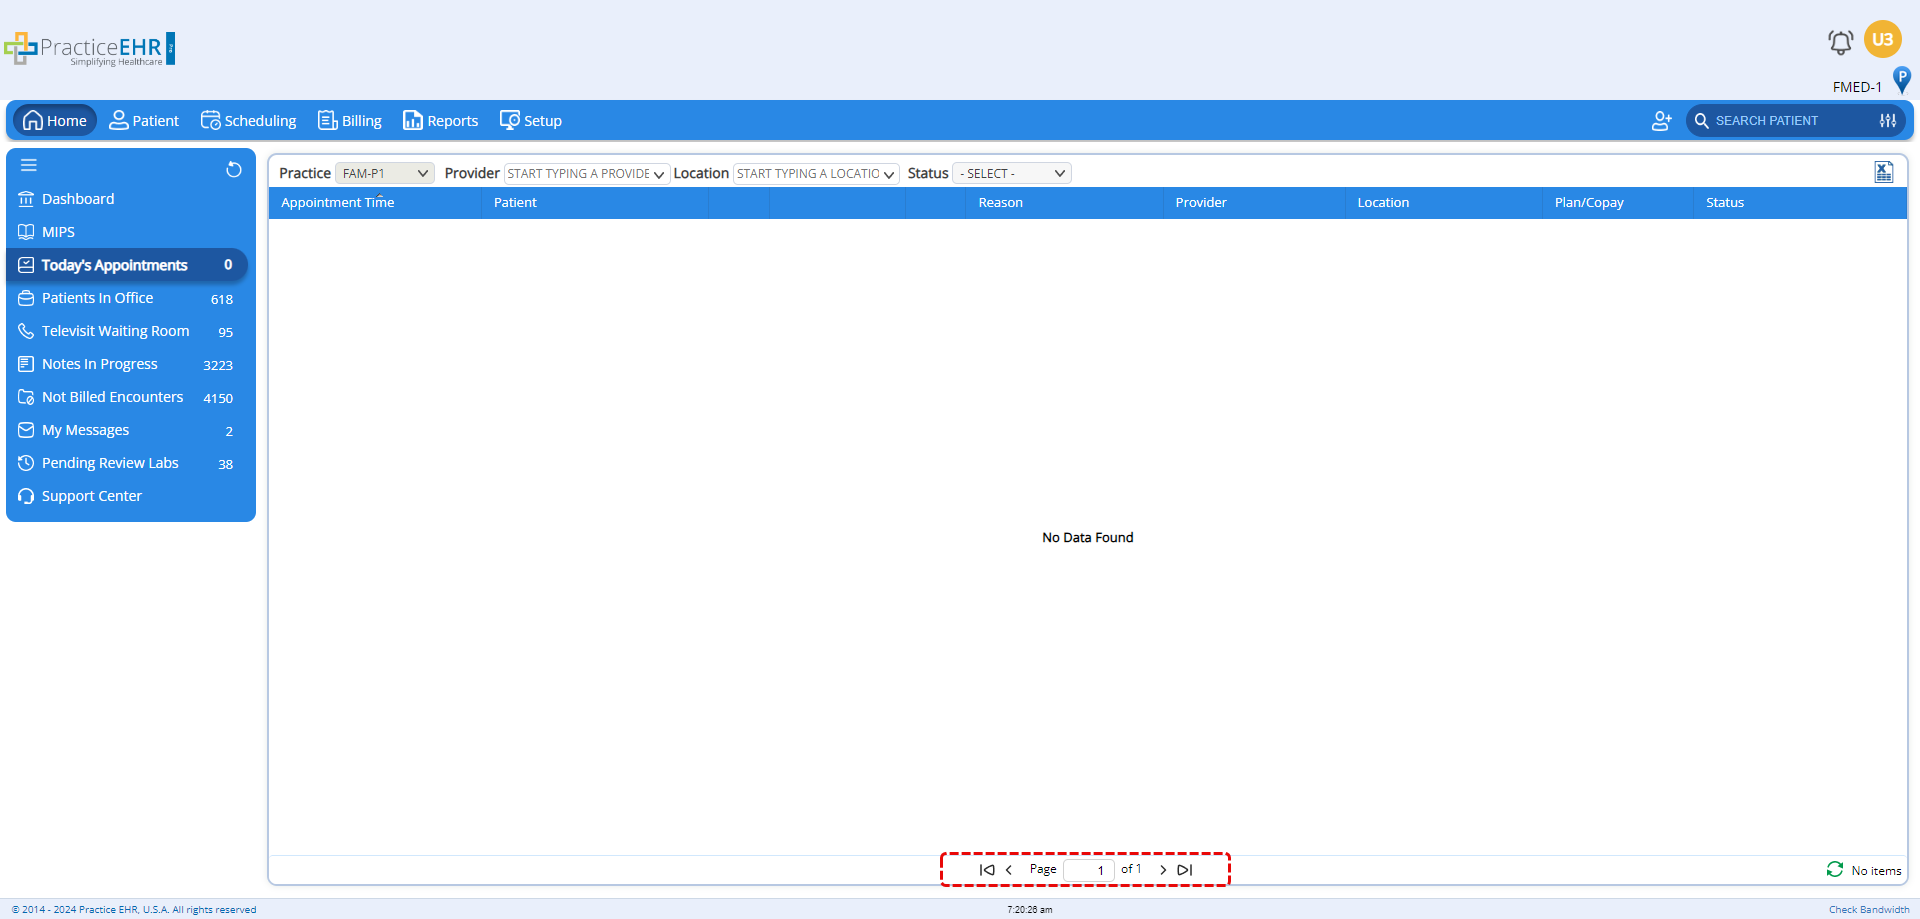
Pagination controls are now centrally aligned.
The Date Picker component has been enhanced to offer more intuitive date selection.


The improved design supports quick and accurate entry of dates, reducing the likelihood of errors.
The Time Picker has been redesigned to facilitate easier and more precise time selection.

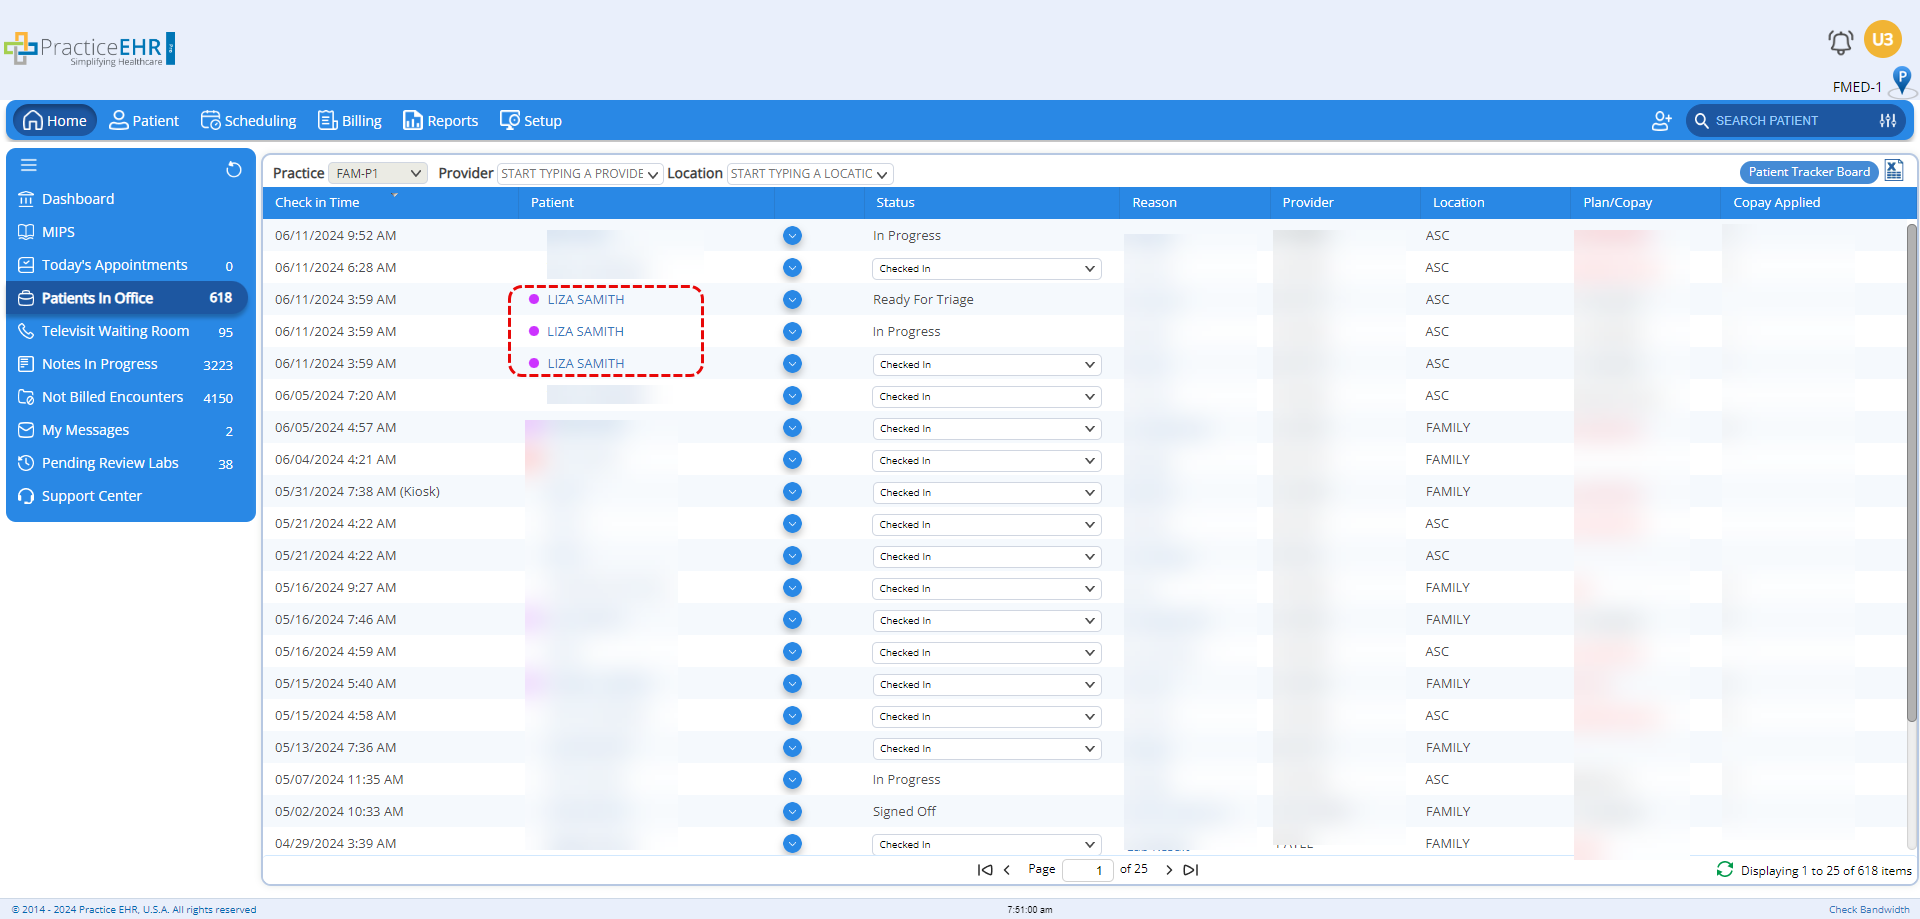
The patient column will now feature the patient color in all table grids as shown below. Note: No color will be displayed against a patient to whom a color is not assigned.
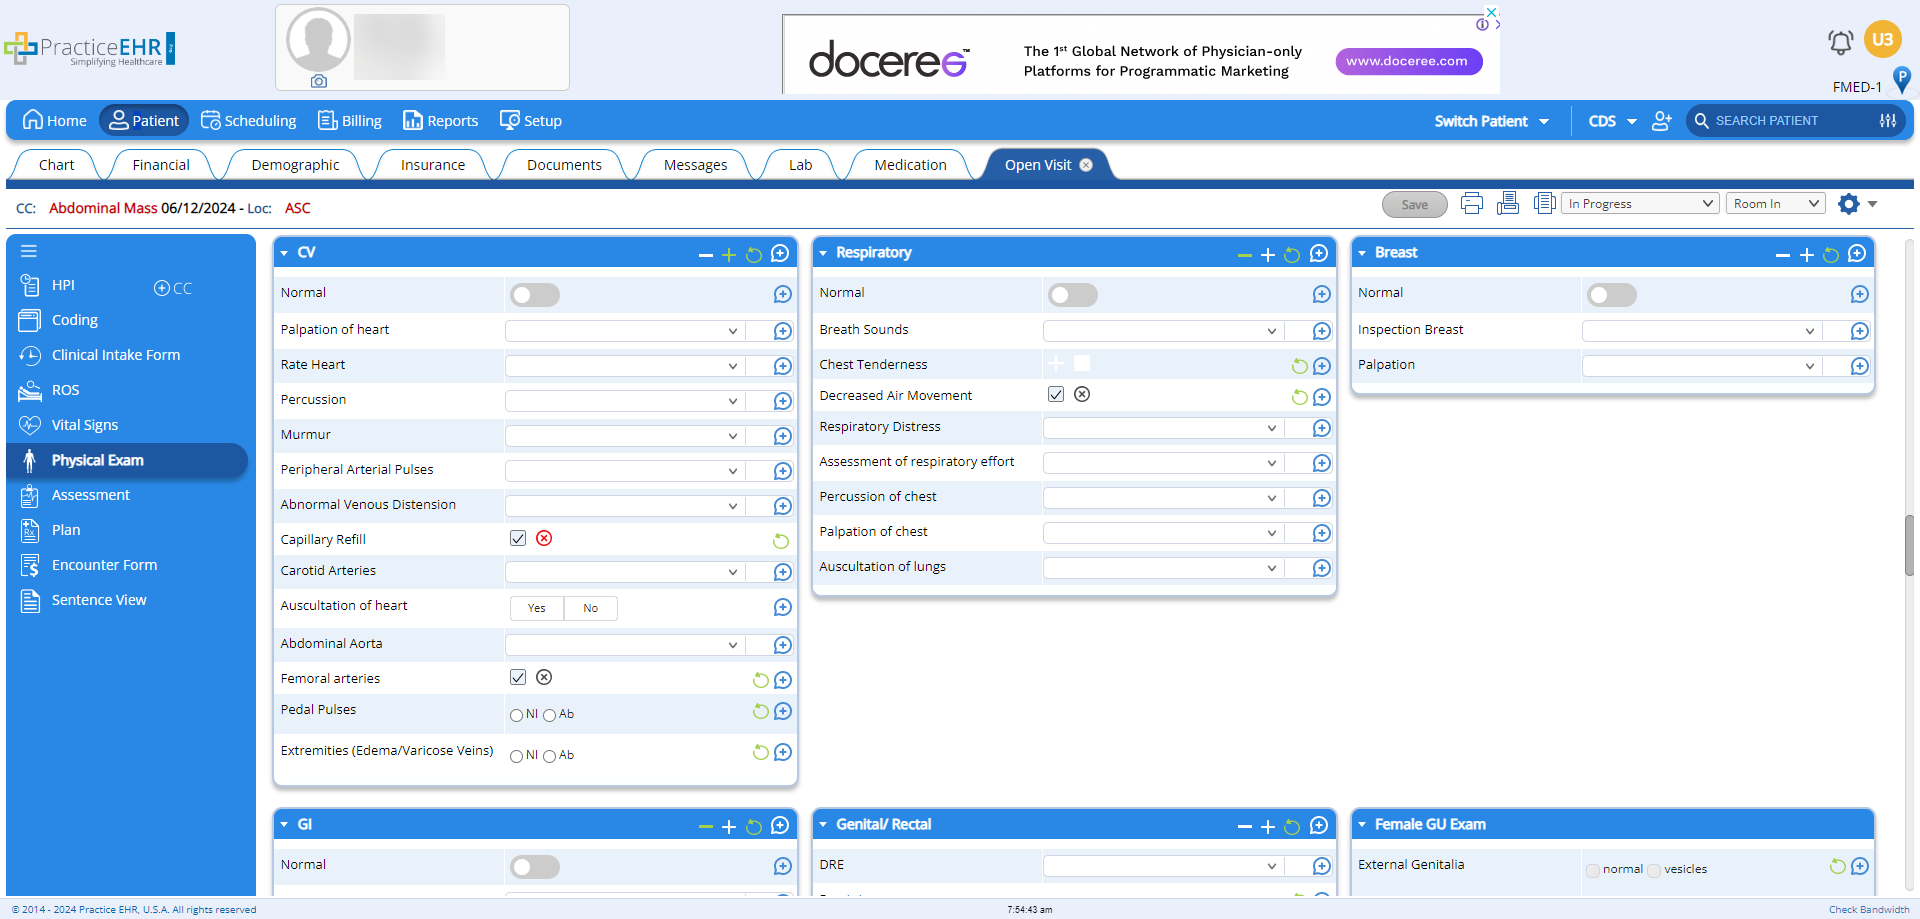
Question groups in the “Open Visit” tab have been further improved in an effort to make the clinical note creation process more intuitive.


![]()
![]()


