1. Evidence Based Decision support Intervention (EBDSI)
Overview
We are excited to announce the launch of the Evidence-Based Decision Support Indicator (EBDSI) in Practice EHR. This feature is seamlessly integrated into the Practice EHR system to support and improve clinical decision-making. This tool leverages real-time data and evidence-based guidelines to provide healthcare providers with actionable alerts and recommendations during patient encounters. EBDSI ensures that crucial clinical actions, such as tests, medications, or screenings, are not overlooked, thereby promoting compliance with best practices and improving patient outcomes.
The usability of EBDSI lies in its ability to seamlessly integrate into existing workflows. Providers receive context-sensitive alerts directly within the patient’s chart, minimizing disruptions. For instance, EBDSI can notify a physician if a patient is overdue for a preventive screening or if a prescribed medication has potential interactions with existing treatments. These alerts are customizable, allowing practices to tailor them based on specialties or individual provider preferences, ensuring relevance and efficiency.
What’s New
- Automated Alerts: Provides immediate insights into critical clinical scenarios, including:
- Potential medication interactions.
- Missing or overdue diagnostic tests.
- Preventive screenings based on patient history.
- Seamless Workflow Integration: Alerts are displayed prominently within the patient’s chart, ensuring no disruption to provider workflows.
- Customizable Measures: Enables tailored recommendations for specialties
- Threshold Management: Adjust settings to fit the unique needs of your practice or specialty.
- Simplified Alerts: Includes concise, evidence-based recommendations.
- Performance Tracking: Measure provider responsiveness to DSI alerts.
- Improved User Experience: Enhanced user interface for intuitive navigation of alerts and recommendations.
- Customizable Configurations: New options in the admin dashboard to enable or disable specific DSI measures based on practice requirements.
- Export Options: Generate and download reports in CSV or PDF formats.
How to Get Started - Configure EBDSI
The EBDSI feature is fully customizable, allowing providers to design rules tailored to their clinical workflows and patient population.
Steps to Configure EBDSI:
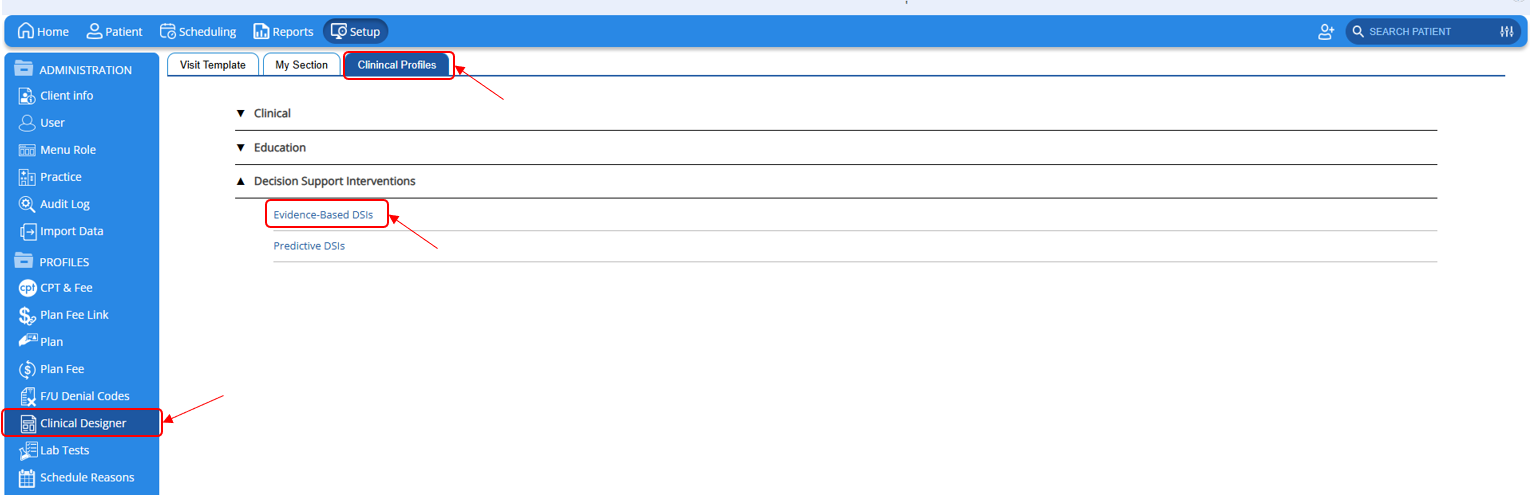
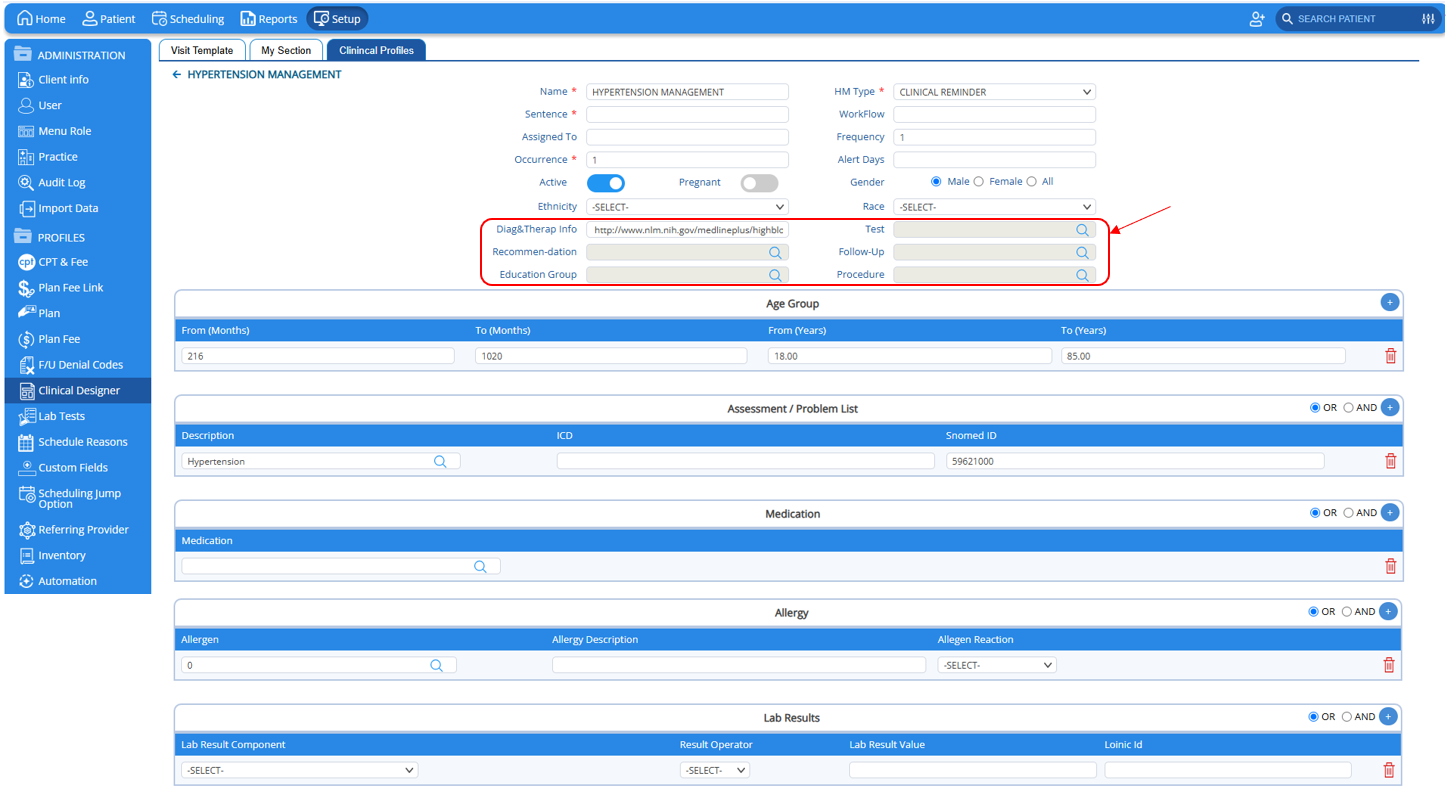
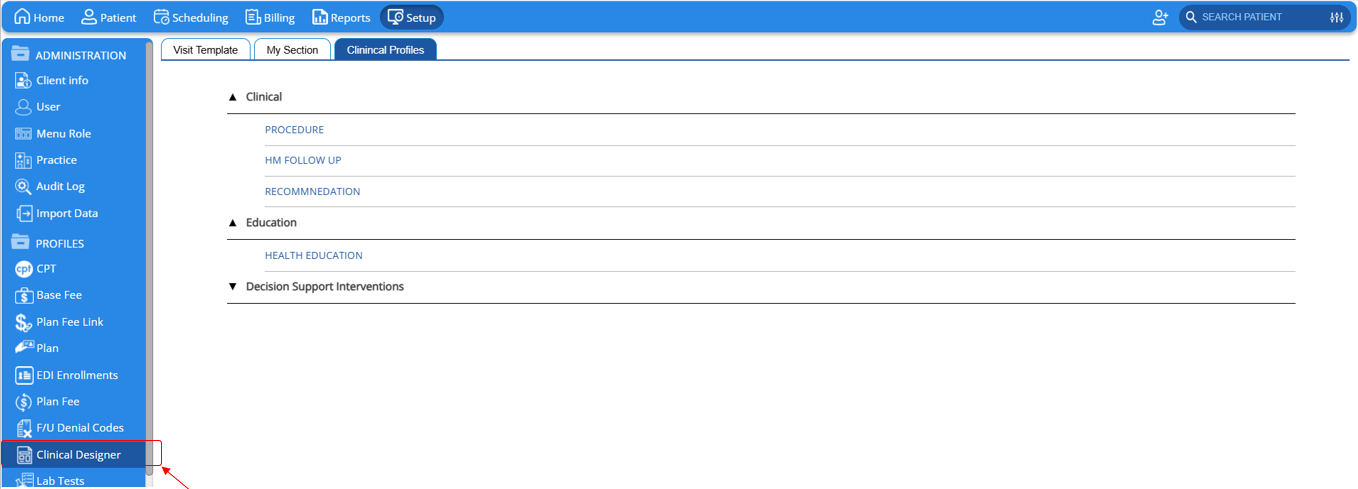
1. Navigate to Clinical Designer:
- Go to Setup > Clinical Designer > Clinical Profiles > Decision Support Interventions > Evidence-Based DSI.
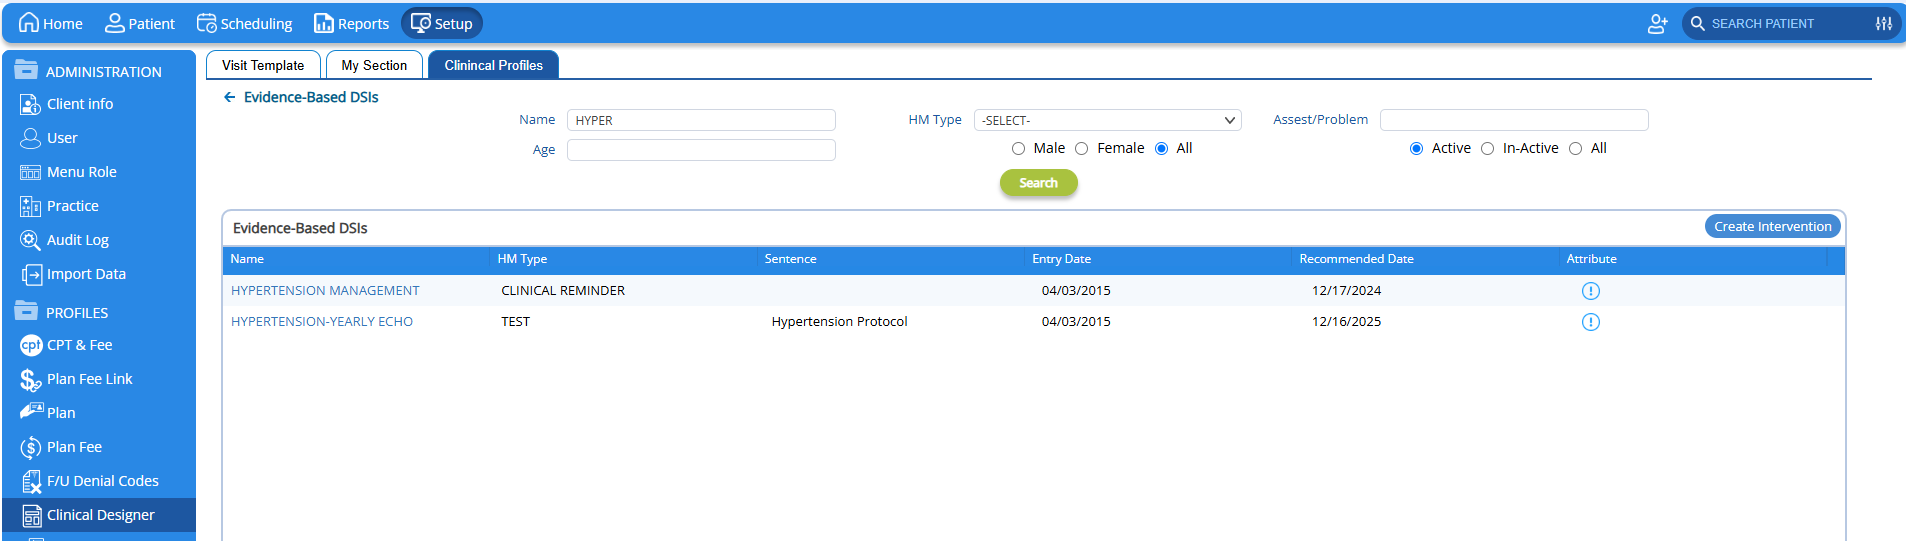
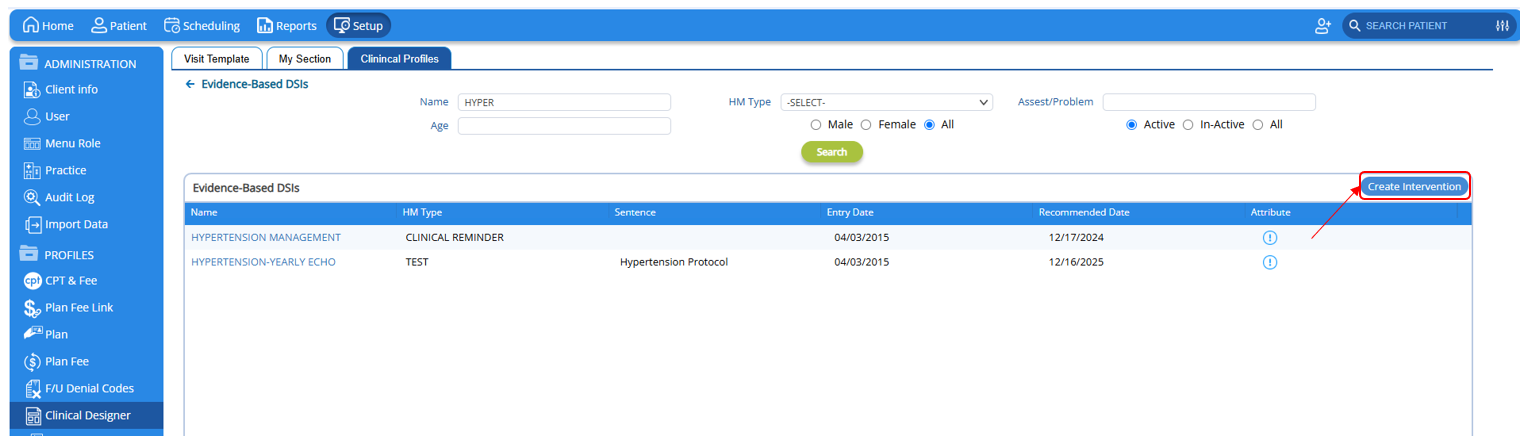
2. Create a New Decision Support Intervention
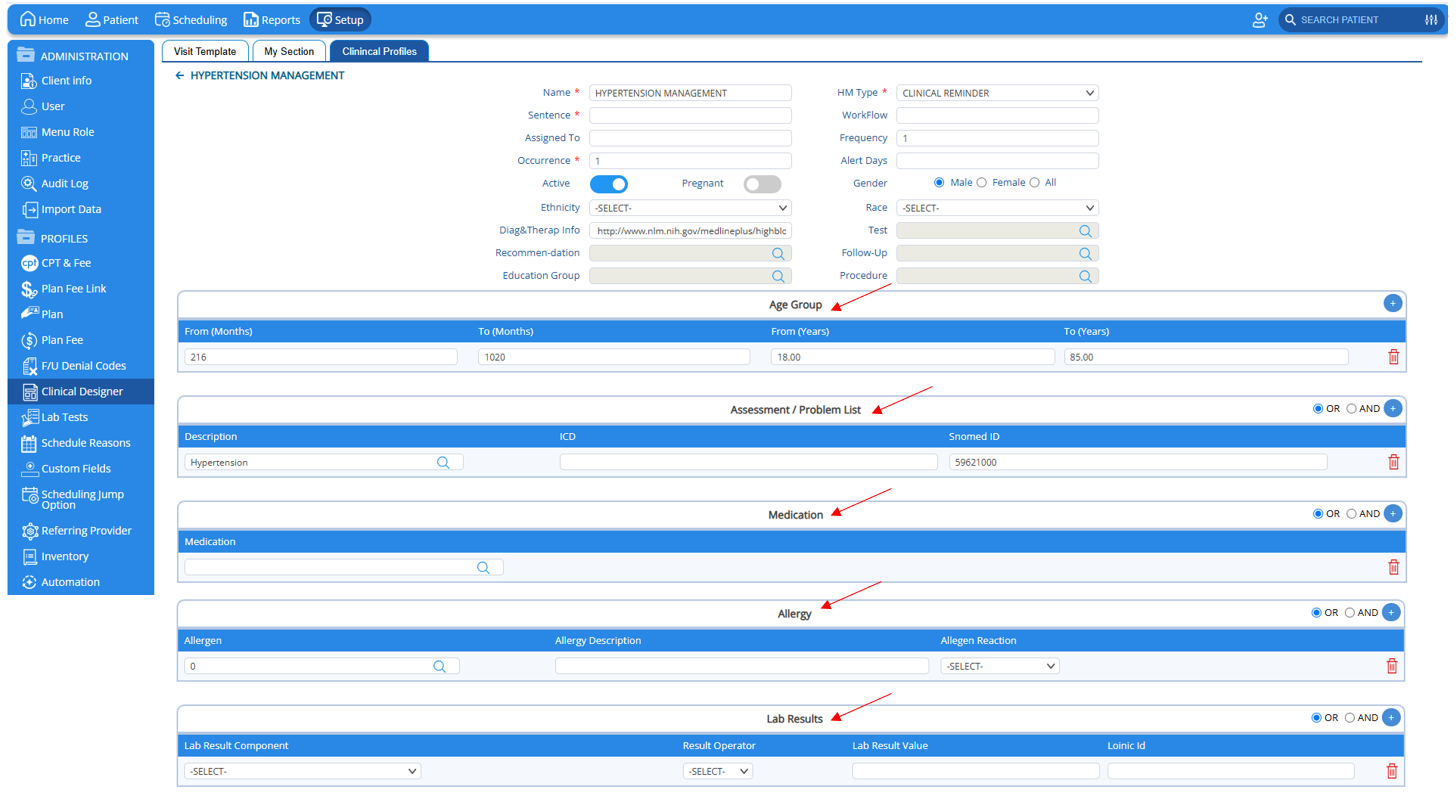
3. Set Up Decision Support Intervention Rules:
- Define rules based on specific patient data, including:
- Demographics: Age, gender, race, ethnicity.
- Clinical Data: Allergies, medications, lab results, implantable devices.
- Patient-Reported Information: Questions or concerns shared by the patient.
4. Setup the Outcome based on the rules:
Outcomes in EBDSI are the actions or recommendations generated when a patient meets certain predefined conditions. The following outcomes can be configured:
- Order Test: Order a diagnostic test when required (e.g., HbA1c for diabetes management).
- Order Procedure: Suggests specific procedures based on patient conditions (e.g., colonoscopy for patients over 50).
- Recommendation: Displays clinical advice or reminders (e.g., lifestyle changes, vaccination recommendations). The end user will be able to locate these in the clinical note under Treatment plan > Care plans.
- Follow-Up: Alerts providers to schedule follow-up appointments or monitoring (e.g., repeat lab tests in 3 months).
- Education: Provide education to the patient.
5. Save and Apply Rules: Once configured, these rules will automatically trigger alerts whenever a matching patient chart is opened.
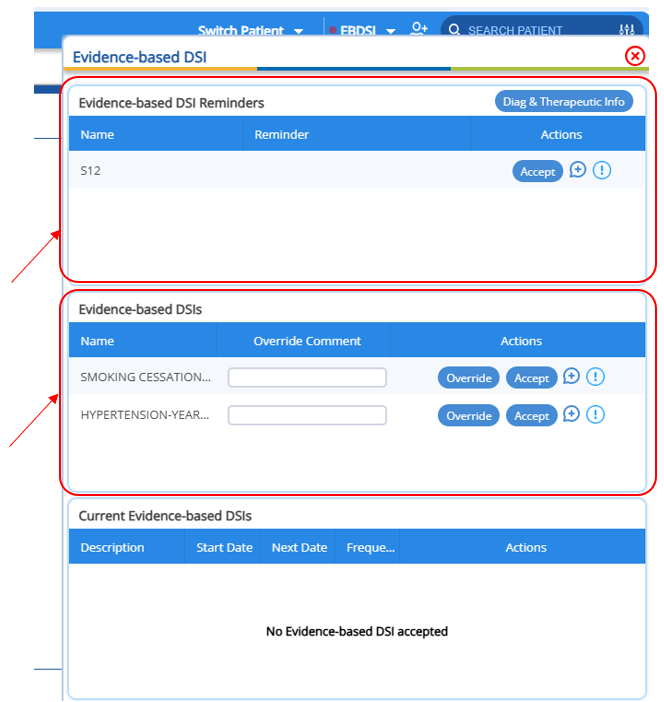
EBDSI Alerts
- Upon patient selection If applicable interventions or reminders exist for the selected patient, the EBDSI dropdown will automatically appear at the top of the chart.
- The dropdown button will also blink if there are urgent or actionable alerts that require attention.
How to Interact with EBDSI Alerts
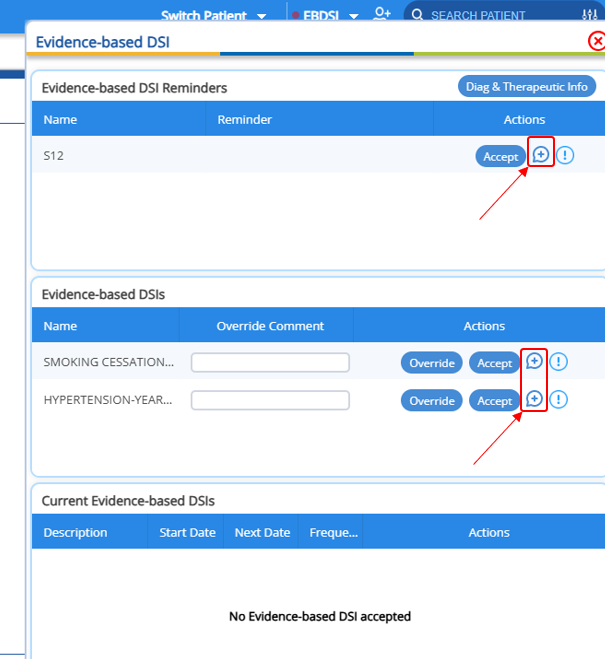
When an alert is triggered, the EBDSI dropdown provides several options for managing Decision Support interventions:
Steps to Manage EBDSI Alerts:
1. View Alerts:
- Open the EBDSI dropdown to see all active Decision Support interventions for the patient.
- Each alert includes details and the source of the recommendation.
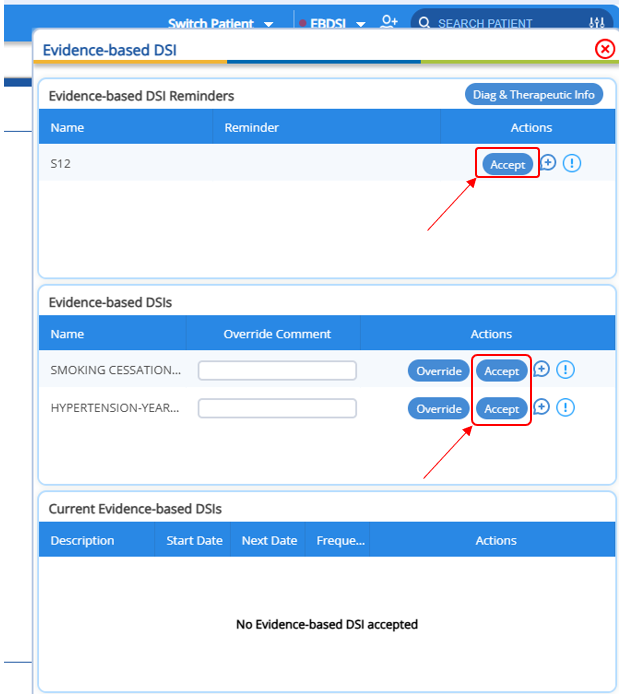
2. Take Action:
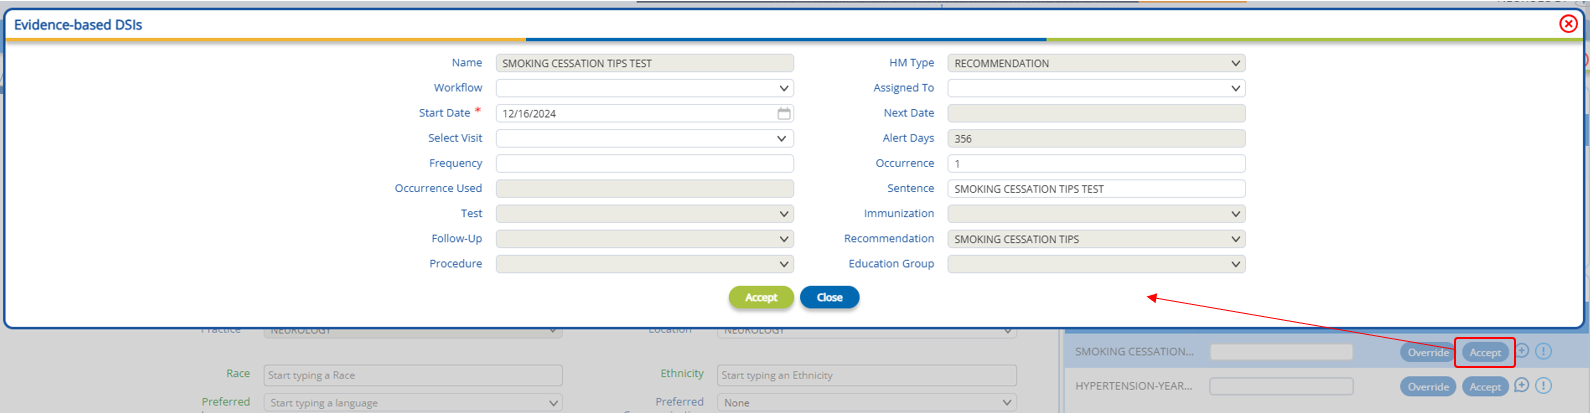
- Accept an Intervention:
- Click “Accept” to add the intervention to the patient's current Interventions.
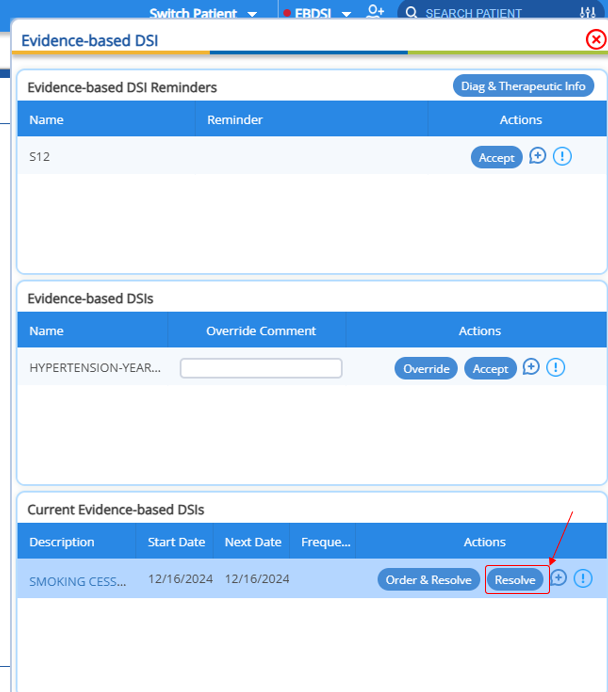
Resolve an Intervention:
Once the intervention is accepted it can be "Resolved" or can also be “Order and Resolved”.
"Resolve" will not order Outcome Actions on patient.
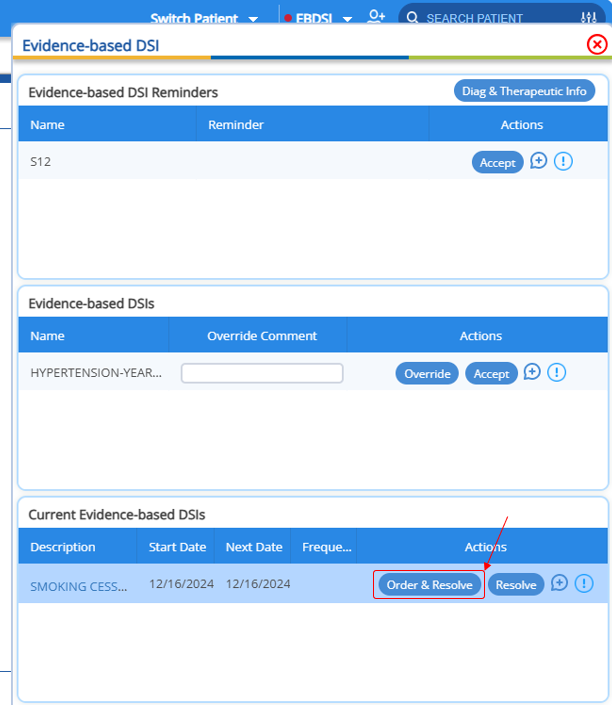
However, “Order and Resolve” will also order all the outcomes associated with the Intervention.
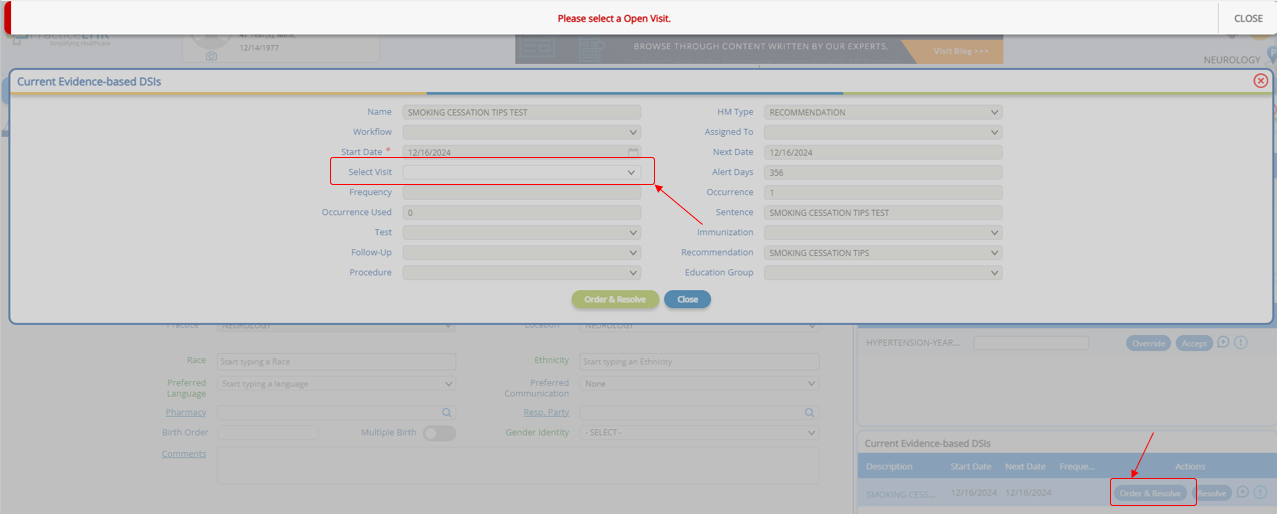
In order to “Order and Resolve” an open patient visit must be linked with the intervention or if the Open visit is not linked if a patient visit is opened then all the outcome orders will be added to that visit.
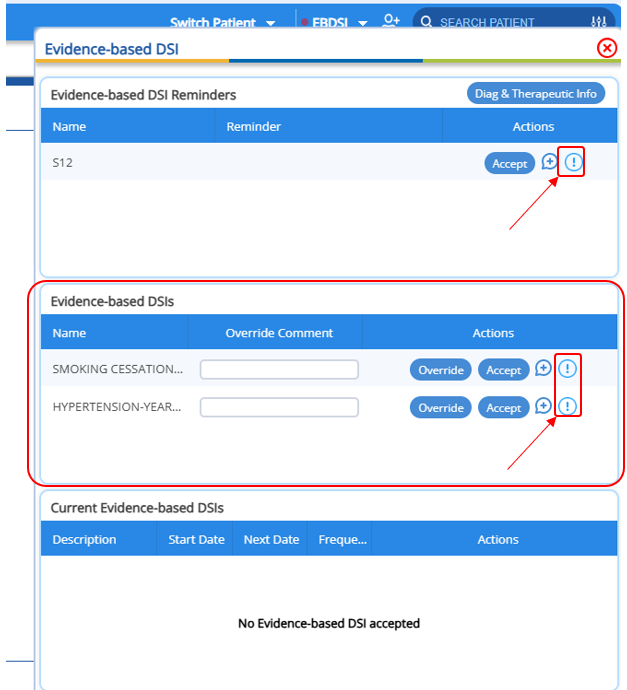
- Ignore an Intervention:
- Provider can “Ignore” the alerts that are not applicable.
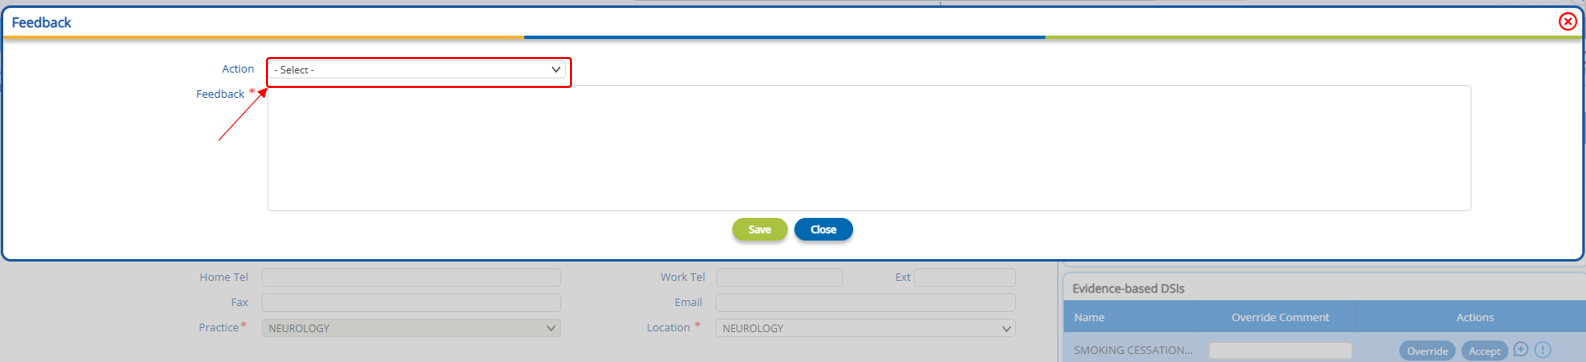
- Provide Feedback:
- Click the feedback icon to share detailed input on the recommendation or alert.
- All feedback is recorded for future reference.
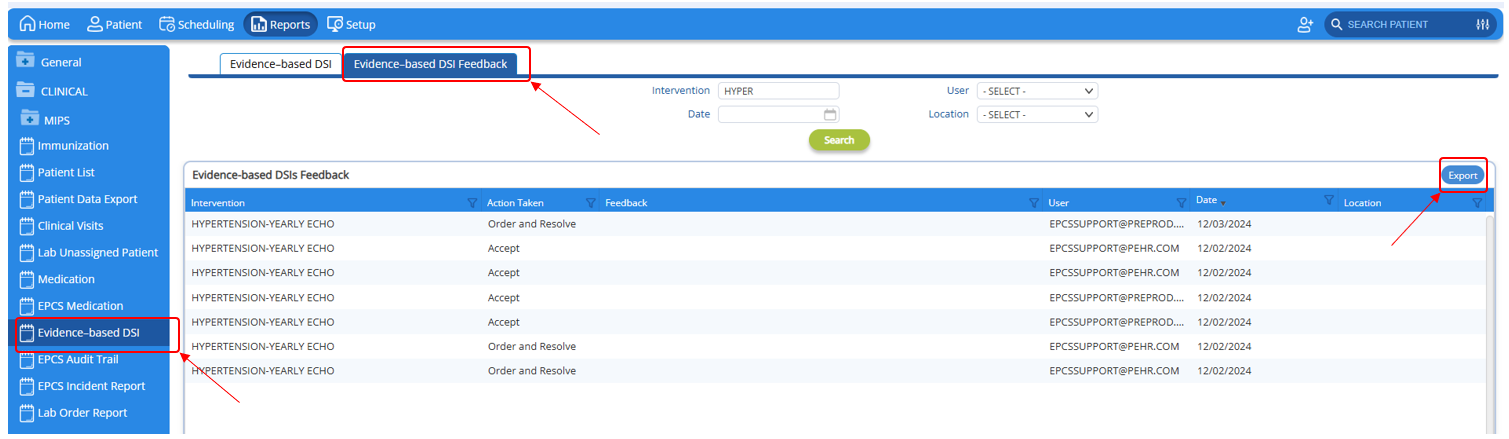
Reporting
EBDSI includes robust reporting features to track interventions, provider actions, and overall impact on patient care.
Steps to Access EBDSI Reports:
1. EBDSI Feedback Report:
- Go to Reports > Evidence Based DSI > Evidence Based DSI Feedback
- Review logged actions such as accepted interventions, ignored alerts, and submitted feedback.
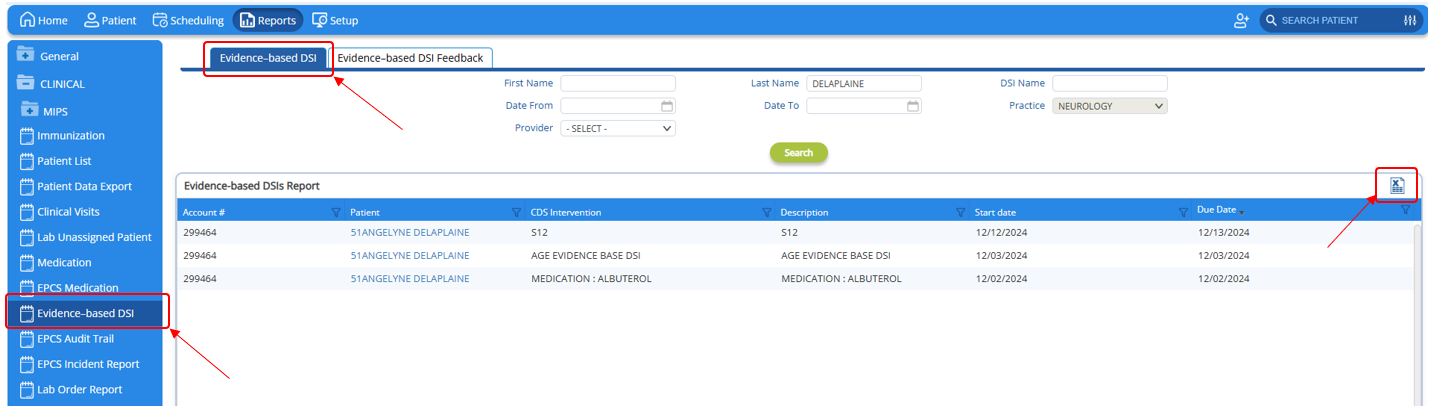
2. EBDSI Patient Interventions Report:
- Go to Reports > Evidence Based DSI > Evidence Based DSI
- View detailed data on all current interventions across the patient population.
- Use filters such as date range, provider name, or intervention type for targeted analysis.
Export Reports:
- Both reports can be exported in PDF or CSV format for further review and sharing.
Next Steps
- For questions or further assistance, contact our support team.
2. MACRO ENHANCEMENTS
Overview
We are excited to announce significant enhancements to the MACRO module in Practice EHR, designed to improve functionality, flexibility, and user experience. These updates address previously unavailable features and introduce advanced options to streamline workflow and documentation processes.
Key Enhancements
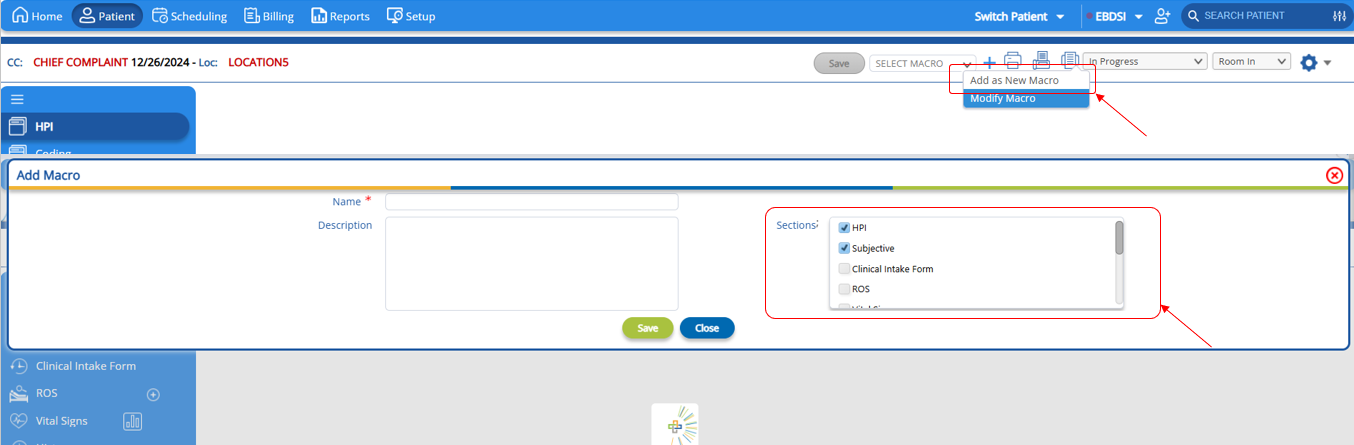
1. Section-Specific Macro Creation and Updates
- What’s New: Users can now create or update macros specific to individual sections within a visit.
- Previously, macros could only be created or updated at a general level, without the ability to target specific sections.
- This enhancement enables users to tailor macros for areas such as HPI, Physical Exam, or any other section, providing greater precision and customization.
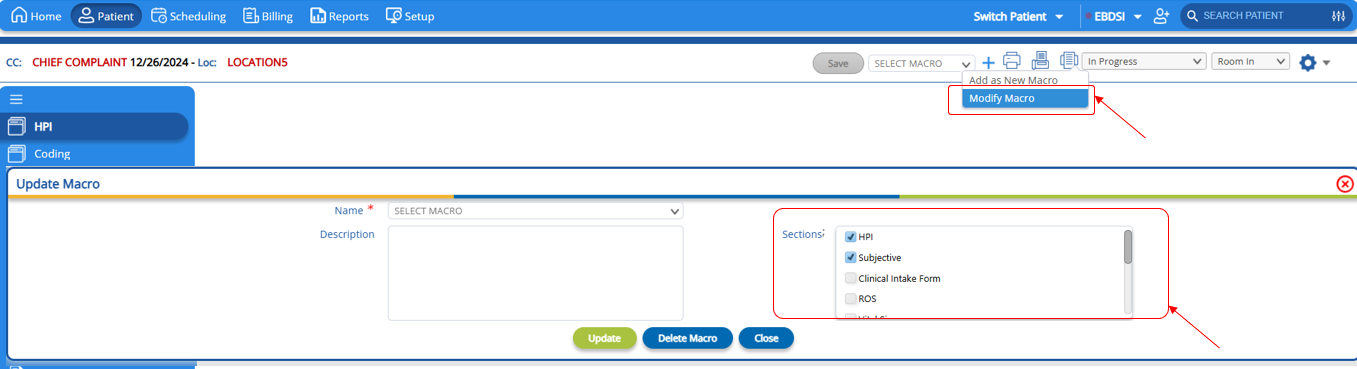
2. Adding New Sections to Existing Macros
- What’s New: Users now have the ability to add new sections to existing macros.
- This feature enhances the flexibility of macros by allowing updates to accommodate evolving documentation needs.
- Existing macros can be expanded without recreating them, saving time and effort.
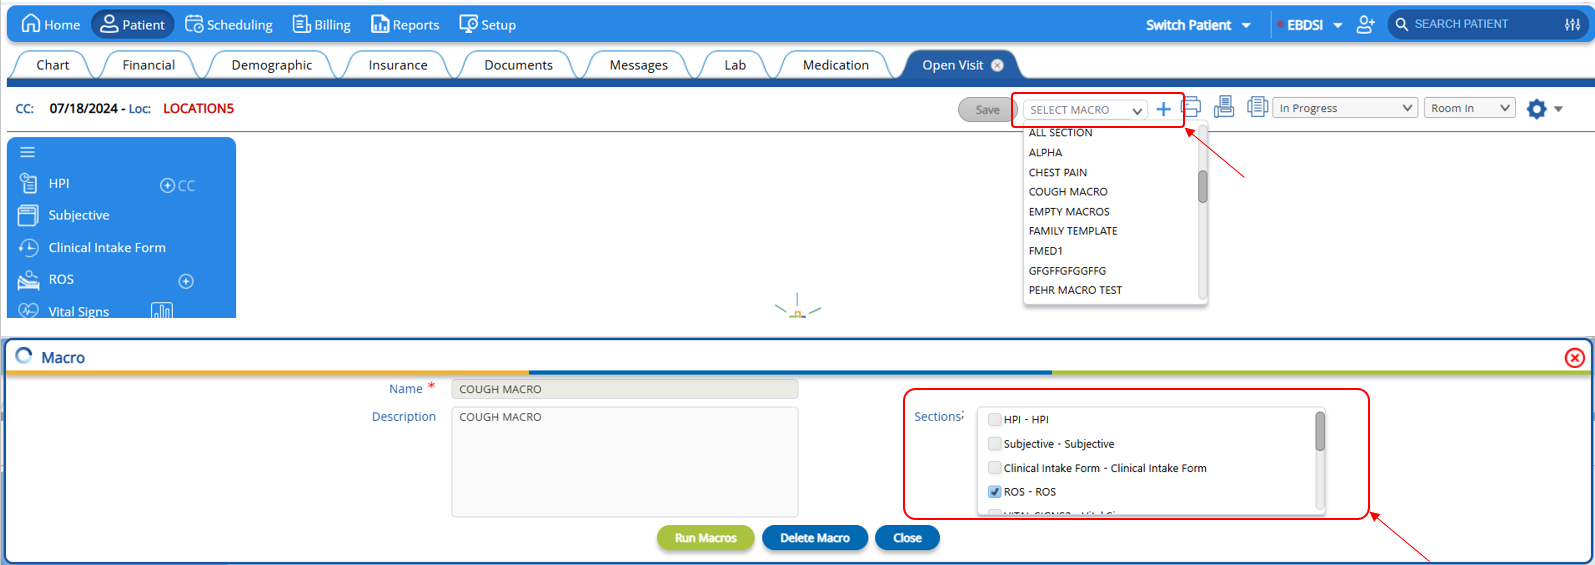
3. Section-Specific Macro Application During Visits
- What’s New: Users can now selectively apply certain sections of a macro during a visit.
- Previously, applying a macro automatically applied all included sections, without the option to exclude specific ones.
- This improvement provides greater control over the application of macros, ensuring only relevant sections are included based on the context of the visit.
4. Automatic Addition of Chief Complaints (CC), ROS, and Physical Exams
- What’s New: If a macro is designed for the HPI, ROS, or Physical Exam sections and includes new data:
- For HPI: If a new Chief Complaint (CC) is added and recorded in the macro, applying the macro to a visit without that CC will automatically add the CC and populate the associated data.
- For ROS: If a new Review of Systems (ROS) item is added and recorded in the macro, applying the macro to a visit without that ROS will automatically add the ROS and populate the associated data.
- For Physical Exam: If a new Physical Exam item is added and recorded in the macro, applying the macro to a visit without that item will automatically add it and populate the associated data.
- This enhancement ensures seamless integration of missing data, improving accuracy and reducing manual input.
Benefits of These Enhancements
- Improved Customization: Tailor macros for specific sections and update them to meet changing needs.
- Enhanced Workflow Efficiency: Quickly update or expand existing macros without recreating them from scratch.
- Greater Control: Apply only the necessary sections of a macro during visits, ensuring documentation relevance.
- Seamless Data Integration: Automatically include missing Chief Complaints and associated data, reducing manual effort and errors.
How to Use These Enhancements
1. Creating Section-Specific Macros:
- Navigate to the Macro creation screen.
- Select the desired section for which the macro should apply.
- Configure and save the macro as usual.
2. Updating Existing Macros:
- Open an existing macro.
- Add new sections or modify existing ones as needed.
- Save the changes.
3. Applying Macros During Visits:
- Select a macro from the list during a visit.
- Choose the specific sections to apply or exclude as needed.
- Confirm the application.
4. Automatic Chief Complaint Addition:
- When applying a macro to HPI or Physical Exam sections, any missing CCs will be automatically added to the visit along with the macro data.
3. EDI ENROLMENT ENHANCEMENTS
Overview
We have introduced significant updates to the EDI enrollment process to improve usability, accessibility, and functionality. These changes include a new menu location, integration of enrollment tickets with the Plan Detail window, and enhanced interaction options for clients. Below is a detailed breakdown of the updates:
Key Benefits of the Updates
- Improved Navigation: Centralized menu for all EDI enrollment activities.
- Enhanced Visibility: Plan-specific enrollment tickets and their progress are easily accessible from the Plan Detail window.
- Streamlined Interaction: Clients can choose to interact with support based on specific plan needs or through a general menu option.
- Flexibility: Multiple options for creating new tickets ensure adaptability to different workflows.
What’s New
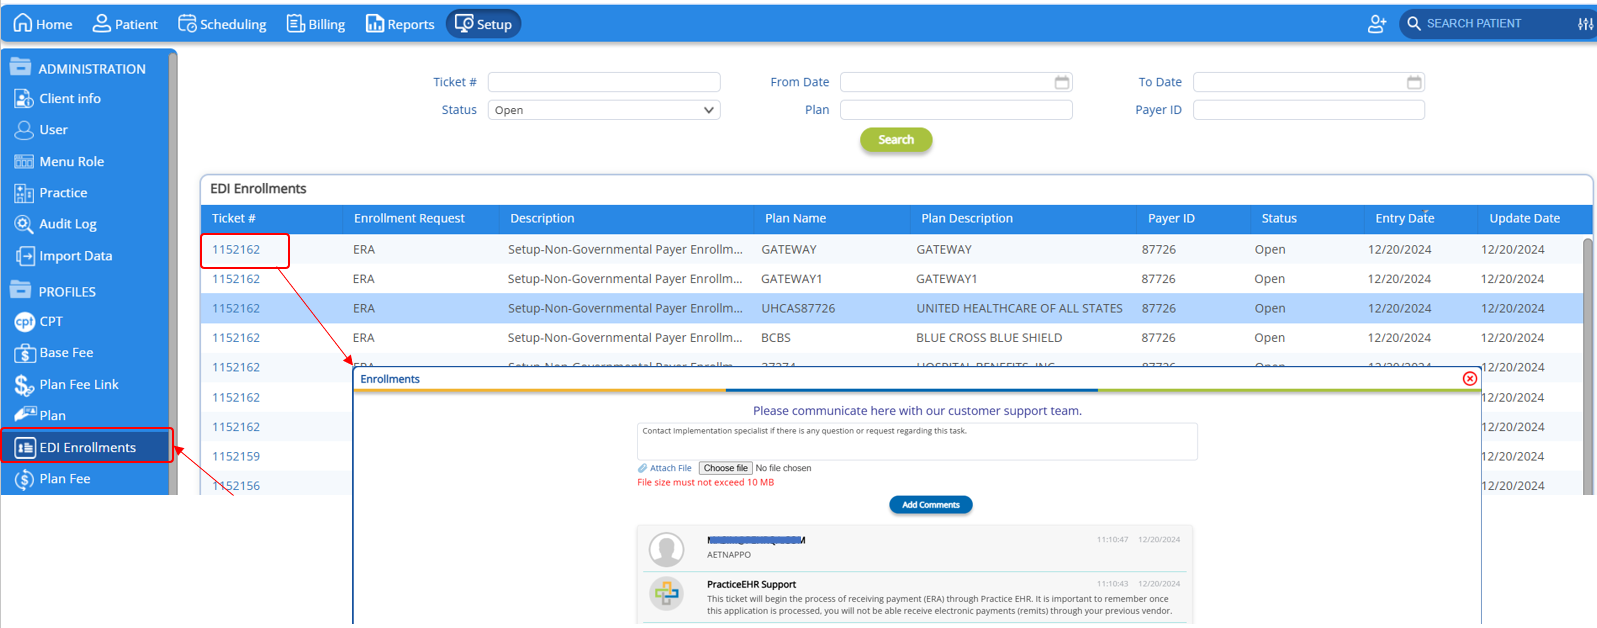
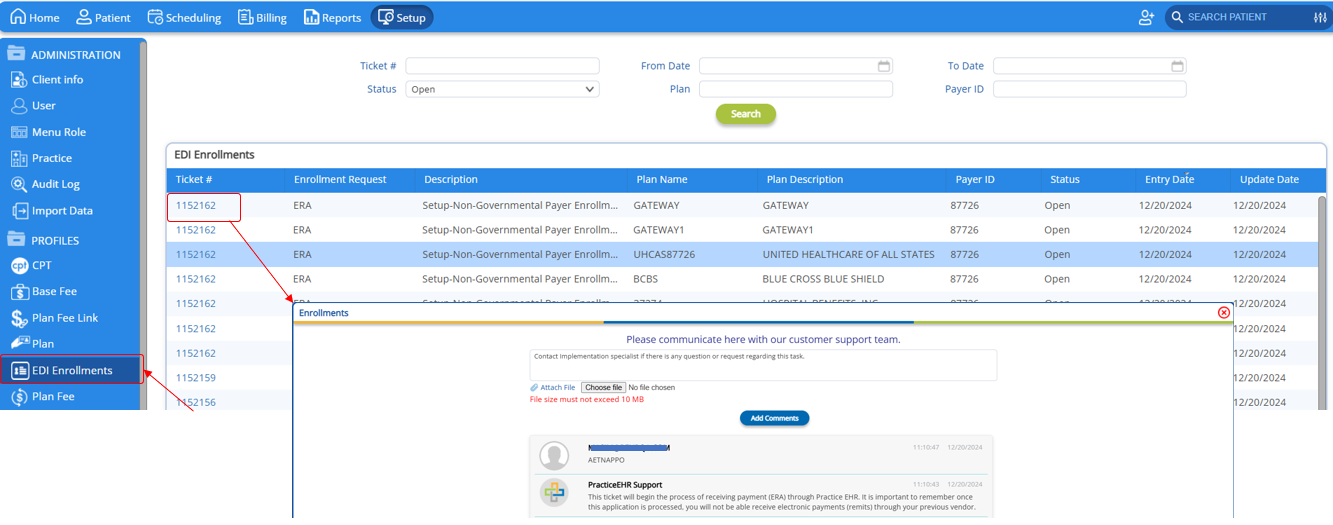
1. New Menu Location for EDI Enrollments
- Previous Location: SUPPORT CENTER > SYSTEM SETUP.
- New Location: SETUP > EDI ENROLLMENTS.
- All EDI enrollment tickets are now consolidated under this menu for streamlined access.
- This change ensures easier navigation and centralizes all enrollment-related tasks.
- Client can also interact on the progress and updates on these tickets directly from this menu
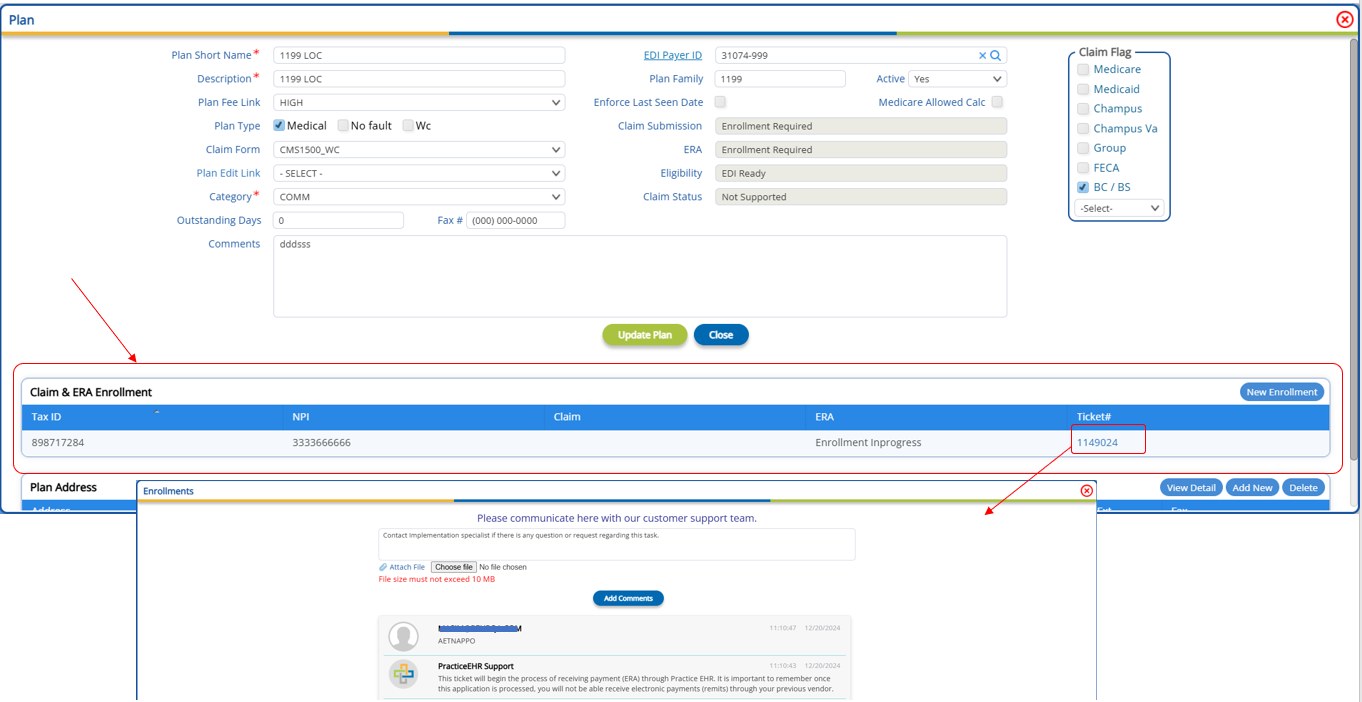
2. Integration with Plan Detail Window
- Enrollment Tickets Grid:
- A new grid has been added to the Plan Detail window.
- This grid displays all enrollment tickets associated with a specific plan.
- Key details such as ticket status and progress are readily visible.
- Client Interaction:
- Clients can interact directly with support by opening enrollment tickets from the Plan Detail window.
- This enhancement allows for more focused and plan-specific support interactions.
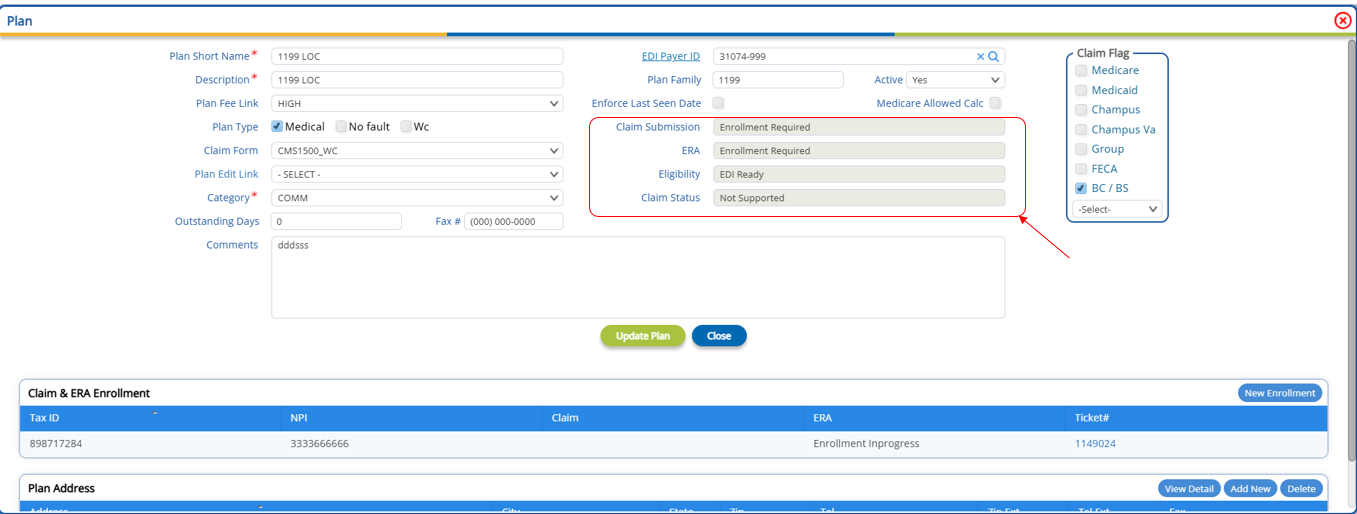
- Updated Status of Enrollments:
- Most recent updated status of enrollments are now available in the plan details windows as follows;
3. New Ticket Creation Options
- Clients can now open new EDI enrollment tickets directly from:
- The Plan Detail section for plan-specific enrollment needs.
4. UPDATE TO ENCOUNTER FORM AND FINANCIAL VISIT INTEGRATION
Overview
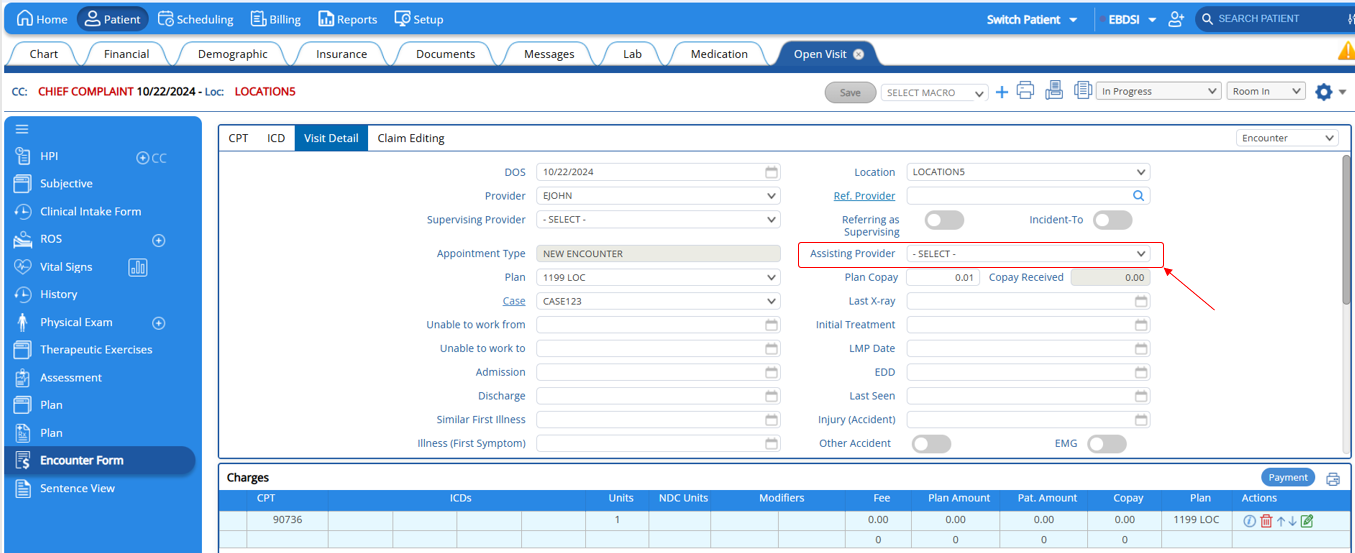
We have introduced a new field, Assisting Provider, to the Encounter form to enhance reporting capabilities and streamline workflows.
- Encounter Form Enhancement:
The Assisting Provider field is now available in the Encounter form. Users can populate this field to indicate the supporting provider for the encounter.
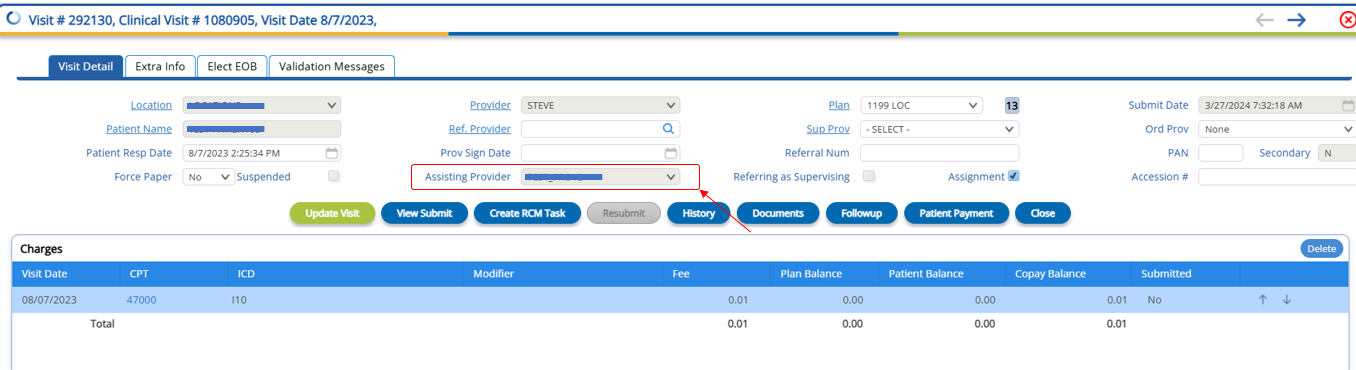
- Financial Visit Integration:
When an encounter is marked as Ready to Bill, the corresponding Financial Visit will automatically inherit the value from the Assisting Provider field in the Encounter form.
This change ensures consistency between the Encounter and Financial Visit records, improving data accuracy and simplifying reporting for billing processes.
5. CLINICAL DESIGNER UPDATES AND NEW CLINICAL PROFILES
Overview
Feature Update: Transition from Visit Templates to Clinical Designer
We have renamed Visit Templates in the Setup section to Clinical Designer to better reflect its expanded functionality. Alongside this renaming, we have introduced several new clinical profiles to enhance customization and documentation within Practice EHR.
Key Changes:
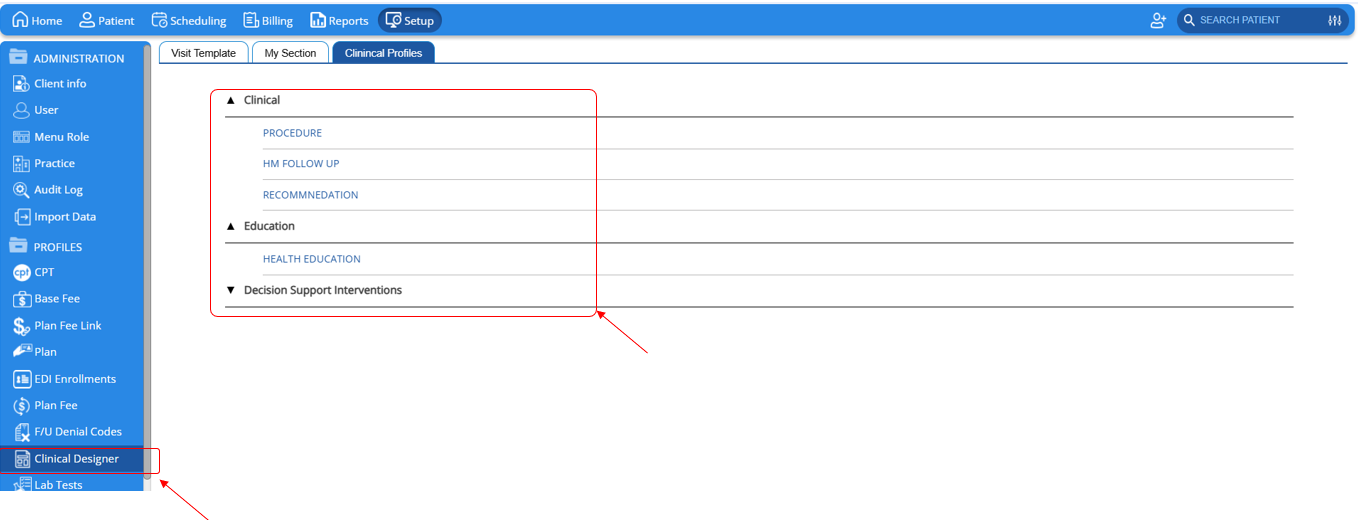
1. Renaming of Visit Templates to Clinical Designer:
- The Visit Templates section in Setup is now renamed to Clinical Designer.
- This change aligns with the enhanced scope of the tool, focusing on designing and managing clinical workflows and templates.
2. Introduction of New Clinical Profiles:
Under Clinical Designer > Clinical Profiles, the following new profiles have been added:
- Procedure:
- Allows practices to create templates for documenting procedures efficiently.
- Facilitates standardized procedure notes for accurate record-keeping and billing.
- HM Follow-Up (Health Maintenance Follow-Up):
- Provides templates for tracking and managing follow-up visits related to health maintenance activities.
- Ensures continuity of care and adherence to preventive health protocols.
- Recommendations (Care Plans):
- Enables providers to document personalized patient recommendations, such as lifestyle modifications or treatment plans.
- Improves patient engagement and care outcomes.
- Health Education:
- Offers templates for documenting educational resources provided to patients.
- Supports patient awareness and informed decision-making about their health.
6. SYSTEM SETUP ENHACEMENTS
Overview
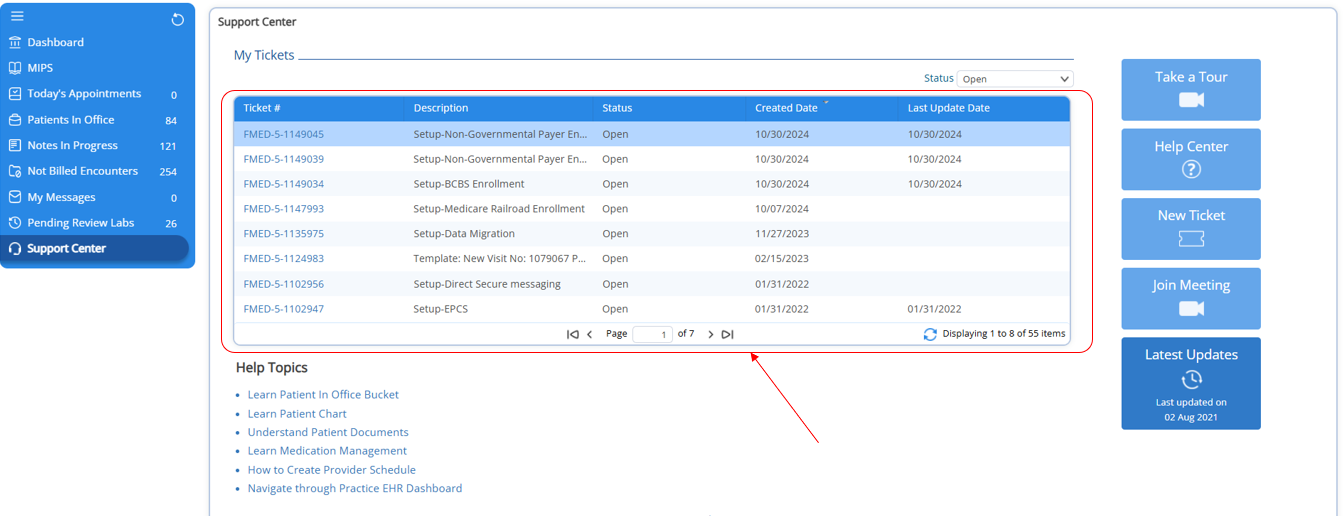
The "System Setup" button will no longer be available in the Support Center, and all its functionalities have been relocated to relevant sections within Practice EHR. These options have been reorganized into the following areas for enhanced visibility and accessibility:
Support Center Grid Updates
- Implementation-type tickets are now displayed directly in the Support Center grid, enabling users to monitor their status more efficiently.
EDI Enrollment Improvements
- EDI Enrollment-related tickets are accessible under Setup > EDI Enrollments for better organization and navigation.
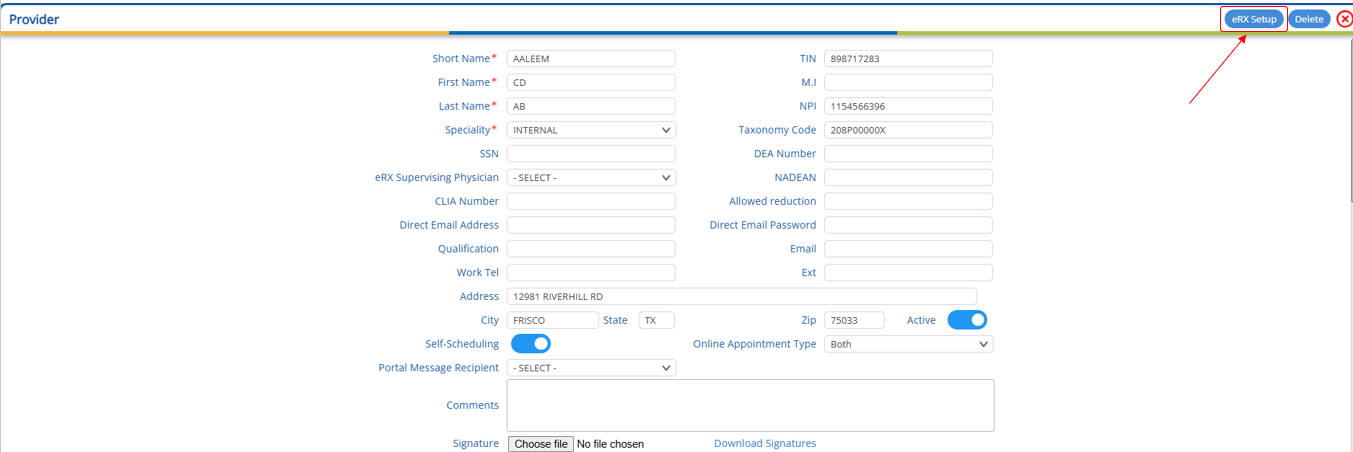
eRX Setup Integration
- eRX setups can now be initiated directly from the Provider Profile window through the new "eRX Setup" button.
- NPI Validation: Clicking the button will validate the NPI. If there is a mismatch between the NPI registry information (provider's first name, last name) and the profile details, the system will display the following message:
"The information provided does not match the NPI registry extract."
- Once validations are completed, an implementation ticket will be generated, similar to the previous workflow.
NPI Field Restriction for Surescripts-Enabled Providers
- The NPI field is now disabled for providers already enabled in Surescripts, ensuring data integrity and preventing unnecessary changes.
7. MISCELLANEOUS CHANGES
Overview
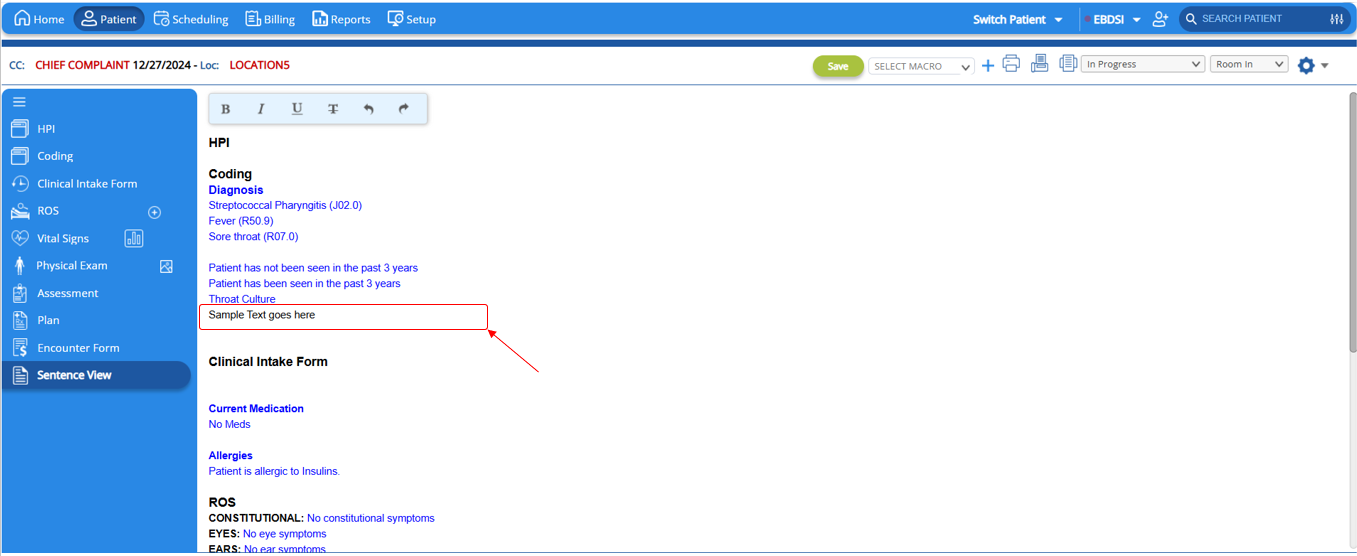
Sentence View Update
1. Editable Text Improvements
- Blue text in the Sentence View is now non-editable, ensuring better clarity and consistency.
- Users can now directly add text to the Sentence View. Any new additions will appear in black text, which can be added or removed as required.
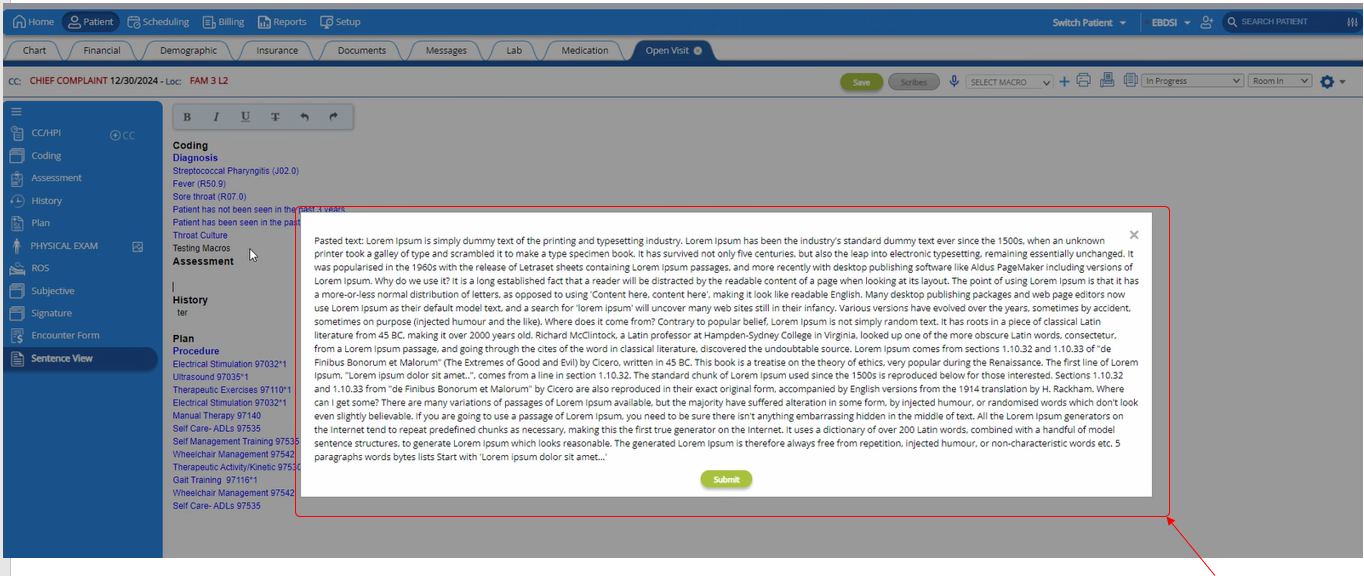
2. Copy-Paste Confirmation
- To enhance user control, a confirmation dialog is now displayed whenever content is copied and pasted into the Sentence View. This ensures that only intended changes are applied.
These updates aim to improve the usability and precision of the Sentence View functionality.
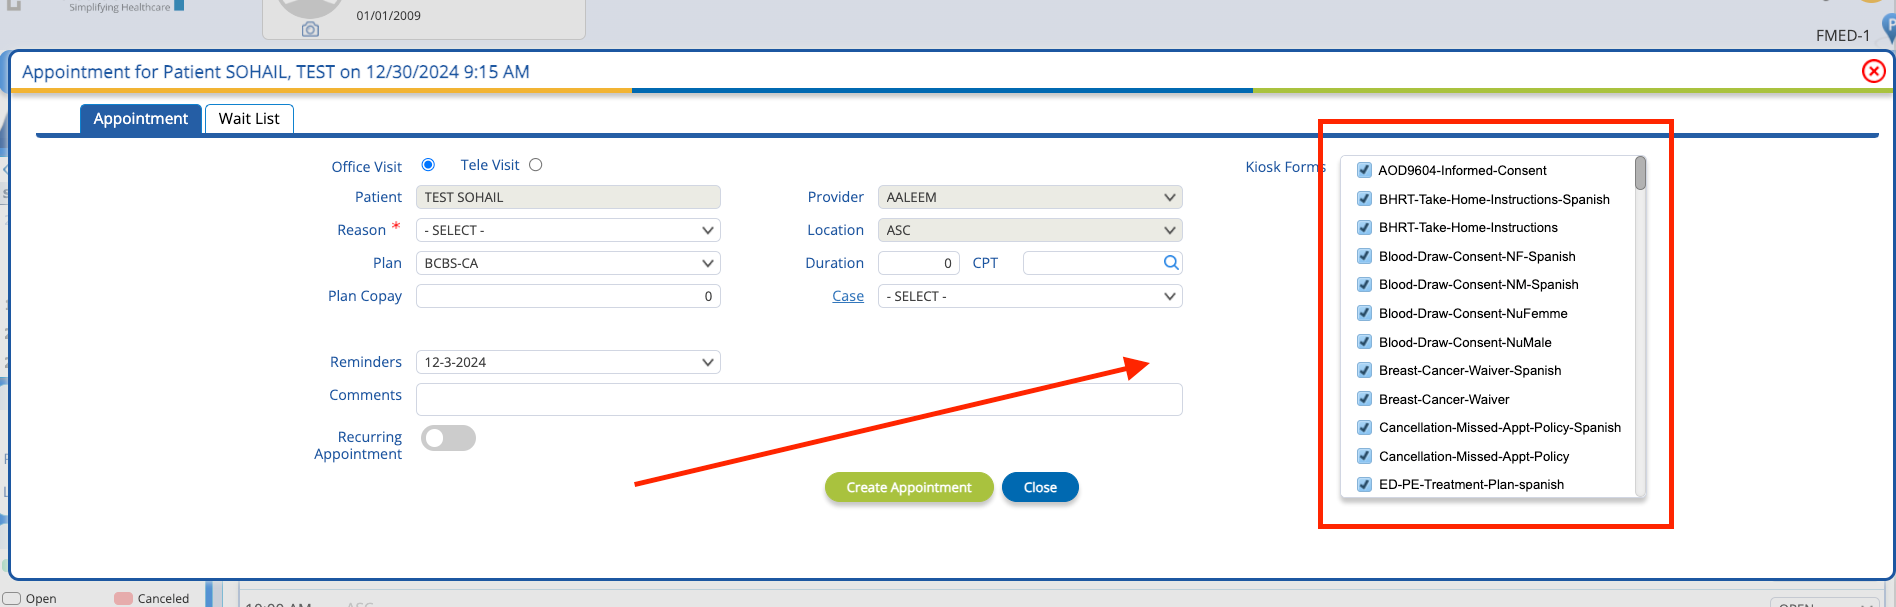
Patient and Kiosk Form Update
The form boxes in Patient and KIOSK views have been expanded to enhance readability and ease of interaction.