
1. ADDRESS AUTO FILL
Practice EHR is now linked with the Google API for retrieving physical addresses. As a user begins to type an address in the patient demographic window, for example, the system will display valid addresses based on the information provided.
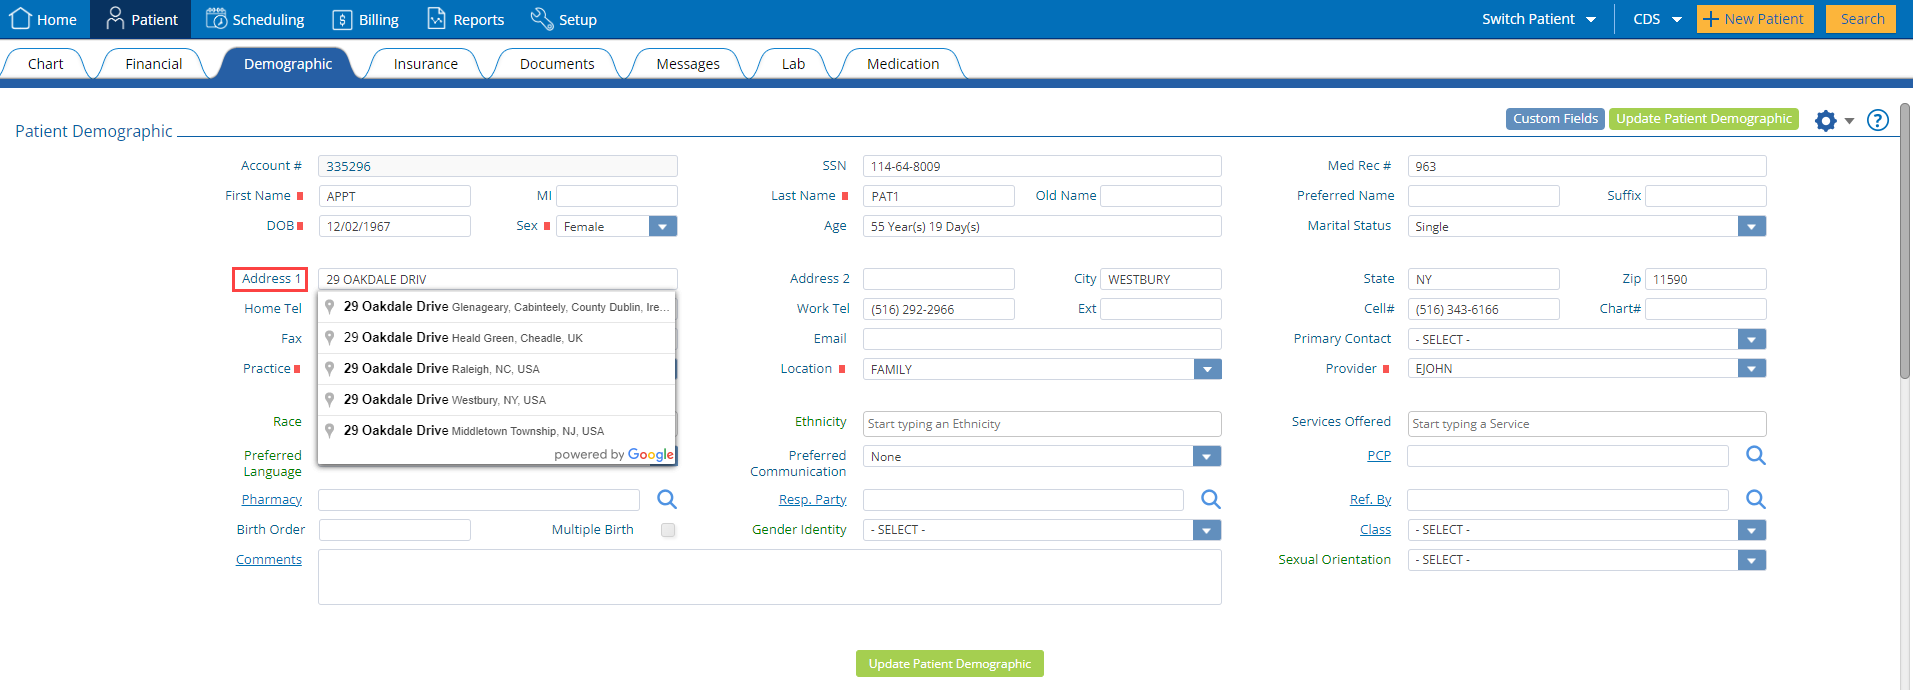
The Google API will display the address, city, state and zip code based on the user’s input. Selecting an address from the Google API linked field will also populate the city, state and zip code fields as well.
The windows and fields updated with this functionality are specified below:
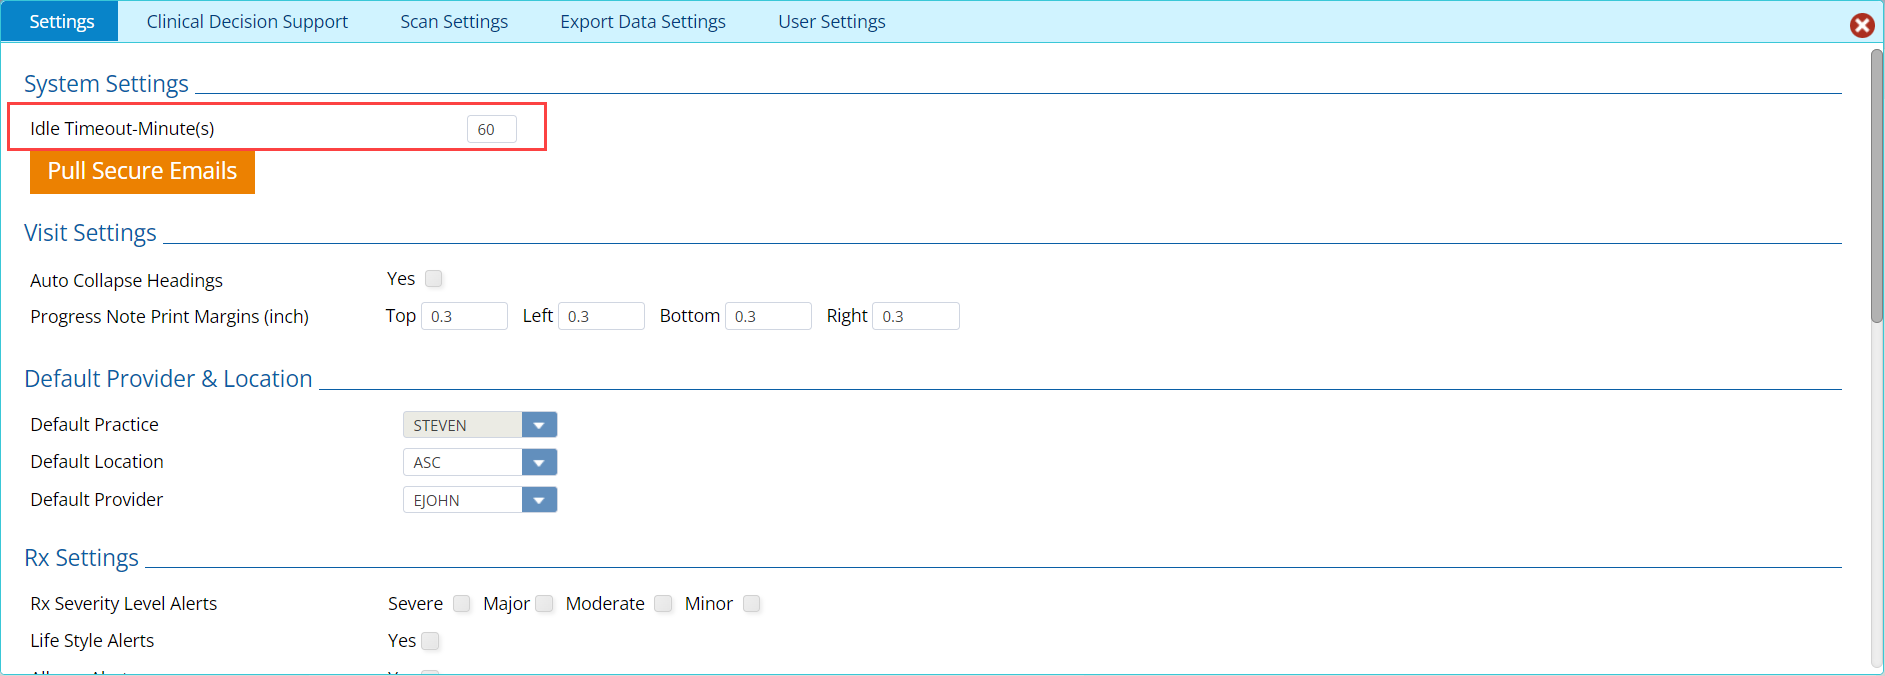
2. IDLE TIMEOUT RULES REVISION
The maximum amount of time the user can remain idle has been reduced from 120 minutes to 60 minutes. User can setup there required "Idle Timeout-Minute(s)" in setting window. If no "Idle Timeout-Minute(s)" is setup, it will be 60 minutes by default.
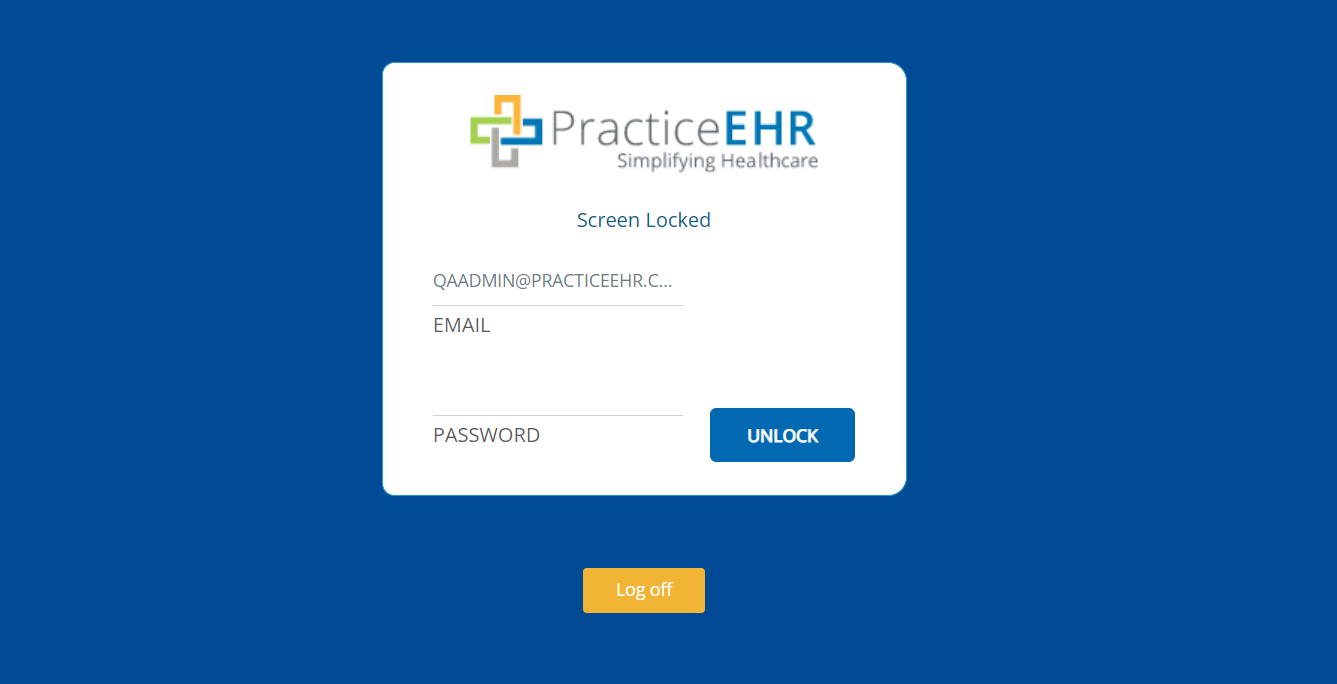
If the user remains idle for more than the idle time the application will go back to lock window.
Lock window will remain for 60 mins and after that the login window will appear.
3. PREFERRED BROWSER NOTIFICATION
Practice EHR is best supported using either the Chrome or Safari browsers. To ensure the best user experience, the Practice EHR application will now generate an alert message at the time of login, to alert the user if the application is being run on an unsupported browser.
The message states: "You are using an unsupported browser and you may experience issues. Please use a supported browser Chrome / Safari"
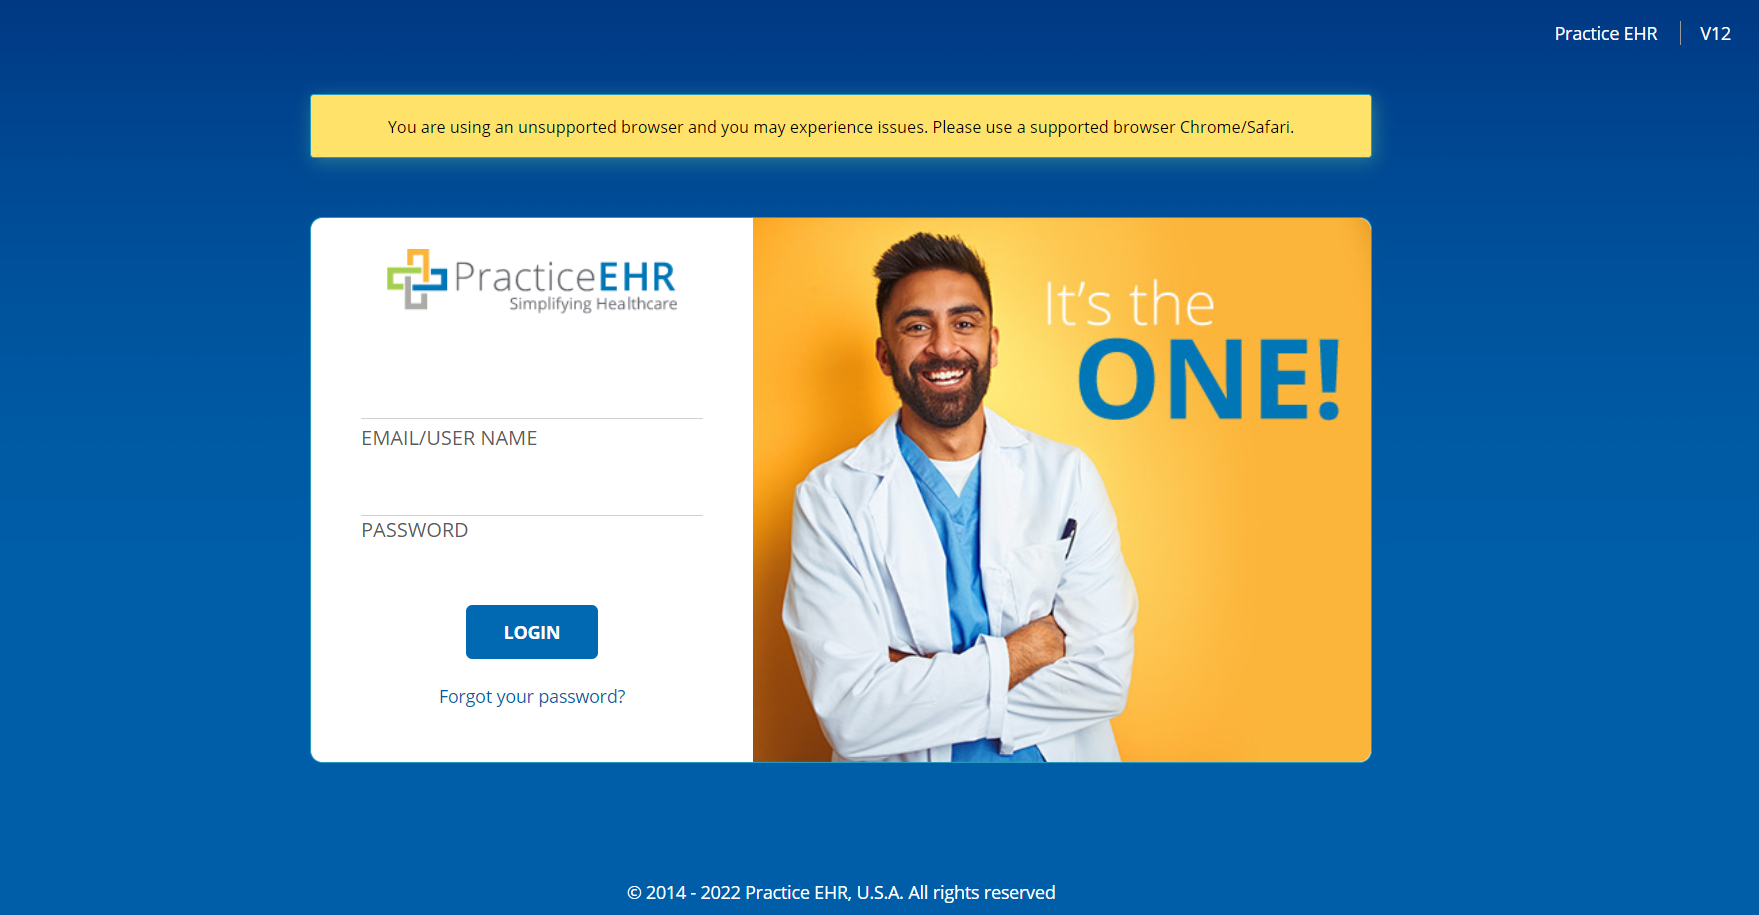
Note: The application will still run-on unsupported browsers but it's not recommended.
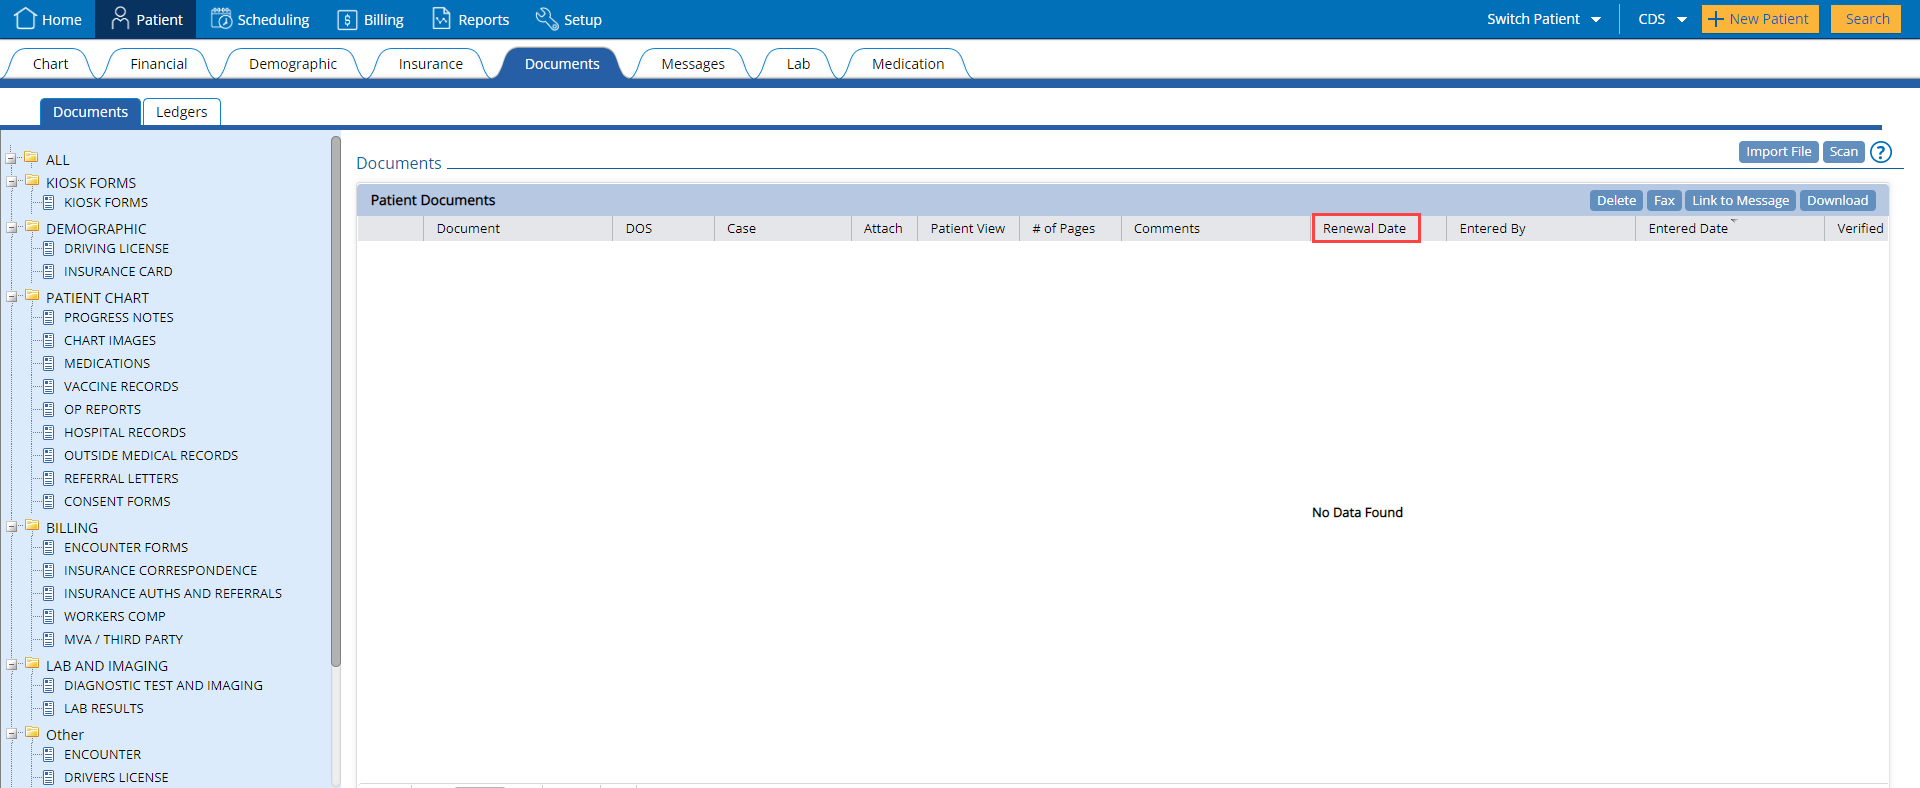
4. PATIENT DOCUMENT RENEWAL REMINDERS
“Renewal Date” field has been added in the patient document window that will help the practice to make sure they get the new documents from the patient timely.
User can contact support to setup the “Renewal Days” for each document types they want and based on “Renewal Days” assigned to the document type the system will assign renewal date to the documents.
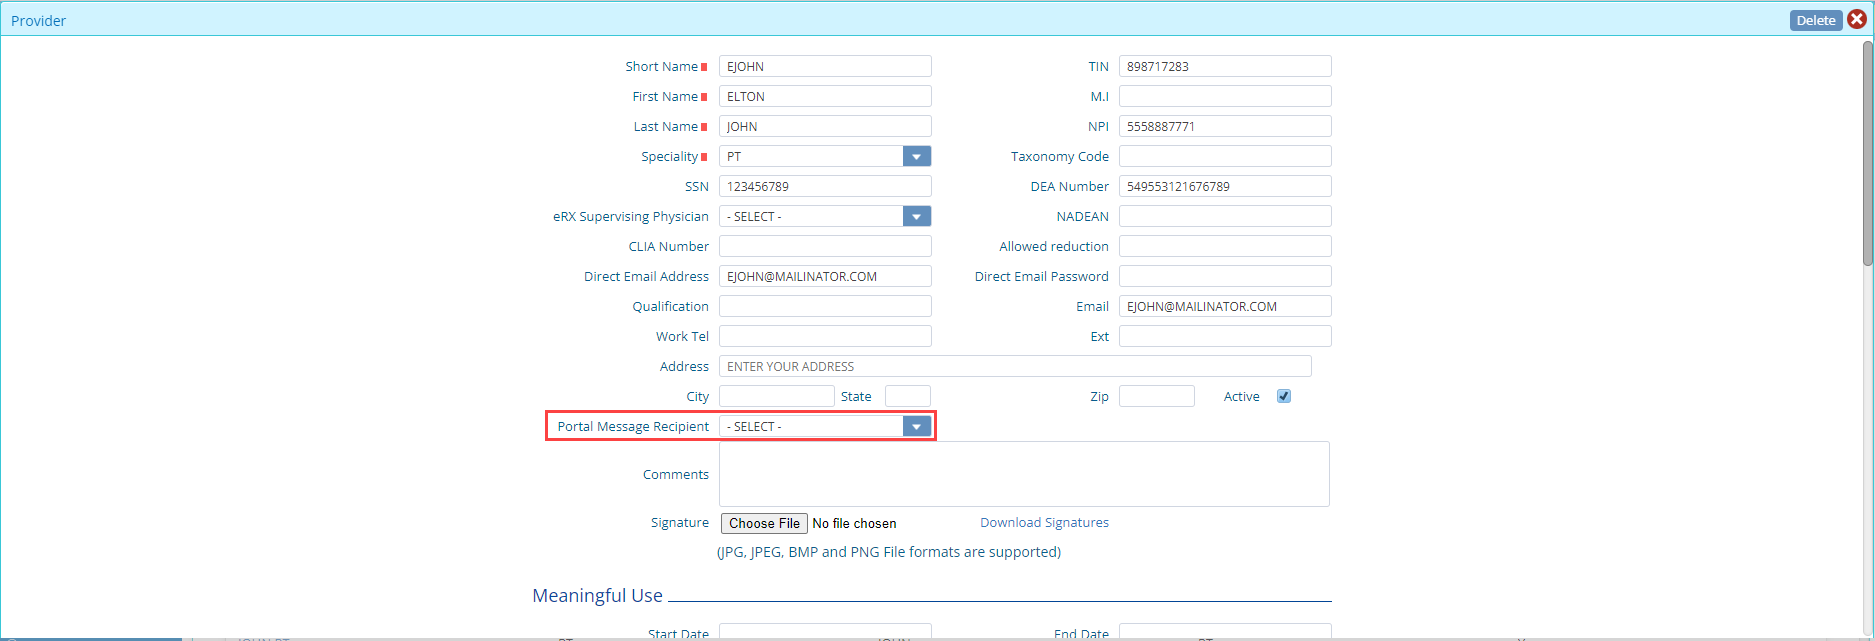
System will automatically generate patient messages, 15 days ahead of the document “Renewal Date” will assign the messages to the user configured in the “Portal Message Recipient”. If no “Portal Message Recipient” is configured the message will still be generated but will not be assigned to anyone.
For example, if a patient's HIPAA form must be signed annually, the system can remind the user when a patient needs to resign this form with the reminder set at 365 days.
Note: This feature will only work for all the new documents that are uploaded. It will not work for existing documents in Practice EHR
5. MIPS / HEALTH EFILINGS
Practice EHR has partnered with Health eFilings to provide the tracking and reporting services for Merit-based Incentive Payment System (MIPS) and other CMS compliance programs, enabling clinicians to avoid significant financial penalties.
Each practice that is eligible for MIPS will need to initiate a subscription with Health eFilings by contacting:
Once enrolled with Health eFilings, the practice dashboard can be accessed at: https://healthefilings.com/
Practice EHR will no longer independently provide the reports for MU or MIPS within Practice EHR. All clinical and financial records will be shared directly with Health eFilings for those clients with an active subscription to Health eFilings.
MIPS / Health eFilings
Practice EHR has updated all MIPS related areas within the system to communicate this partnership.
The meaningful use dashboard is now replaced with the “MIPS / Heath eFilings” dashboard. Users will be redirected to Health eFilings.
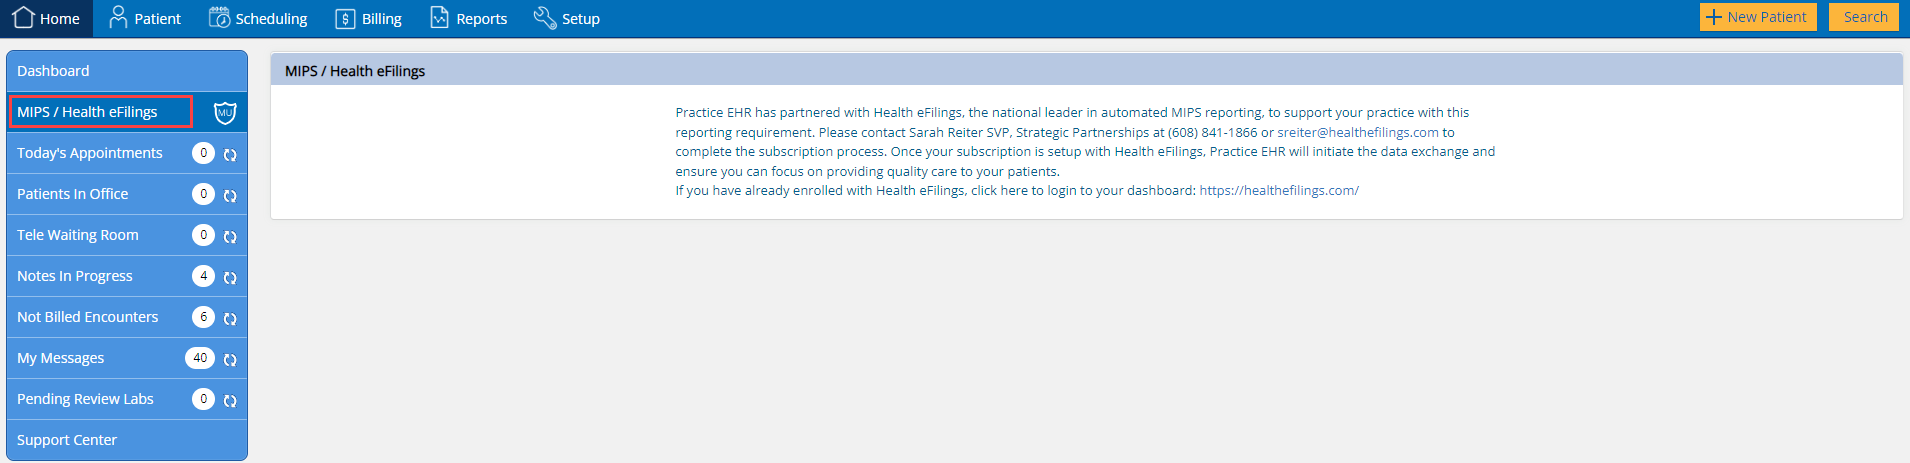
MIPS / Health eFilings Ticket
There is a new option within the “Practice Setup” menu for “MIPS / Health eFilings” as shown below.

This option can be used to communicate with our support team with regards to the user's Health eFilings subscription.
The following window will appear on clicking the “MIPS / Health eFilings” option. Here the user can communicate with the Practice EHR support team.

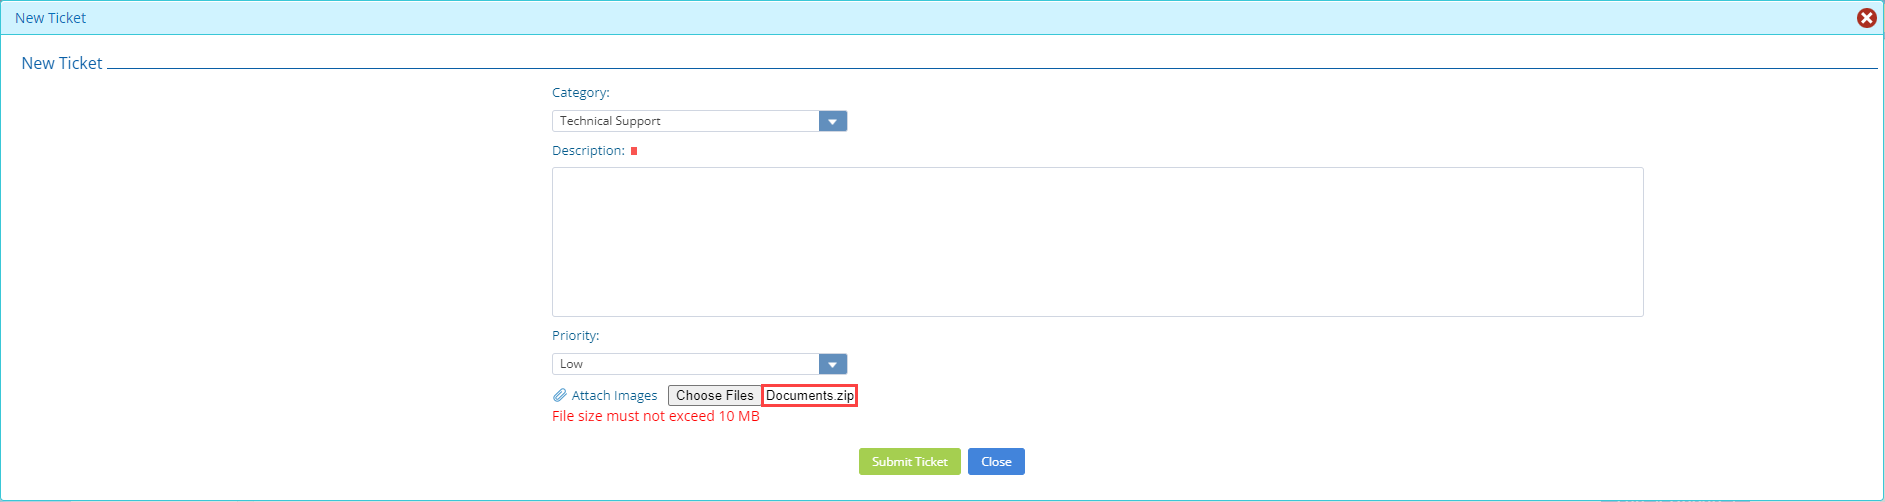
6. TICKET ATTACHEMENT ENHANCEMENT
Users can now attach zip files to a support or clinical support ticket, meaning multiple files can now be sent as a single zip file.
As shown below, a user will now be able to attach zip files to support tickets. Home > Support Center > New Ticket
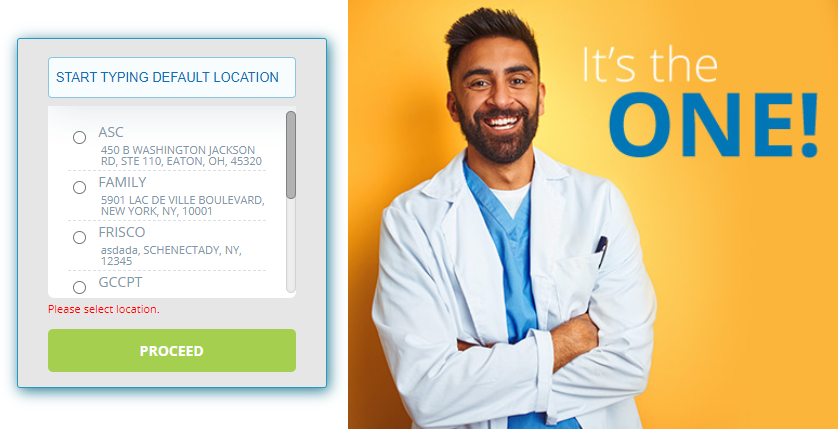
7. LOCATION SELECTION ON LOGIN
For clients with location selection on login enabled, it is now mandatory to choose a location from the login location selection menu.
The location chosen in the location selection menu on the login screen, will update the default location field in the “User Settings”.
8. ENHANCED MESSAGE COMMUNICATION
Messaging in Practice EHR has been updated for ease in communication. In the “Message Detail” window the value format of the “Assigned To” and “Assigned CC” dropdown fields across Practice EHR have been changed to include the “First Name”, “Last Name” and “Email Addresses” of users.
The new format for values in these two fields is as follows:
“Last Name, First Name Email Address”

9. SCHEDULING UPDATE
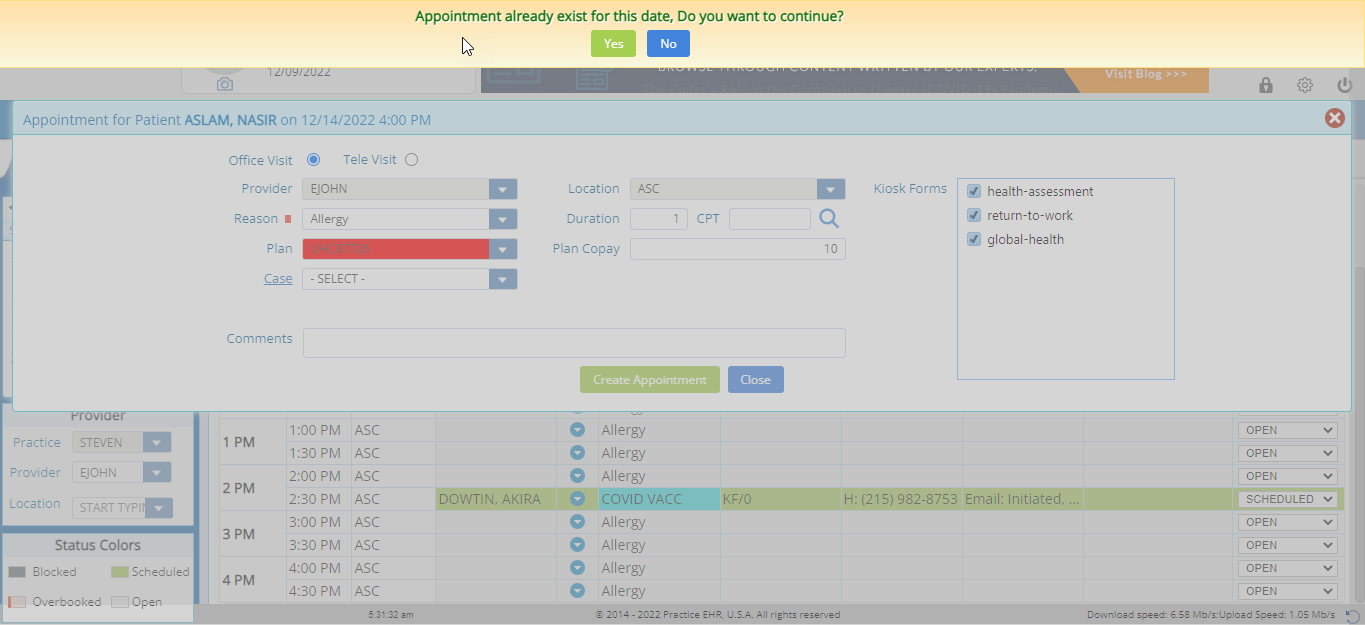
Existing Appointment Alert Message
A new alert message has been added in the scheduling module. This alert message displays when an appointment is being booked for a patient who already has an appointment scheduled on the same day.
The alert will state the following message: “Appointment already exists for this date. Do you want to continue?”
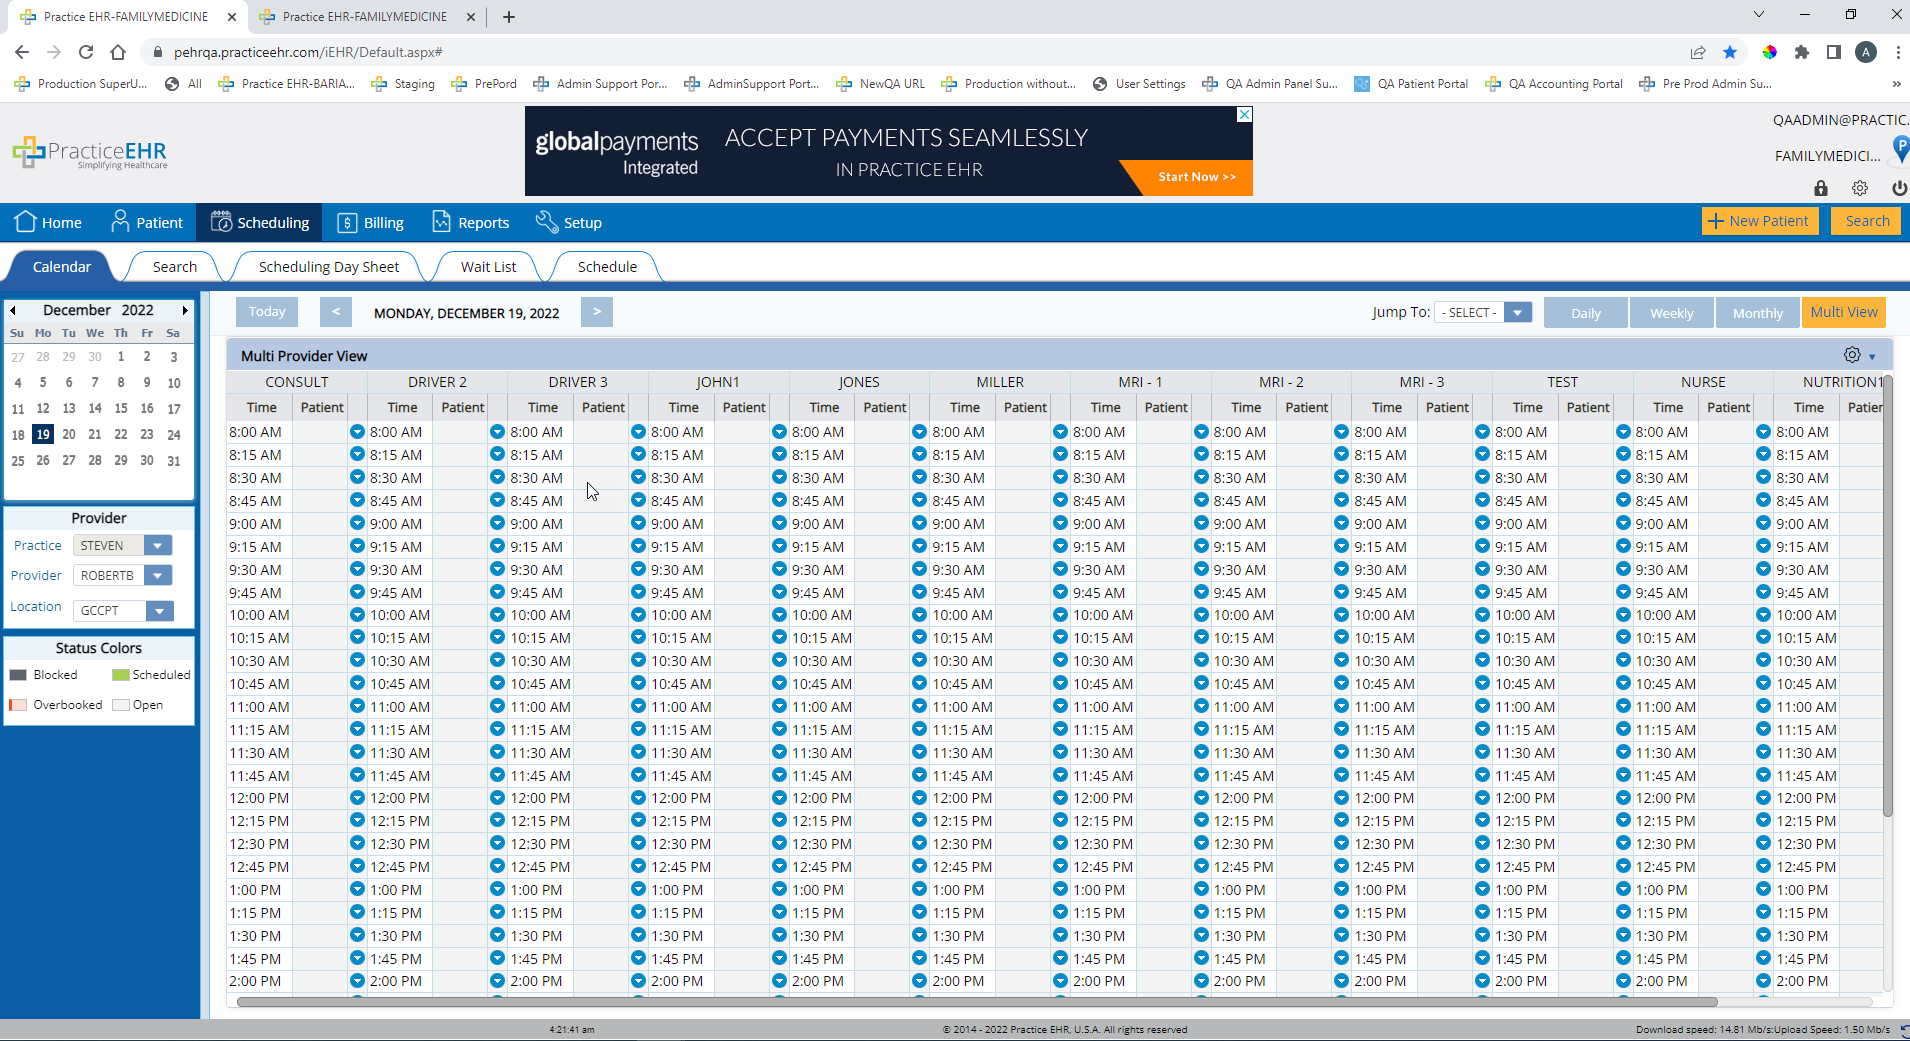
Multi Provider View Update
The Multi View option in the Scheduling tab has been updated to allow the user to view unlimited number of providers and/or resource schedules at the same time.
All schedules of the selected providers will be on display side by side. The user will be able to scroll horizontally to view the schedules, as shown below.
Appointment Based Kiosk Forms
When booking an appointment, the Kiosk forms can now be filtered based on appointment types.


10. CLINICAL VISIT UPGRADE
Visit Plan
The following changes have been made to the “Plan” section of a visit.
The user will be able to add clinical notes in a visit’s plan. This option has been added in adherence to the ONC guidelines.

Clicking on the “Clinical Notes” option will open the following “Add Clinical Notes” window:

On the “Add Clinical Notes” window the display will identify those types of notes that can be added into that progress note. Clinical Notes will be visible in the “Sentence View” of the visit.
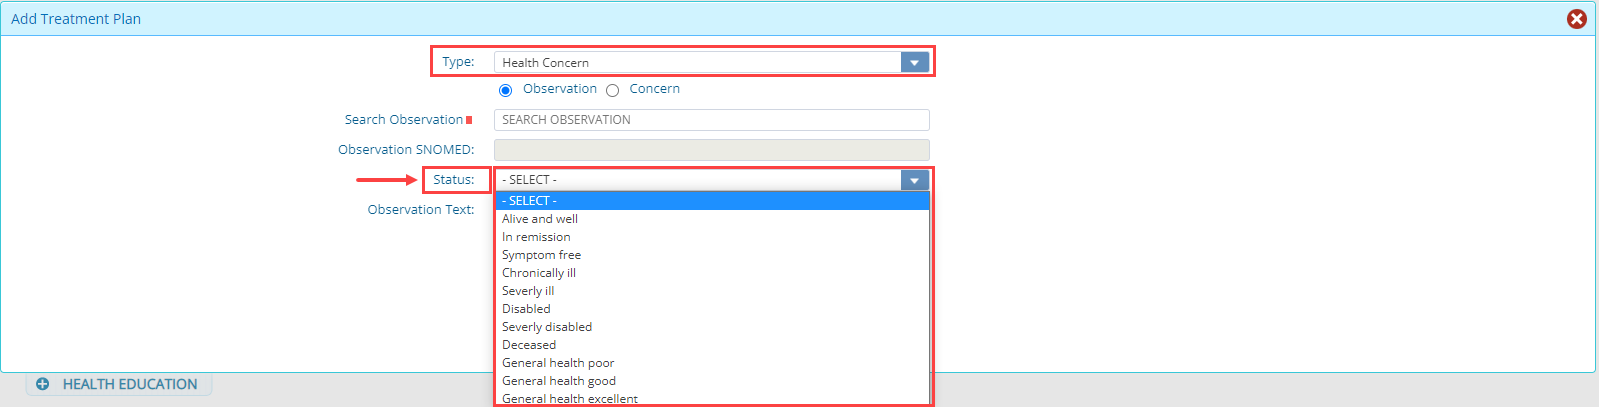
Also, a status dropdown field has been added to the “Add Treatment Plan”window, for the “Health Concern > Observation” type plan. This is another addition that was made in adherence to the ONC guidelines.

Here, the user will be able to add a status to a patient’s condition.
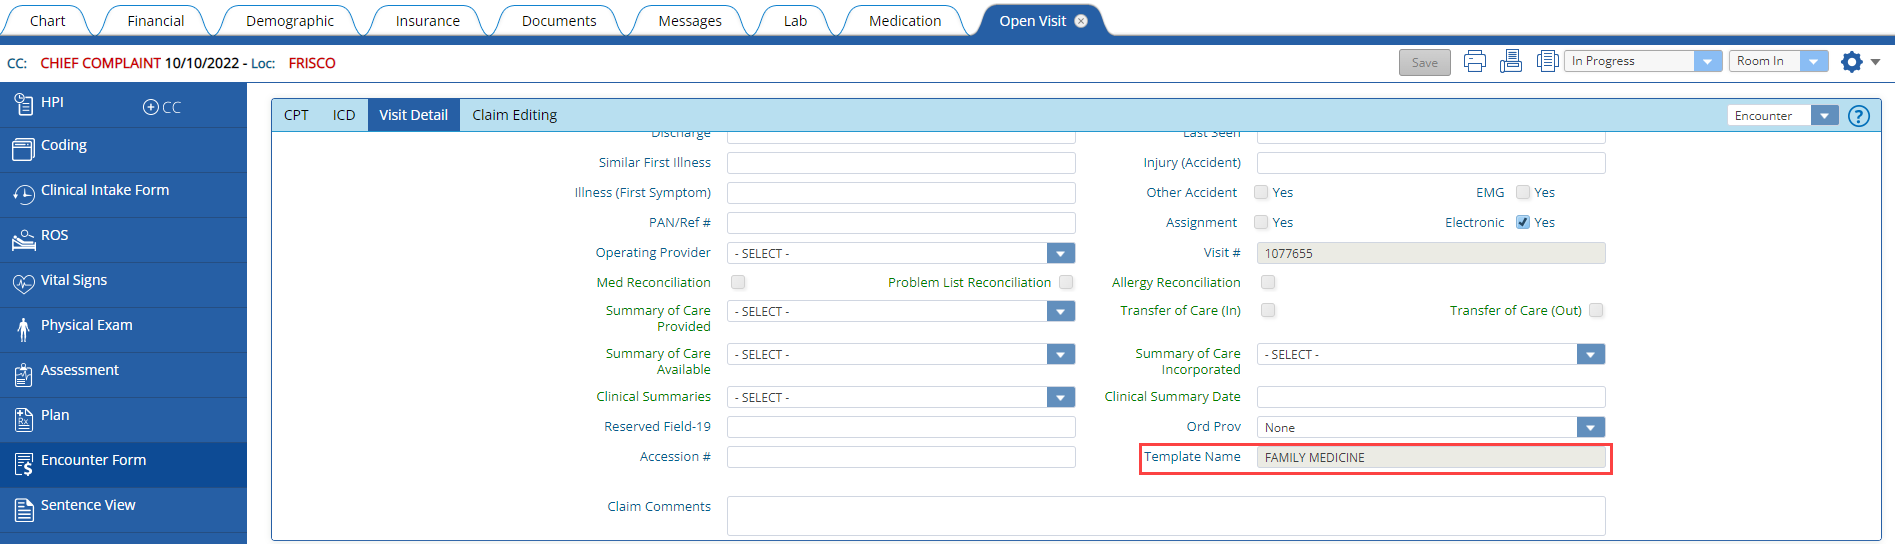
Template Name
The “Template Name” field found in the Visit Detail tab of an Encounter Form section, will now display the name of the latest clinical template that is added to a clinical visit.
Sections Displayed in Sign-Off Note
Users will now be able to choose which sections will be displayed in the sign off note. Sections data will still be available in the sentence view. It allows a practice to include a Coding section in the template (as an example) but not include that section when the note is “Signed Off”.
For all the sections that have been marked not to be displayed will be hidden in all the templates that has that section. This is an optional feature for which user can contact support to setup the sections that needs to be hidden from the “Signed off” progress note.
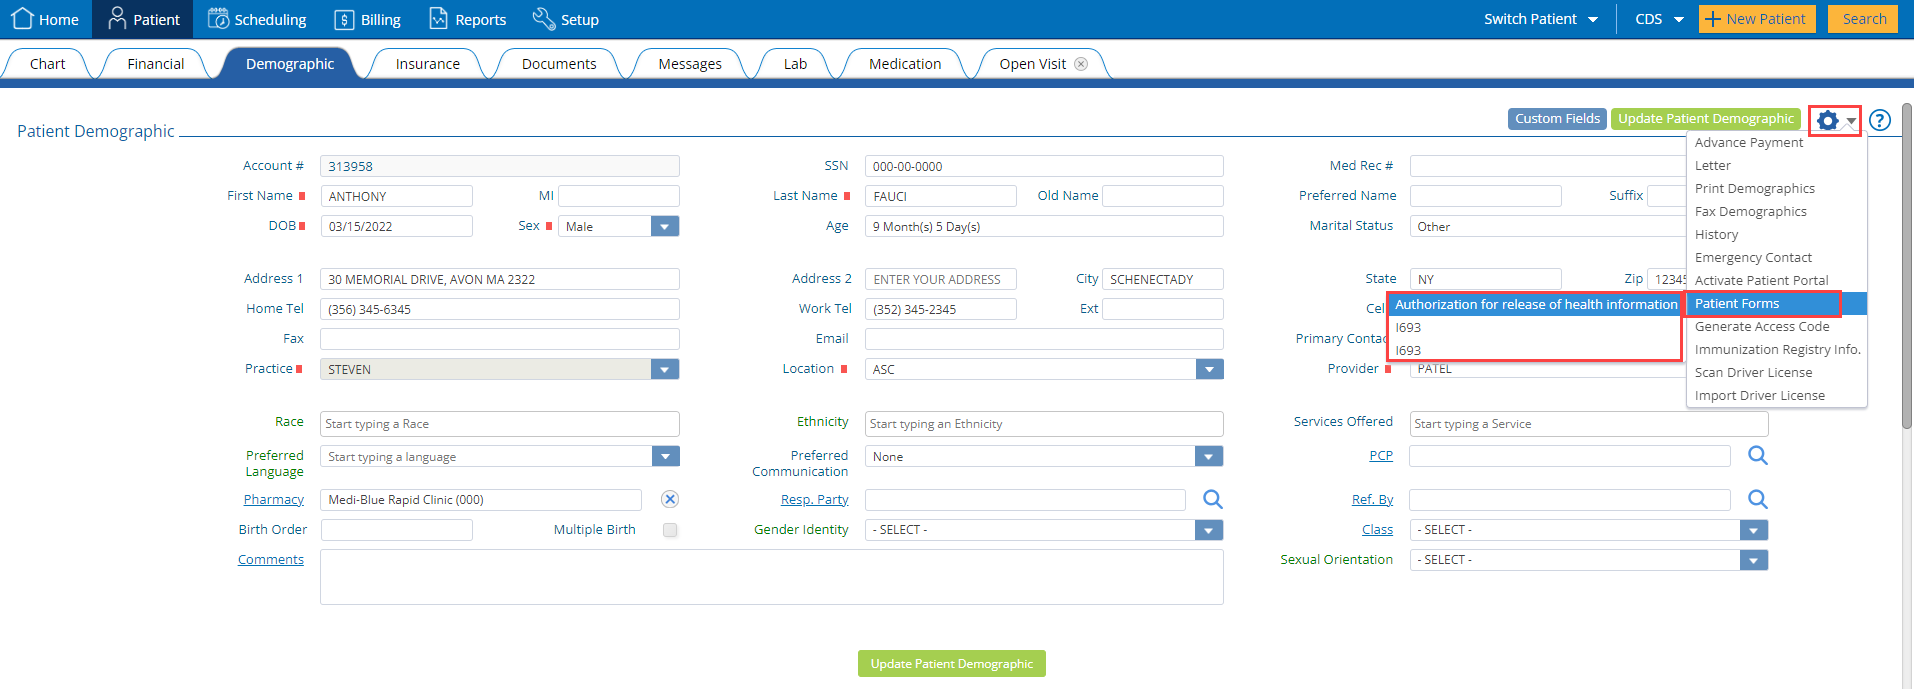
11. PATIENT FORMS UI IMPROVEMENT
In order to improve readability, the height of “Patient Forms” has been increased.

12. PATIENT LAB UPDATE
Verify All Normal
In the “Pending Dr. Review” section of a Patient’s Lab, the caption of the button has been updated from “Verify Normal” to “Verify All Normal”. The functionality of the button remains the same, meaning all results for a patient with “Normal” alert will be verified in bulk.

13. MEDICATION TAB UPDATE
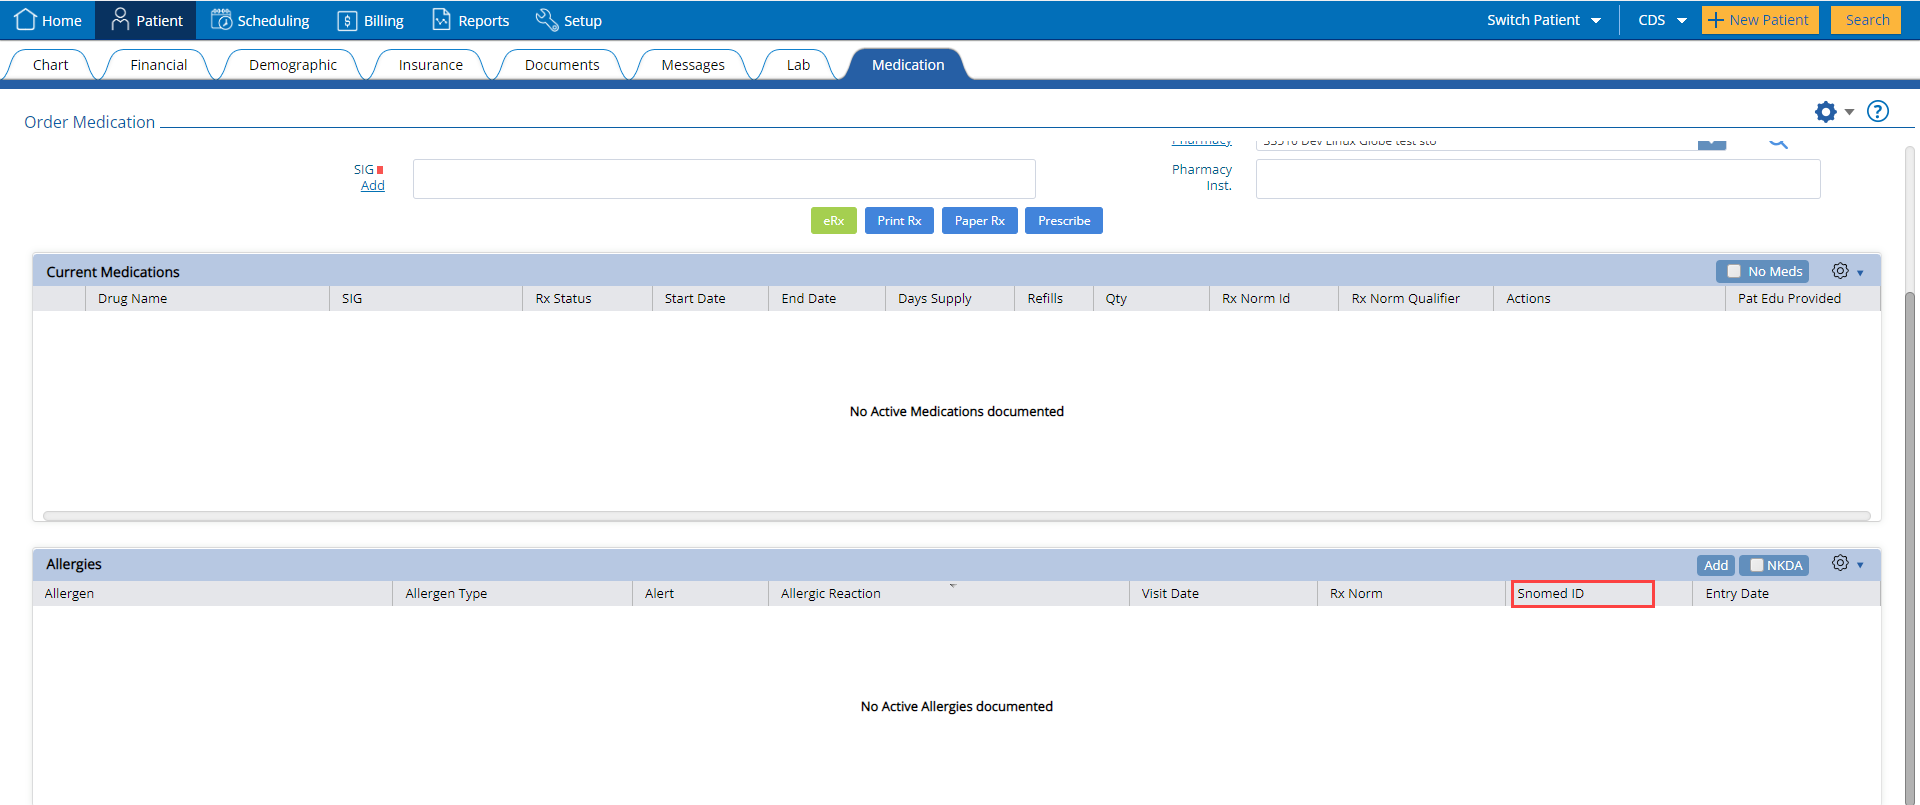
Allergies Section
In adherence to the ONC guidelines, following changes have been made to the Allergies section of the Medication tab.
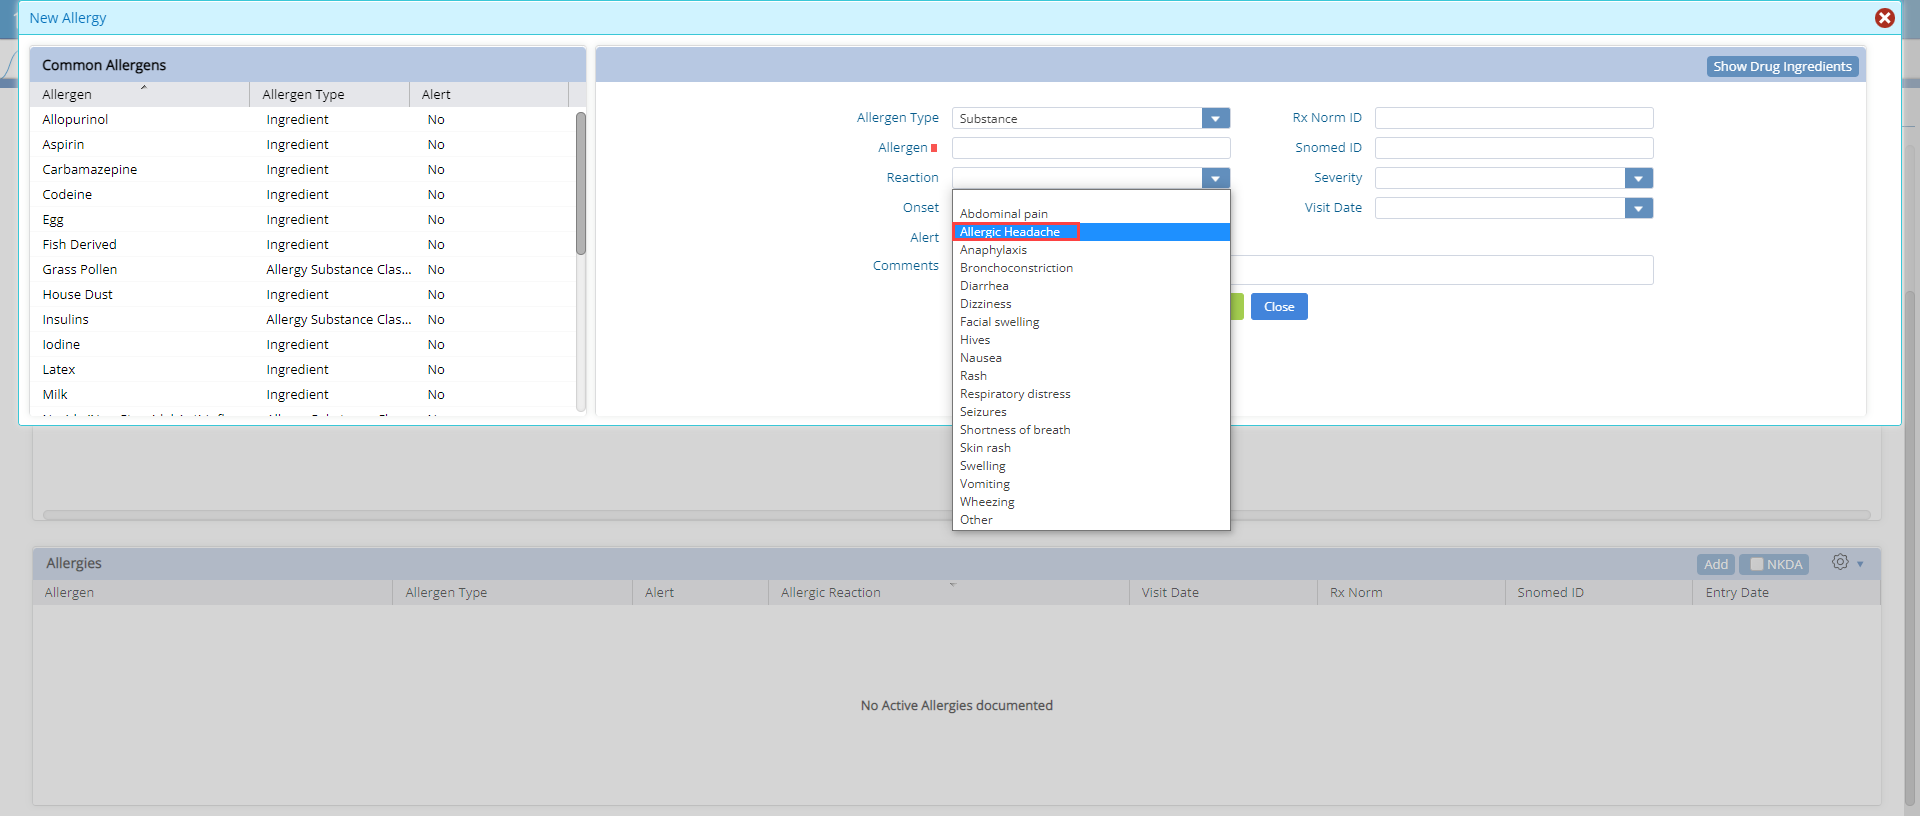
“Snomed ID” field has been added to the Allergies section of the Medication tab.
A new reaction by the name of “Allergic Headache” has been added to the “Reaction” drop down, in the New Allergy window used to add new allergies to a patient.
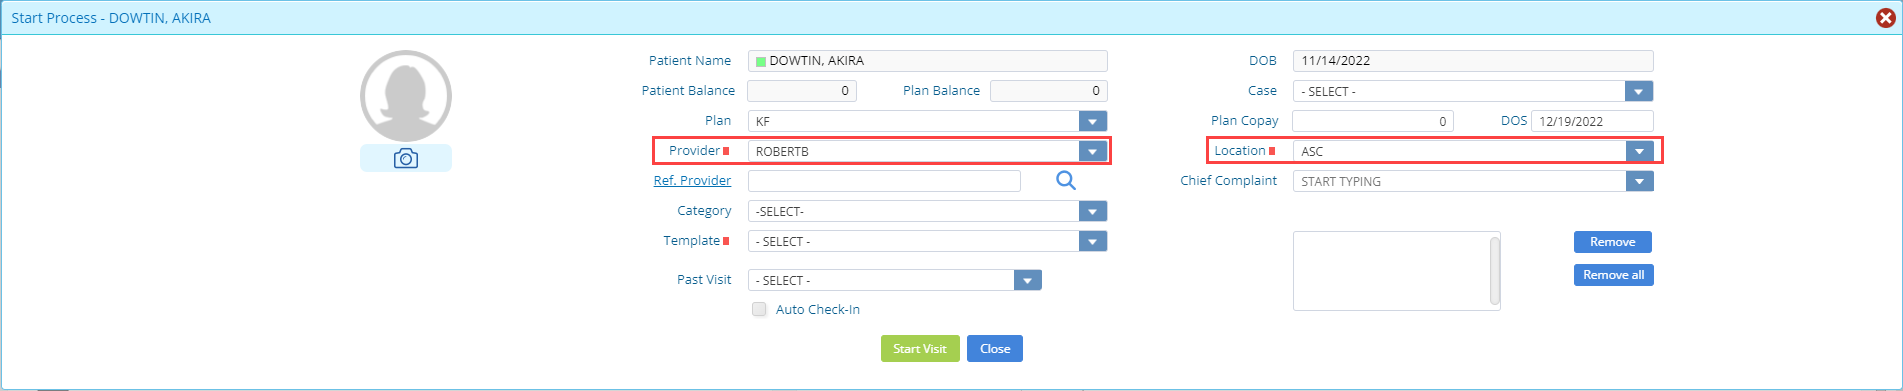
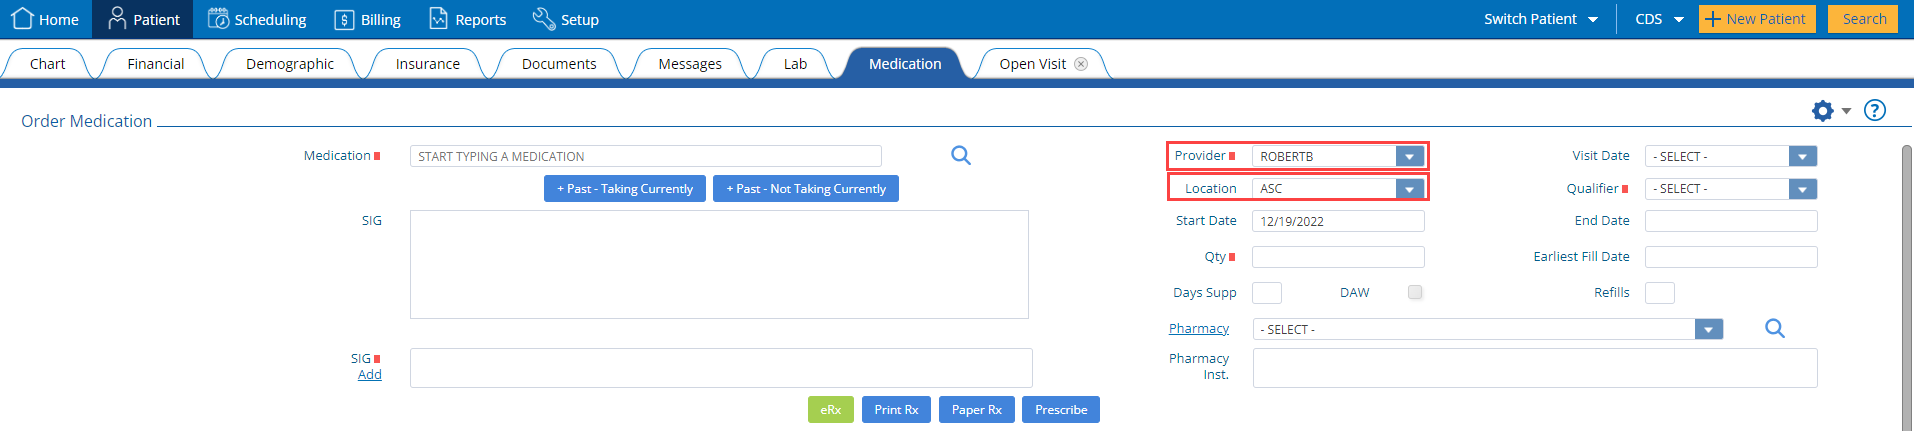
Visit Provider & Location
In the medication tab, the provider and location fields will be populated with the provider and location entered when the visit is started.
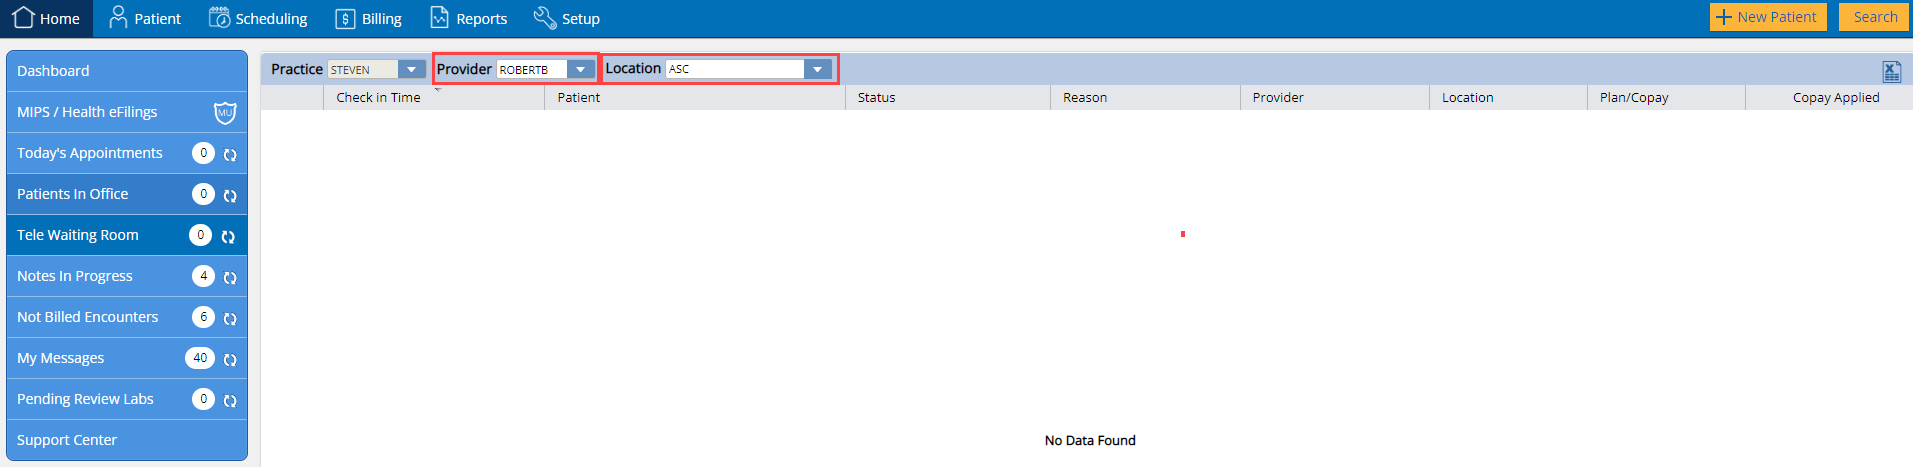
14. TELE WAITING ROOM
Provider & Location Filter
In the “Tele Waiting Room” section on the home page, a “Provider” filter and a “Location” filter has been added. This will allow the user to filter tele visit appointments on the basis of different providers and locations.
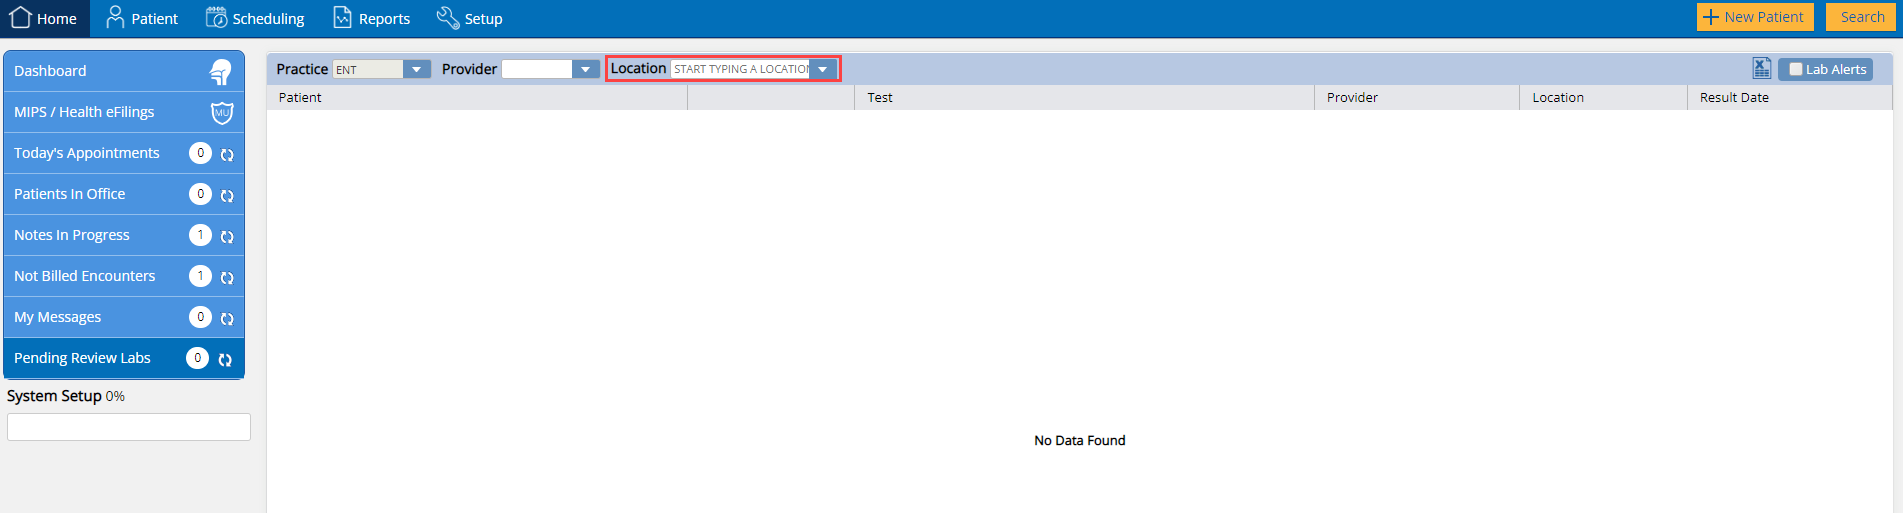
15. PENDING LAB REVIEW
In the “Pending Lab Review” section on the home page, a “Location” filter has been added. This will allow users to filter test results on the basis of different locations. “Unknown Patient” results will not be viewable in case the location is selected.
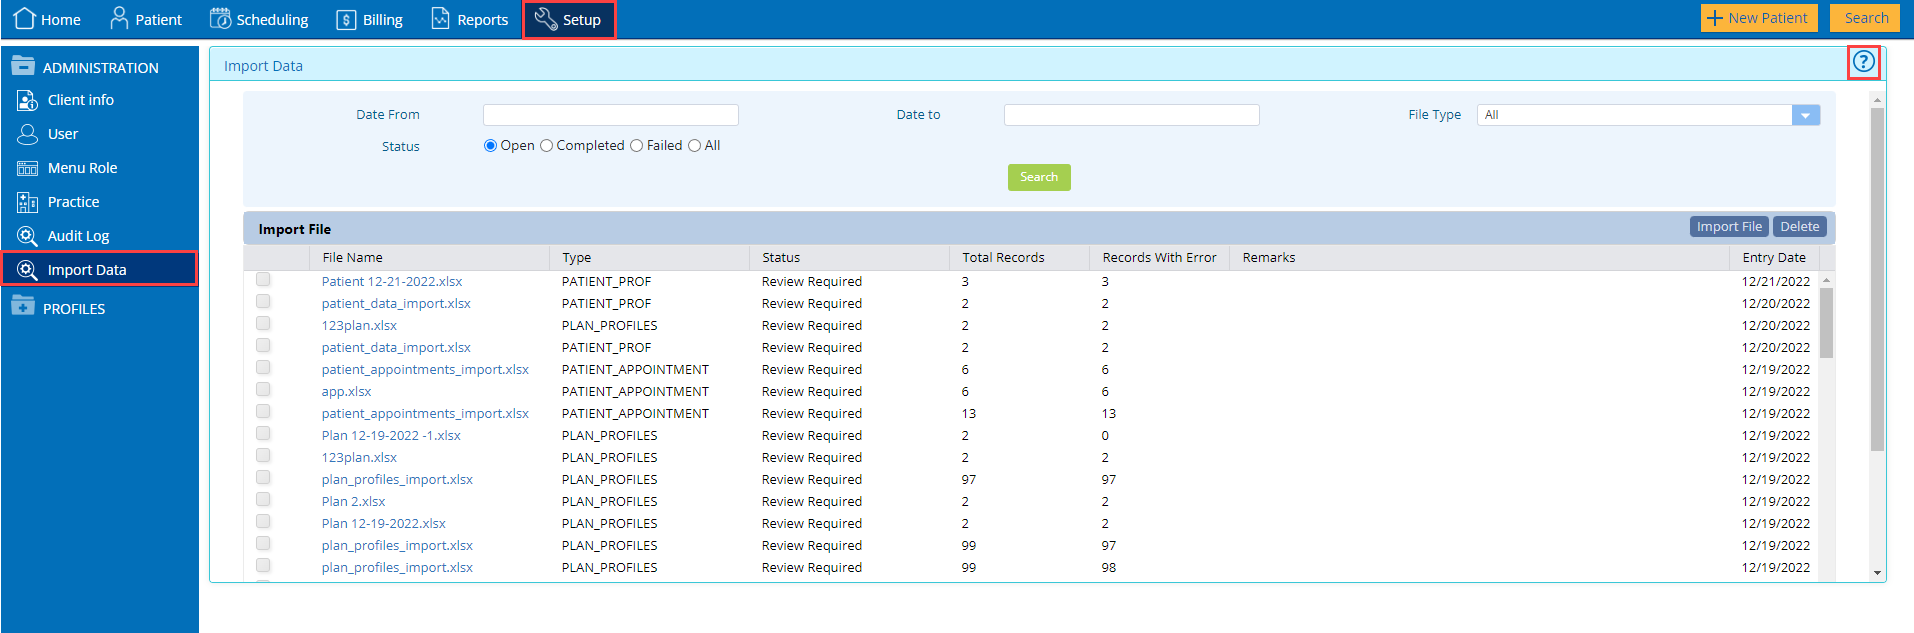
16. IMPORT DATA
A new feature has been added which will allow users to import their existing medical data. This import data feature can be found in the Administration section of the Setup tab, as shown below.
Here, by clicking on the “Import File” button, the following “Upload File” window will be displayed:
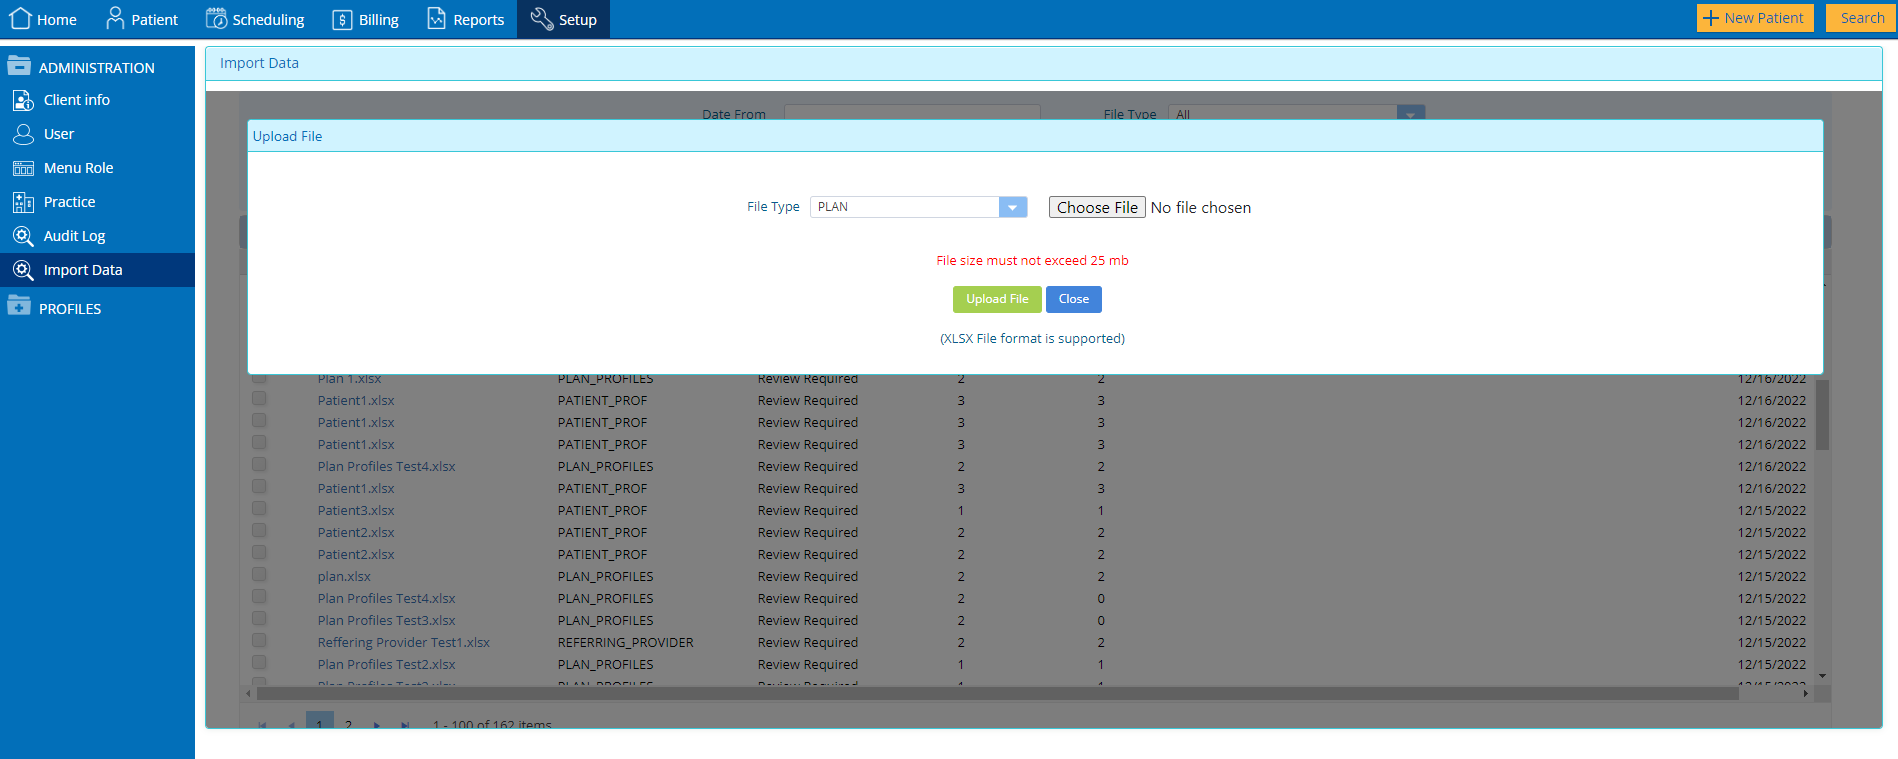
On this “Upload File” window, users can select the type of file they want to import from the “File Type” dropdown. There are 5 types of files that the user can import, namely;
After the “File Type” is selected, the user can then select the “Choose File” button to load a native file.

Once the chosen file is loaded, the user can select the “Upload File” button to upload the file.
As shown in the below screenshot, a file whose upload is currently in progress will be displayed with the “Queued” status.

If the file does not contain errors, the status of the file will be changed from “Queued” to “Completed” indicating that the file has been uploaded completely.

If any single record in the file, contains an error then the data will not be loaded and the file status will be changed to “Review Required”.

By clicking on the “File Name” hyperlink, the user will be able to view the file. When the user clicks on the file name hyperlink the below window will be displayed.

This window will display all the columns in the file and the data they contain. If the file contains any errors they will be shown in the “Remarks” column.
Error Resolution
On the file detail window, the user will be able to “Reprocess” the file, by clicking on the reprocess button which will change the file’s status from “Review Required” to “Queued”, and Practice EHR will try to re-upload the file.

If the user does note resolve the error then the upload will still be unsuccessful and the status of the file will again change to “Review Required”.
If the user resolves the errors in the file and then selects the “Reprocess” button, then the file will be successfully uploaded and its status will change to “Completed”.

The user can also select the “Ignore Errors & Process” button, which only import those records of the file which are free of errors and the status of the file will change to “Completed”.

Lastly, the user can select the “Discard” option which will change the file’s status to “Discarded”.
File Formats
In order to facilitate the data import process, attached to this article you will find templates to use to import your patient and practice data.
User can use the below given templates to provide the data into an automated system to load the same in Practice EHR.
Employer Template.xlsx
Plan Template.xlsx
Referring Provider Template.xlsx
Patient Demographics Template.xlsx
Patient Appointments Template.xlsx
For detailed guidelines on the process please refer to the document available here or click the help icon on the import data window.


![]()
![]()


