PracticeEHR is always working to make the system better for smoother operations, easier use, and better patient care.
The latest updates include improvements to the Template Designer, Fax patient Demographics, Lab Enhancements and most importantly the AI Scribe enhancement. These changes help make tasks easier, improve communication with patients, and support healthcare providers in working more efficiently.
Fax Patient Demographics
Overview
A new Fax Patient Demographics enhancement has been made to PracticeEHR, making it easier to include patient demographic information directly while sending faxes, without needing to visit the Patient Demographics tab separately.
Previously, users had to manually go to the Patient Demographics tab to send patient information via fax. With the new update, a Patient Info toggle is now available across all Fax windows where faxes can be sent. When this toggle is turned ON, the patient's demographic information will automatically be included with the fax. This streamlines the process and saves time.
How it Works
- Locate the Patient Info toggle option in the Fax sent window.
- Turn the toggle ON to automatically include the patient's demographic details.
- Click Send Fax, the patient information will be attached to the fax automatically.
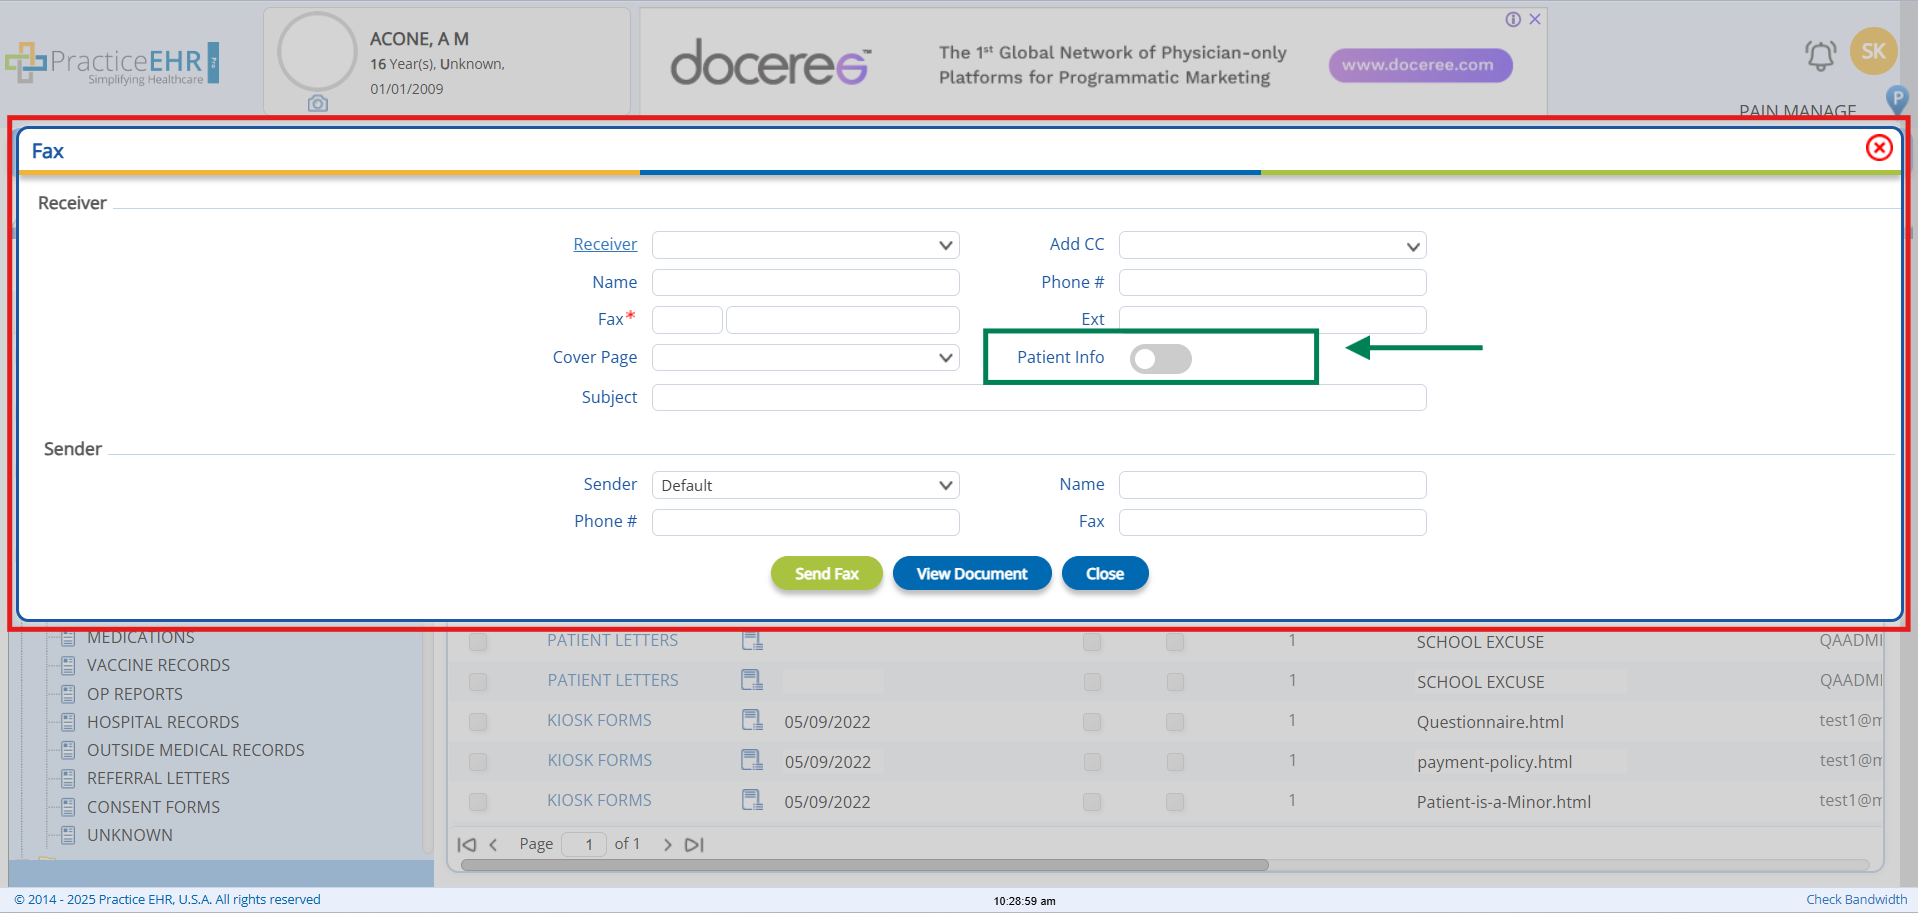
- When the Patient Info toggle is ON, the Patient Complete information will be sent in the fax and it will be shown as below.

Lab Enhancements
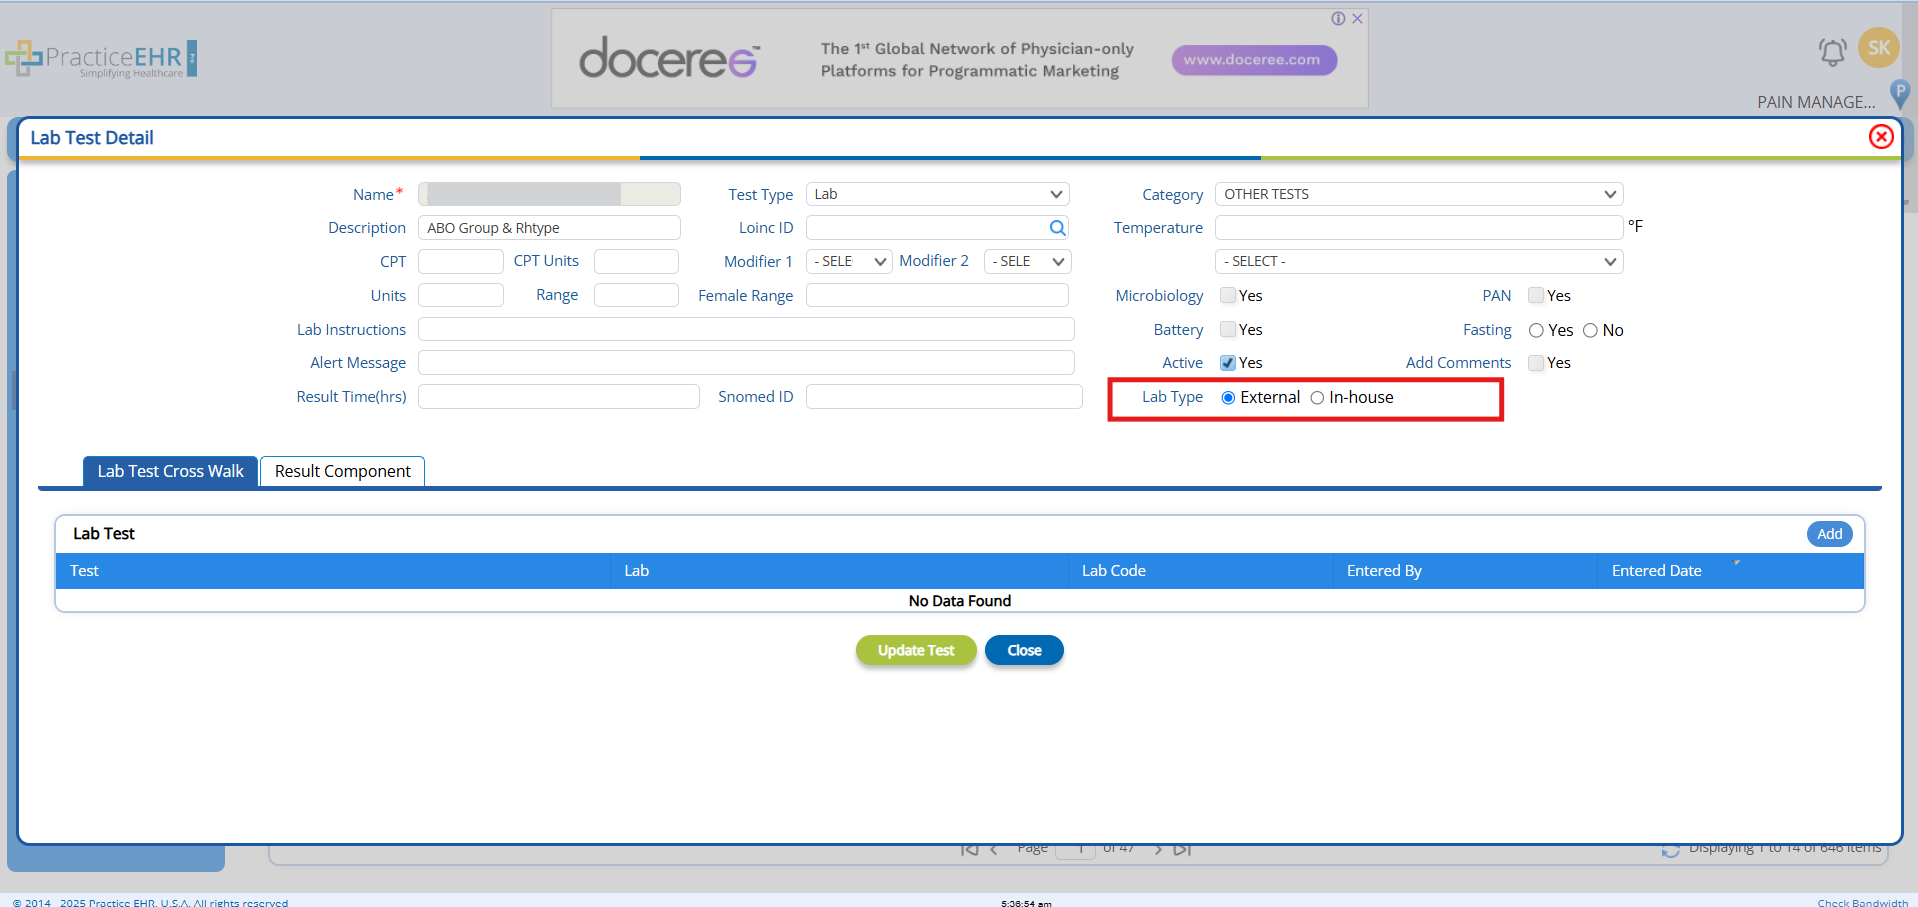
Enhancement 1: Lab Type Classification
We are excited to introduce a significant enhancement to the Lab Management module in Practice EHR—Lab Test Classification. This feature allows users to classify lab tests as either In-House or External at the Test Profile level. Based on this classification, distinct workflows will be triggered in Practice EHR to streamline lab order management, requisitions, and result entry.
This update is designed to simplify the clinical workflow, reduce data entry, and improve
Key Features
- Lab Test Classification at Profile Level
- Users can now define a Lab Test as:
- In-House: Tests conducted within the facility.
- External: Tests sent to third-party laboratories.
- Classification is configurable at the Test Profile level during test setup or editing.
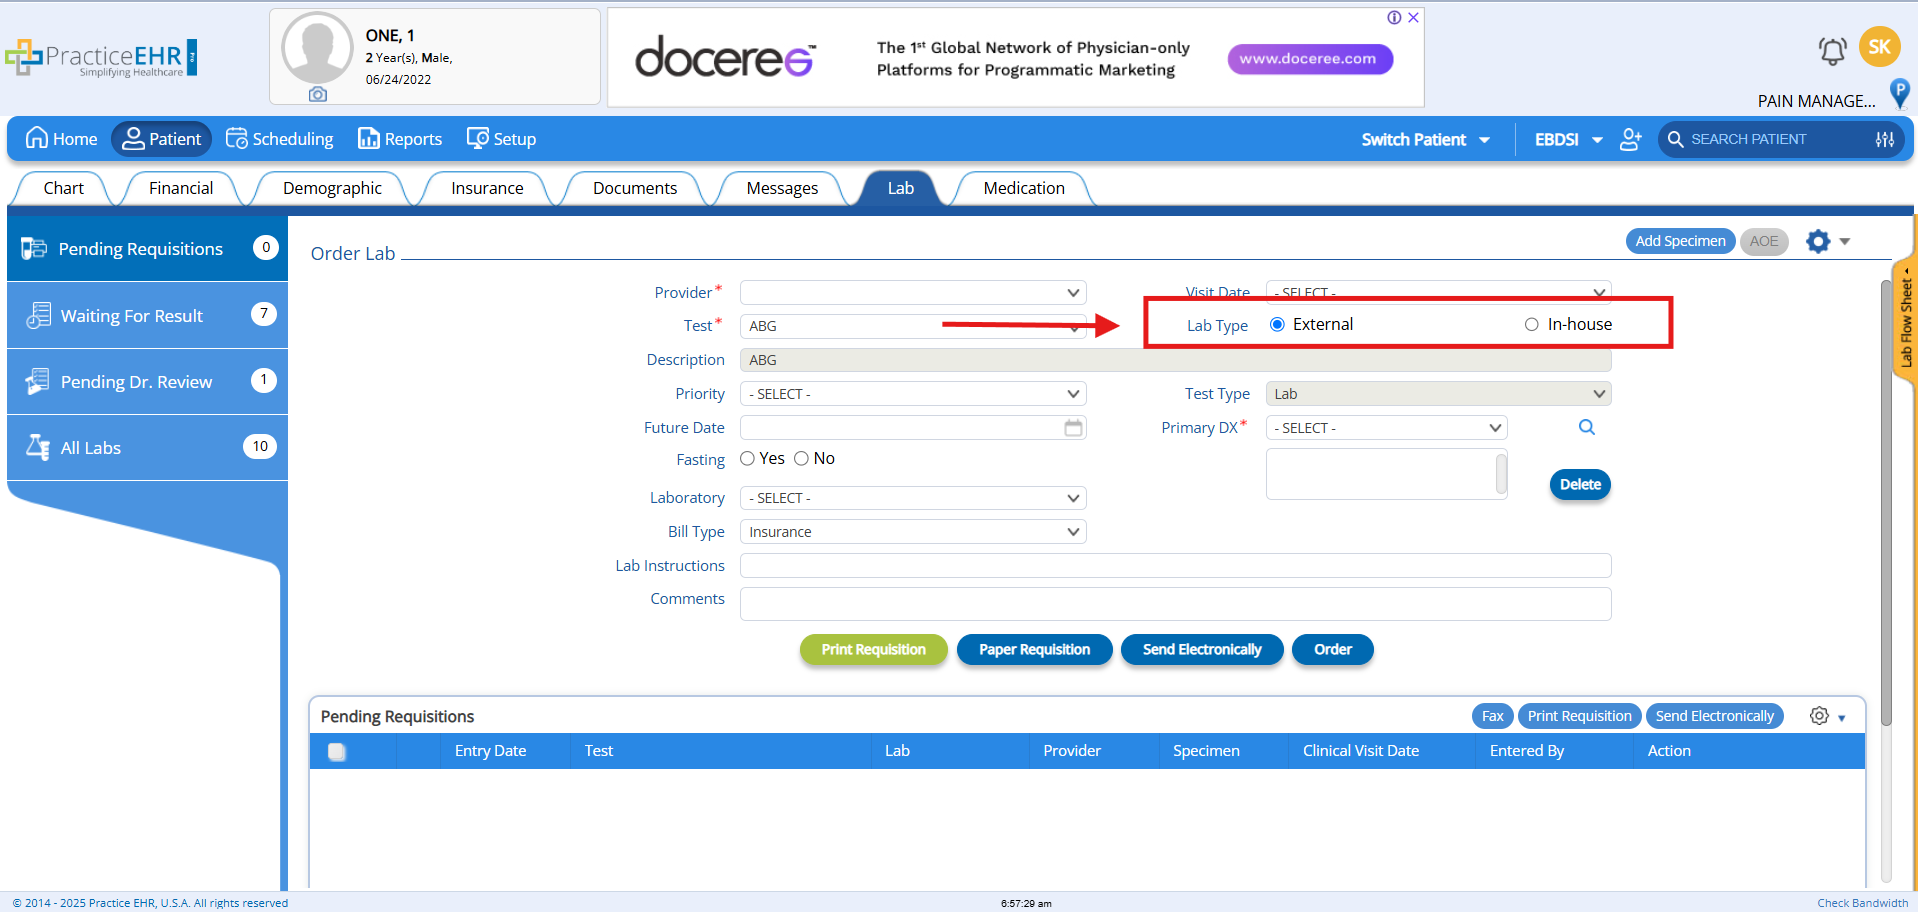
- No requisition is required for In-House lab tests.
- Once ordered, these tests are directly routed to the “Waiting for Results” bucket.
- Users can enter results directly within Practice EHR:
- Accessible via the Lab section in the Plan section of the Clinical Visit.
- Results entry interface is integrated into the EHR for seamless documentation.
How to Setup
- Go to Setup > Clinical > Lab Test > Open Test
- Locate the In-house/External option in the of the Test profile.
- Configure and save the test profile
How it Works
- When ordering the Lab test the Lab Type will be auto selected based on the test profile.
- To change or override it, just select In-House or External.
- For In-House labs, click Order, the lab order will move directly to Waiting for Result.
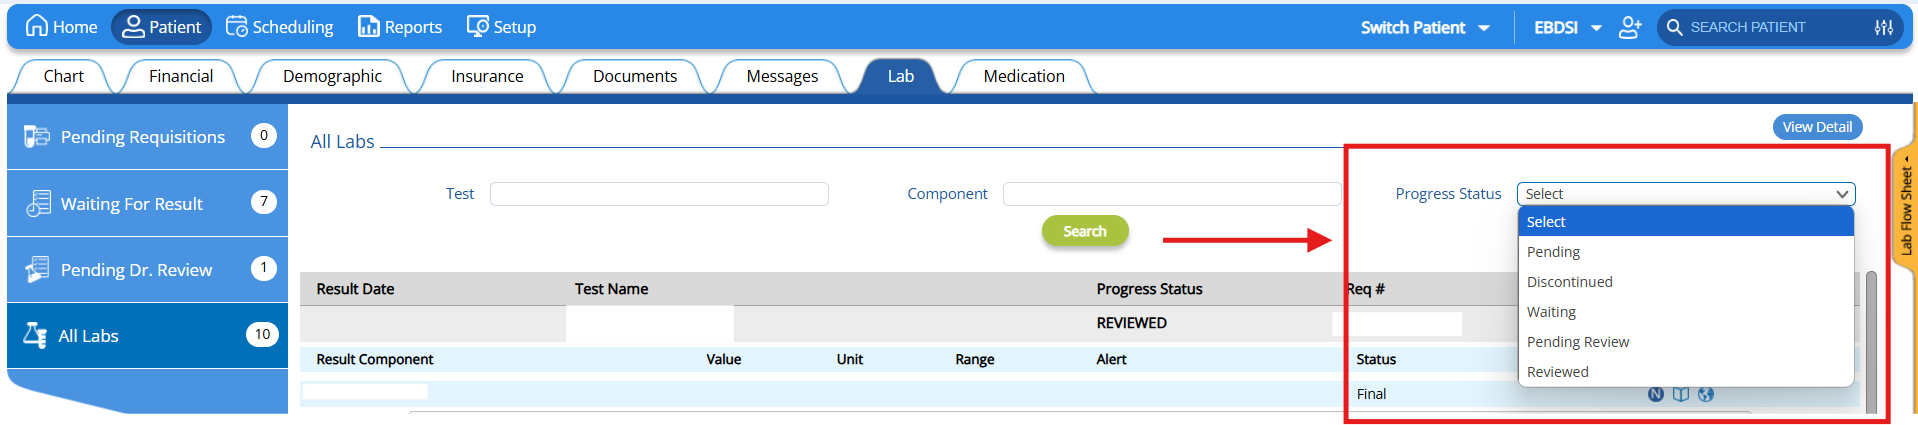
Enhancement 2: Progress Status Filter in All Labs
To enhance lab tracking and streamline clinical workflows, we’ve introduced a new Progress Status Filter in the All Labs section of Practice EHR. This feature empowers users to efficiently view and manage lab orders and results based on their current status in the workflow.
With this enhancement, clinical and administrative users can quickly locate lab records that need attention, such as pending reviews or unentered results, helping practices stay organized and responsive.
How it Works
- Go to Lab > All Labs.
- Locate the Progress Status dropdown at the top.
- Select a status (e.g., Ordered, Waiting for Result, Completed).
- The system will filter and display the corresponding lab orders/results.
Enhancement 3: Result Component Profiles
New Result Component Profile section has been added to Test Profiles. Admins can predefine Result Components (e.g., Hemoglobin, WBC count, Glucose) for each lab test.
When entering results for In-House tests:
- All configured components auto-populate.
- Users simply input corresponding result values—eliminating repetitive manual setup.
How it Works
- Go to Setup > Clinical > Lab Test > Open Test
- Locate the Result Component Tab at the bottom of the Test profile.
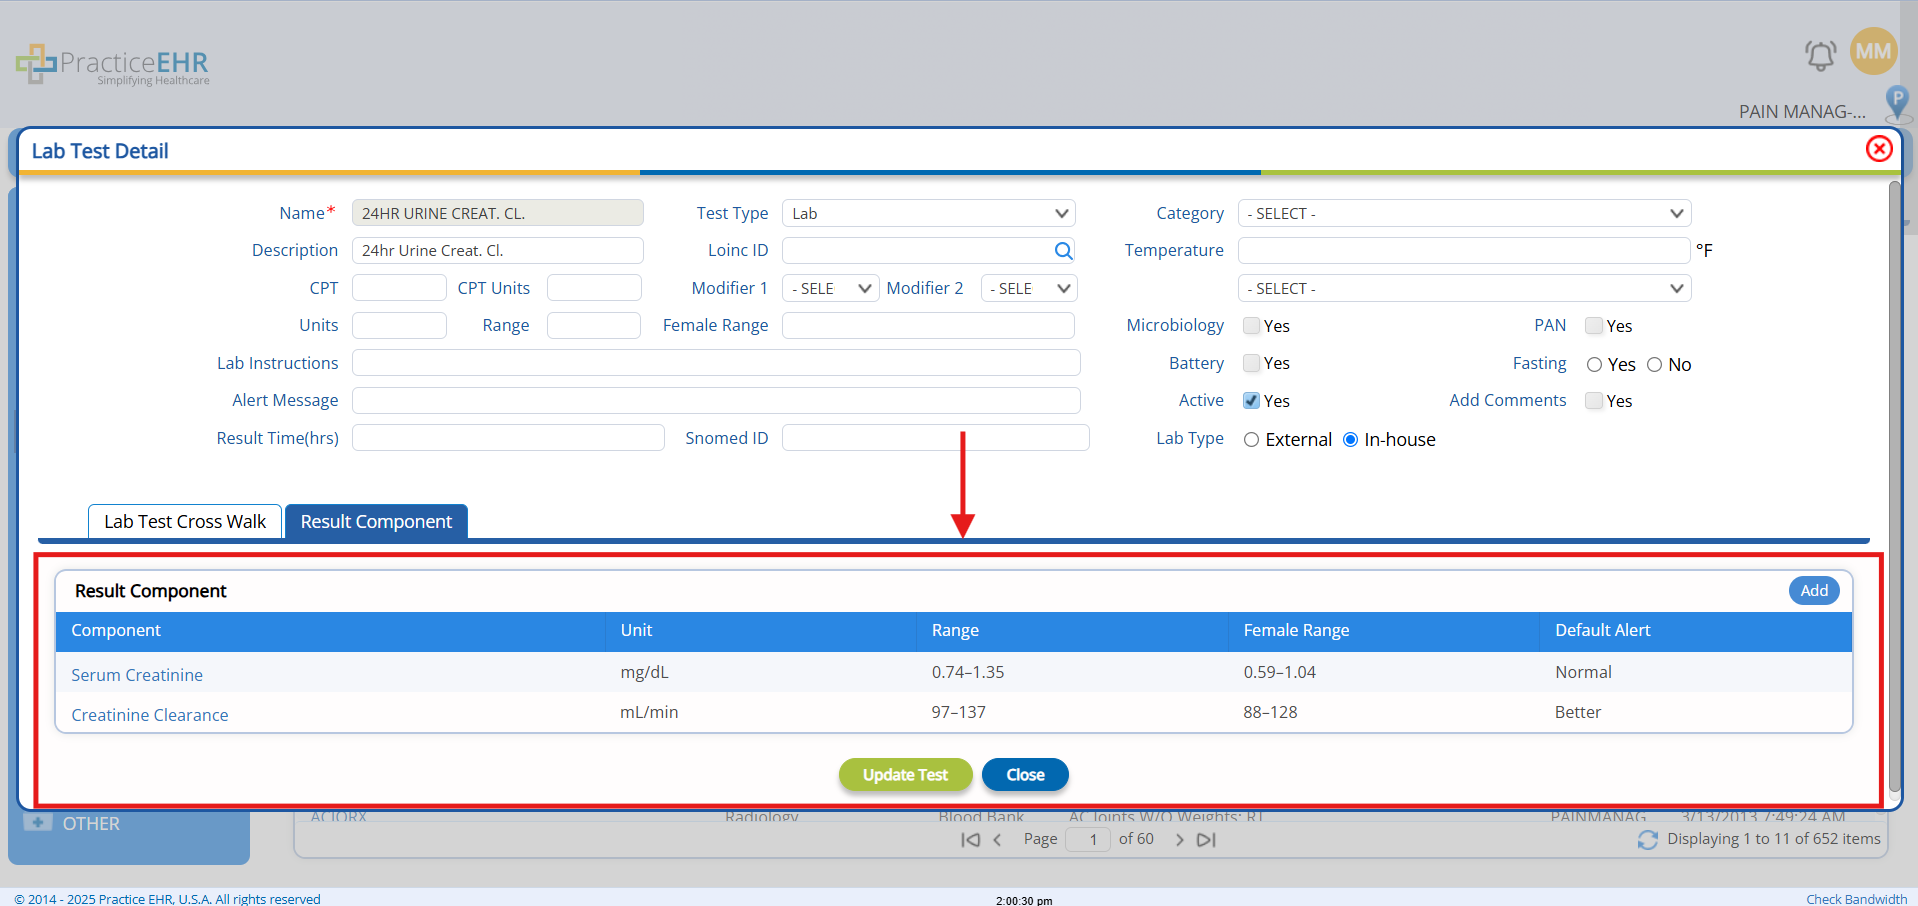
- Click the Add button, a Pop-up window will appear, where User can add the
- Component
- Unit
- Range
- Female Range
- Default Alert (Normal, Abnormal, Better, BelowAbsol etc)
- Active
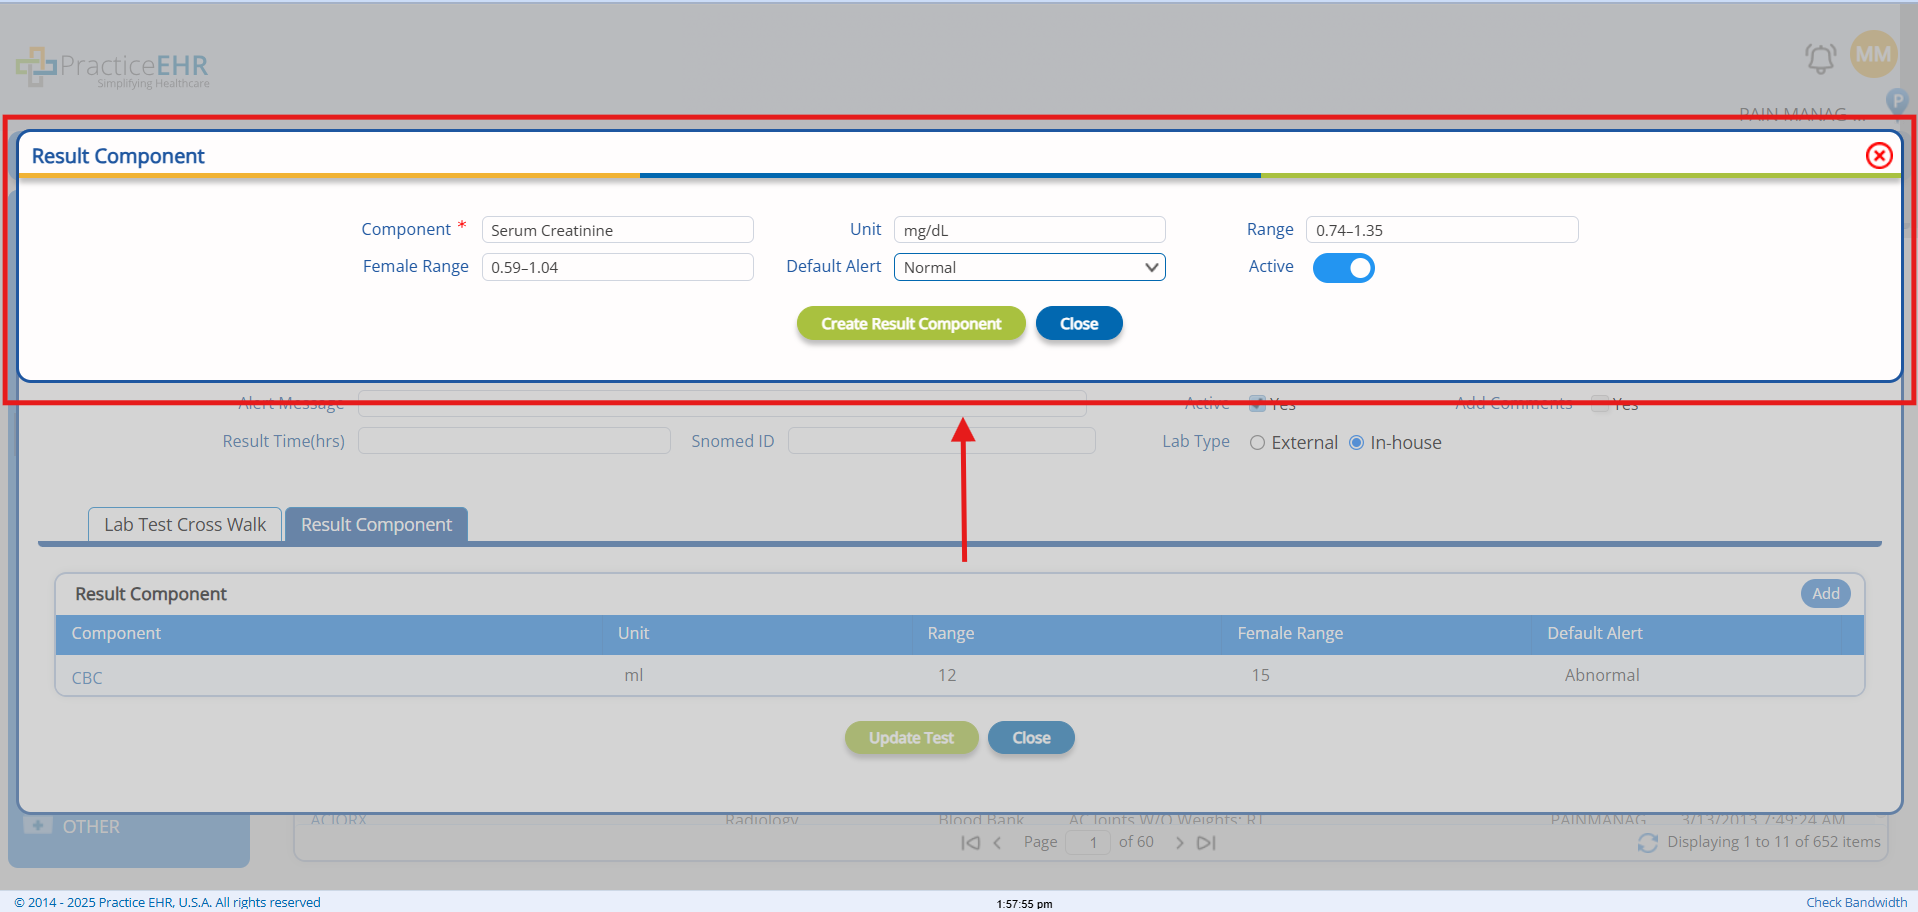
- Click on the Create Result Component button to add the component in the GRID.
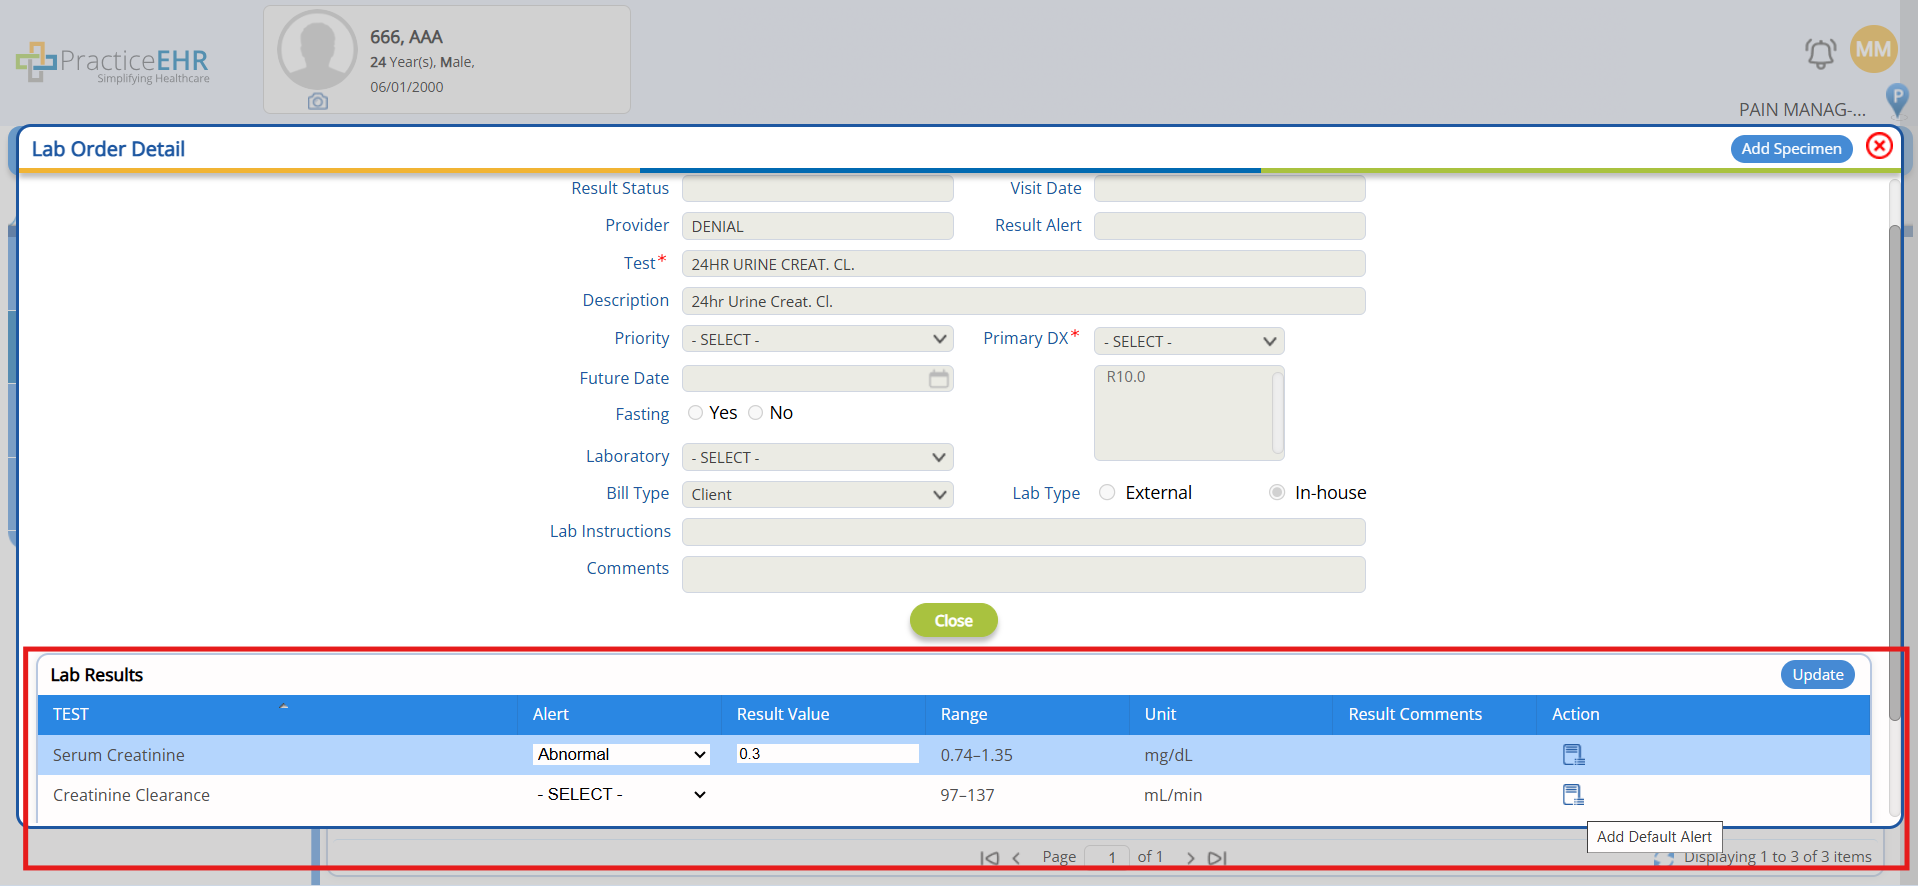
- Navigate to Patient > Lab > Add Lab > Order > Waiting for Result > Enter Results. This will open the Lab Order Detail Screen, where the Lab Result Components are displayed in the Lab Results Grid. From here, you can:
- View the all Lab test components for example, Serum Creatinine, Creatinine Clearance etc.
- Enter result values for each component.
- Select appropriate alerts based on the values i.e., Normal, Abnormal, Better, BelowAbsol, etc.
- Click on the "Action" icon. The system will add the Default alert value to the Alert Dropdown.
- Update the Lab Result Component values by clicking the Update button, and Results will be updated and saved.
AI Scribe Enhancement
The AI Scribe functionality was already available in PracticeEHR, helping providers automate and streamline clinical documentation. With this new enhancement:
- Users can now insert custom shortcuts during transcription to avoid repeating common phrases or sections.
- Multilingual support has been introduced, allowing users to scribe in different languages based on their preference or patient needs.
This enhancement delivers a more dynamic and efficient scribing experience while supporting diverse clinical environments.
Features
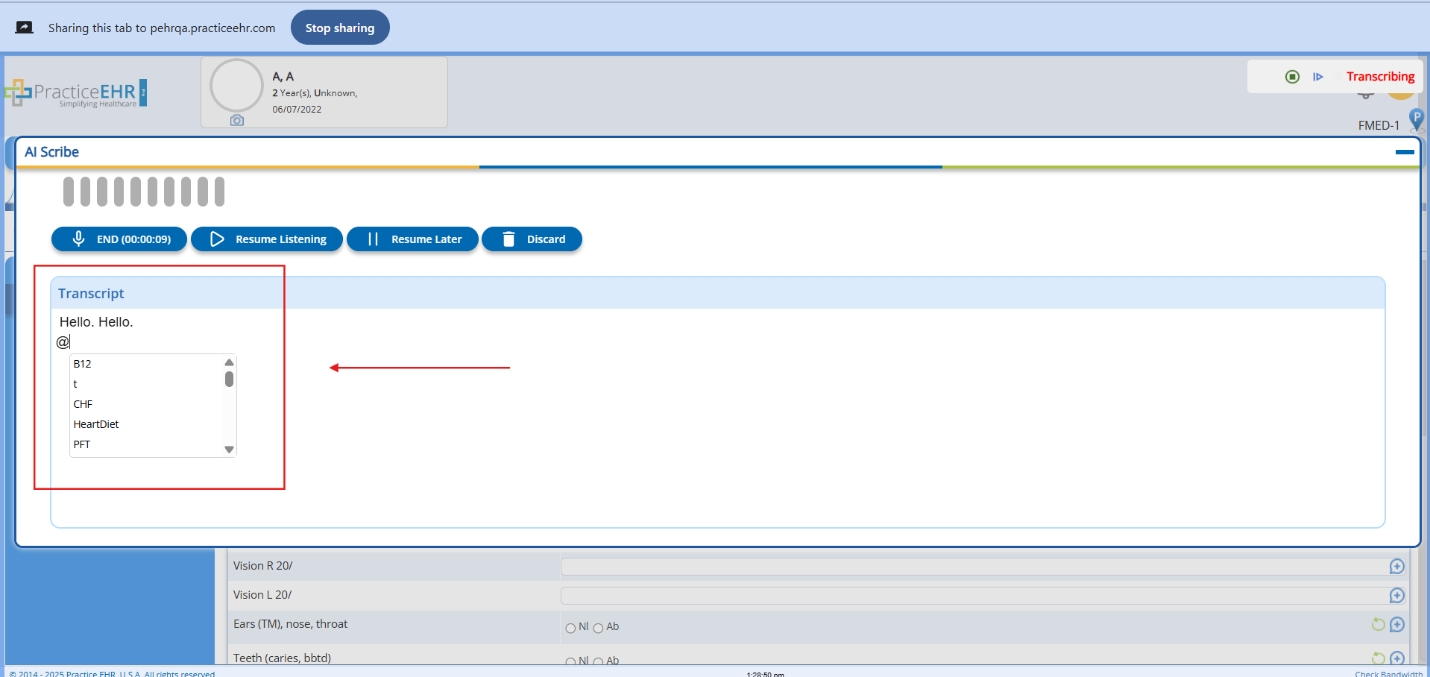
Shortcut Integration
- Users can pause the AI scribe at any time during transcription.
- By typing the @ symbol or pressing the space bar after a shortcut keyword, predefined content is suggested and can be inserted instantly.
- Enables faster documentation of commonly used text like patient instructions, notes, or standard assessments.
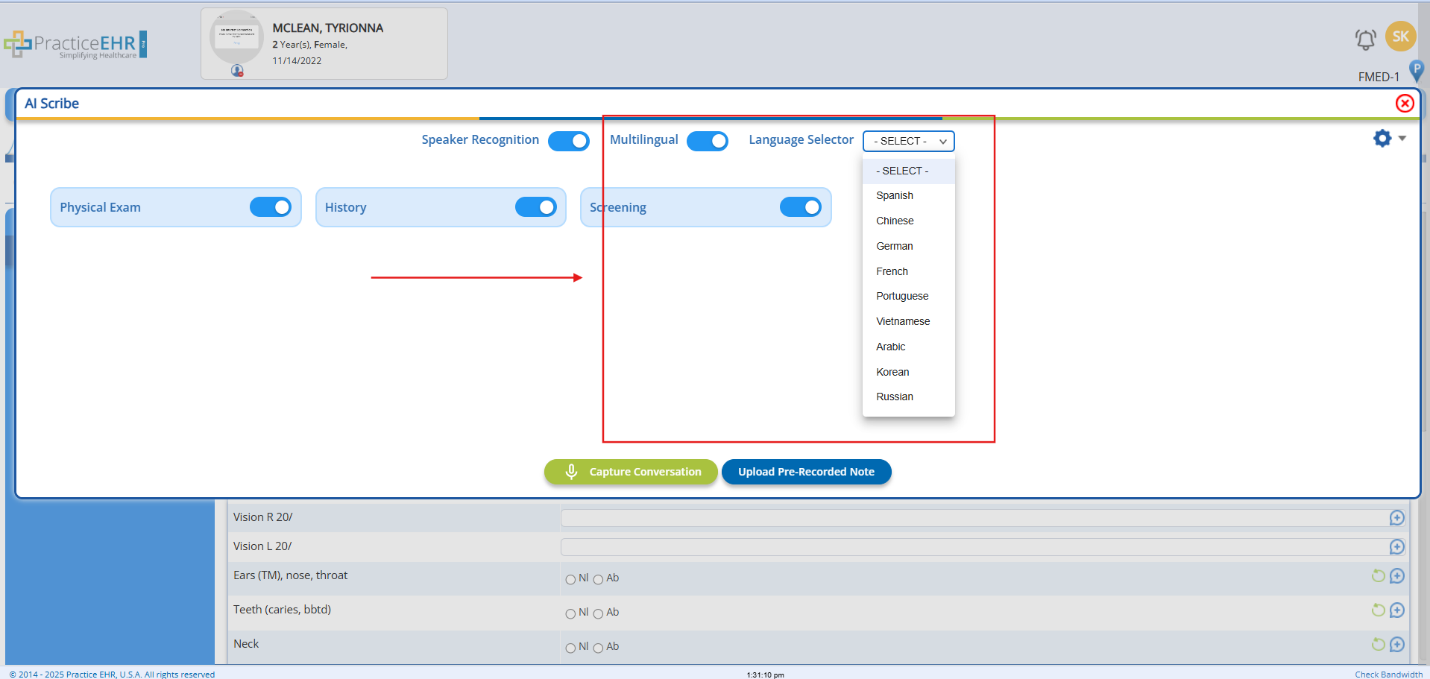
Multilingual Scribing
- AI Scribe now supports multiple languages that includes language support for
- Spanish
- Chinese
- German
- French
- Portuguese
- Vietnamese
- Arabic
- Korean
- Russian
- Users can scribe in the language of their choice, as mentioned above, making it easier to document visits in a linguistically diverse setting.
How it Works
Using Shortcuts
- During transcription, pause the AI Scribe where you want to insert a shortcut.
- Type @shortcutname or enter the shortcut name followed by a space.
Using Multilingual Support
- Navigate to the AI Scribe settings.
- Turn On the Multilingual toggle and select the Language using Language Selector as shown below
Template Designer
Overview
PracticeEHR is excited to announce a new upcoming feature i.e., Template Designer, a great enhancement that will allow users to create and customize clinical sections tailored to their unique practice workflows. This feature will be available in the month of June 2025. This feature represents a major leap forward in documentation flexibility and control.
What to Expect
With the Template Designer, users will soon be able to:
- Create and configure custom clinical templates within the system.
- Define section such as:
- HPI Section
- Generic Sections
- History and many more
How to Create Sections?
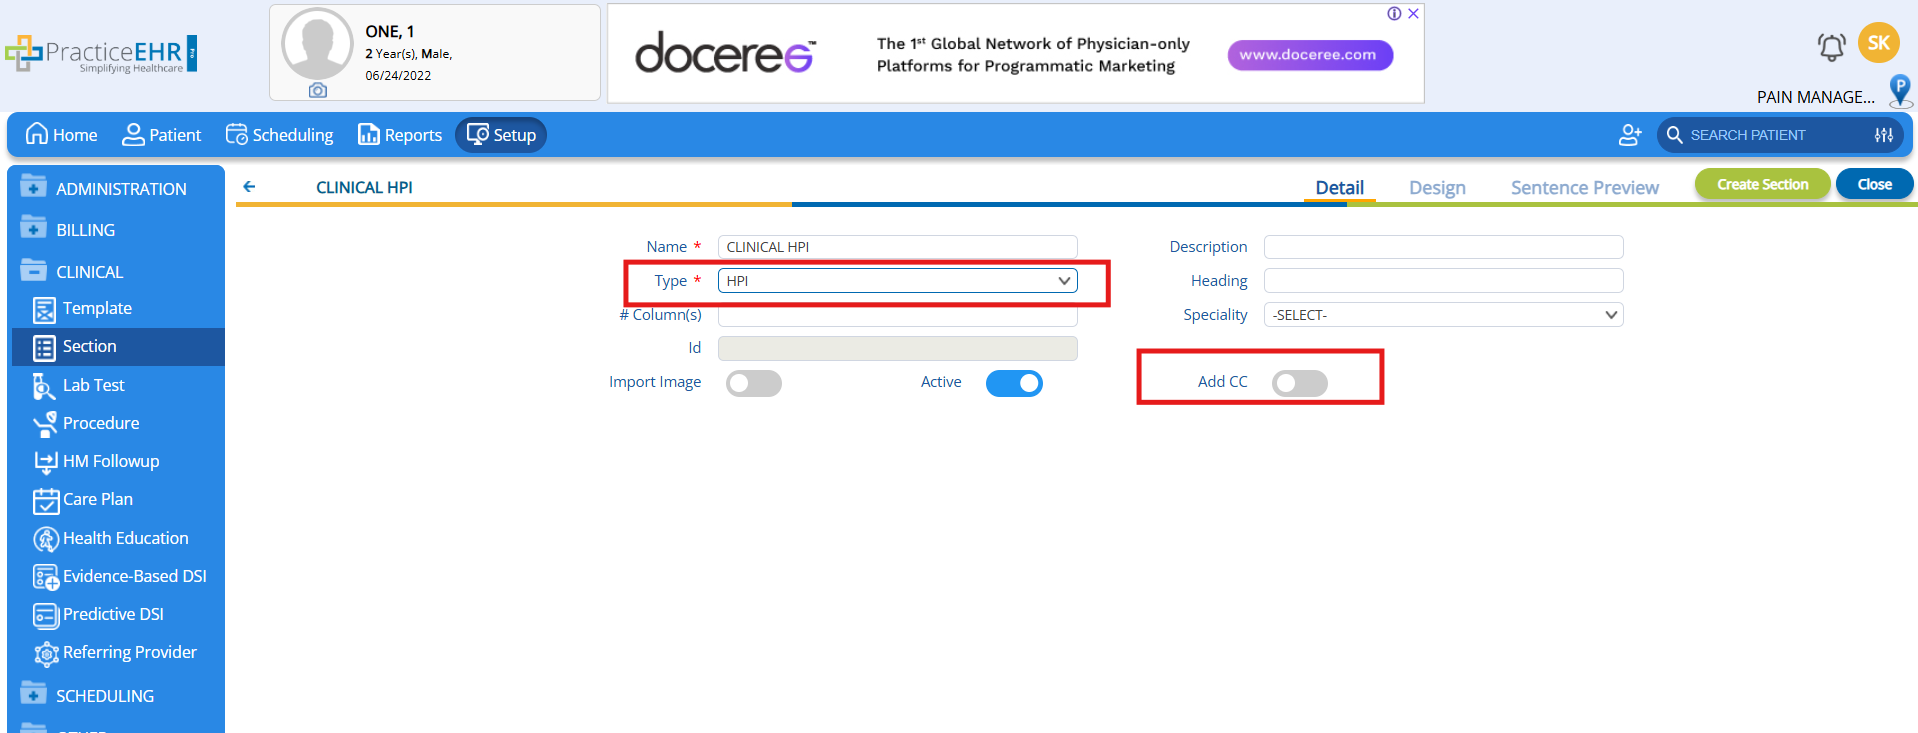
To create a section in PracticeEHR using the Template Designer, users can navigate to the Clinical Designer interface and select "Create New Section." From there, they can choose the section type, name and start the design process.
Each section can then be customized with fields, question groups, and layouts tailored to the specific needs of the practice or specialty.
- In the Section Tab, just click on the Create New Section

- Design your new section using under the Specific Type.
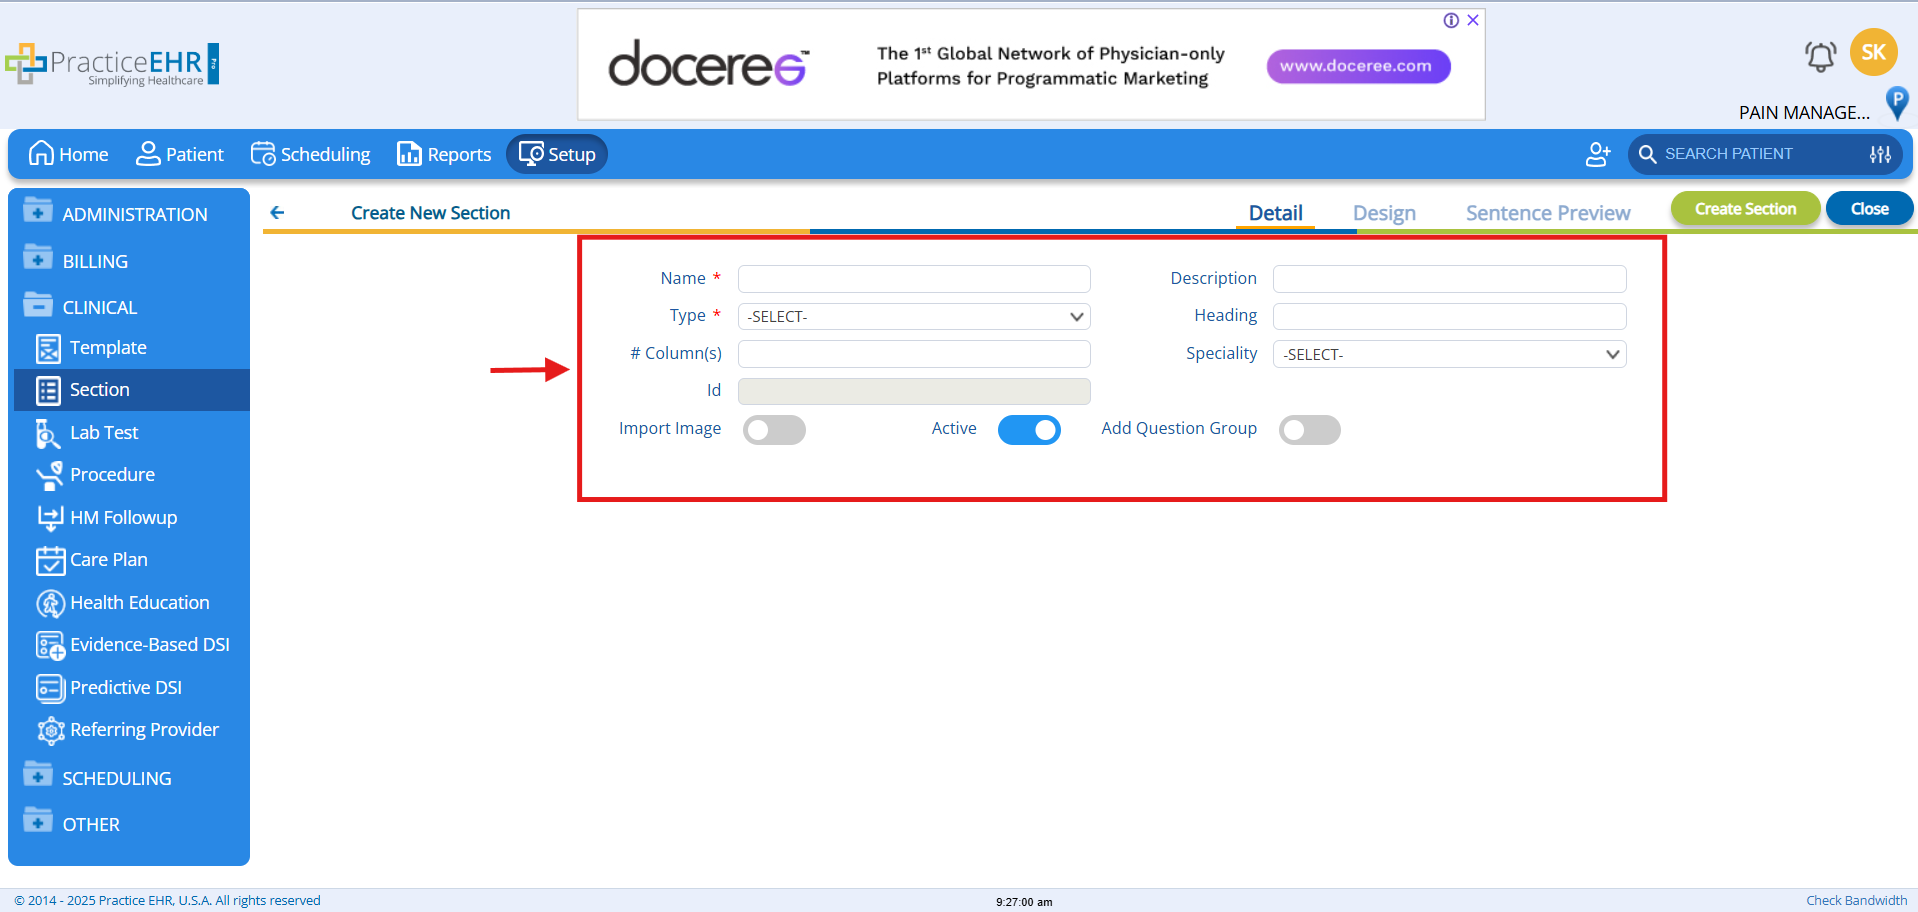
- Give a proper Section Name.
- Select the Type of Section
- In the Design Tab, user will add the Chief Complaint or Question Group/ Questions depending on the section type, as shown below.

- User can drag and drop different Question types based on the design needs to the Question Group section.
- One or more Question Groups can be added during building the sections as per the need.
- Users will also be able to setup properties for different fields and add Clinical Code to the questions.
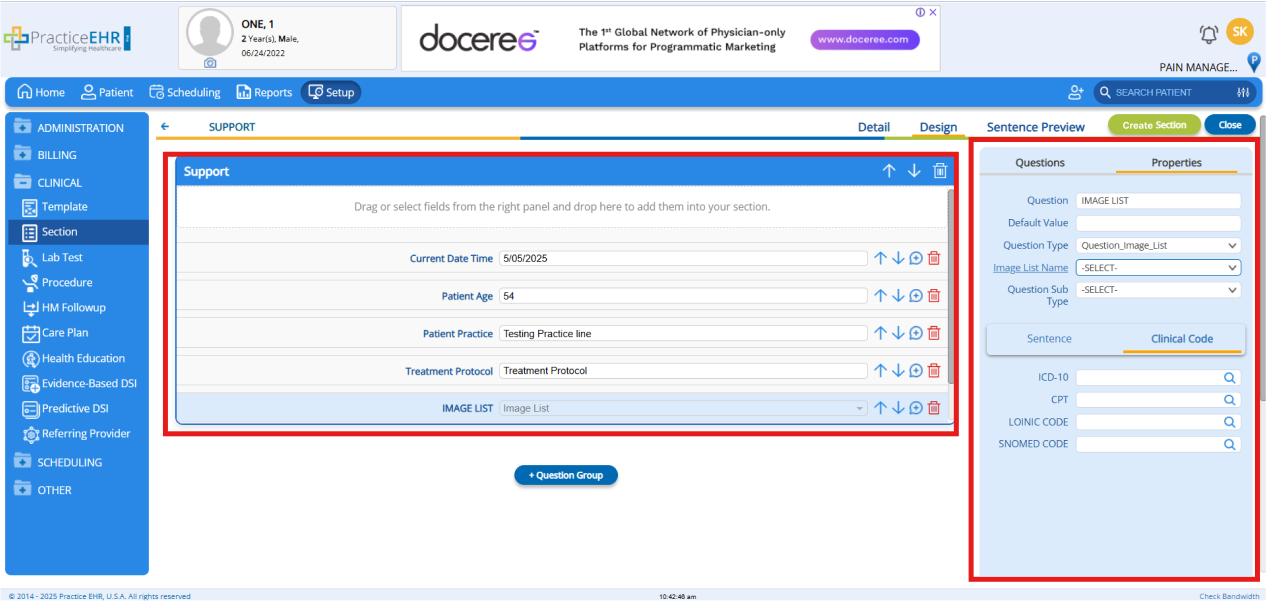
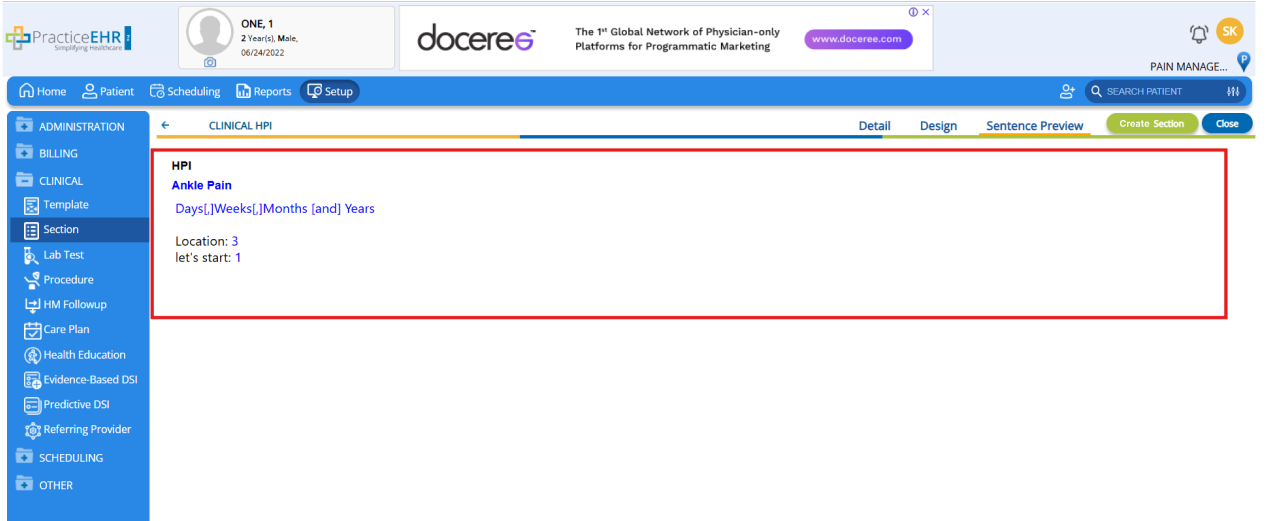
- While building the section user can also navigate to the Sentence Preview section to see how the Sentence will look like.
- Finally Click on the Create Section button, and you will be navigated to the Main Section Screen where the newly designed section will be available.
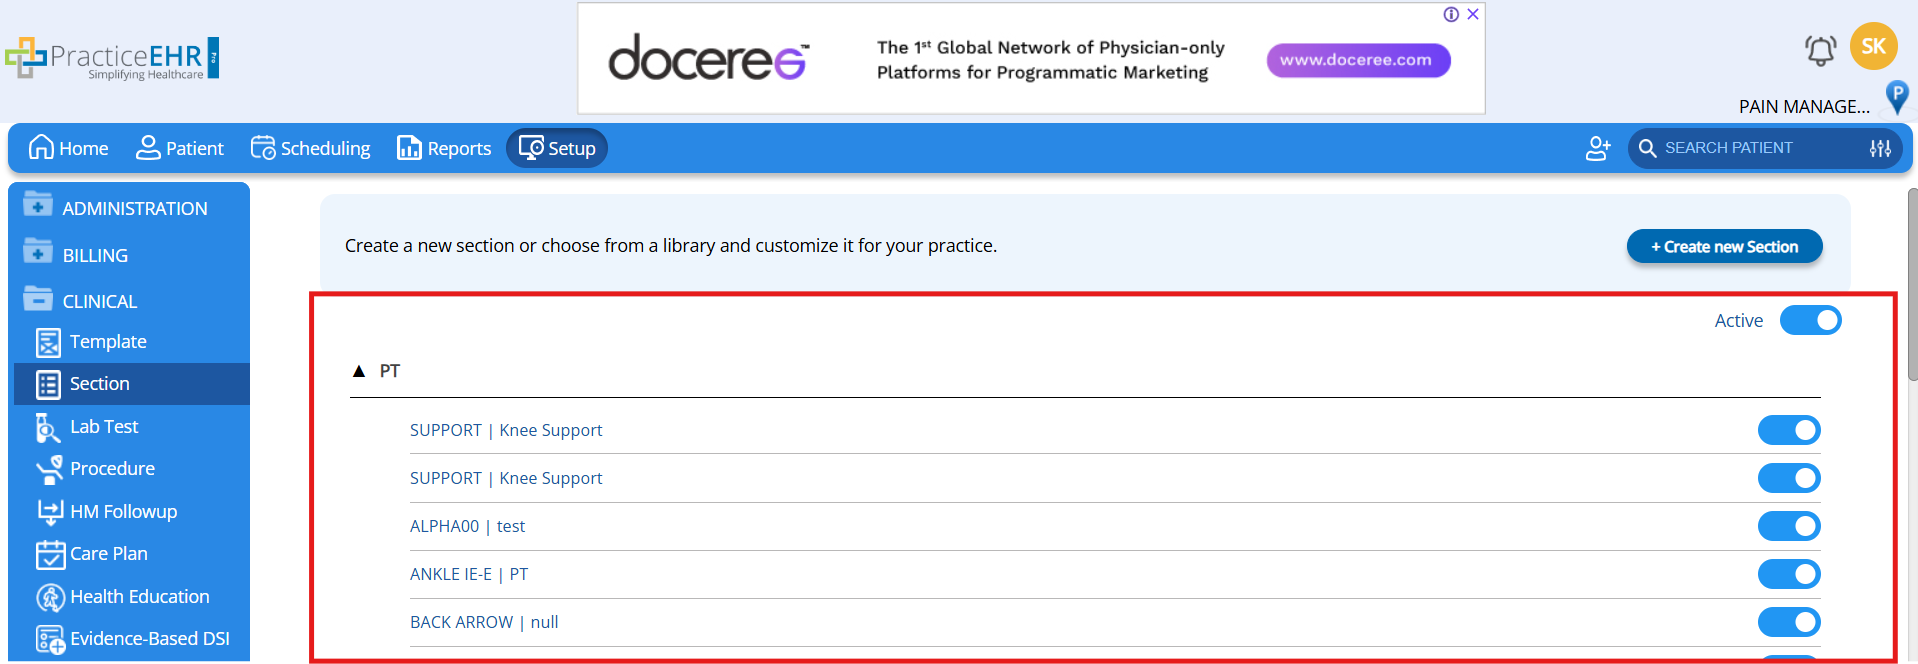
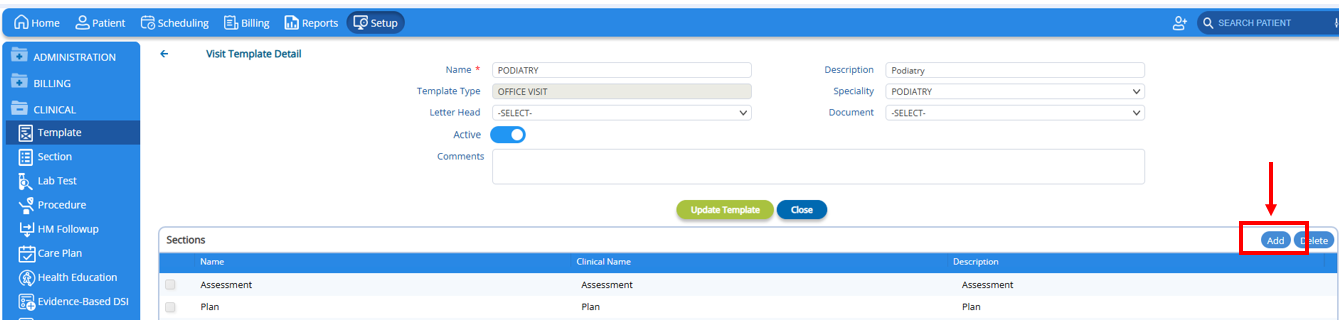
- This section can now be added to different Templates as per the need for the “Create New Template” option in the Setup > Clinical > Template or by editing any existing template.
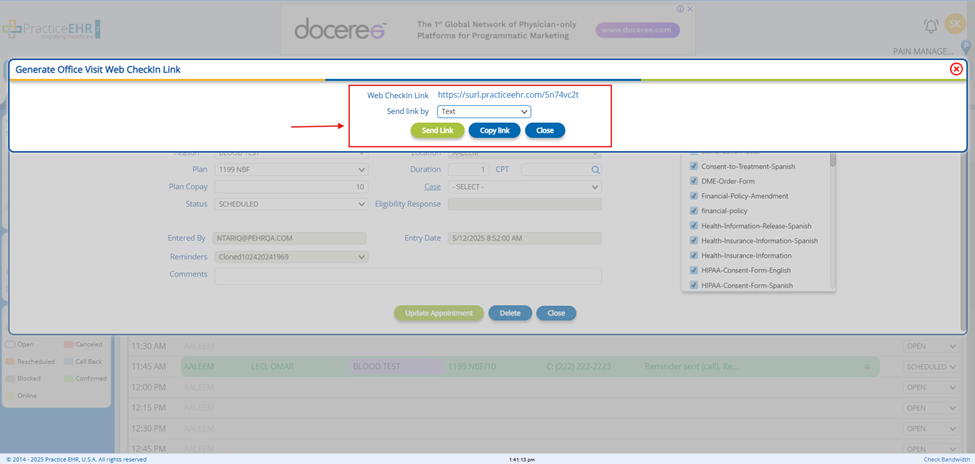
Web Check-In Link Message Enhancement
Overview
An improvement has been made to the Web Check-In Link via Text Message feature, allowing customization of the message content through a configured template. Previously, the text message sent with the Web Check-In link had a fixed format. With the latest enhancement, the text message format is now configurable. This means the content of the message can be tailored to suit specific practice needs.
- Enables personalized and branded communication with patients
- Increases flexibility in message formatting
- Enhances patient experience with clearer or more informative messages
Steps
- Please get in contact with Practice EHR Support team to setup the desired text message template.
- Once configured, the system uses this custom template to send Web Check-In links.
- When a Web Check-In is initiated, using the Send Link button, the patient receives a message using the updated format.
Example Template:
Dear [PtFirst, PtLast],
Your KIOSK Link with [ProviderFirst, ProviderLast] is <a href=':CLICK_PAGE' target='_blank'>click here</a>.
Thank you for trusting [Practice Name] with your healthcare needs.