
An intuitive patient search functionality has been added to the top menu bar of Practice EHR. The search button has been replaced with a search bar. Users can now search for patients based on the patient first name, patient last name and date of birth.
Users can enter their search queries in three formats to search for a patient:
When searching against date of birth, if two digits are entered, Practice EHR will treat the two digits as the month of the date of birth.

Based on the matches found, the dropdown will display:
If the user selects the advanced search option, the rightmost icon in the search bar, the provided inputs will be automatically populated in the advanced search window.
The scheduling module has undergone several improvements, both from a functional and a visual perspective. The improvements are aimed to not only look appealing but streamline appointment management as a whole.
The layout of the calendar tab has been redesigned to be modern and minimalistic, all the while displaying critical information clearly and concisely.

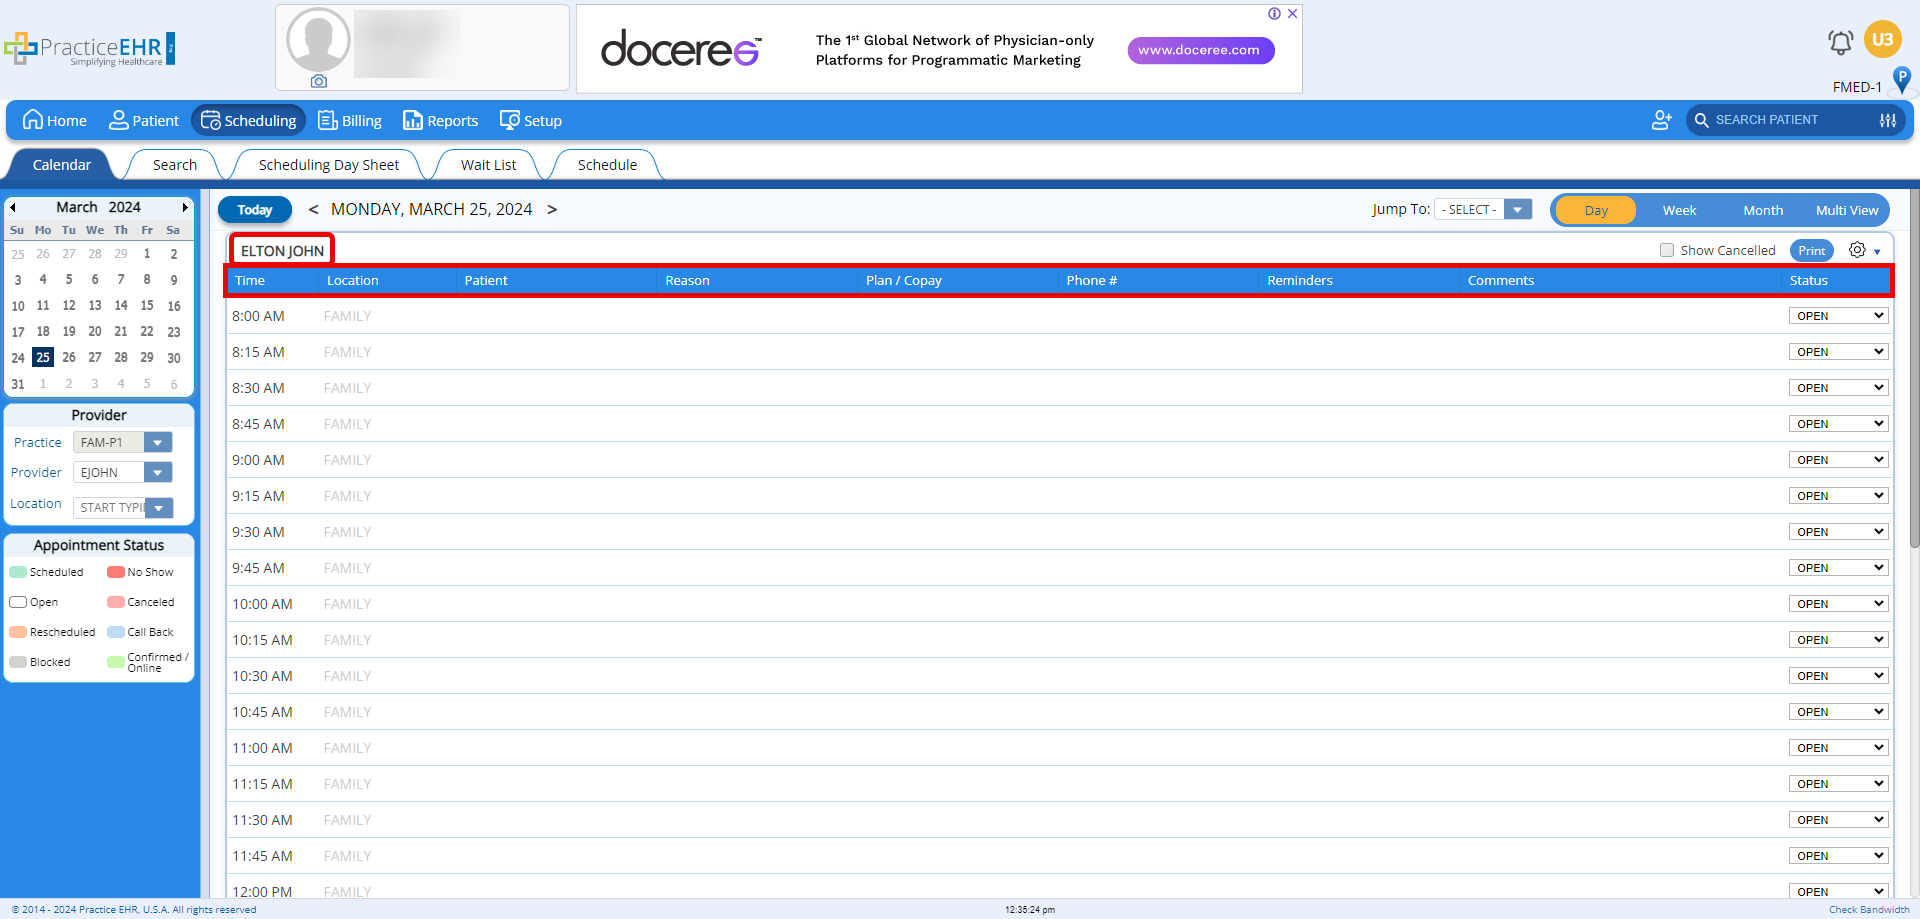
Appointment statuses have been expanded and redesigned to make appointment management more intuitive. Previous appointment statuses namely, "Scheduled" and "Blocked" have been assigned new lighter colors.
The following new appointment statuses have been added:
When an appointment is scheduled, a scheduled appointment row will be created within the time slots.
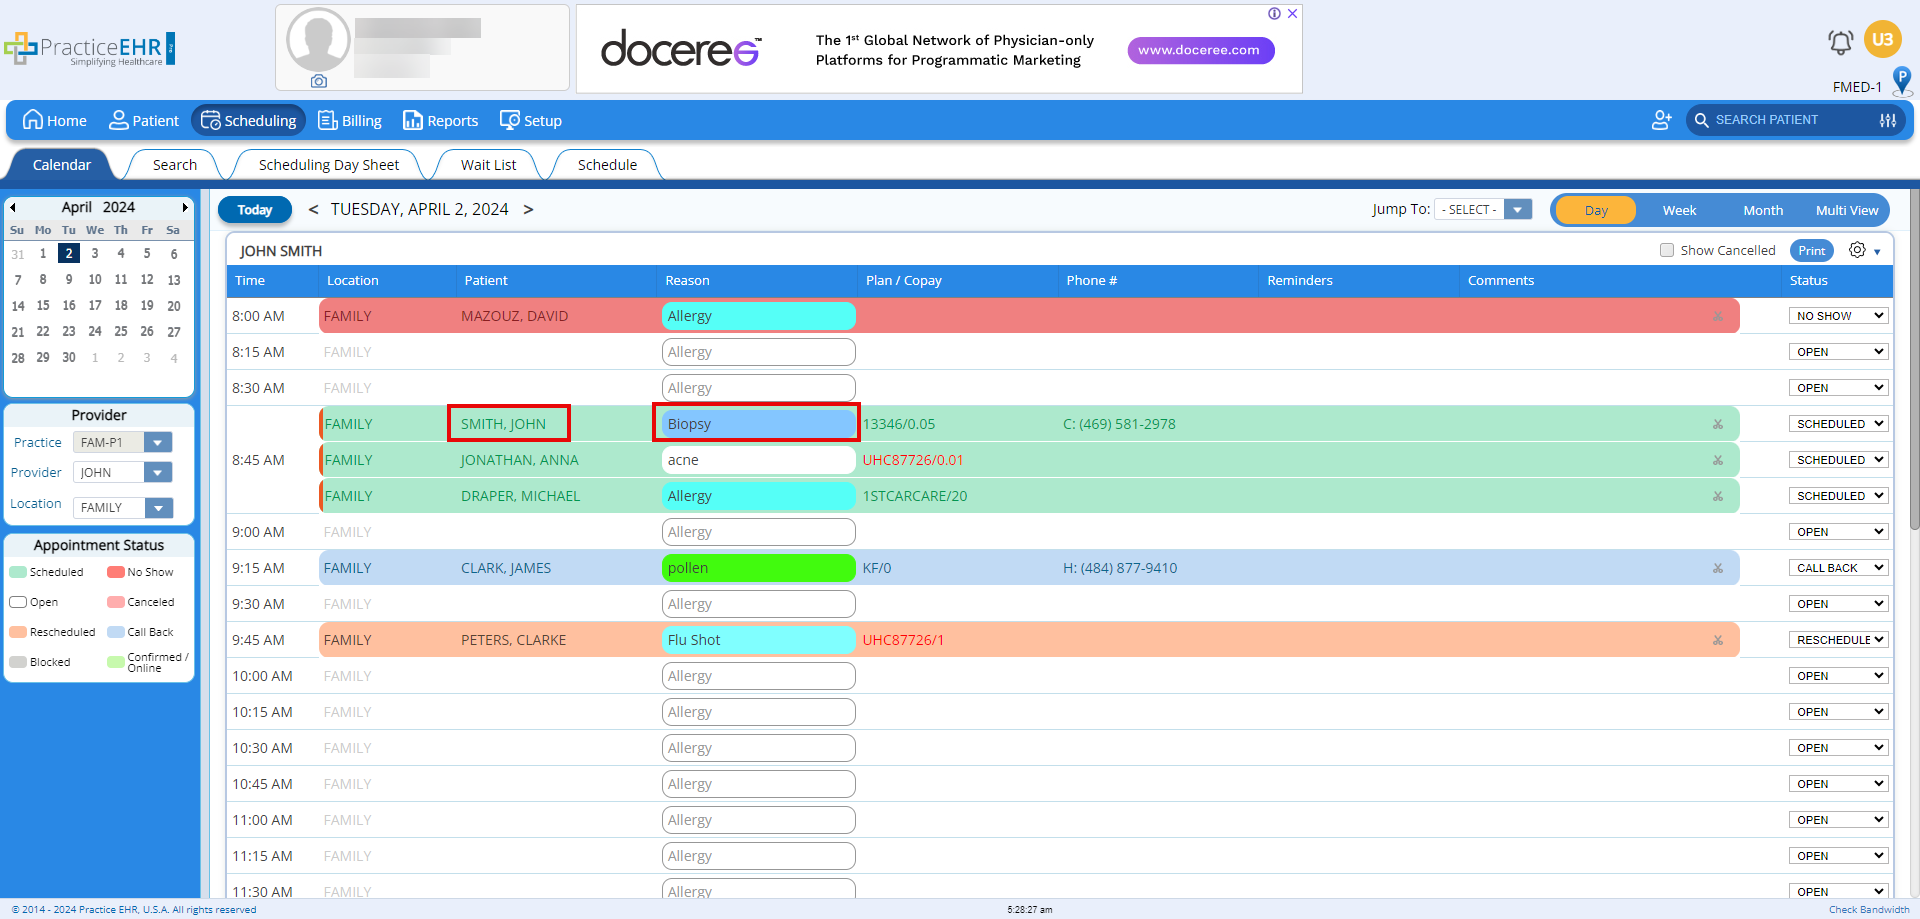
A scheduled appointment row does not take up the complete length of the grid, there is a white space left in the slot and upon clicking it the new appointment booking window will appear.
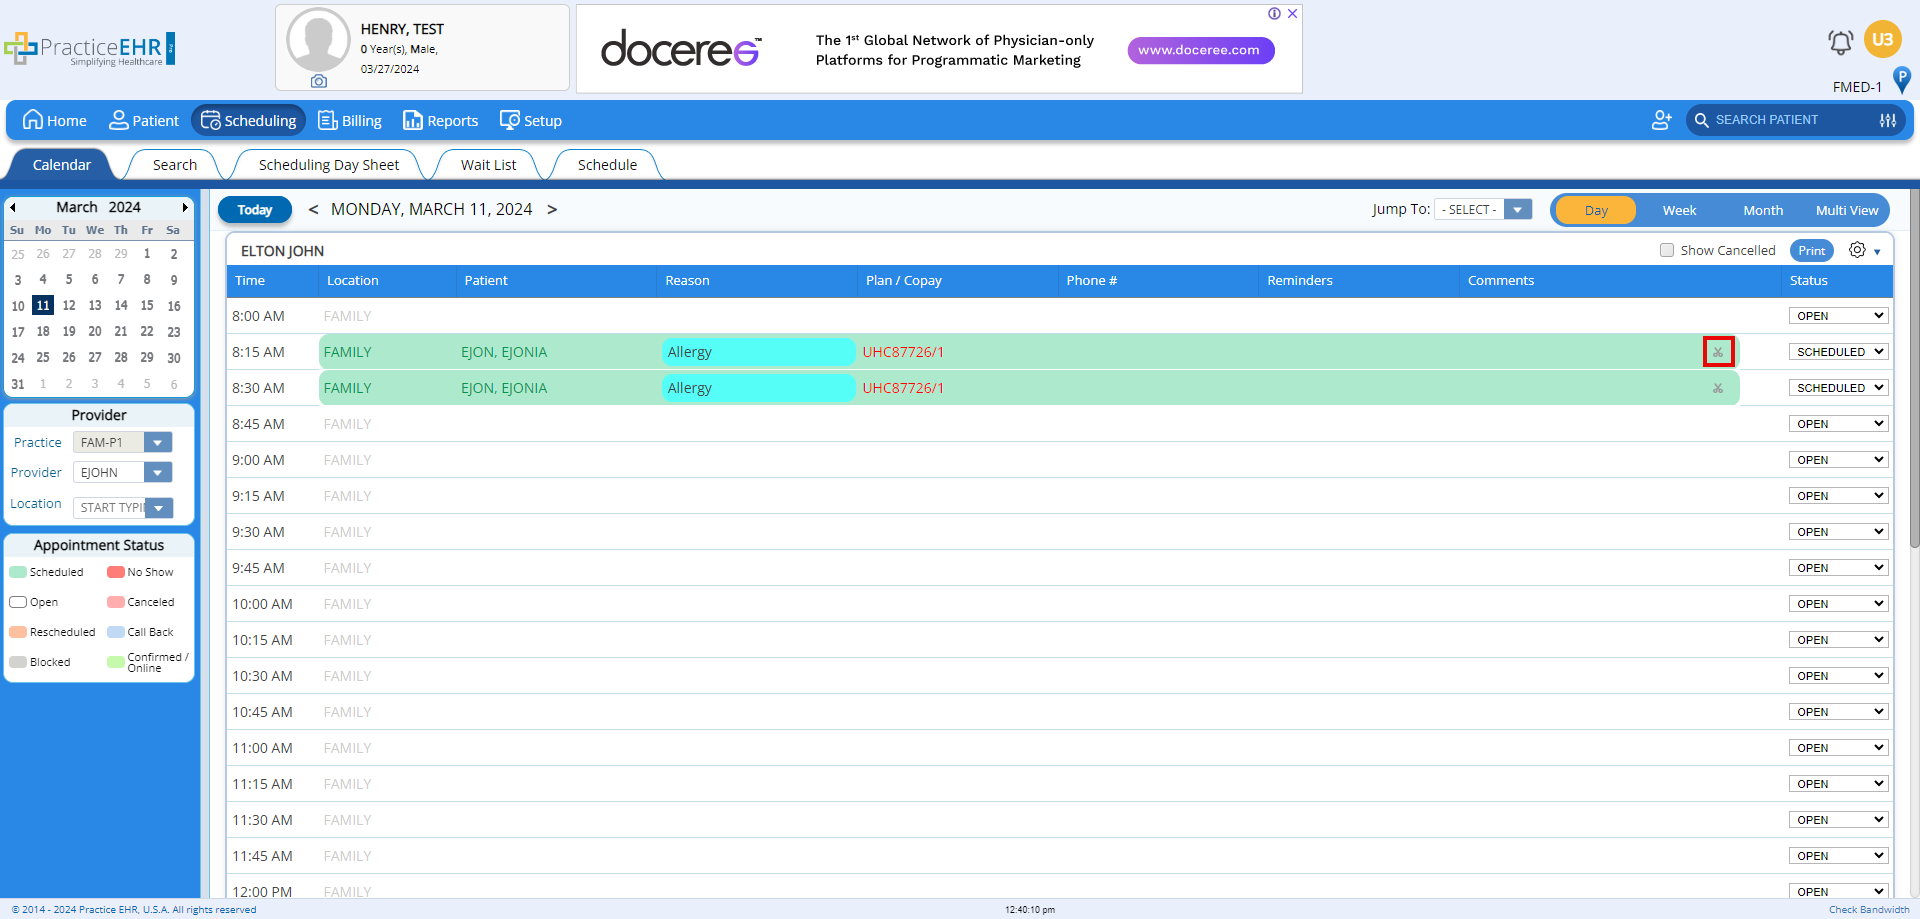
All the booked appointment now has a "Scissor" icon, which allows users to cut the appointment. After cutting an appointment, the user can only paste that particular appointment on the required available slot. To paste the appointment when hovering over a slot, a tooltip will appear displaying "paste appointment".
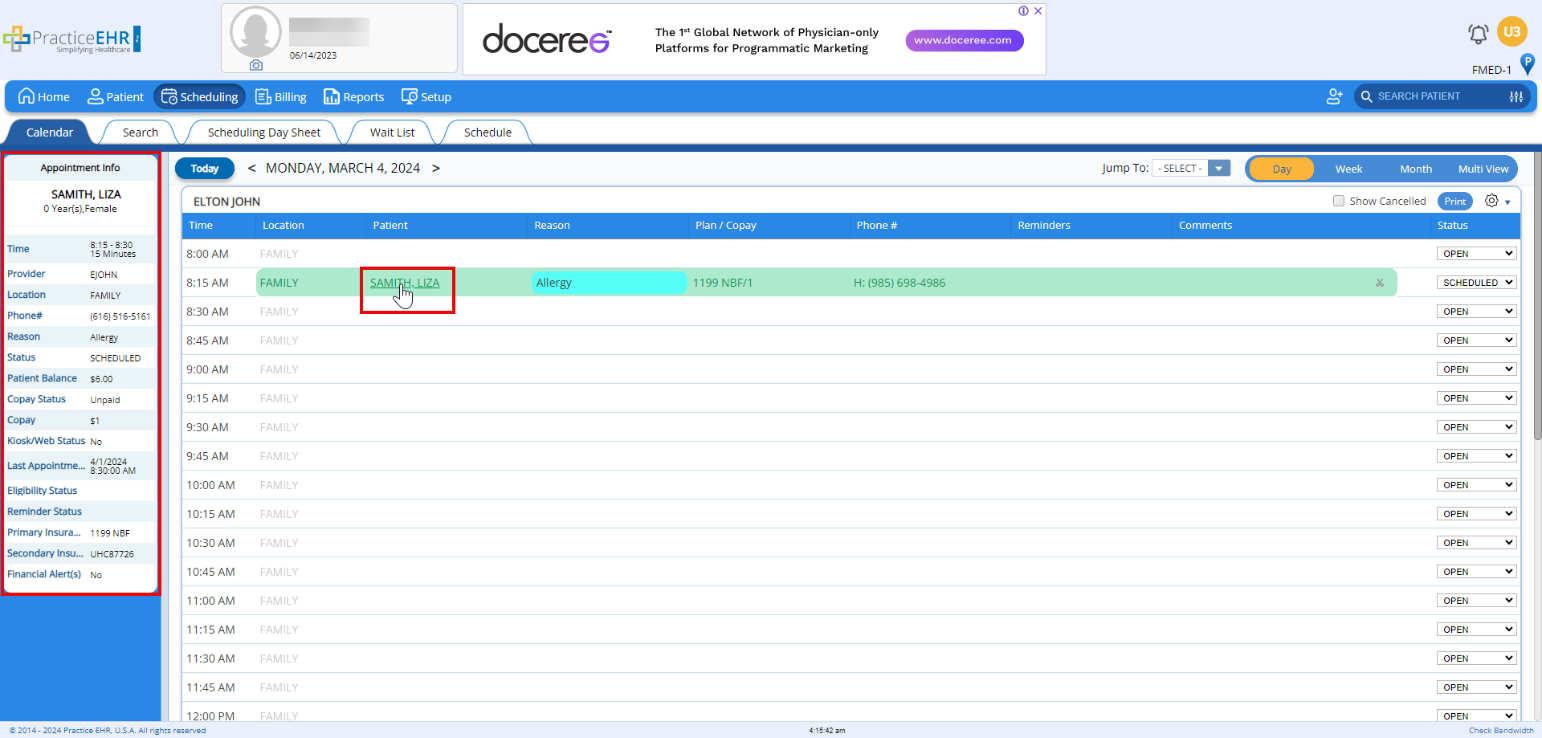
Hovering on the patient's name hyperlink on any booked appointment will display an appointment info card on the left-side menu.
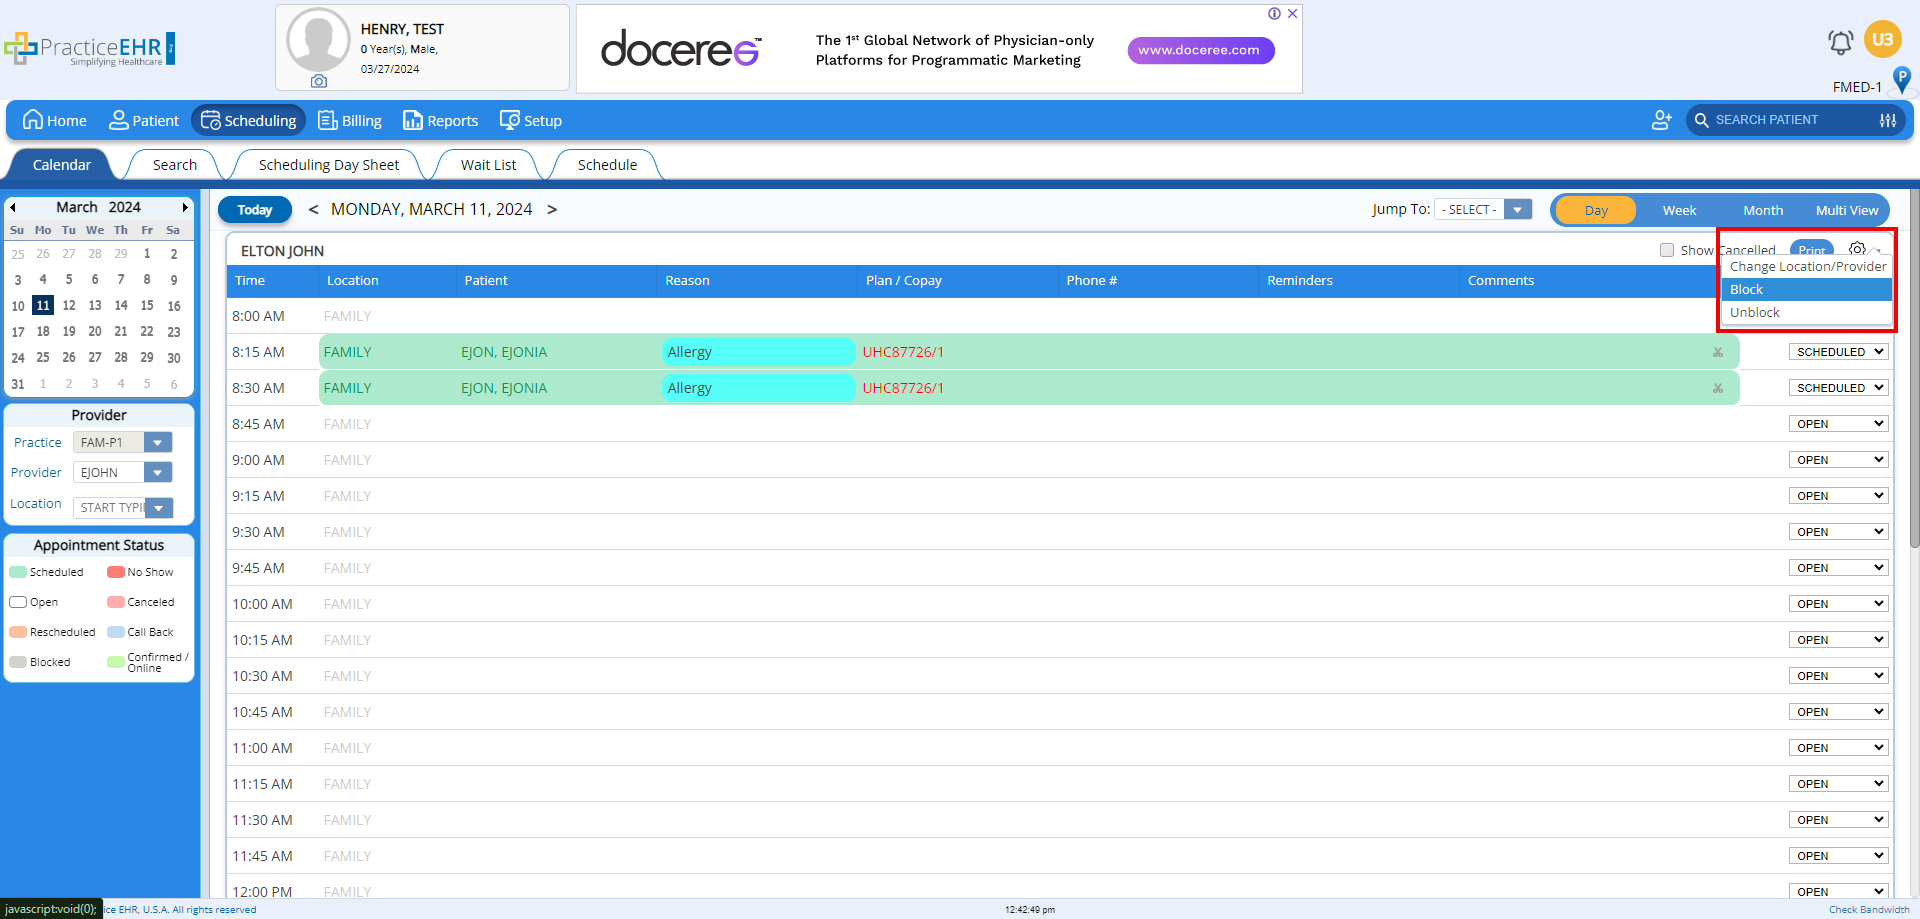
The provision to block multiple time slots has been provided in the Day view. This option is available in the gear icon dropdown. Clicking on the "block" option will display the block window. Here users can define the time range for which they would like to block timeslots.
In the Day view, users will be able to change the location or provider for a timeslot. In the gear icon dropdown, the "Change Location / Provider" option has been added.
Clicking on this option will open the "Change Location / Provider" window. This window will allow users to select a new provider and location for multiple timeslots, using the time range provided.

The week view also displays the location in a muter font. In addition to this, Practice EHR has provided the provision to set location colors.
The height of the scheduled appointment will vary based on the duration of the appointment. Overlapping of overbooked appointments will be displayed from left to right.
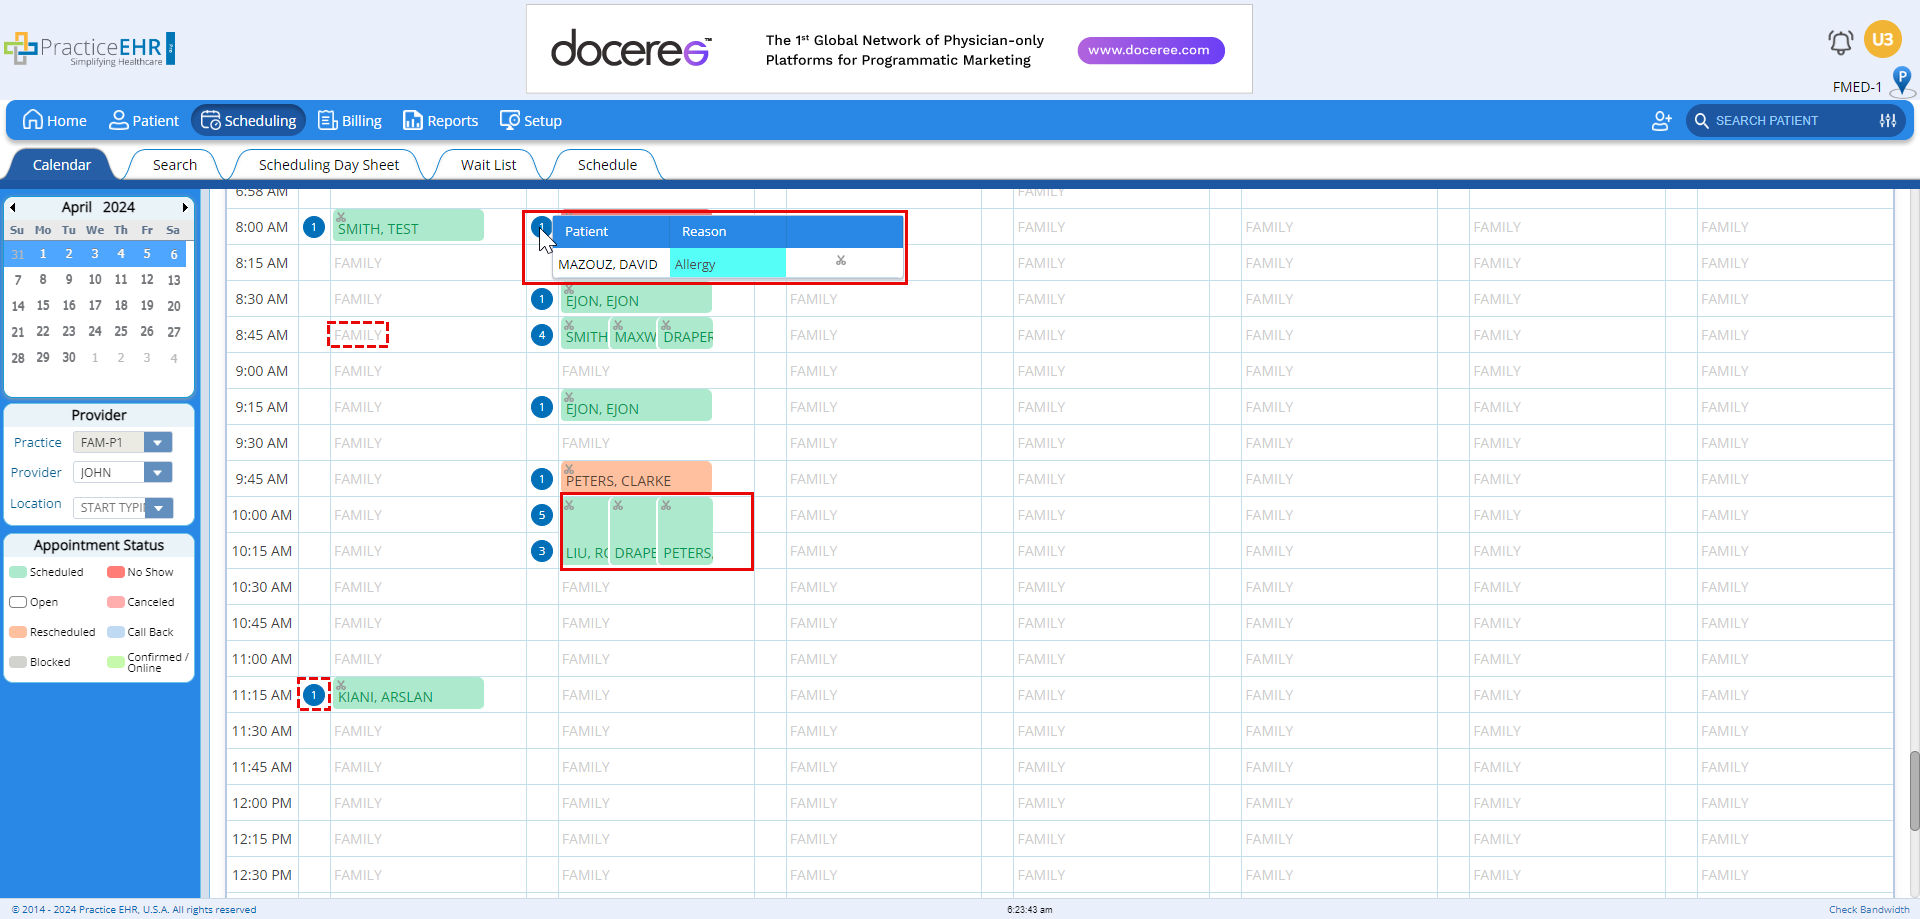
A number is displayed in a column to the left of the appointment showing the total number of appointments booked on that particular slot. Hovering on the number will display the appointment reasons and patients of that specific slot as shown below.
The month view will now display the counts for each day cell:
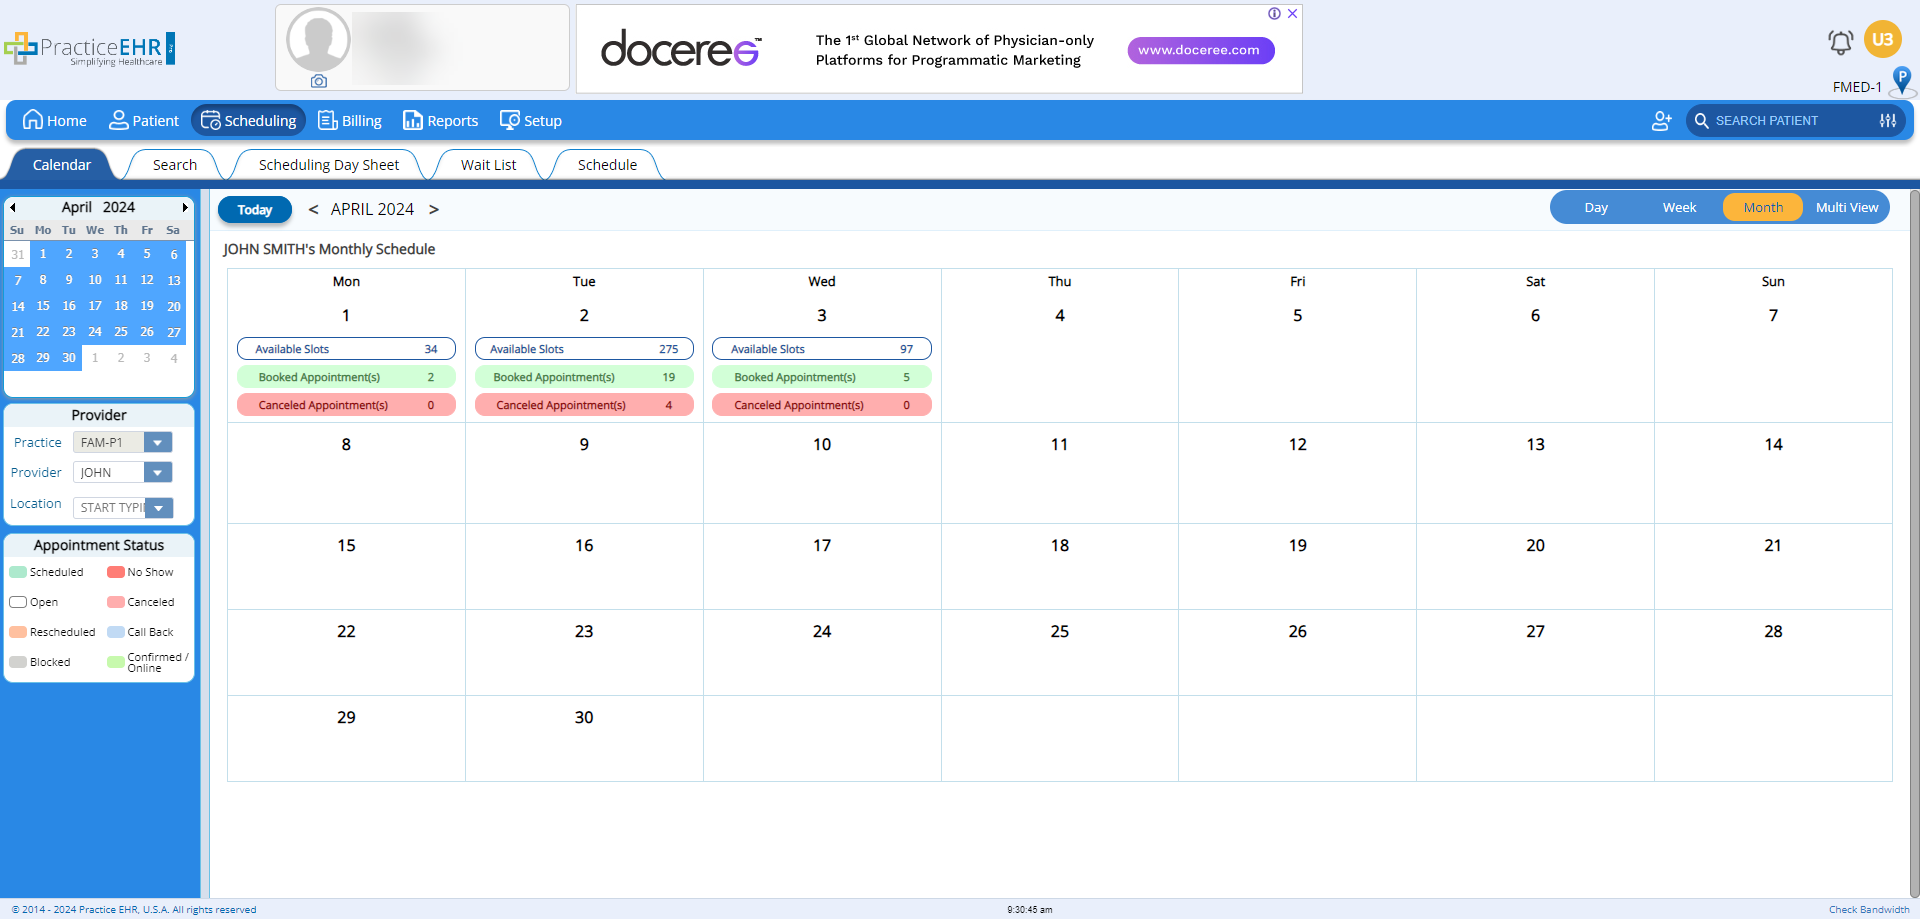
They are designed to convey key information for efficient appointment workload management for the practice.
The multi view showcases the same general UI changes displayed in the week view. A number is displayed in a column to the left of the appointment to show the total number of booked appointments on that slot. Hovering on the number will display the appointment reasons and patients of that specific slot as shown below.
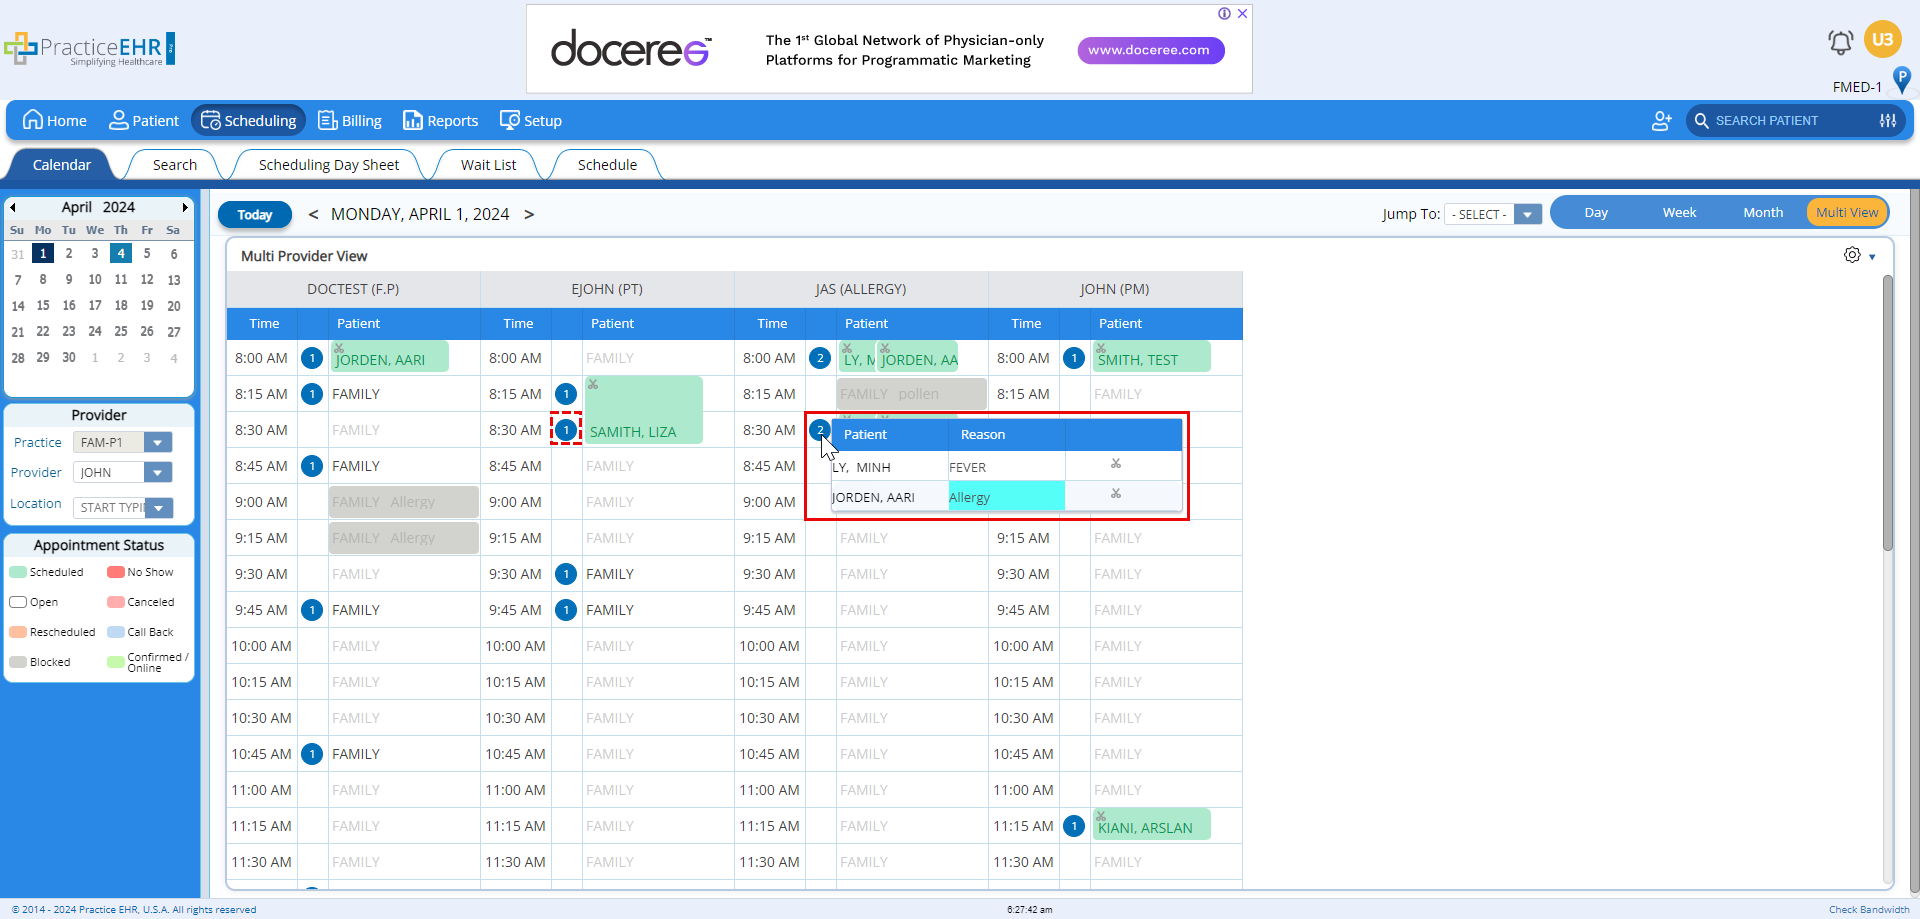
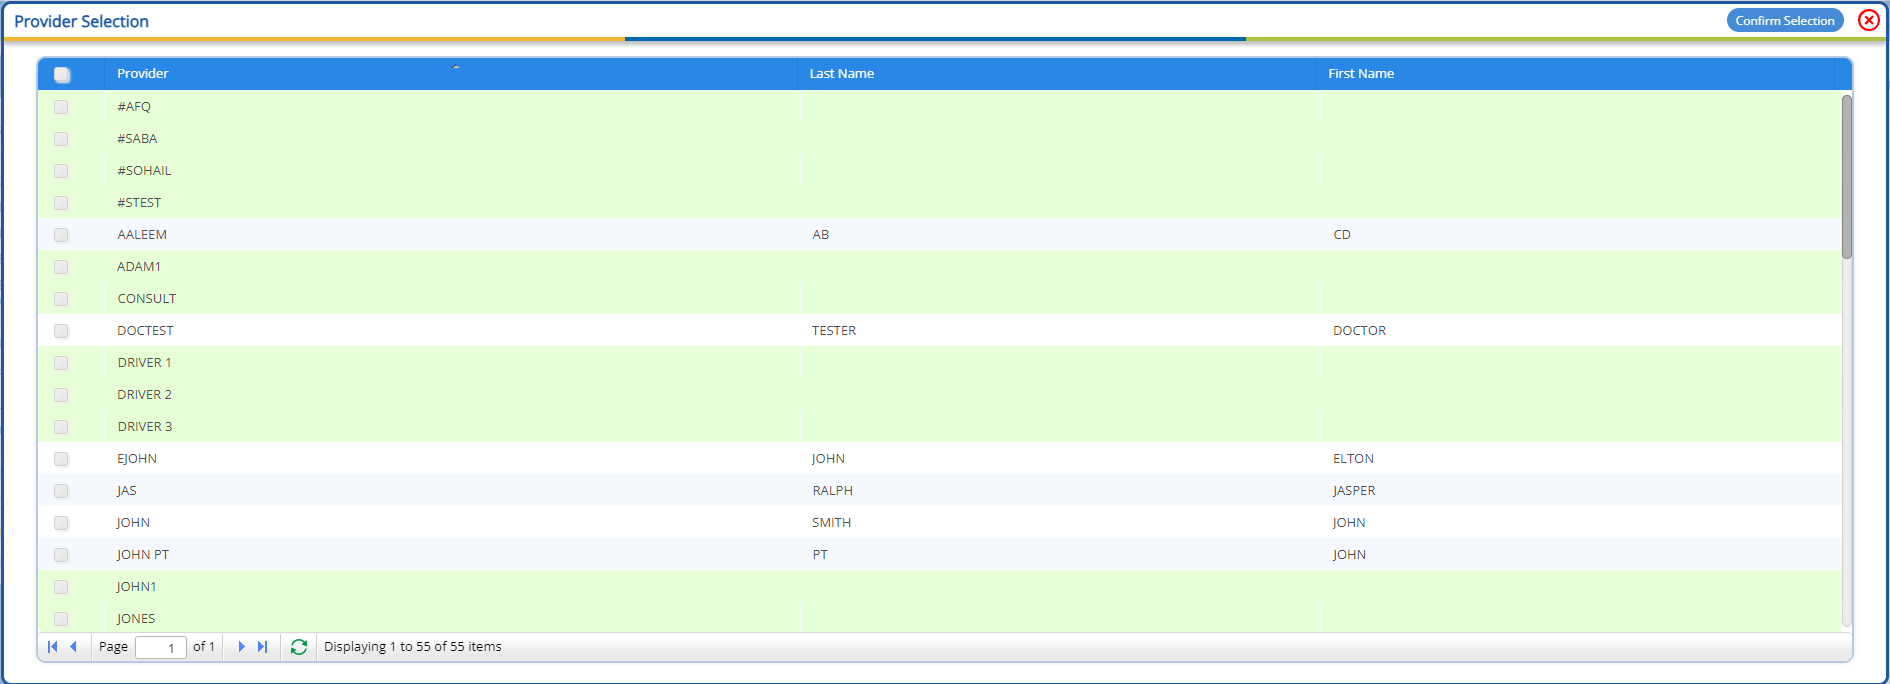
The "Provider Selection" window, accessed from the multi view gear icon has been updated. The "Cancel" and "Confirm Settings" buttons in the header have been replaced with "Confirm Selection".
The colors for inactive providers and resources have been updated to a lighter tone.
Users will be able to book a new appointment by clicking any empty space in the scheduling calendar grid. This can be done on the "Day", "Week" and "Multi-View" grids. This will open the "Book Appointment" window.
Users can cut an appointment by clicking on the "scissor" icon in the scheduled appointment row. This icon is located in the top right corner of a scheduled appointment. This icon will be available on all views except the "Month" view.
After clicking the "Cut" icon, now when the user hovers on an empty timeslot, the tooltip will display "Paste Appointment". Clicking on any open slot will paste the appointment.
Hovering on the patient's name hyperlink on any booked appointment will display an appointment info card on the left-side menu.

Clicking on any booked appointment will display the appointment detail window.
Users will be able to overbook an appointment by clicking on the blank space on a timeslot.
In addition to the usual appointment creation options, users will have access to the recurring appointment options for the appointment.
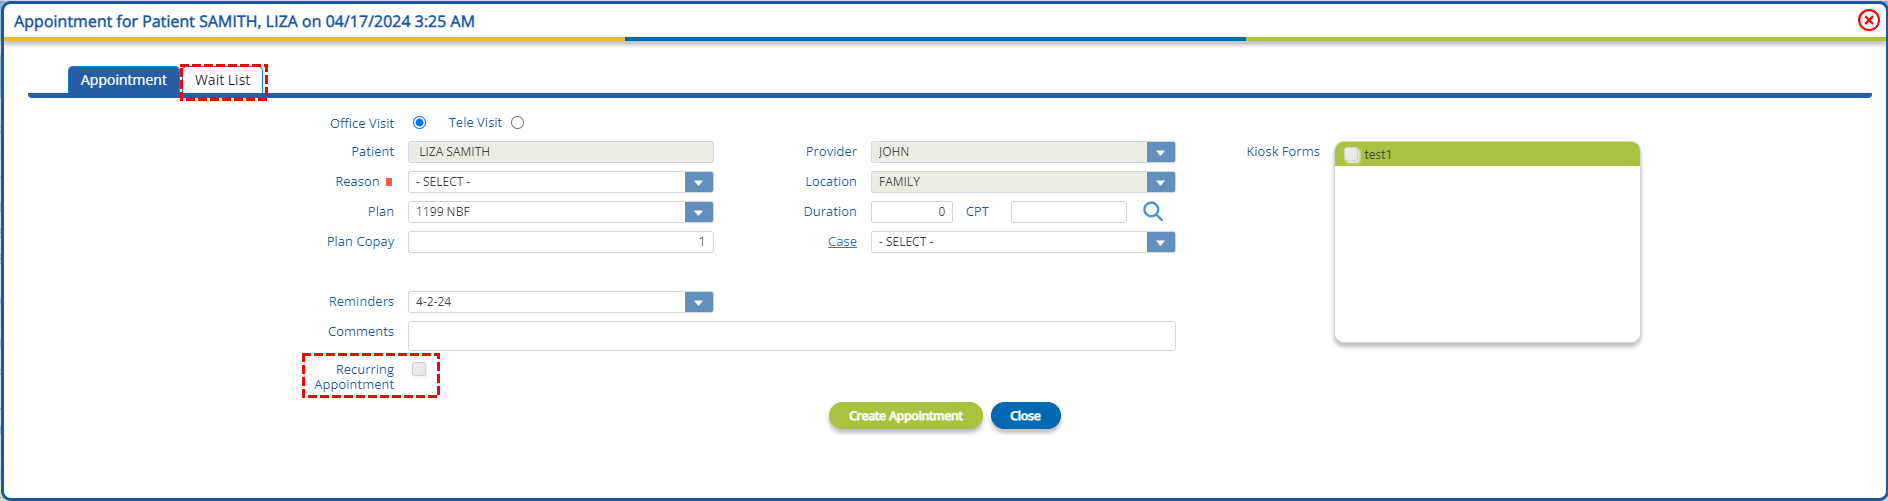
From the appointment booking window, the "wait list" can be accessed from the sub-tab below the window header. Users will be able to book an appointment from the wait list just as before.
Once an appointment is booked, users can view the appointment details by clicking on the appointment slot to open the appointment detail window. This window contains the operations that were previously accessed by the blue dropdown icon.
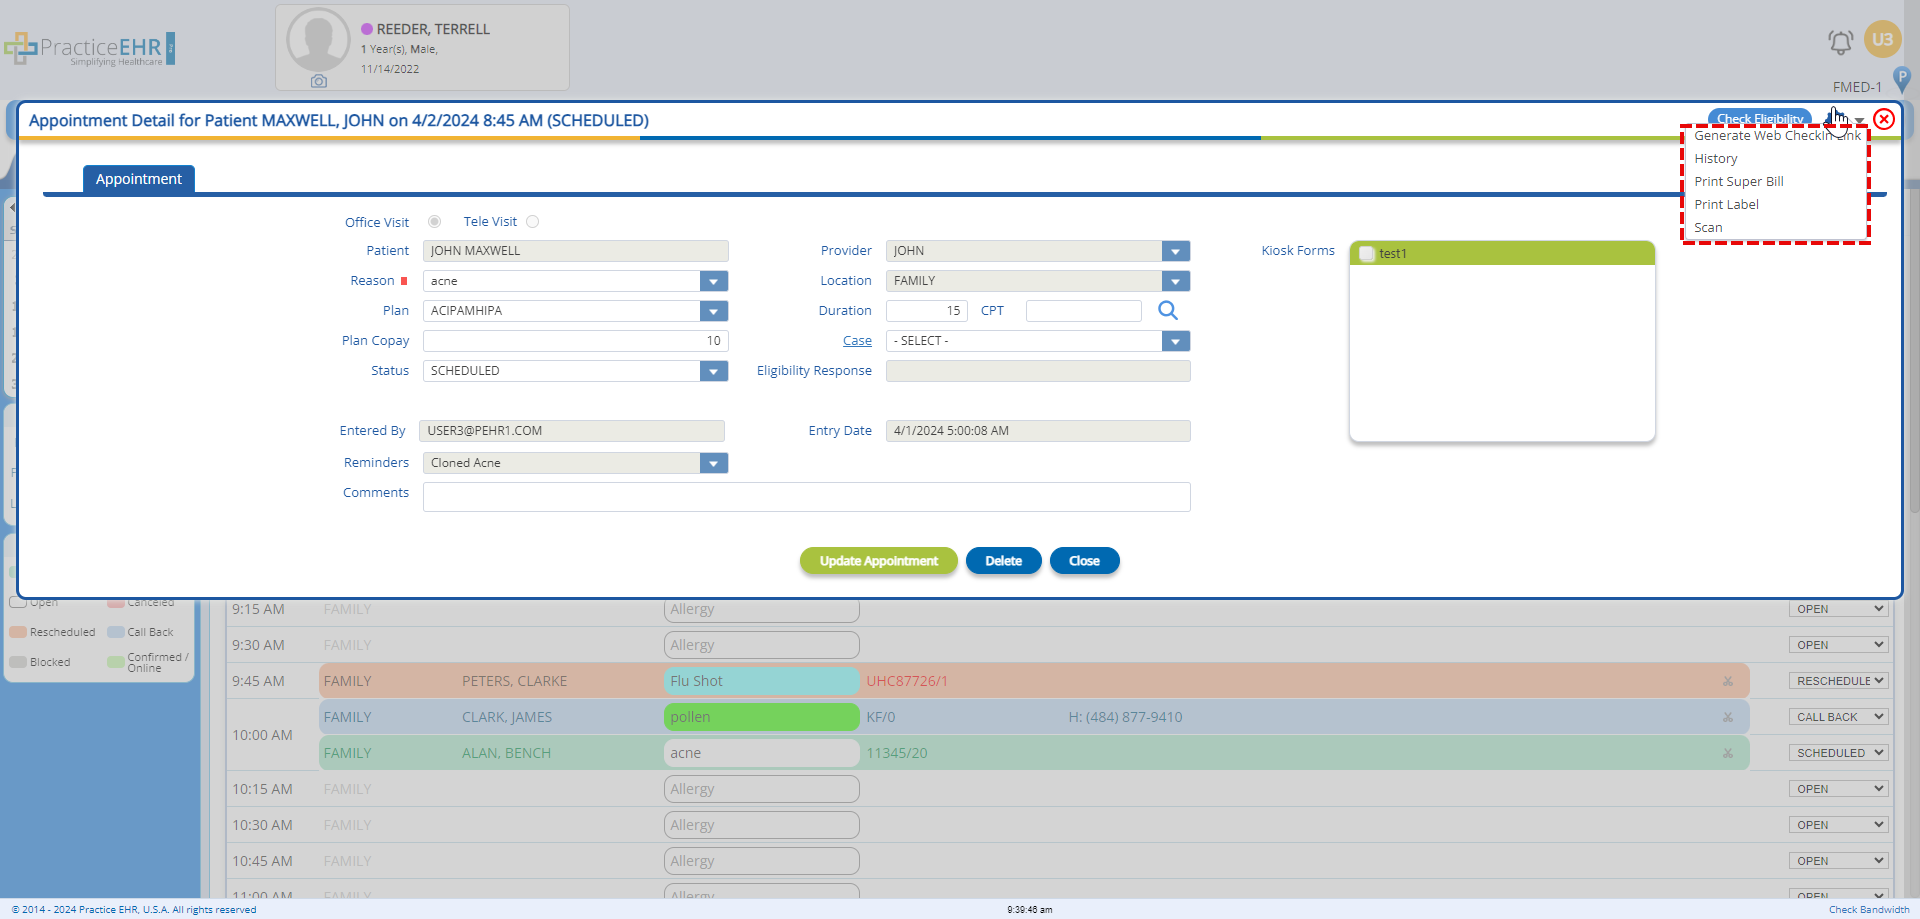
The "Generate Web CheckIn Link", "History", "Print Super Bill", "Print Label" and "Scan" options can be found in the gear icon located in the header.
The "Check Eligibility" option is now a button in the window header beside the gear icon.
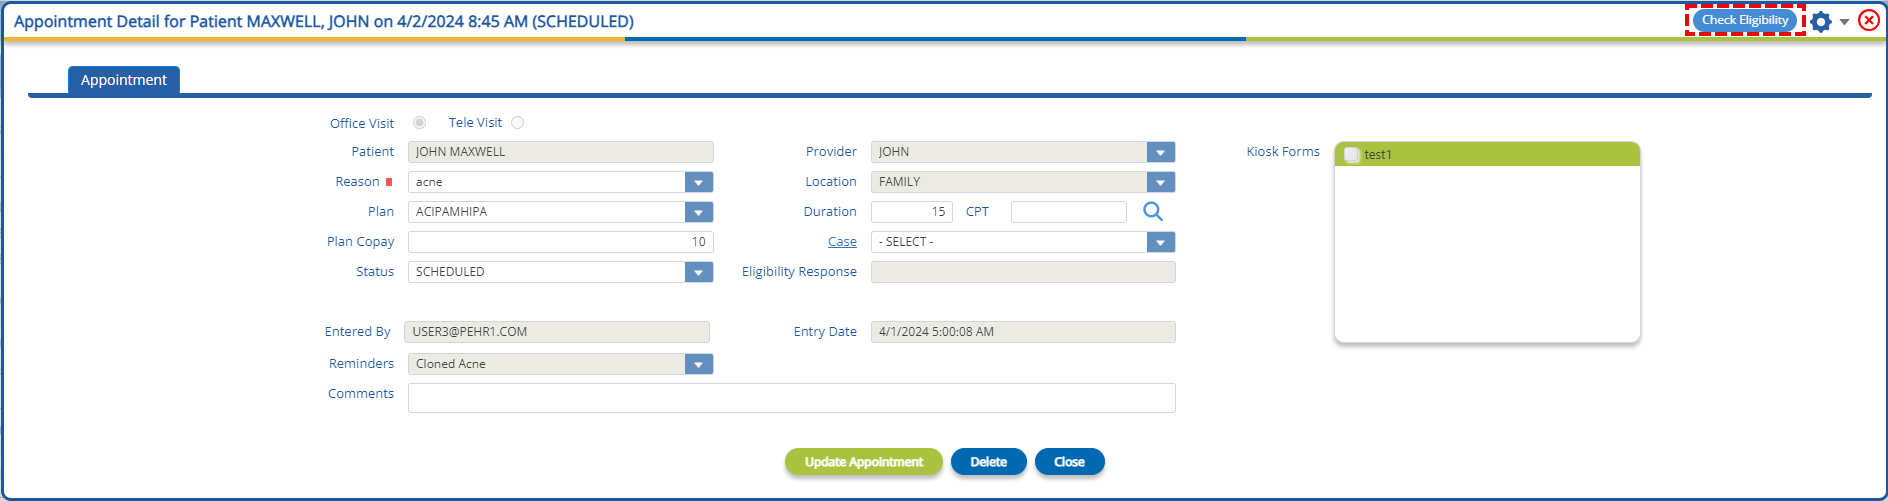
Two fields are visible in this window when an appointment is booked. These fields are:
In the "Patient Demographics" tab, the "Driver's License" field has been updated. The driver license icon has been shifted in the field itself.
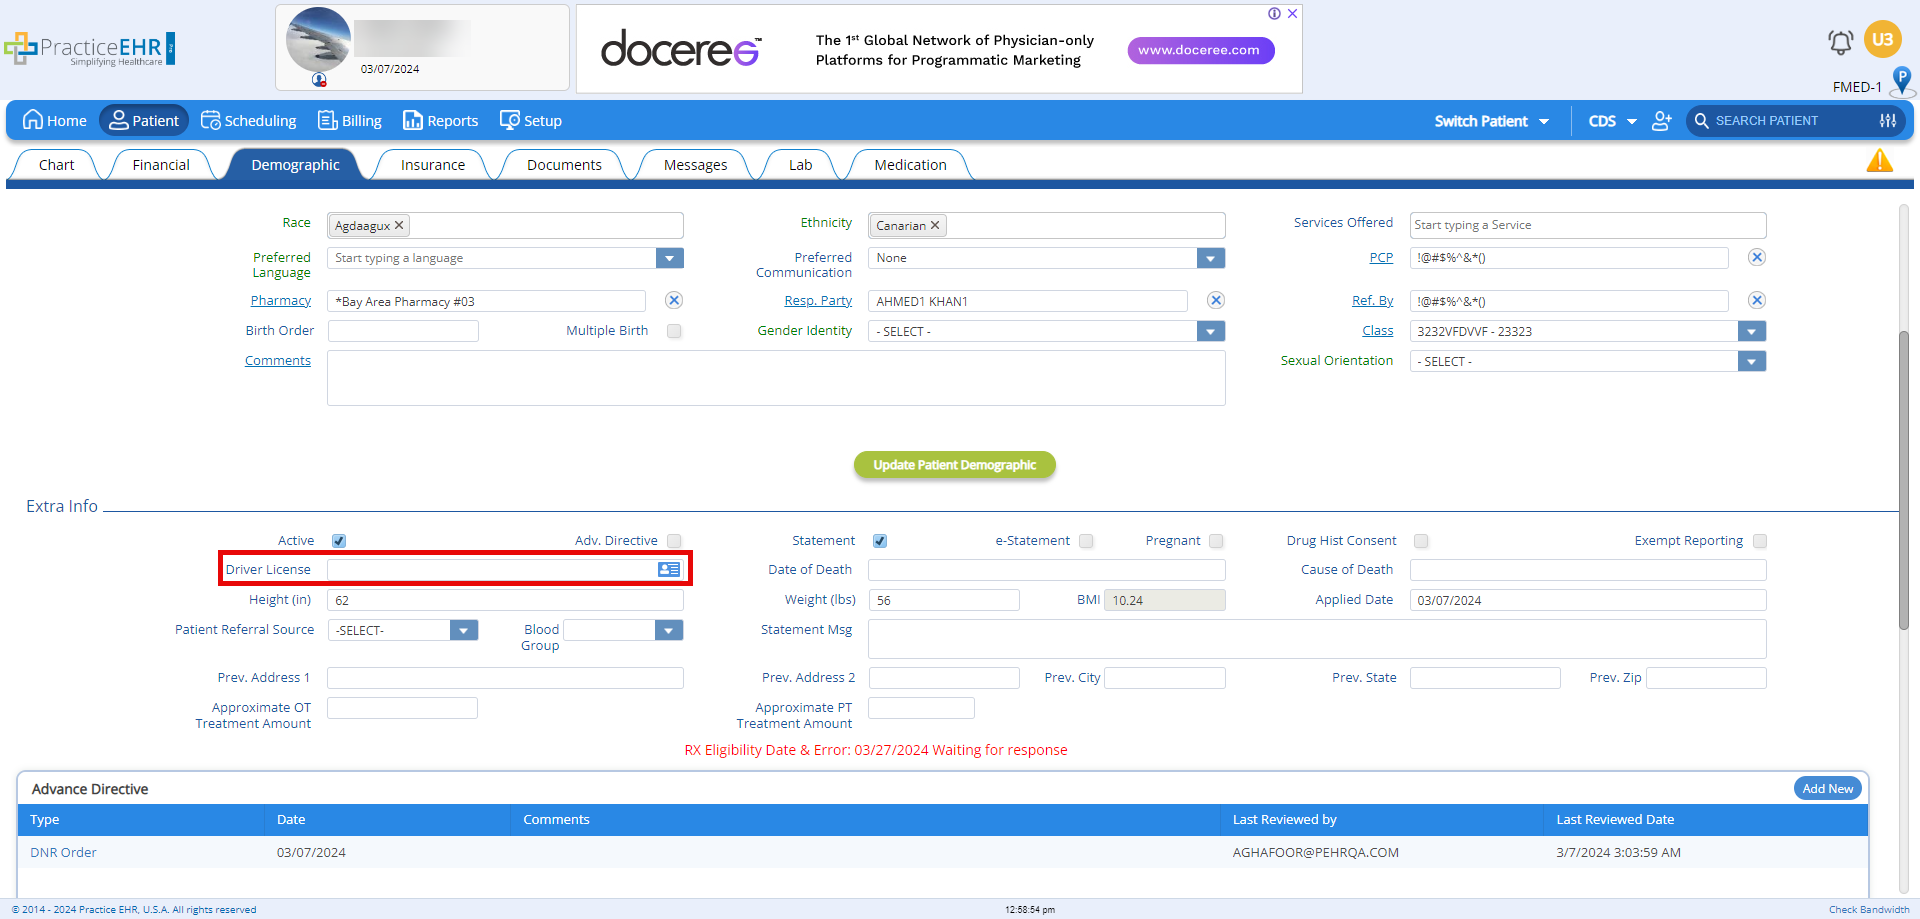
The default view of this icon will now be grey, indicating that no driver's license has been uploaded. If a driver's license is attached to the patient, only then will the icon's color change to blue. Clicking the blue icon will open up the driver license document.
This has been done to clearly communicate whether a driver's license is attached to the patient.
Practice EHR has introduced the facility to import insurance cards within the "Patient Insurance" tab. Users can find the new "Import Insurance Card" option in the new gear icon dropdown.
This dropdown also contains the "Scan Insurance Card" and the "Custom Field" options. In addition, the "Scanned Medical Cards" button has been renamed to "View Insurance Card".

On clicking "Import Insurance Card" option from the gear icon dropdown, the "Upload file(s)" will appear.

Here the user can upload files by dragging them into the window or by using the browse option.
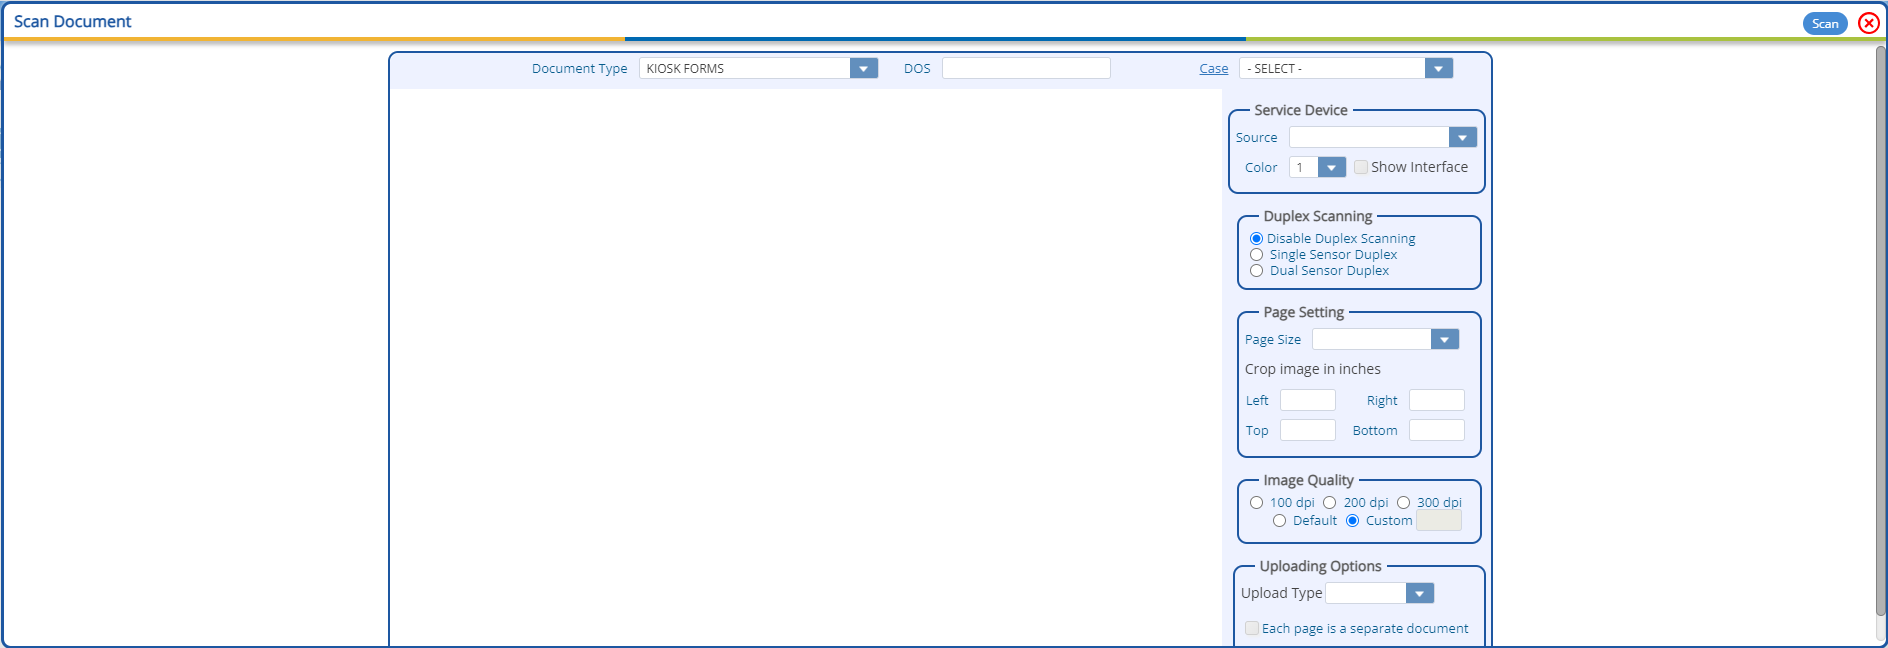
The insurance card scanning operation can be performed from the option provided in the gear icon dropdown. Clicking the "Scan Insurance Card" option will display the "Scan Document" window.
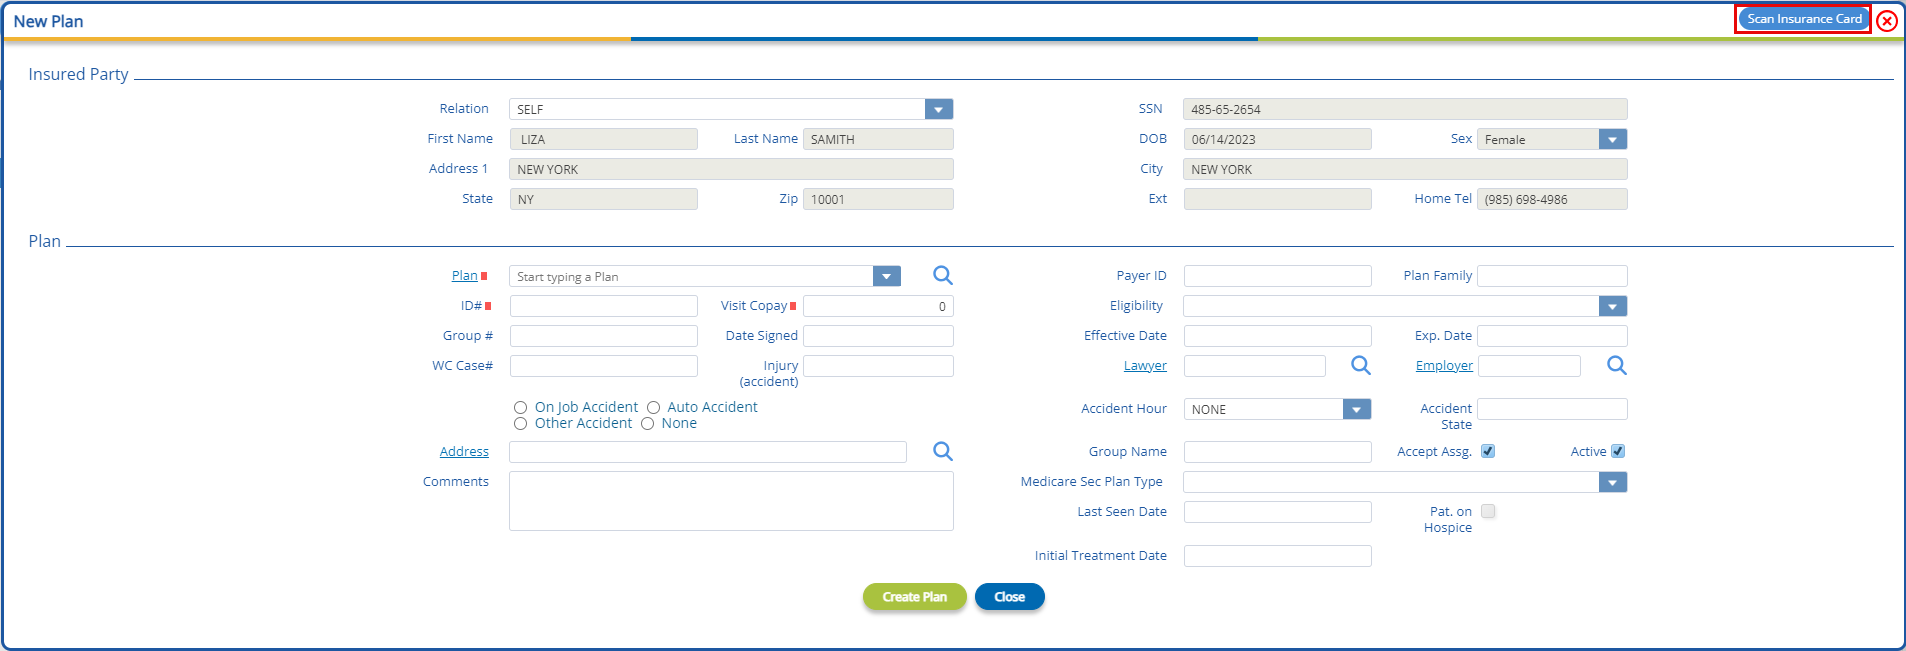
Users will also be able to scan insurance cards from the "Scan Insurance Card" button available in the "New Plan" window.
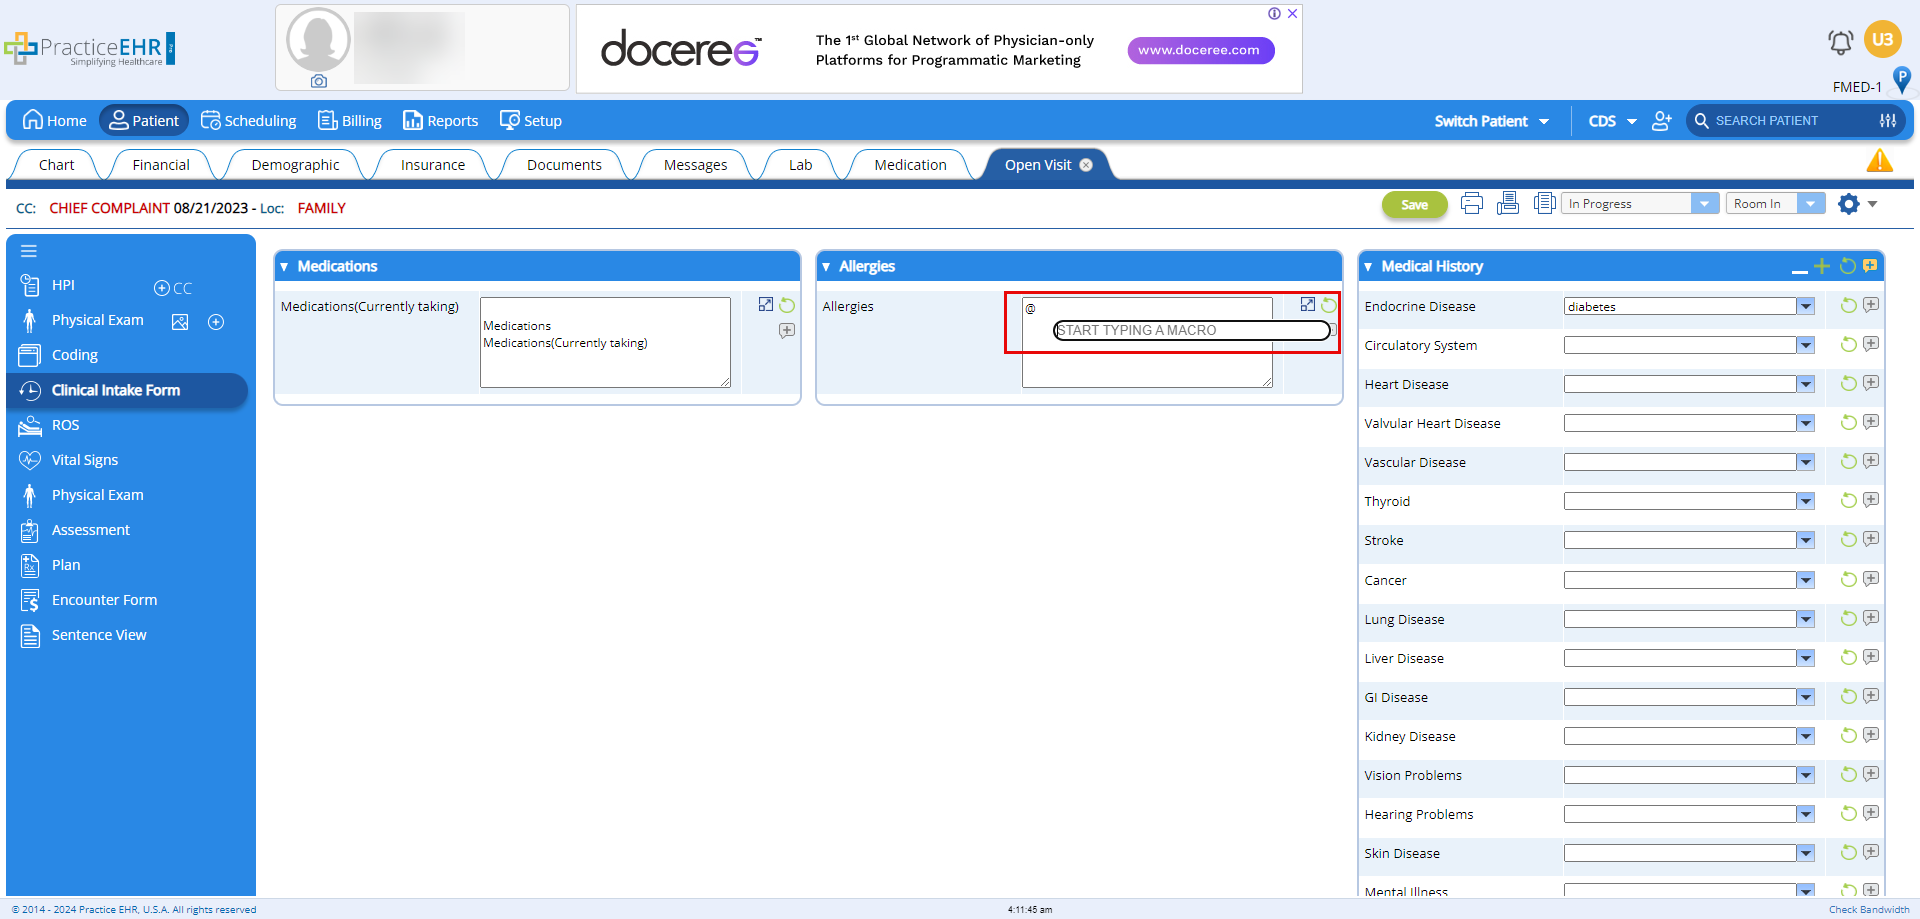
The "Macro" functionality in patient visits has been upgraded. Previously, a macro could be run by typing the macro name and then entering space in text fields or in the sentence view.
Users will now be able to apply macros intuitively by typing the "@" sign in text fields. This will display a smart search allowing users to add macros to their visits without having to type the entire macro.
In the 'Add' section, accessible via the gear icon in Open Visit, the search button has been removed.
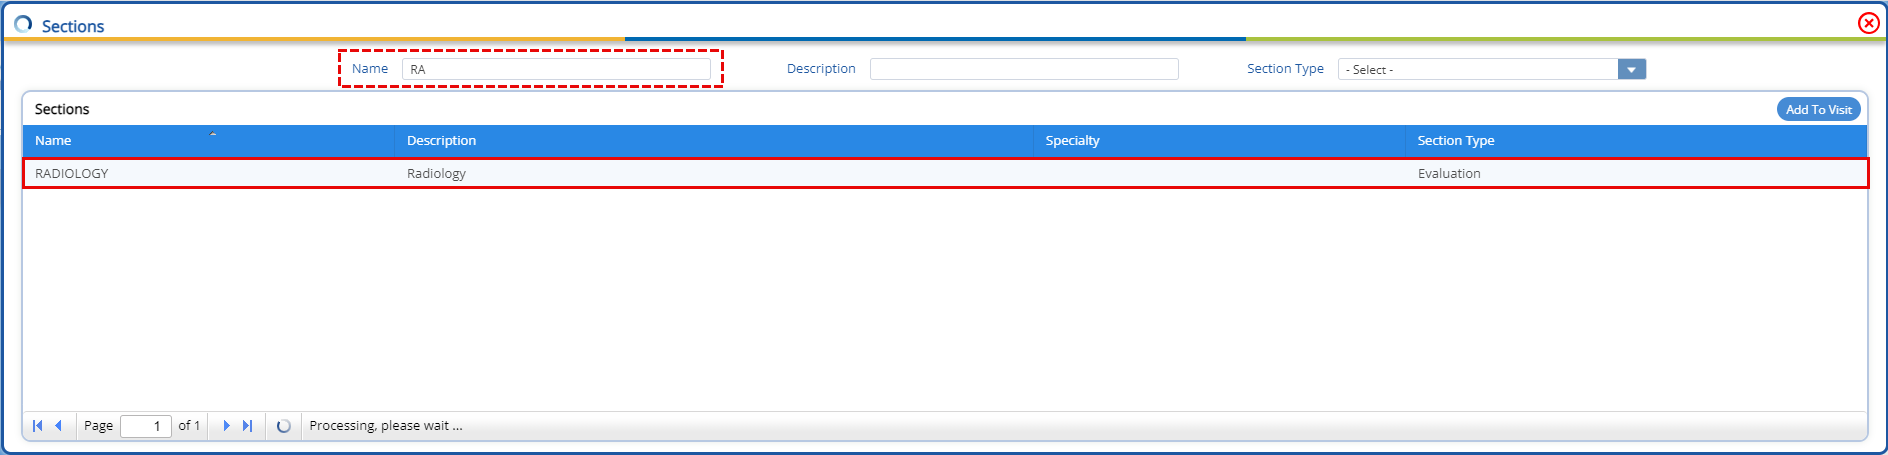
Now, if a user inputs a single character in any of the fields (Name, Description) or selects an option from the 'Section Type' dropdown menu, the table grid will automatically filter according to the input.
In the "Appointment History" window, a new tab by the name of "Reminder" has been added.
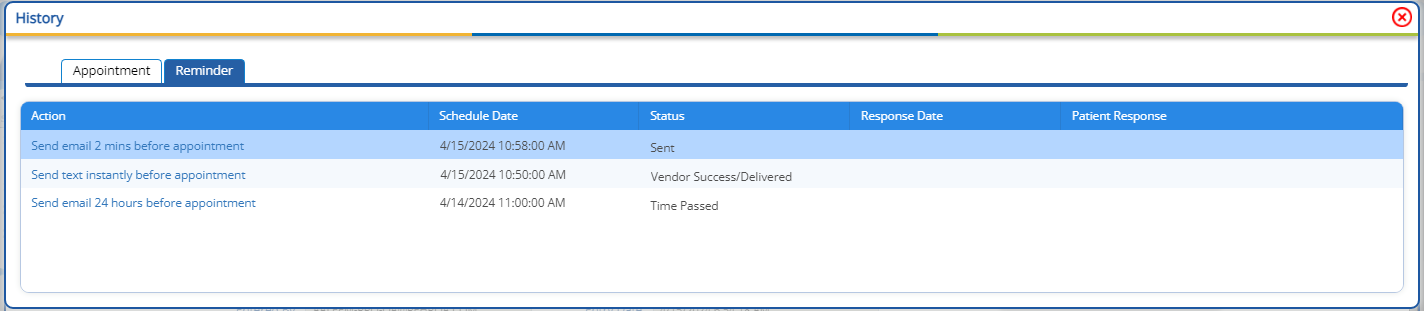
This tab displays all the actions that have or have yet to be carried out for the appointment as defined by the reminder workflow.
Users will be able to view the "Status History" for each action by clicking on the hyperlinked action.

This will tell users of the changes in status of the action and the date time at which those changes occurred.
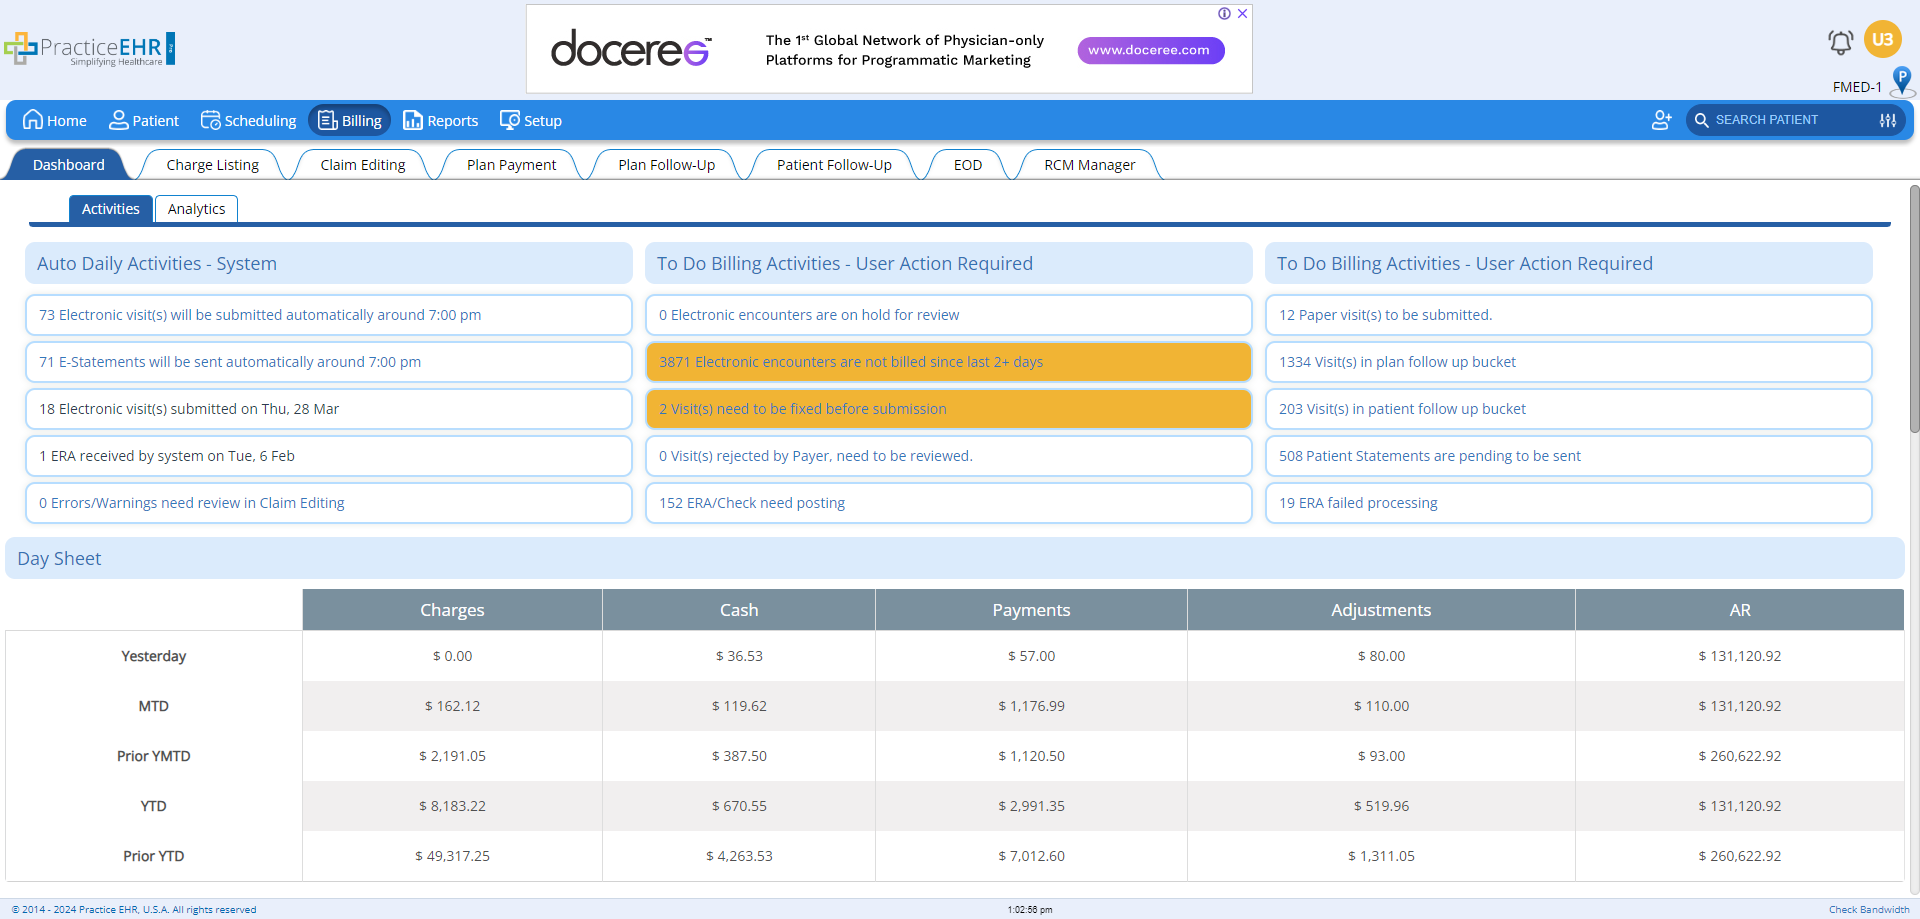
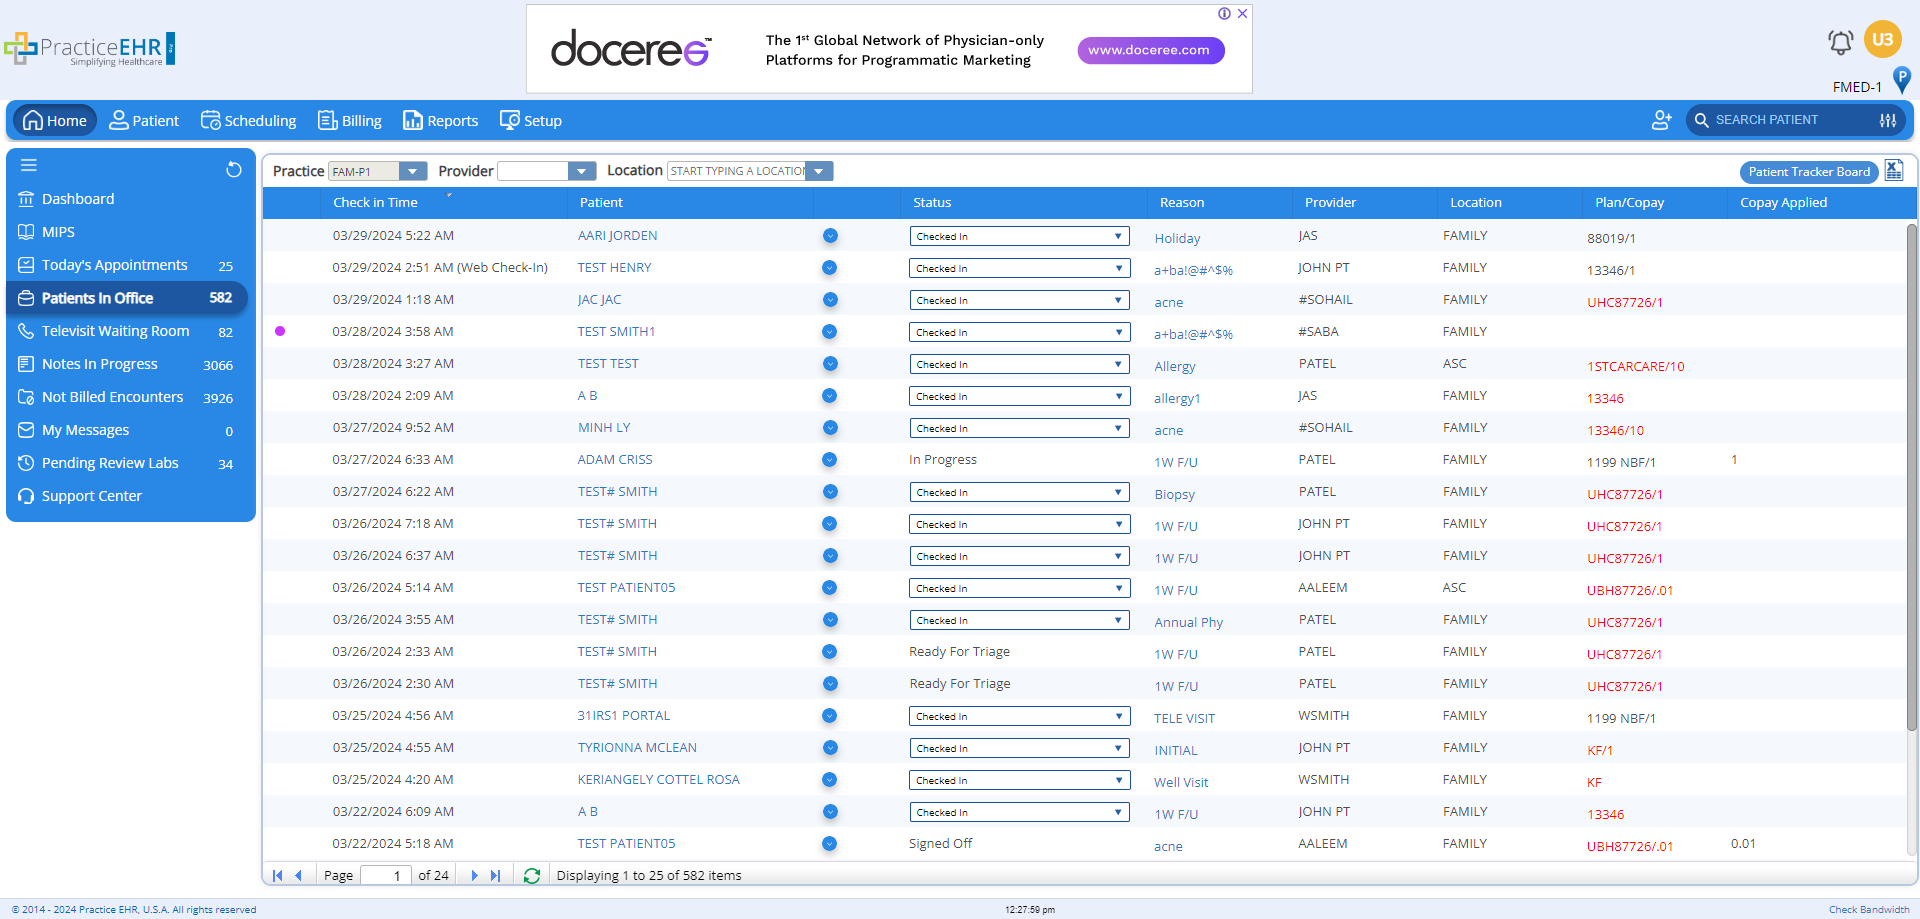
The activities tab of the billing dashboard will now feature the UI upgrades implemented across Practice EHR. The activity section now has a white background. The bucket header font, background color and the border color of the buckets themselves have been updated.
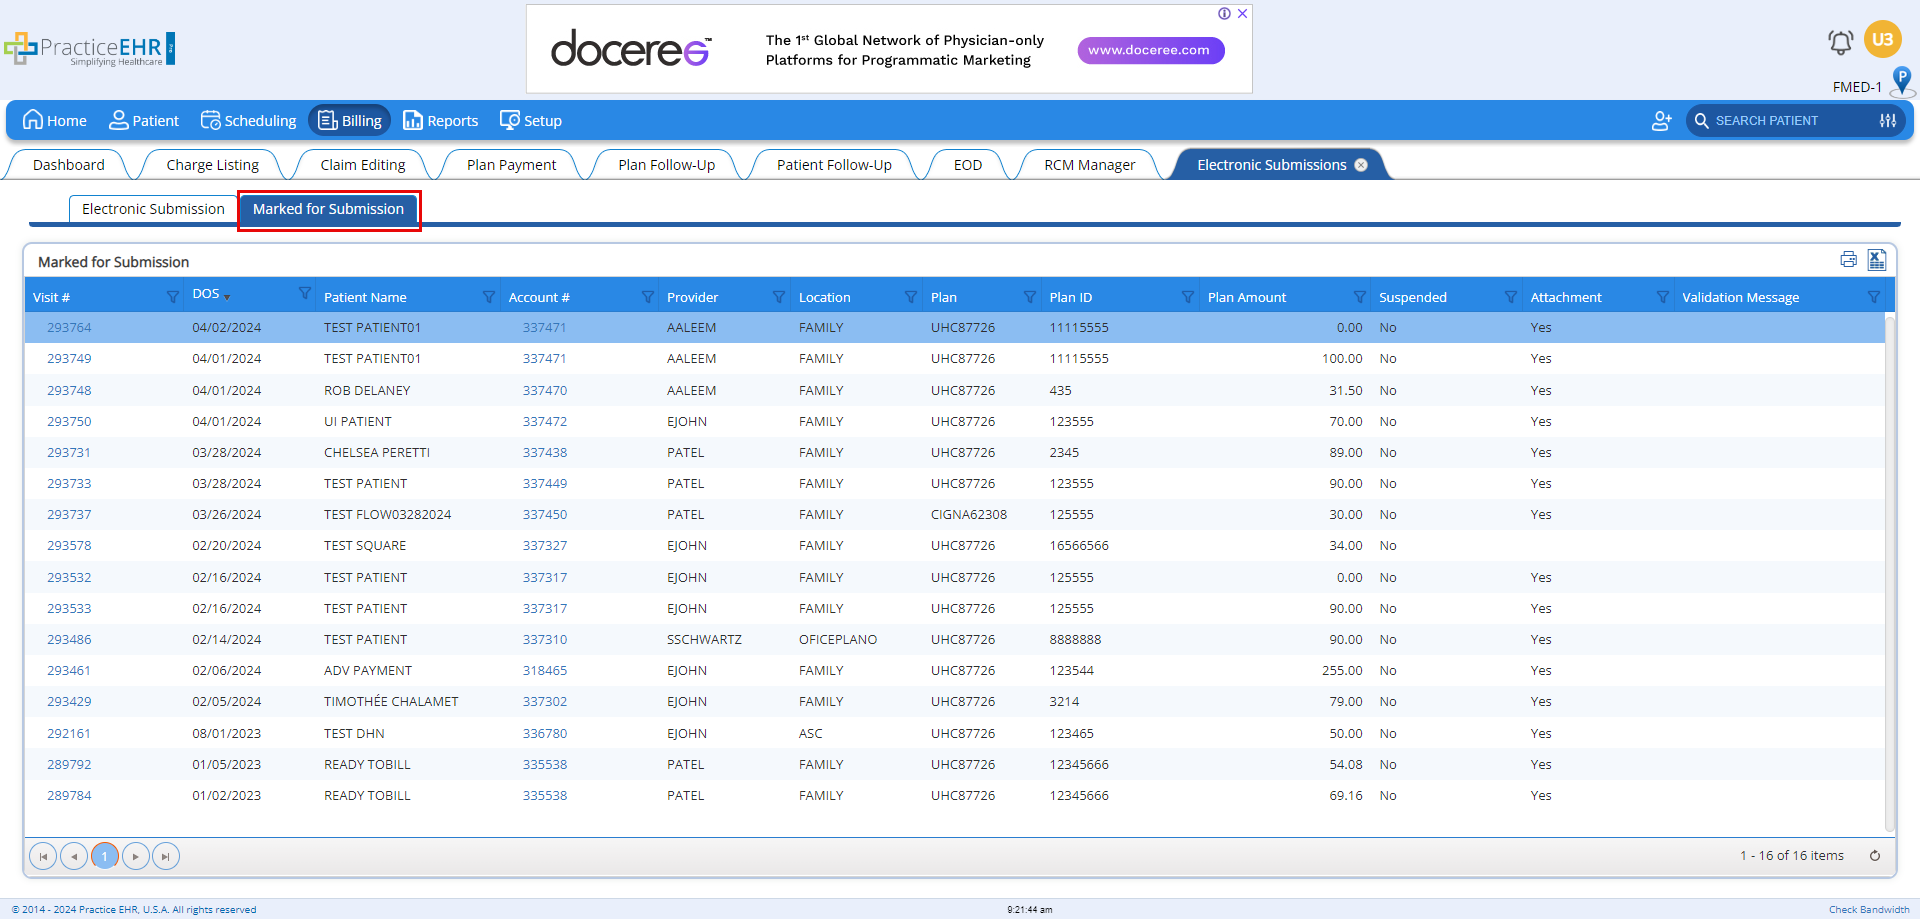
In the “Electronic Submissions” tab, within the billing module, a “Submit All” button has been added to the electronic submissions grid. In addition, a new “Marked for Submission” sub-tab has been added as well.
Clicking the “Submit All” button, will mark all the claims for submission without having to select claim records individually. This will save time to select claims page by page to perform the submission.
Also the user will no longer have to wait for the claim submission process to complete instead system will submit the claims in background and status will be updated on billing dashboard under “Auto Daily Activities – System”.
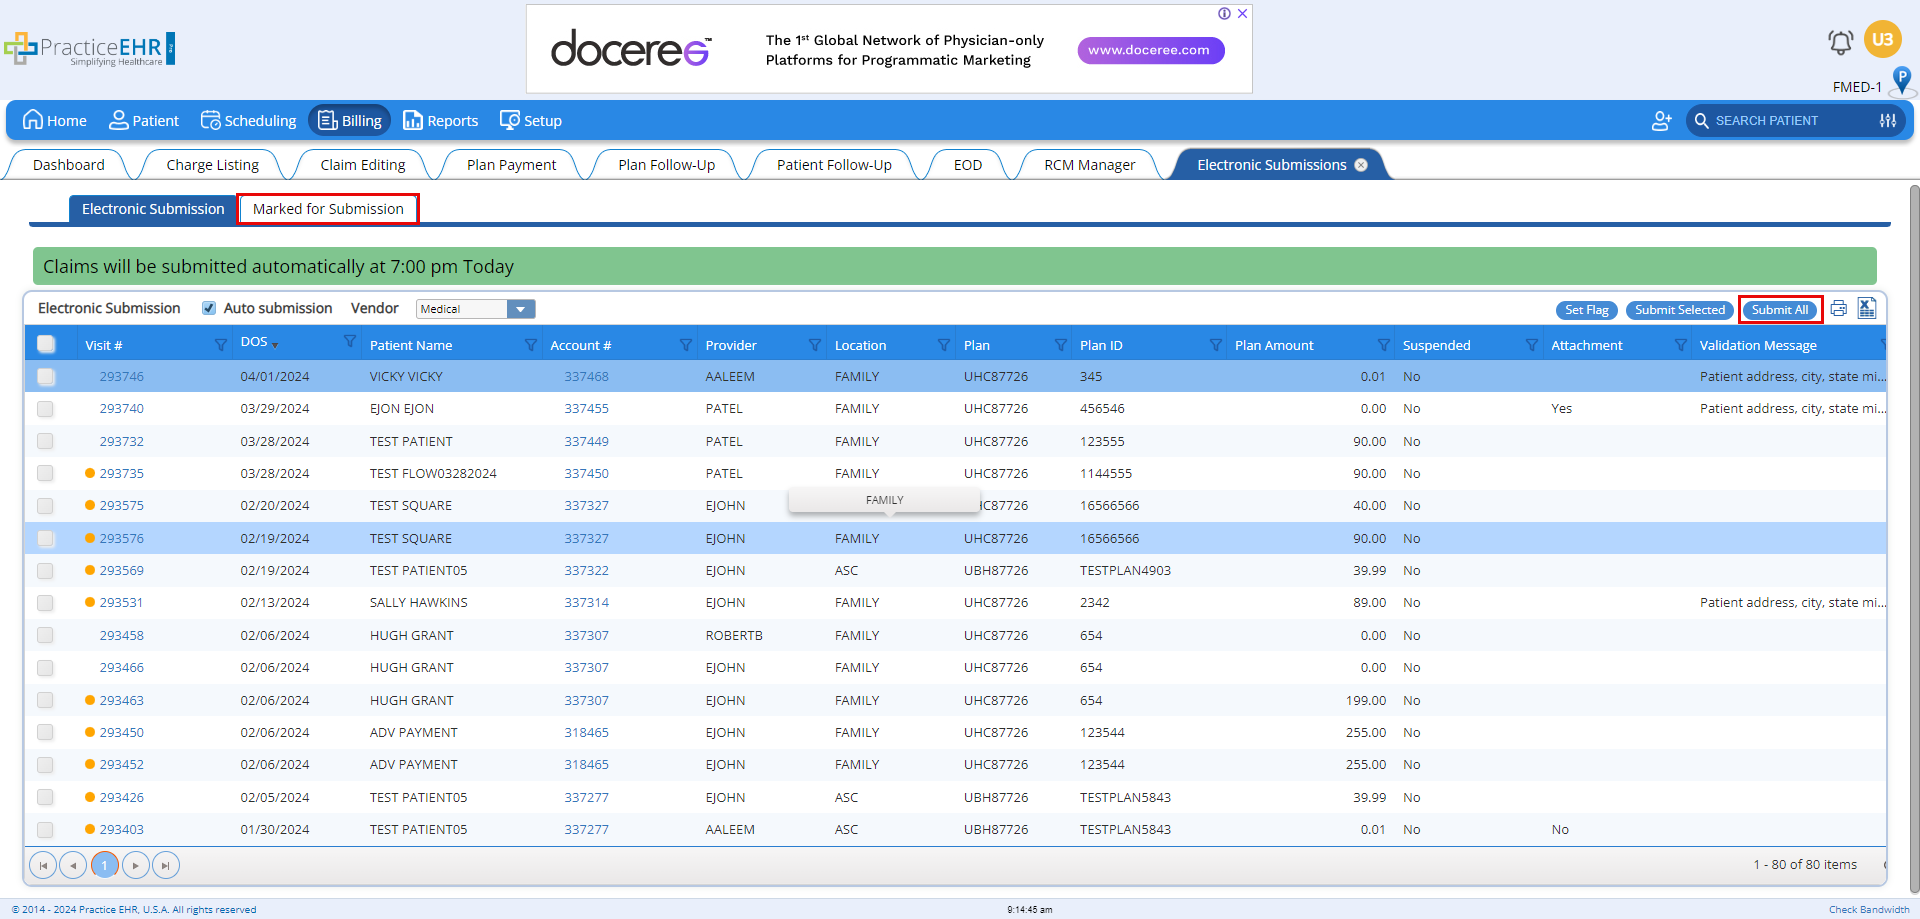
All claims until submission will be shown in the new “Marked for Submission” sub-tab.
Previously claim attachments were downloaded, where auto attachment Fax is not setup, on the user’s system automatically. Now these attachments will be made available in the “Inbox” on the home dashboard where they can be downloaded and sent to the respective payer.
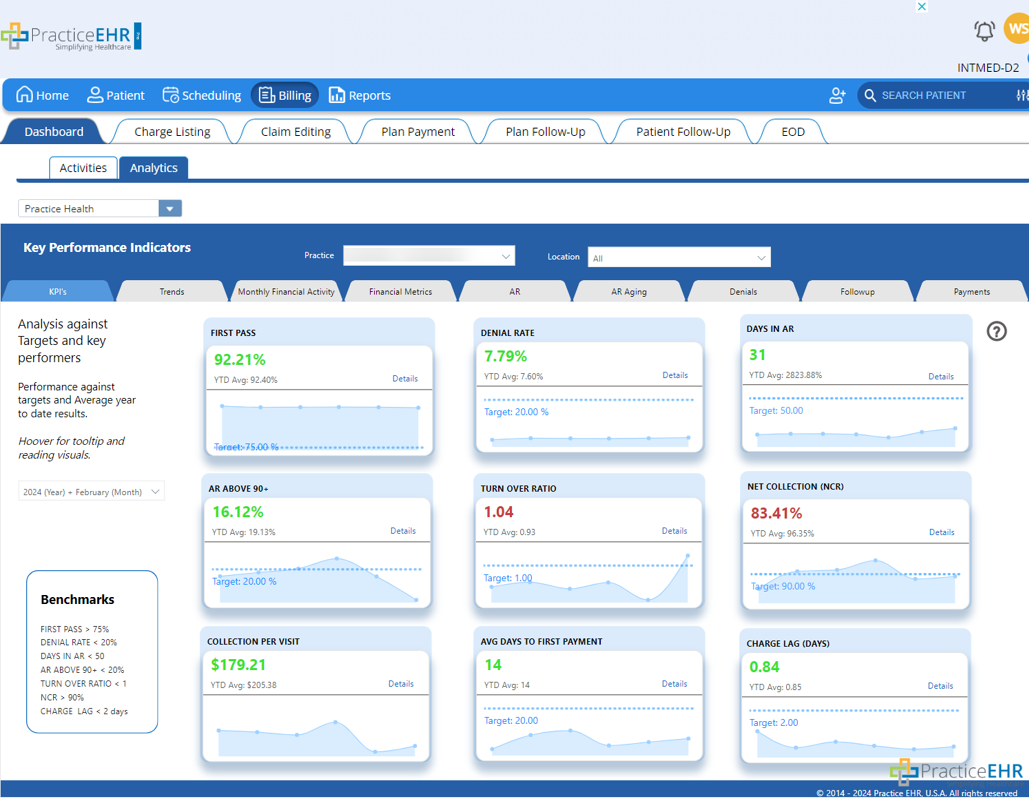
The billing dashboard has been divided into two sub-tabs for Practice EHR Pro. The “Activities” sub-tab and the “Analytics” sub-tab. The “Activities” sub-tab contains the current “Auto-Daily” and “To Do Billing” activities. Analytics tab is only available in Practice EHR Pro version.
The new “Analytics” sub-tab displays a real-time visual dashboard of the practice’s billing activities, as well as provides insights, in terms of key KPIs and trends.
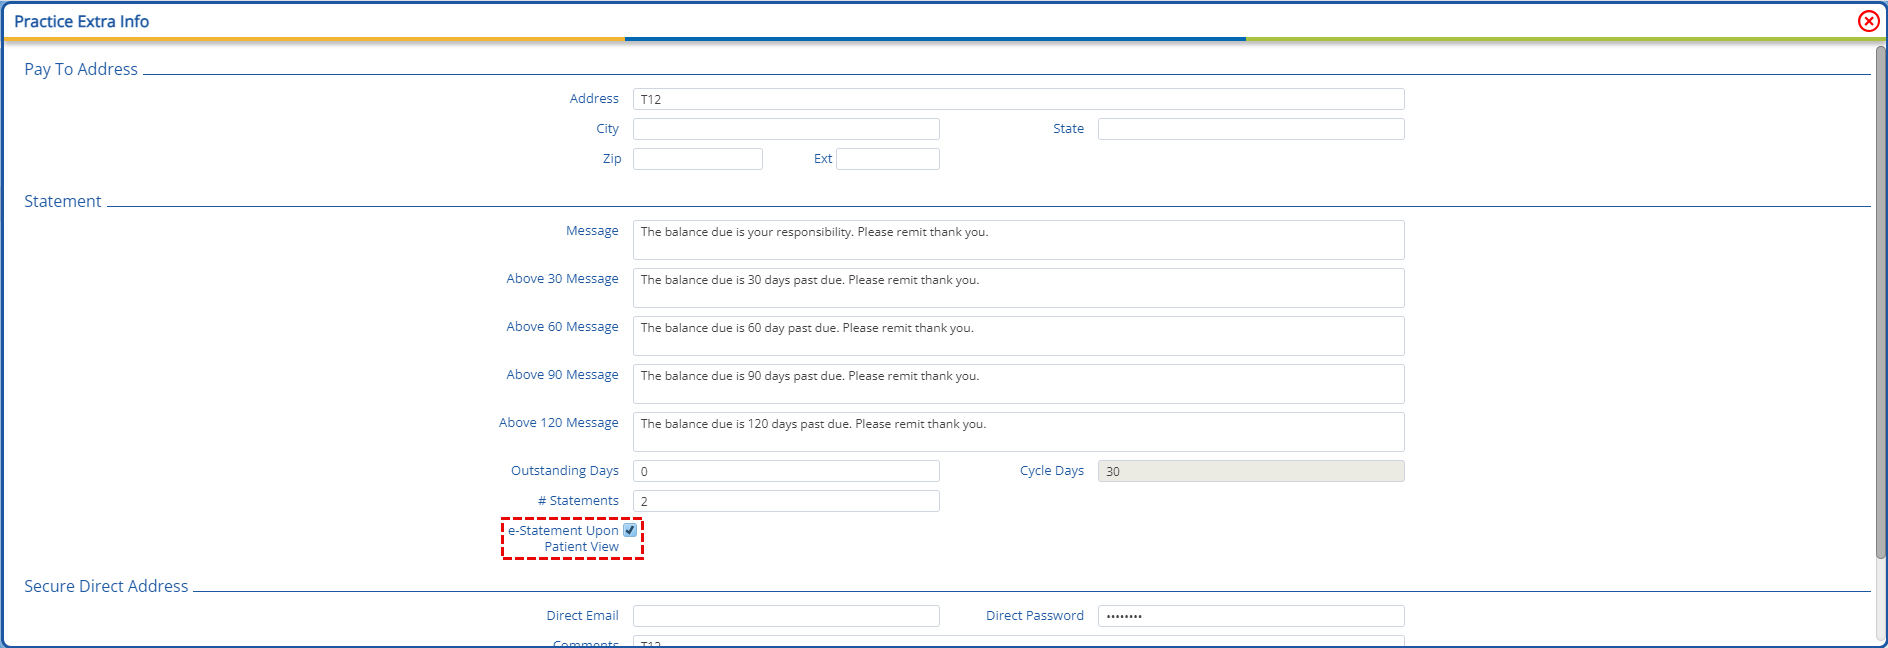
A new e-statement workflow feature has been introduced in Practice EHR. This feature automatically enables the “e-statements” checkbox in the patient demographics if patients view their e-statements from their portal.
This feature works only when the “e-Statement upon Patient View” checkbox located in the “Practice Extra Info” window, as shown below, is checked.
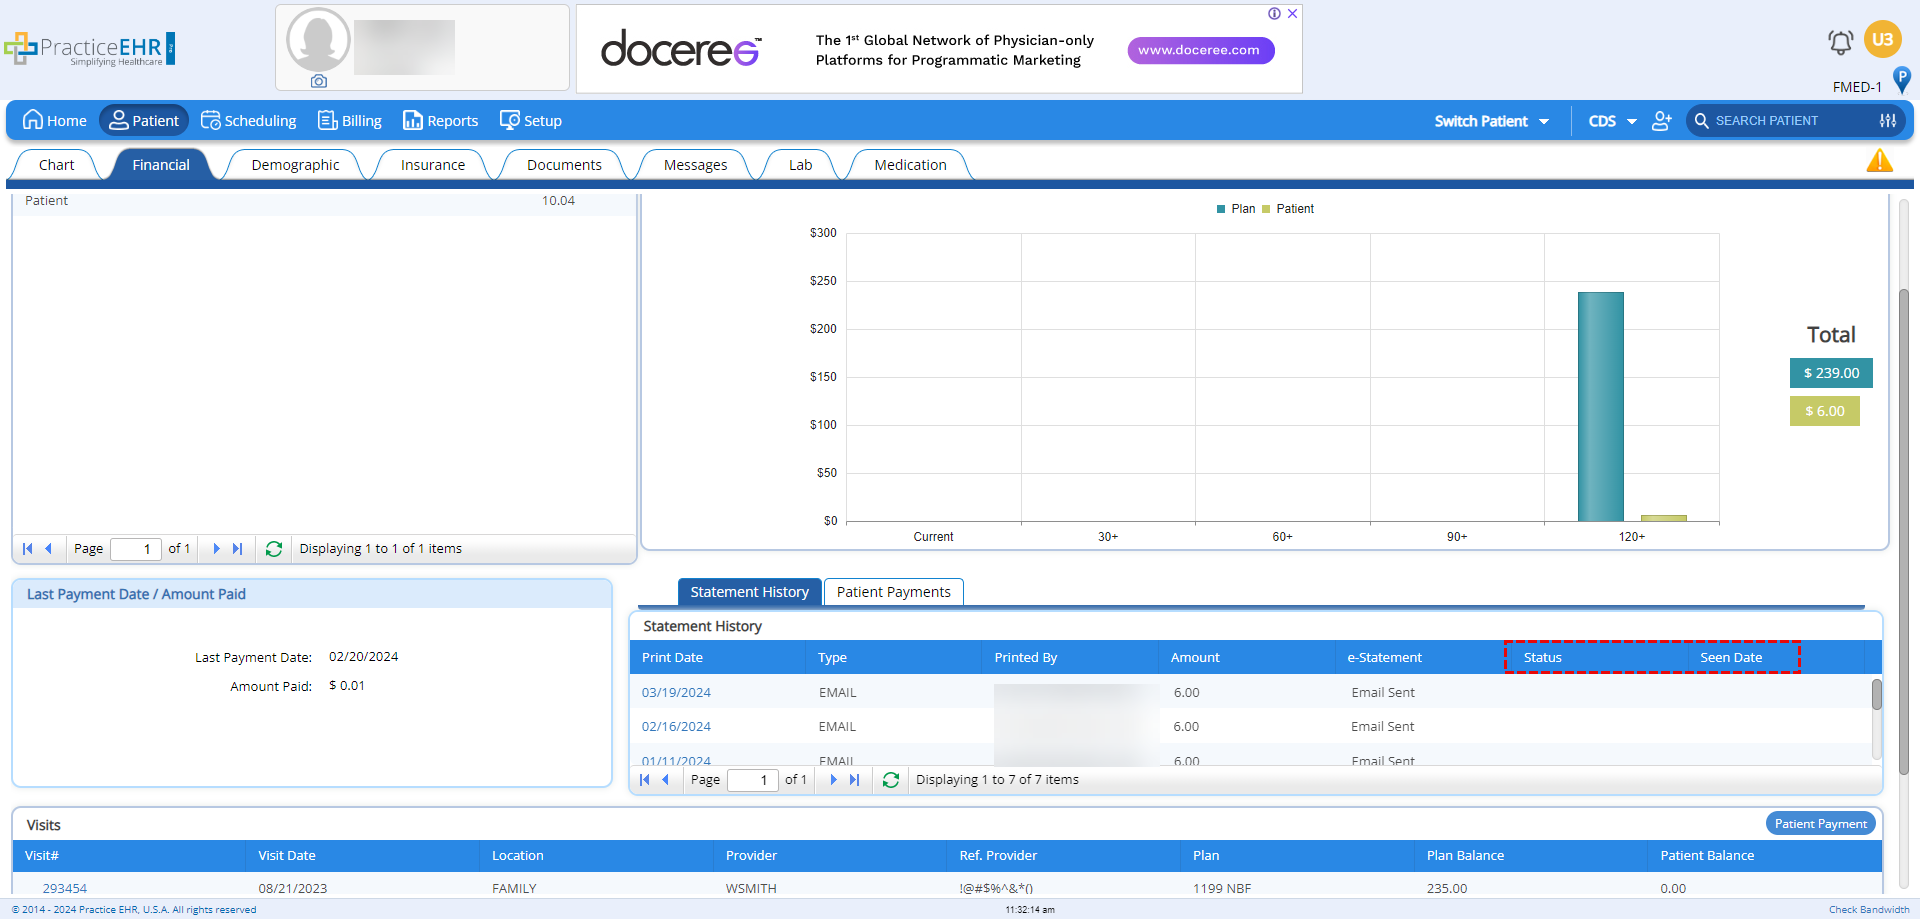
In the “Statement History” grid, located in the “Patient Financial” tab, two new columns have been added.
Practice EHR is excited to announce the self-scheduling feature which allows patients to schedule appointments directly through a practice’s website. This feature is only available for the practices who have KIOSK enabled. Please get in touch with Practice EHR support to setup KIOSK feature for your practice.
The self-scheduling feature, accessible via the practice's website or through patient messages, offers a convenient alternative for booking appointments by patient themselves.
In the “Location” detail window, a “Self-Scheduling” checkbox has been added. Clicking this checkbox will allow patients to self-schedule appointments for this location.
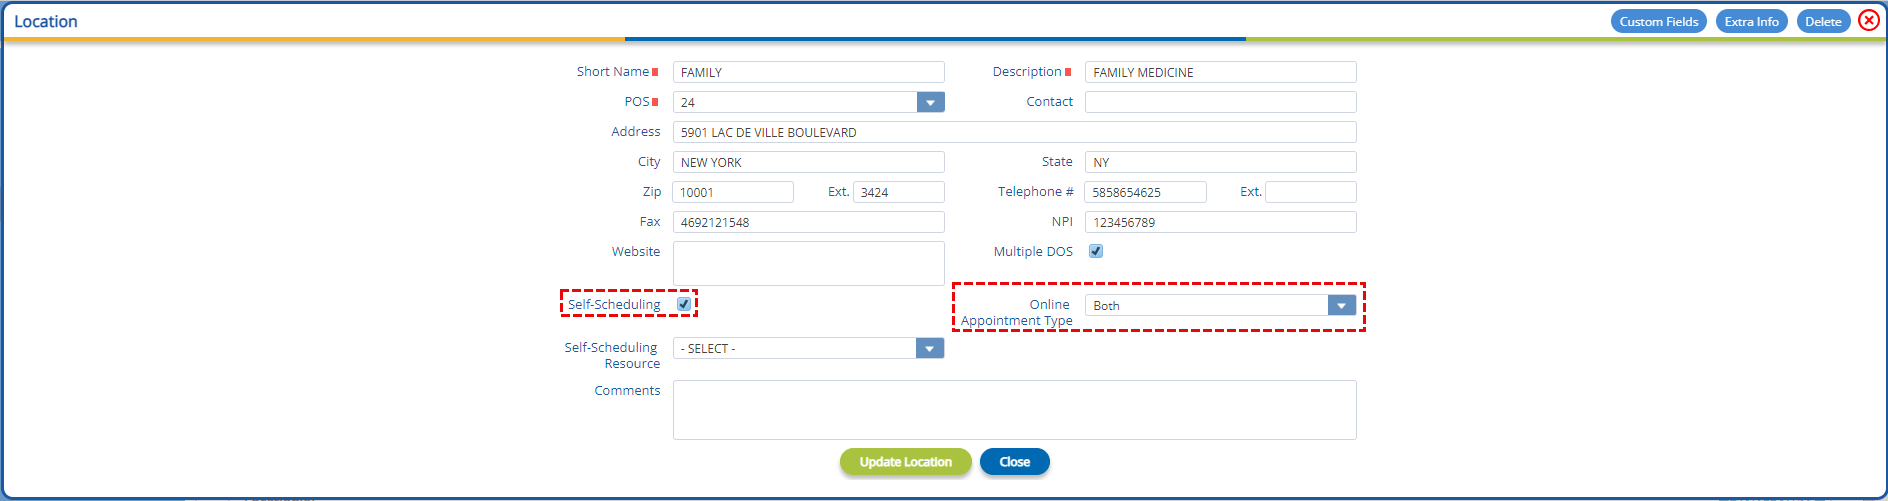
Beside the self-scheduling checkbox, an “Online Appointment Type” dropdown has also been added which contains the following options:
| Online Appointment Type on Location | Result of Selected Option |
|---|---|
| Office Visit | Only “Office Visit” type appointments can be self-scheduled by patients for this location. |
| Televisit | Only “Televisit” type appointments can be self-scheduled by patients for this location. |
| Both | Both appointment types can be self-scheduled by patients for this location. |
The "Self-Scheduling" checkbox and the "Online Appointment Type" dropdown have also been added to the provider detail window.
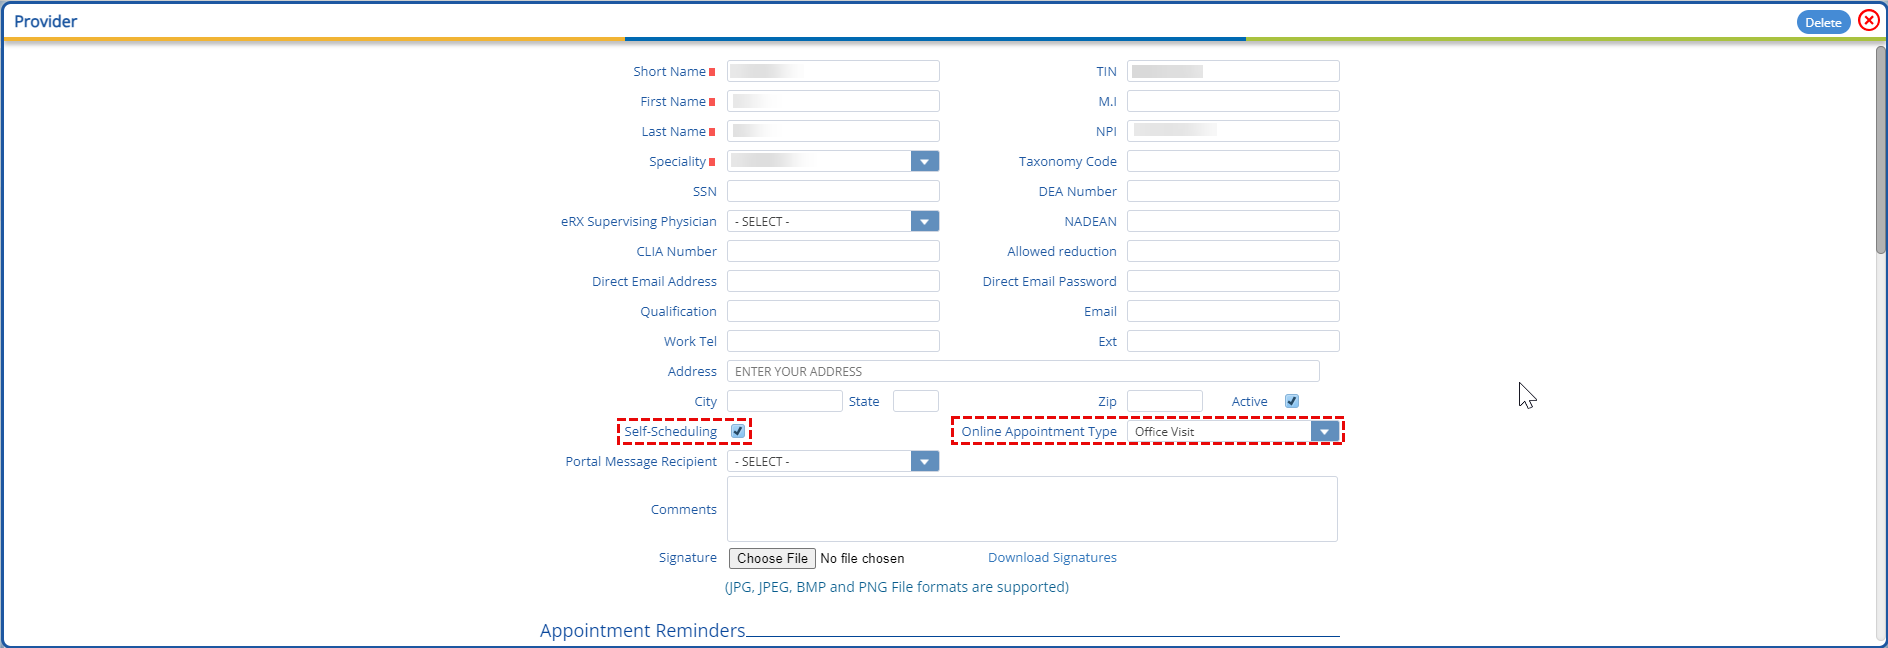
Enabling the “Self-Scheduling” checkbox in the provider profile window will allow patients to choose that provider for their self-scheduled appointment.
This dropdown will allow users to set the type of appointments that can be scheduled by patients for that provider.
| Online Appointment Type for Provider | Result of Selected Option |
|---|---|
| Office Visit | Only “Office Visit” type appointments can be self-scheduled by patients for this provider. |
| Televisit | Only “Televisit” type appointments can be self-scheduled by patients for this provider. |
| Both | Both appointment types can be self-scheduled by patients for this provider. |
Clients can opt to have a self-scheduling link embedded on their website. This can be shown as a “Schedule Now” button. To have a self-scheduling option for patient on the website, clients are required to get in contact with Practice EHR support.
When a patient clicks on the self-scheduling link embedded on a practice’s website, a new tab opens and begins the self-scheduling process. The self-scheduling process for patients from the practice website consist of four steps:
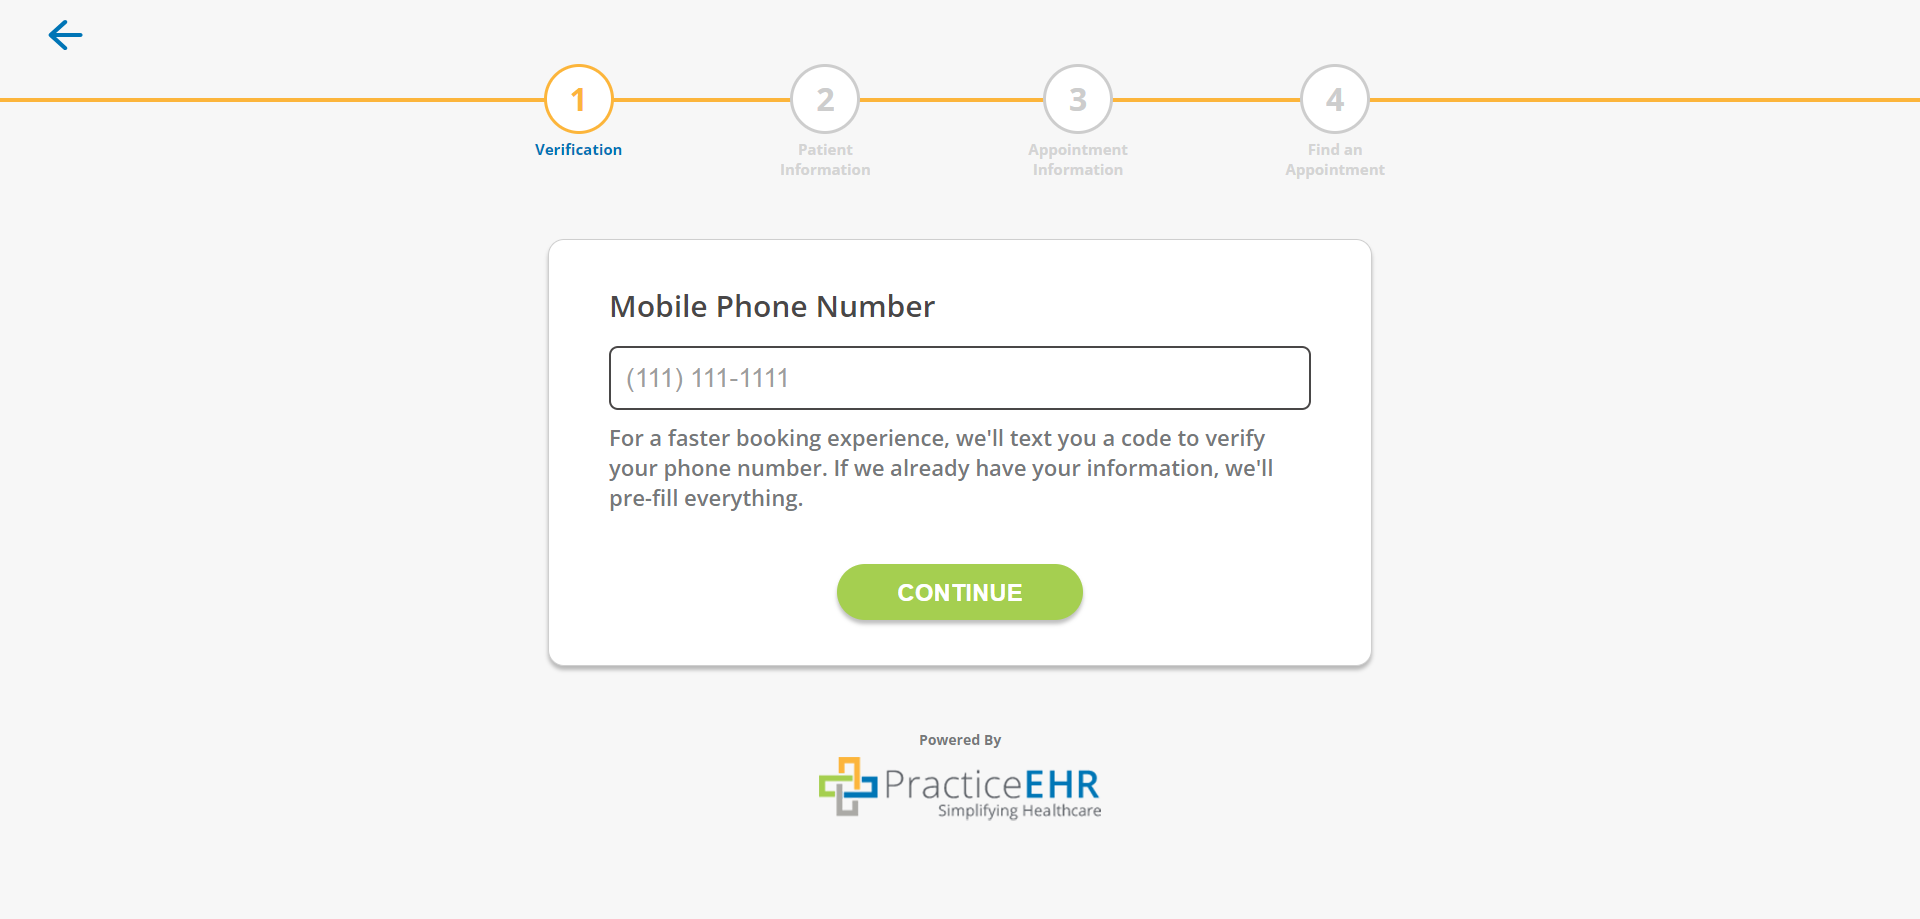
Users are asked to provide their mobile number, after which a verification code is sent to the patient.
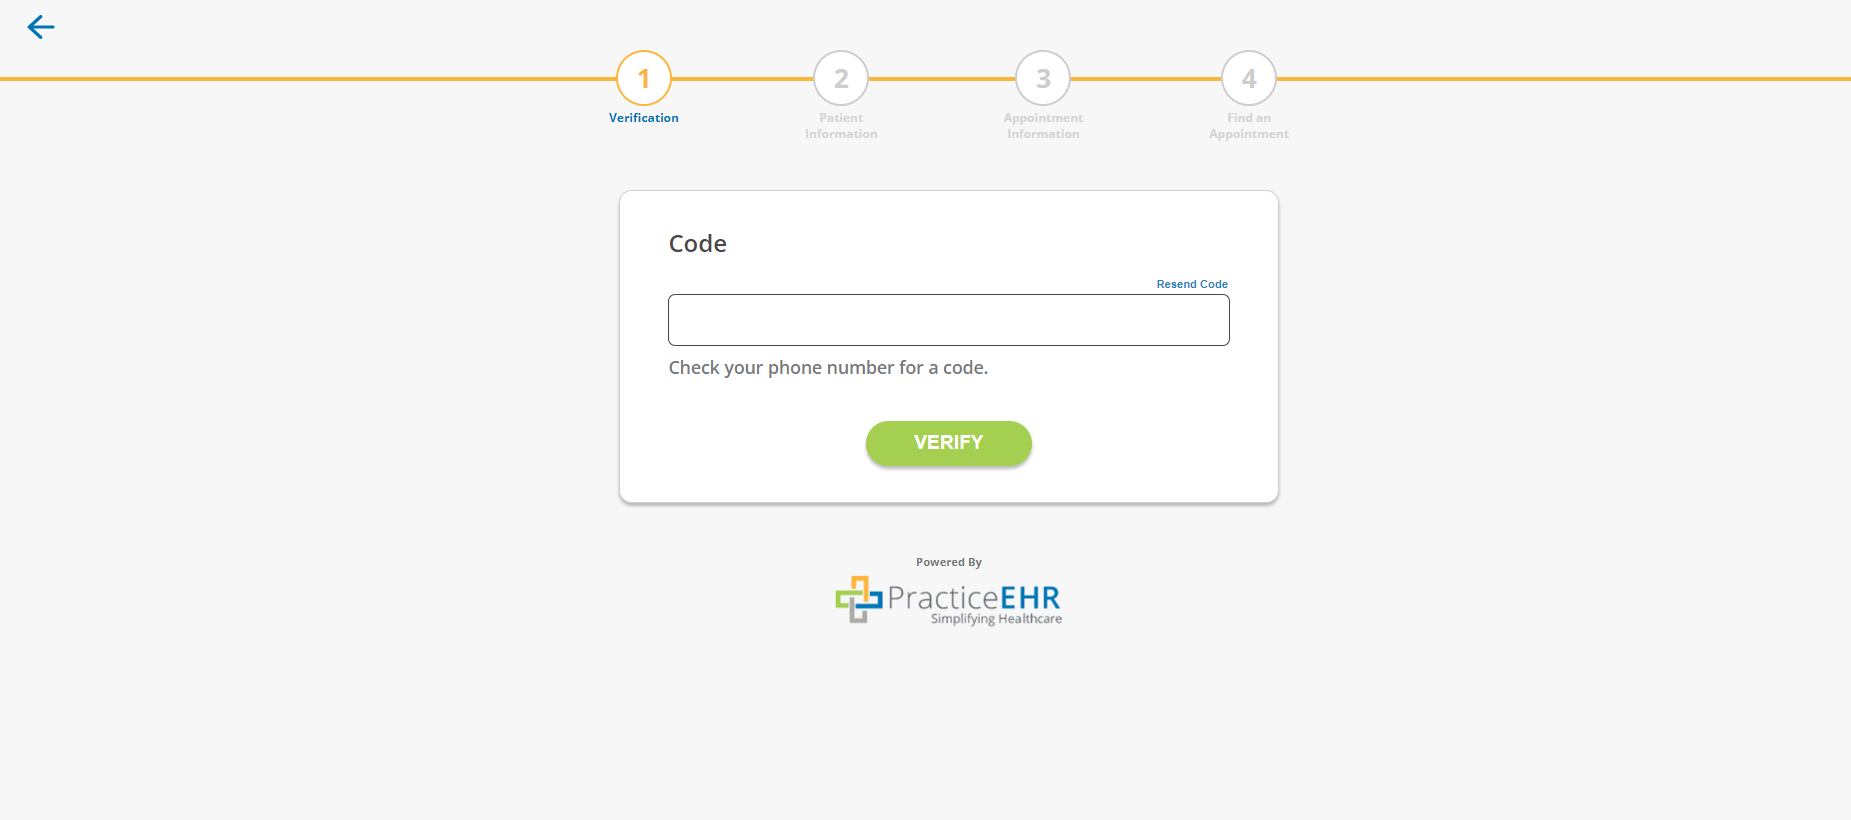
The user is asked to enter the code sent to their mobile to complete the verification.
If the user doesn't get the verification code, they can click 'Resend Code' to receive it again. They must wait 60 seconds before clicking again.
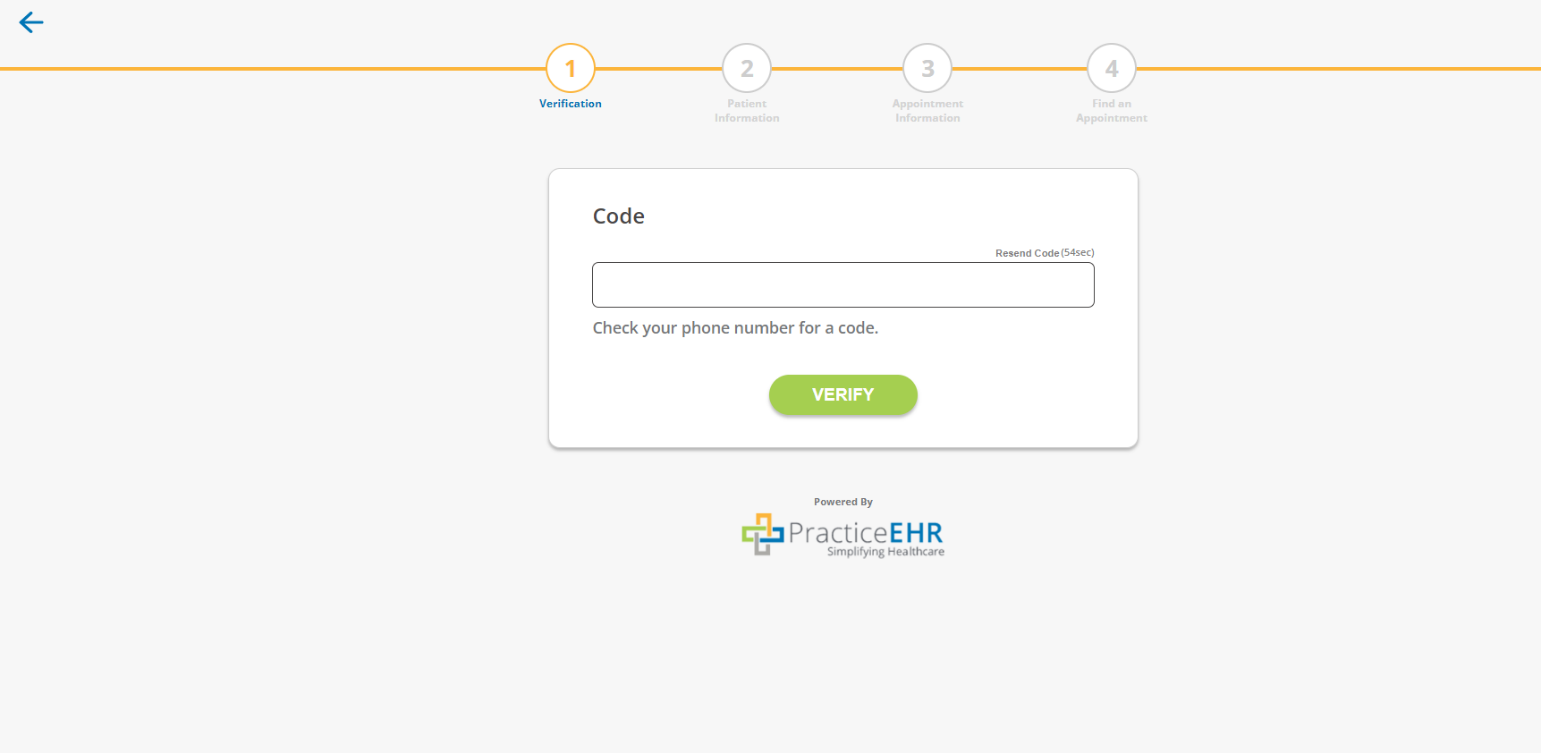
In case a user clicks on the 'Resend Code' link multiple times, only the latest code sent will remain valid for validation.
In this step, basic information is required from the user. The required information includes:
If the patient’s mobile number verifies them as an existing patient, then the above information is auto-filled.

In case the mobile number is not recognized, the user will have to manually input the required information.

If the mobile number is attached to multiple patients, the viewer will be asked to select an existing patient from the screen below.
Choosing a patient from the list will auto-fill their information in the patient information window. The user can choose the “+ Add a family member” option to create a new patient with the same mobile number.

Once the requested information is provided, the system will then check to see if it matches any patient records. If the provided information results in no matches, a new patient is created in Practice EHR.
If the provided information results in a match, the following confirmation screen will pop-up, acknowledging that a patient record has been found. The patient will be asked to confirm if they are an existing patient.
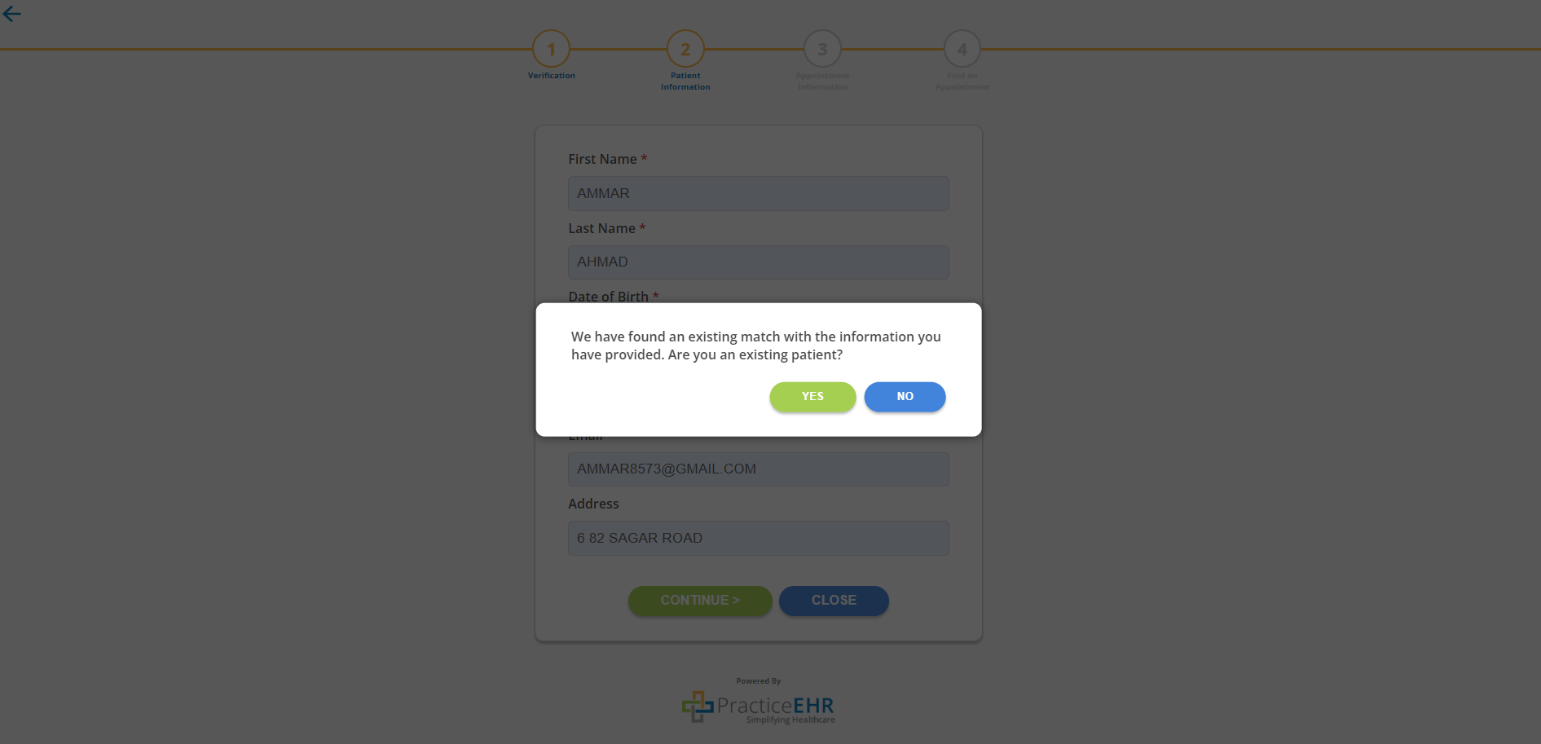
Choosing yes will schedule an appointment for the existing patient, while choosing no will create a new patient, for whom the appointment will scheduled upon completion.
For an existing patient, users will be able to update their address. If the provided email or address is not a match for those saved in the patient record, then these fields will be updated with the user’s latest input.
Now that the patient is confirmed, the appointment details are next which include the following:
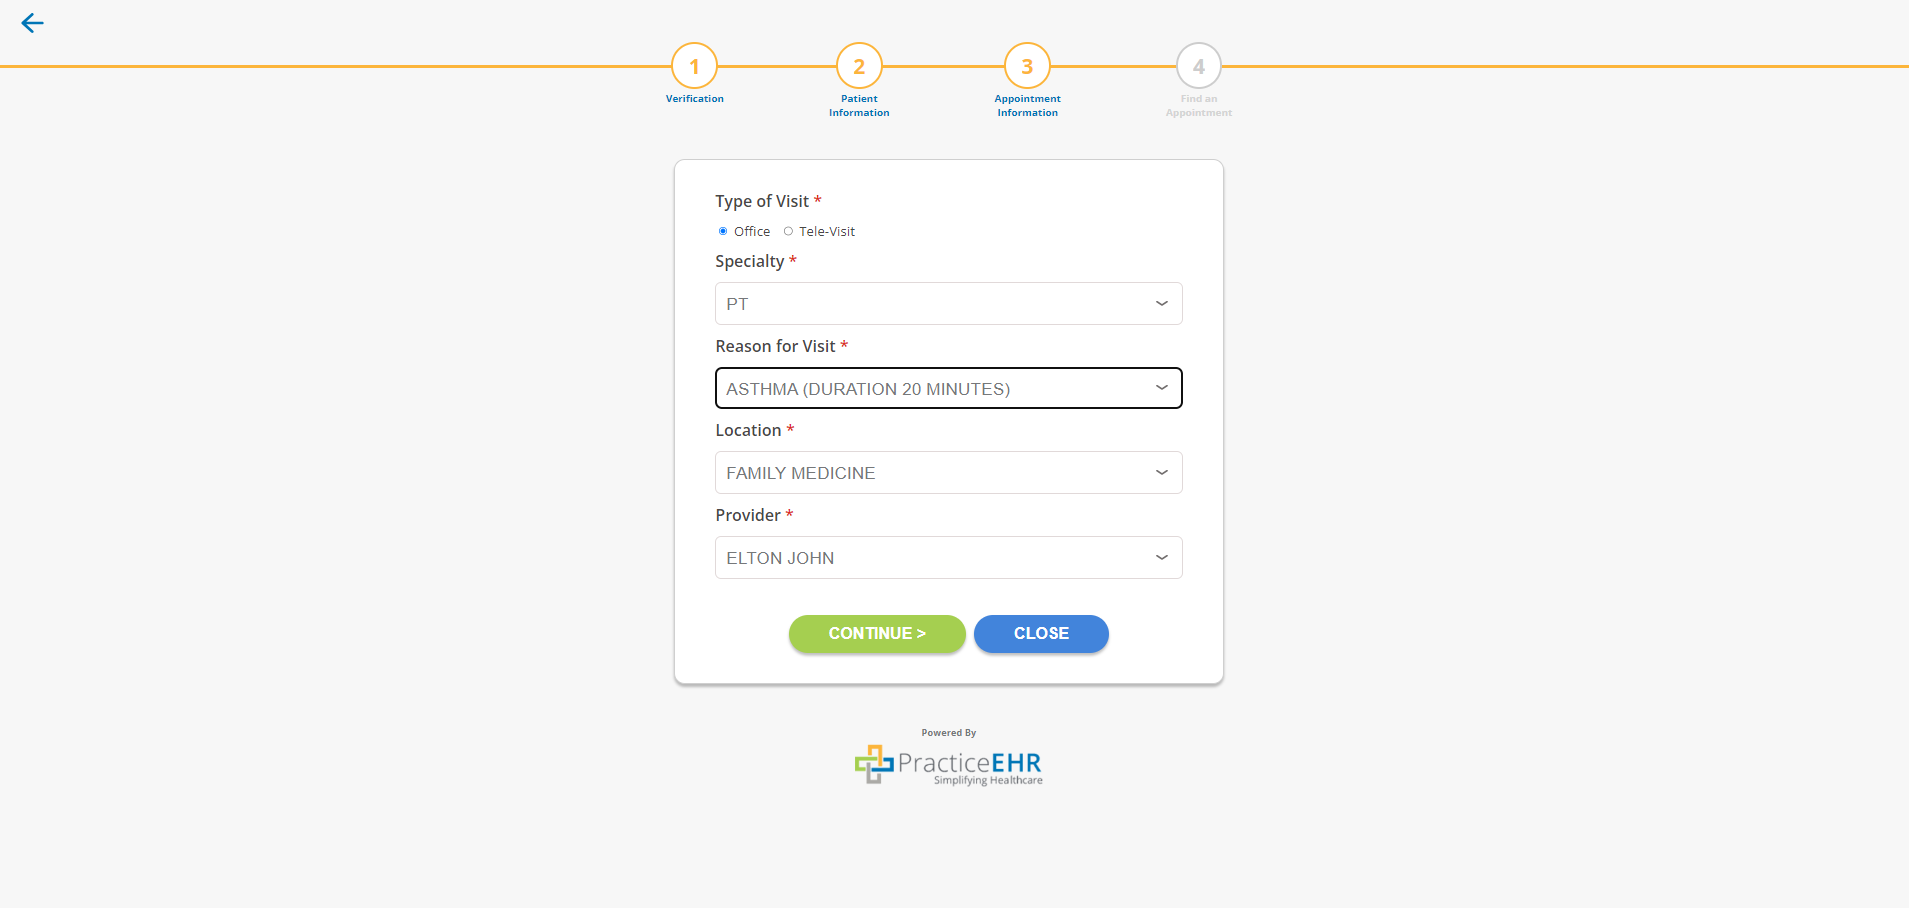
The “specialty” field is locked if the practice offers a single specialty. The patient’s existing provider and location will be auto-populated in their respective fields but the user can change it.
With the patient and appointment details now confirmed, the user can now move on to the final step and select an appointment date and time that best suits them.
A blue dot indicates the current date while the available days will be highlighted in light blue circles.

Selecting a date will open the time slots available for that date. Once a time slot is selected, the chosen date and time are highlighted in orange for confirmation.
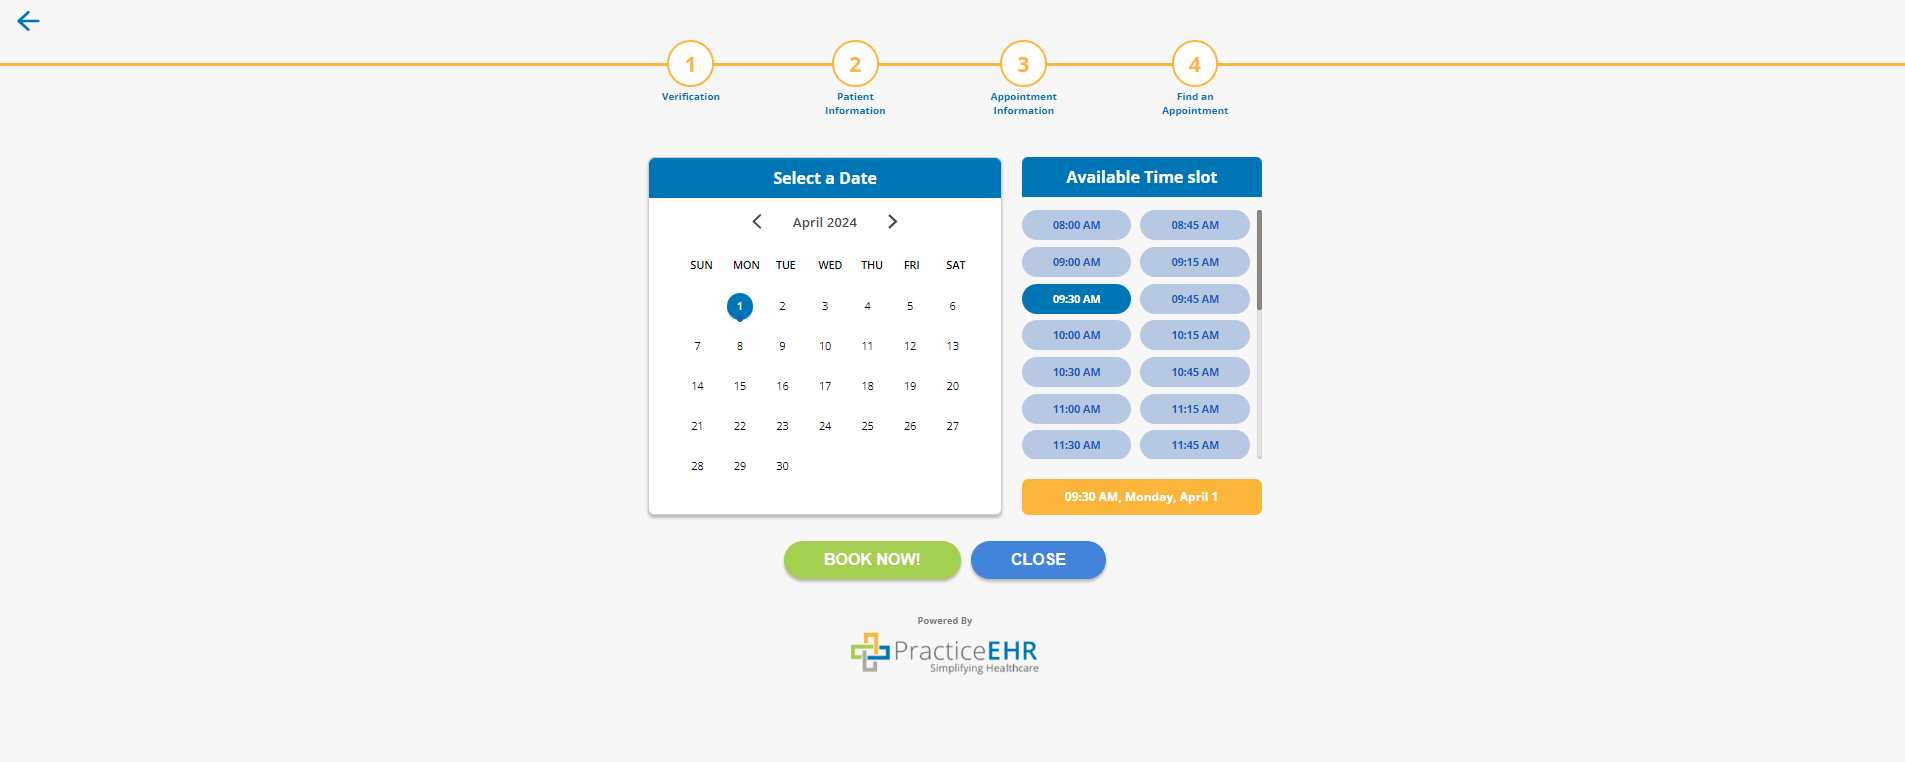
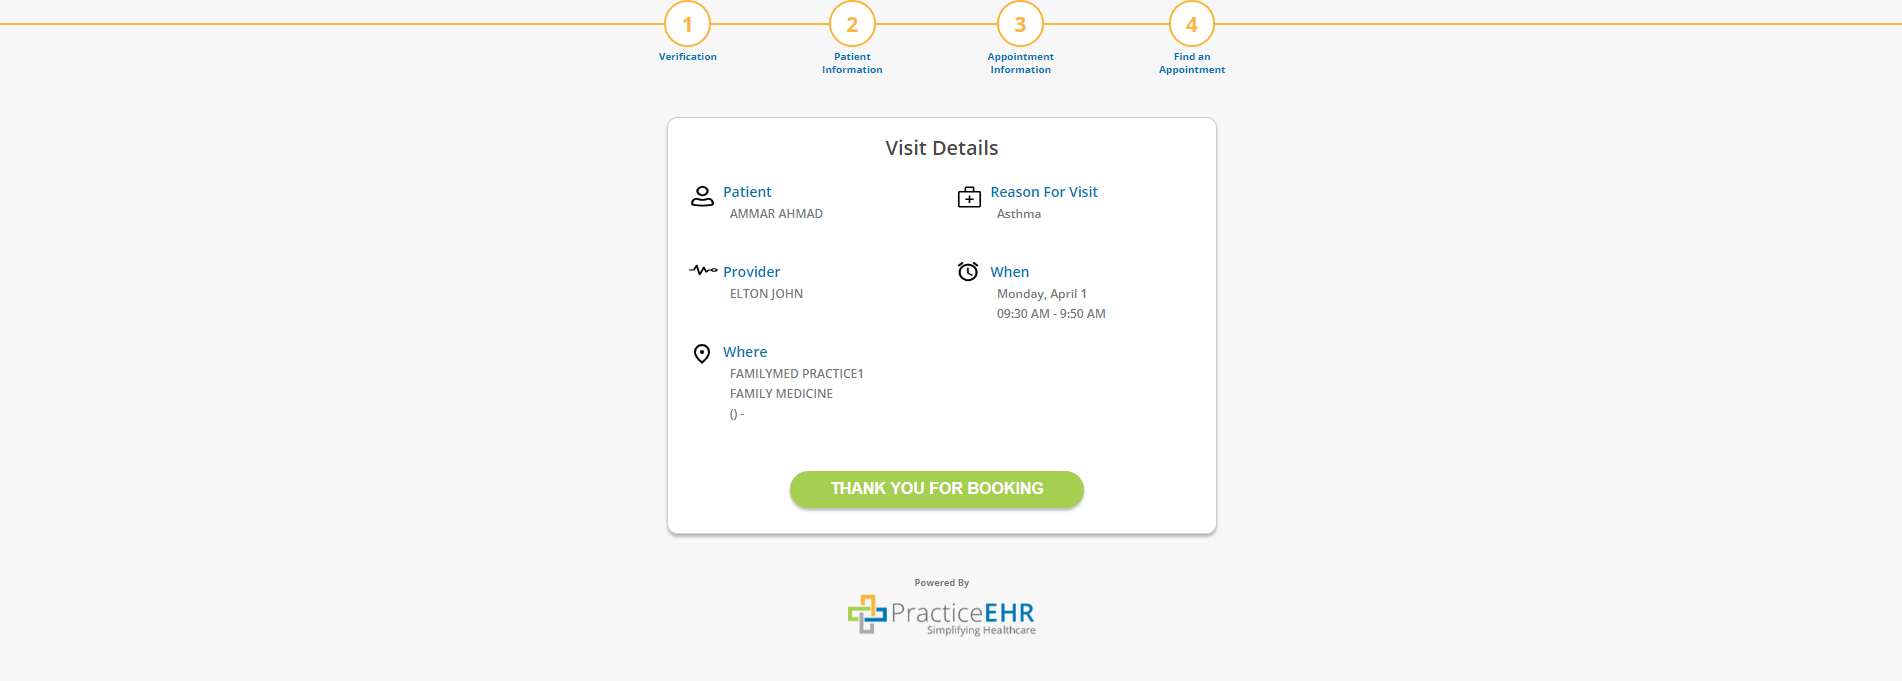
Clicking “Book Now” will confirm the appointment and the appointment details appear as confirmation of the booking.
This completes the self-scheduling procedure from the practice website.
Clients also have the option to send self-scheduling links directly to patients as pre-defined messages. In the “New Message” window, accessed from the “Patient Messages” tab, users can find the following options in the “Predefined Message” dropdown:
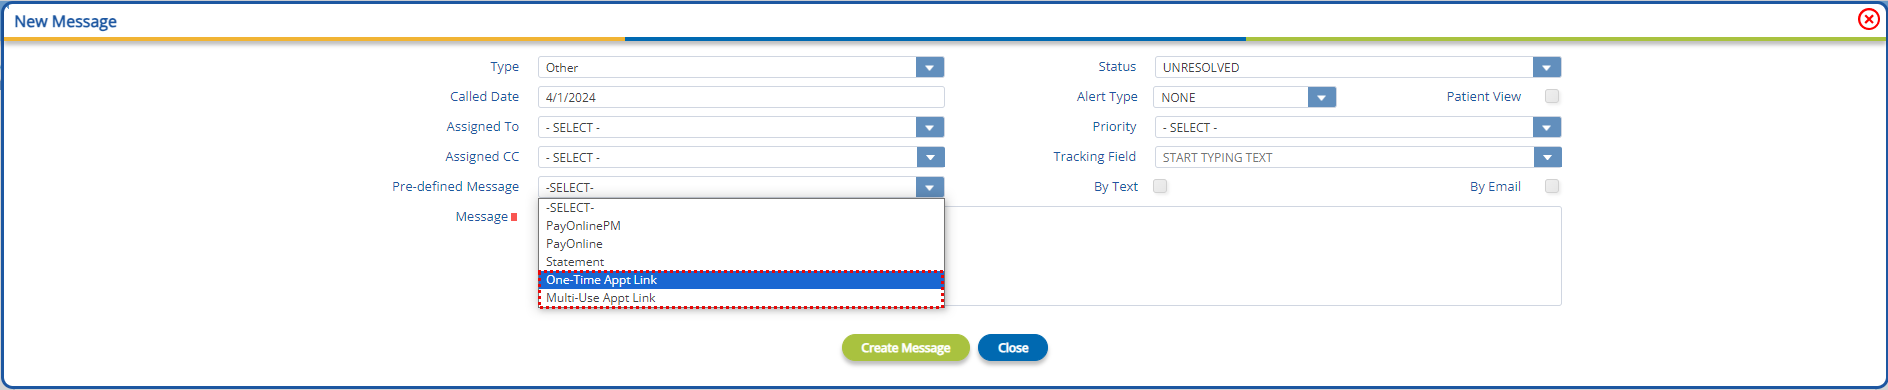
1) One-Time Appt Link: This link can be sent to a patient to create a single appointment. This link will be sent with the following message: "Hi Patient Name, you can now schedule a one-time appointment using this link. Thanks, from (Practice Name)".
2) Multi-Use Appt Link: This link can be sent to a patient to create multiple appointments. This link will be sent with the following message: "Hi Patient Name, you can now schedule multiple appointments using this link. Thanks, from (Practice Name)".
Note: Both the One-Time Appt Link and the Multi-Use Appt Link will only be available for selection in the “Pre-defined Message” dropdown if the practice has Kiosk enabled.
The self-scheduling appointment process for patients from self-scheduling links consist of three steps:
As the patient is already selected within Practice EHR, the “Patient Information” step is not required.
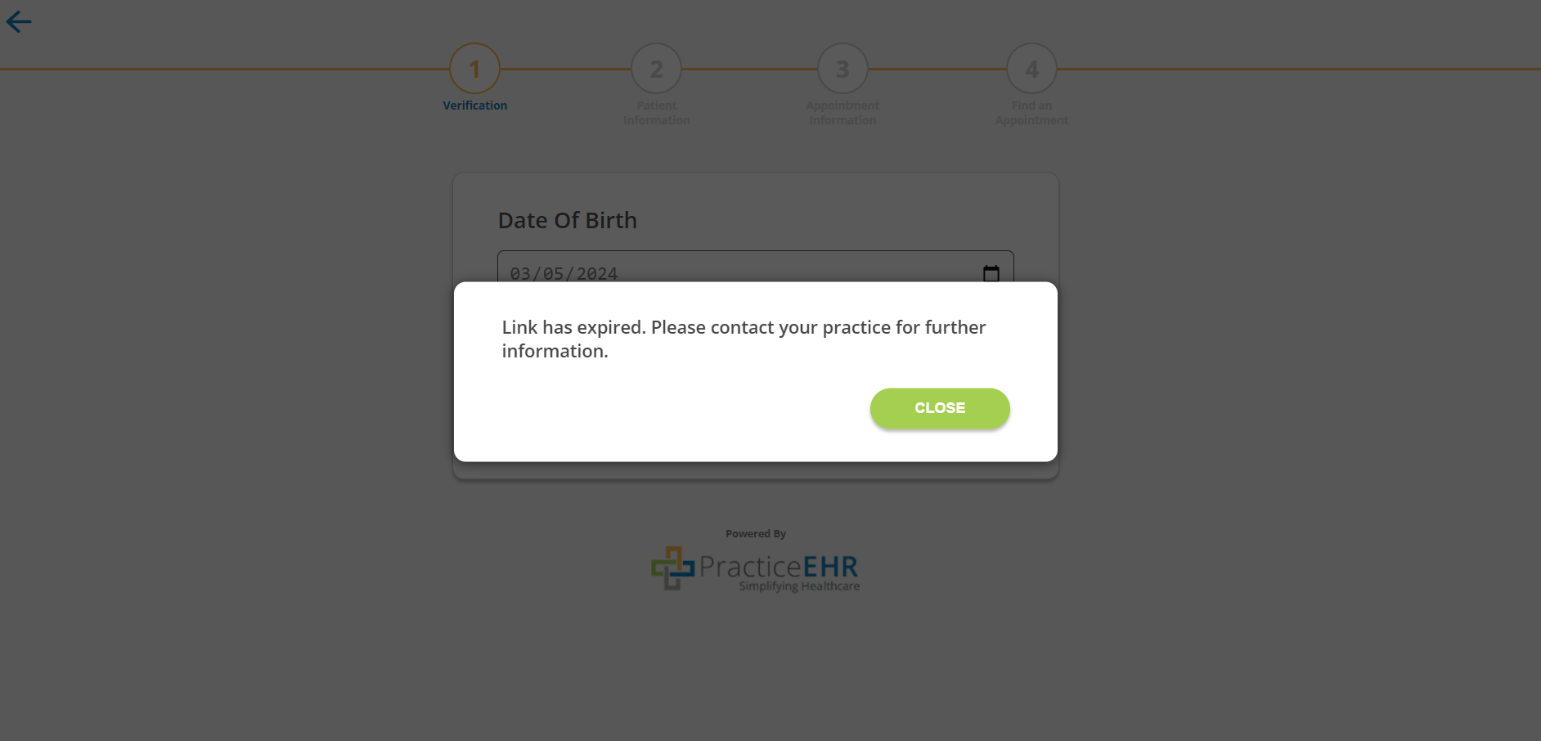
The initial step involves verifying the patient's identity using their “Date of Birth”.
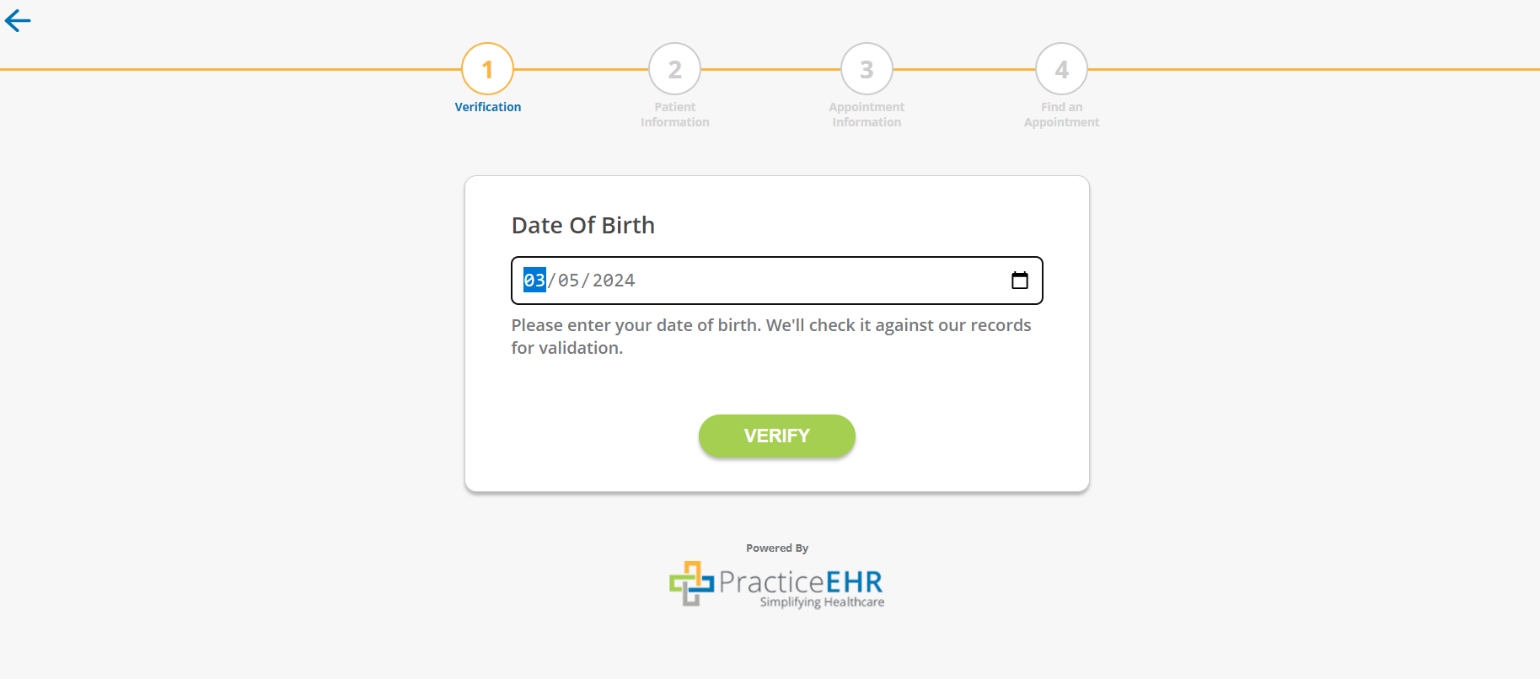
Note: If the date of birth does not match, an error message will be displayed stating "Invalid DOB."
If the user attempts to schedule another appointment using "The One-Time Appointment Link," an error message will be displayed stating: "Link has expired. Please contact your practice for further information."
After verification, the appointment information window appears.
The following information is required in this step.

The “specialty” field is locked if the practice offers a single specialty. The patient’s existing provider and location will be auto-populated in their respective fields but the user can change it.
With the patient and appointment details now confirmed, the user can now move on to the final step and select an appointment date and time that best suits them.
A blue dot indicates the current date while the available days will be highlighted in light blue circles.
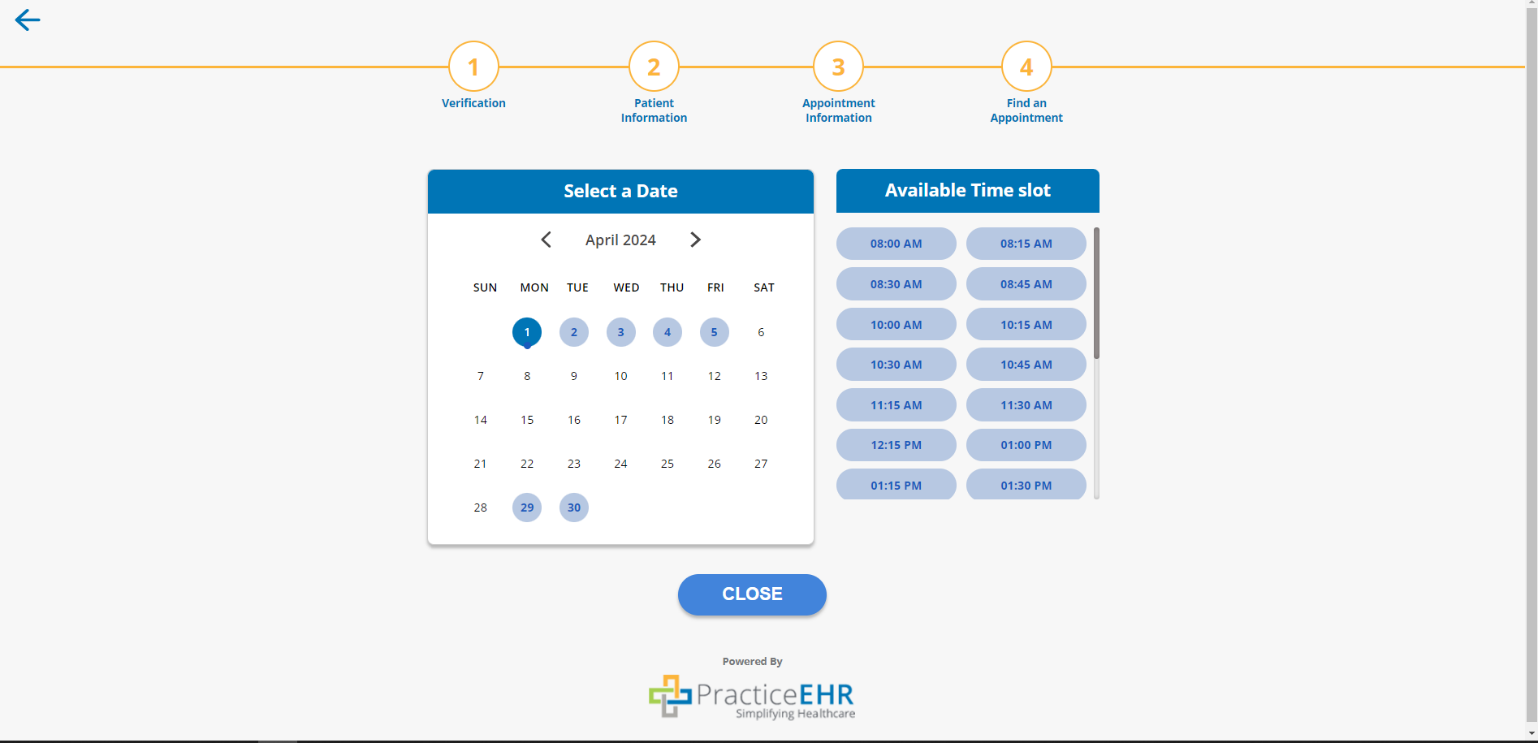
Selecting a date will open the time slots available for that date. Once a time slot is selected, the chosen date and time are highlighted in yellow as confirmation.

Clicking “Book Now” will confirm the appointment and the appointment details window appears as confirmation of the booking.

This completes the self-scheduling procedure from the link sent directly to the patient.
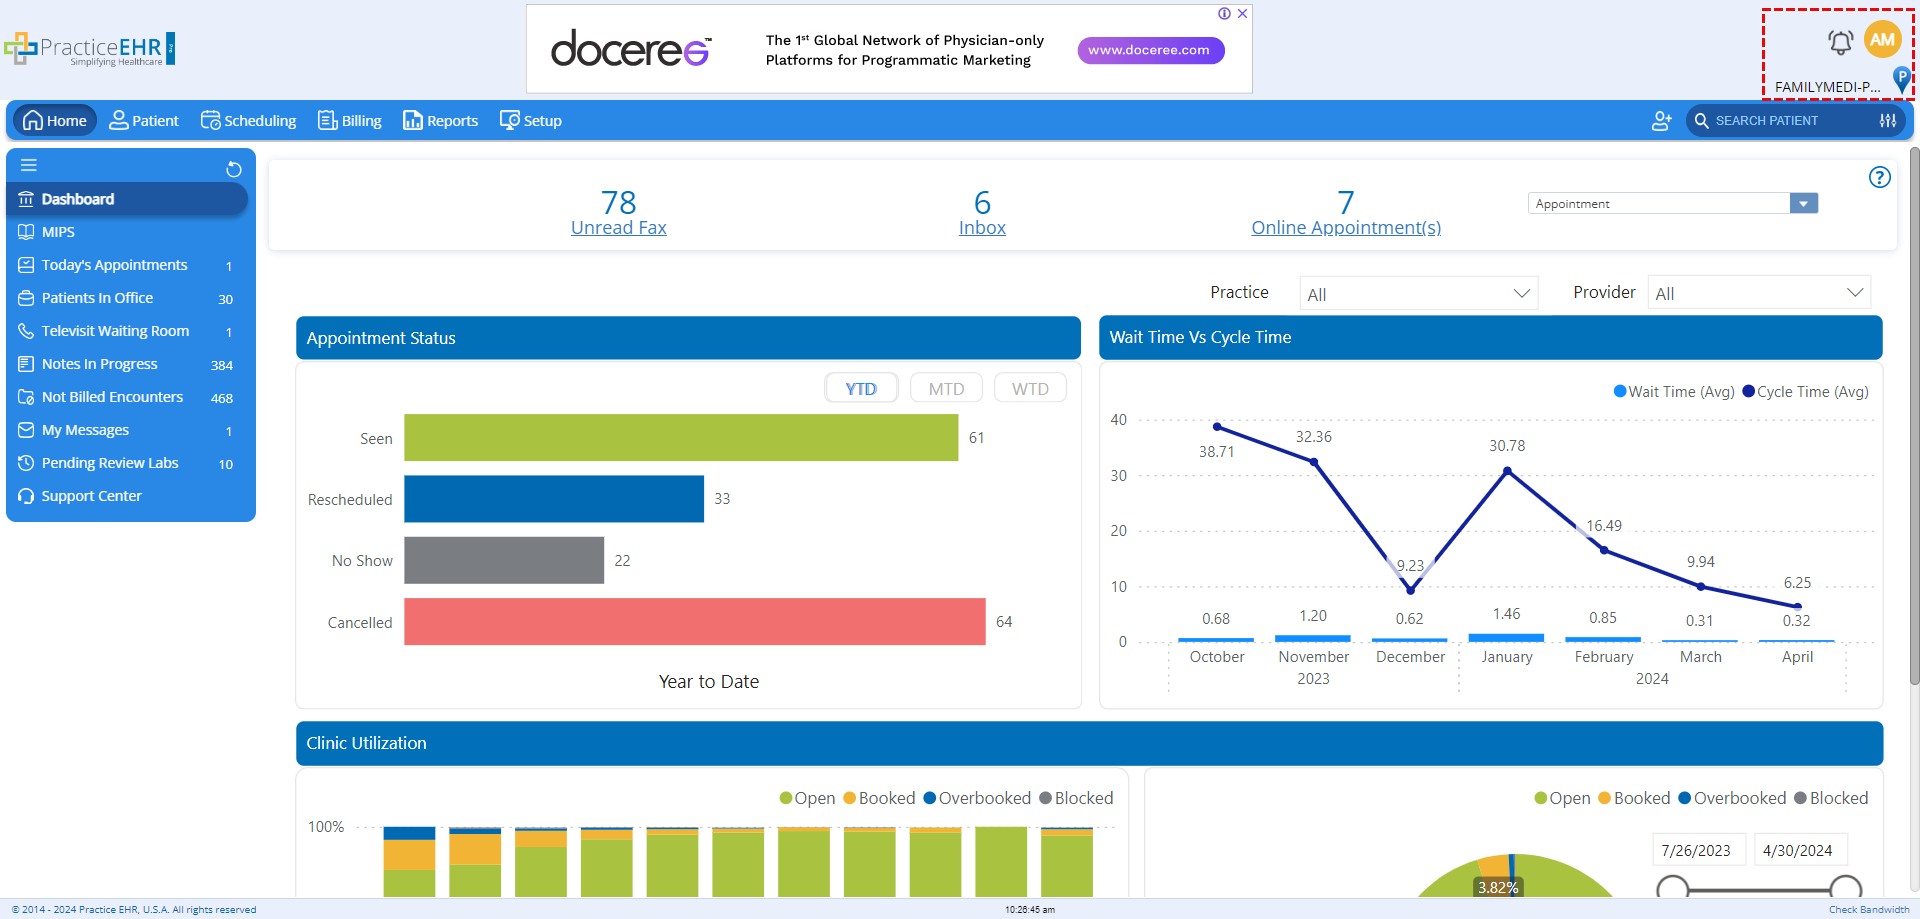
The home dashboard now includes an online appointment(s) count, indicating the current number of appointments booked by patients online via the self-scheduling functionality.

When a user clicks on this count, they will be directed to the “Scheduling Day Sheet” as shown below.

The following user interface enhancements have been implemented across Practice EHR, designed to provide an enriching and functional user experience.
User email on the top right-side corner, has been replaced with a user profile icon. This icon displays the user’s initials when selected.
When selected, a dropdown is displayed which contains the following options:
The user email will be displayed on the top of the dropdown.
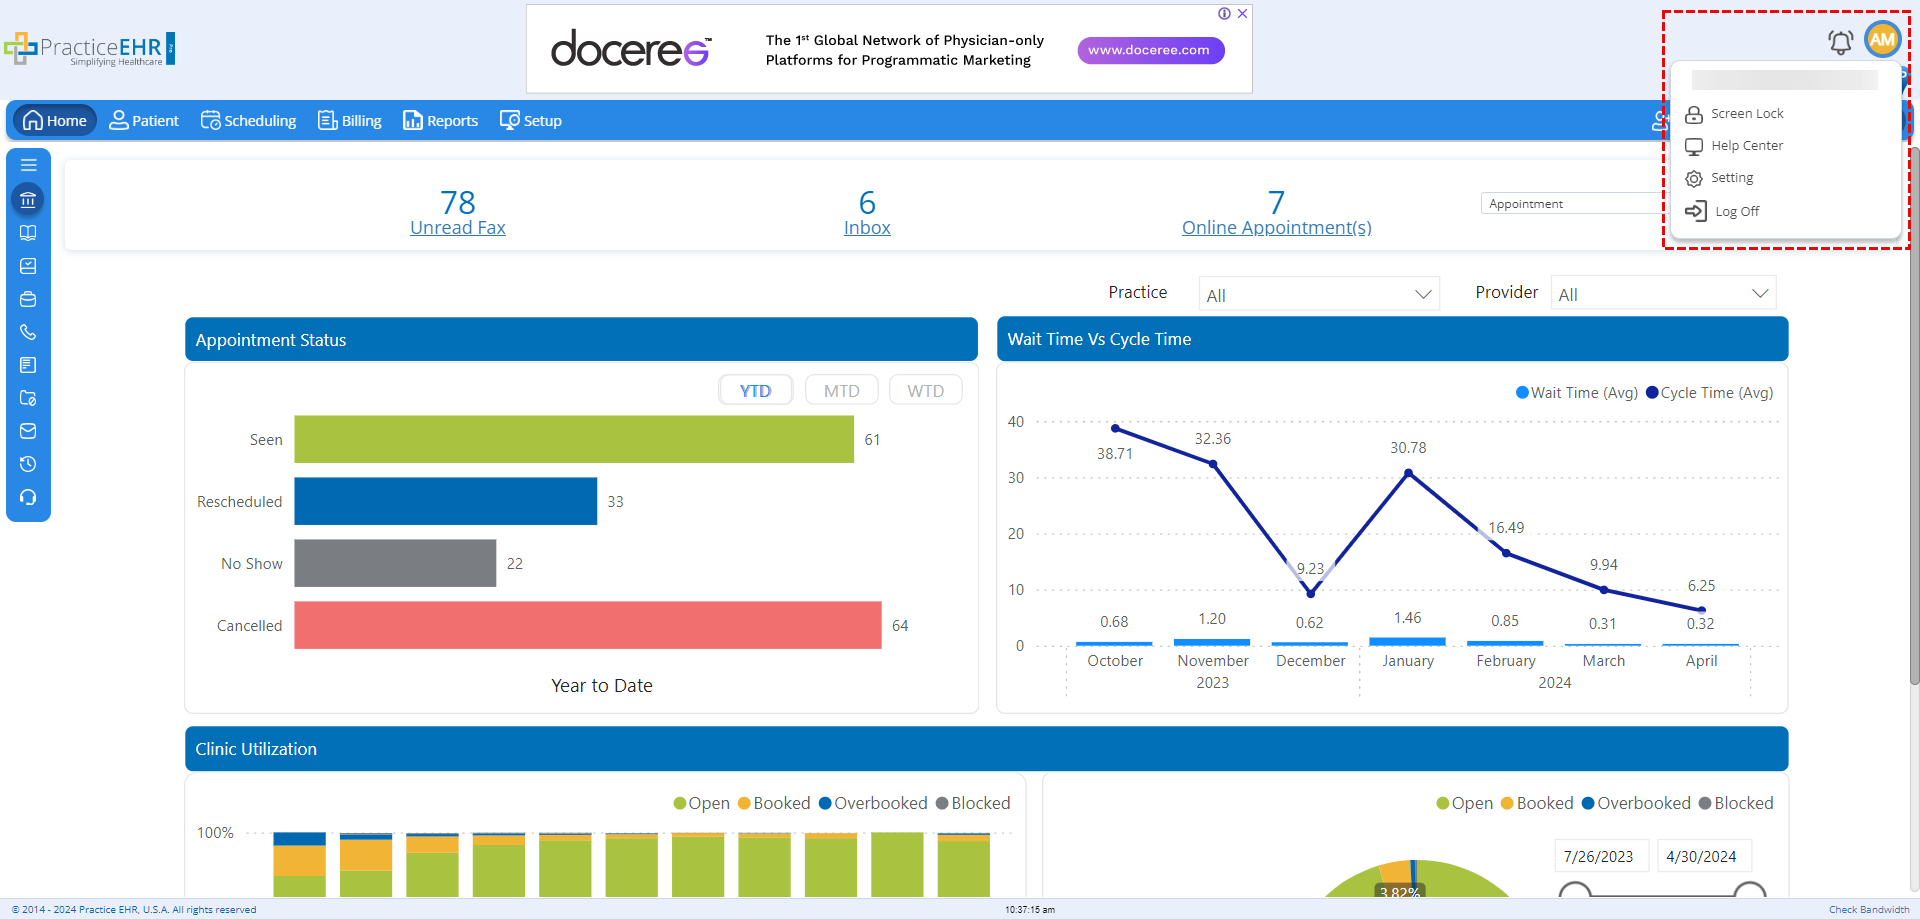
The notification icon and location icons have been updated and remain on the top right of the application.
The top menu bar of Practice EHR has been updated with a new color, new icons and impression buttons for the tabs. The “New Patient” button has been replaced with an icon.

The search functionality in the top menu bar has been enhanced. In addition to a search button, a search bar has also been added. Clicking on the search icon will open the “Search Patient” window, while clicking on the search field will allow users to search for patients.
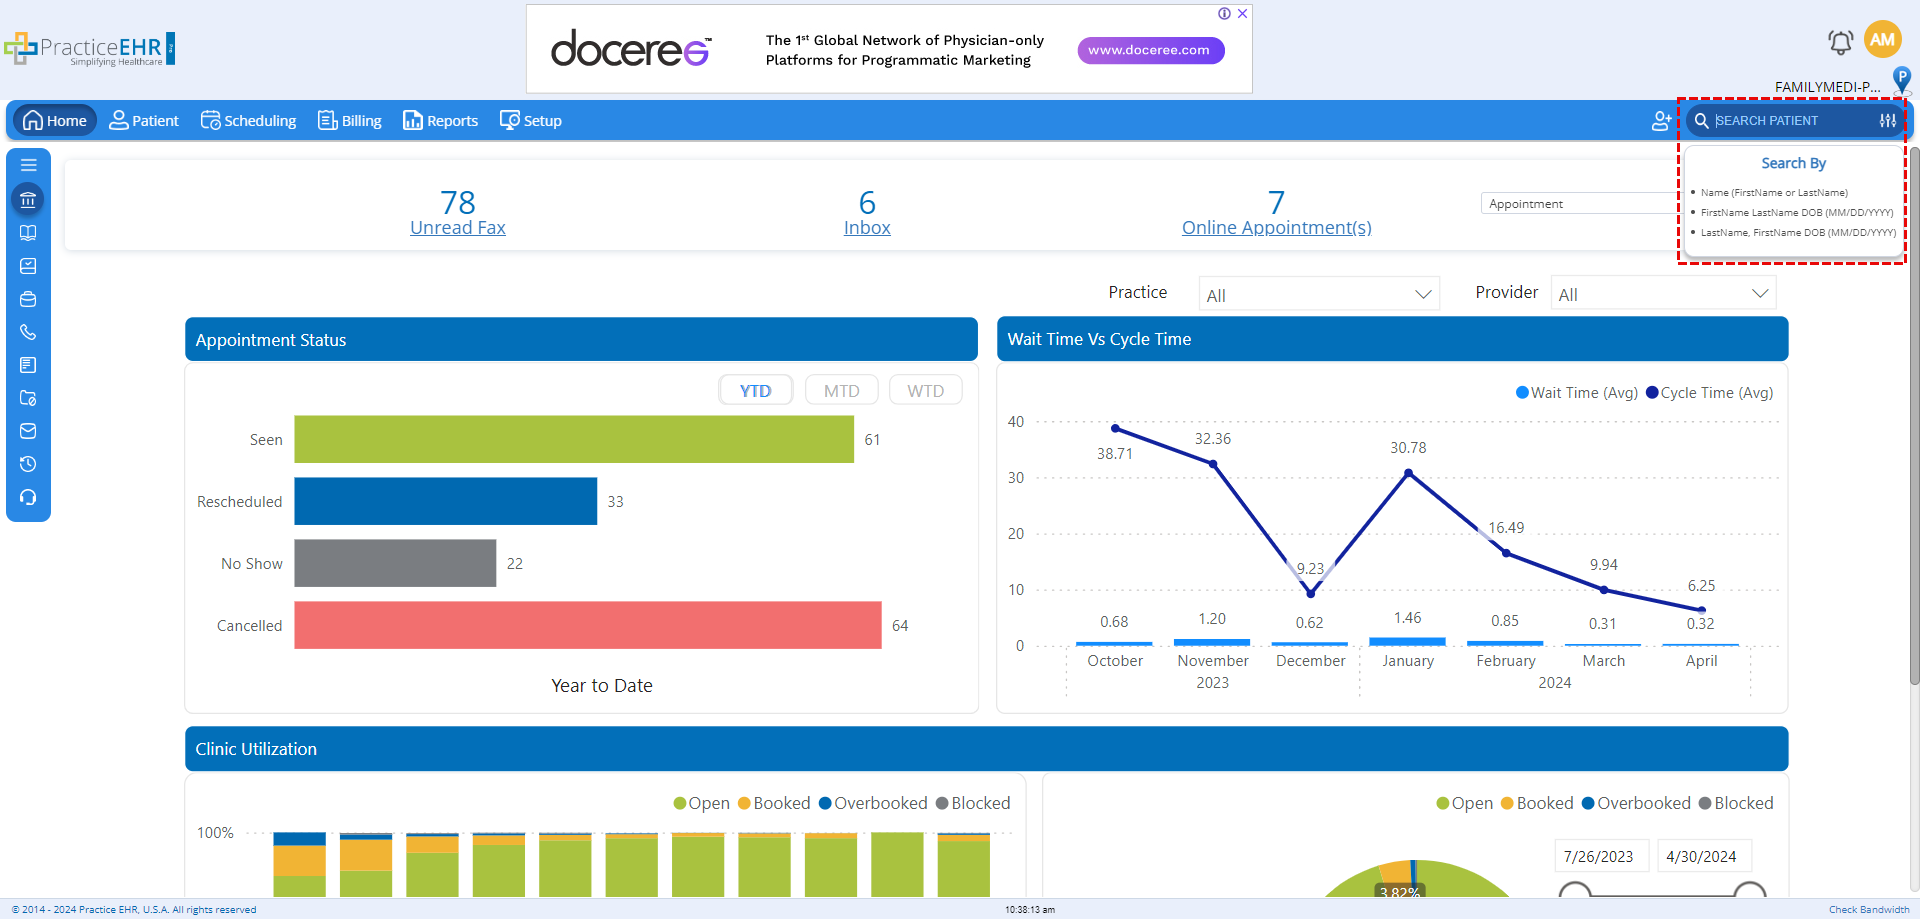
The advanced search window can now be accessed by the “advanced search” icon located within the search bar.
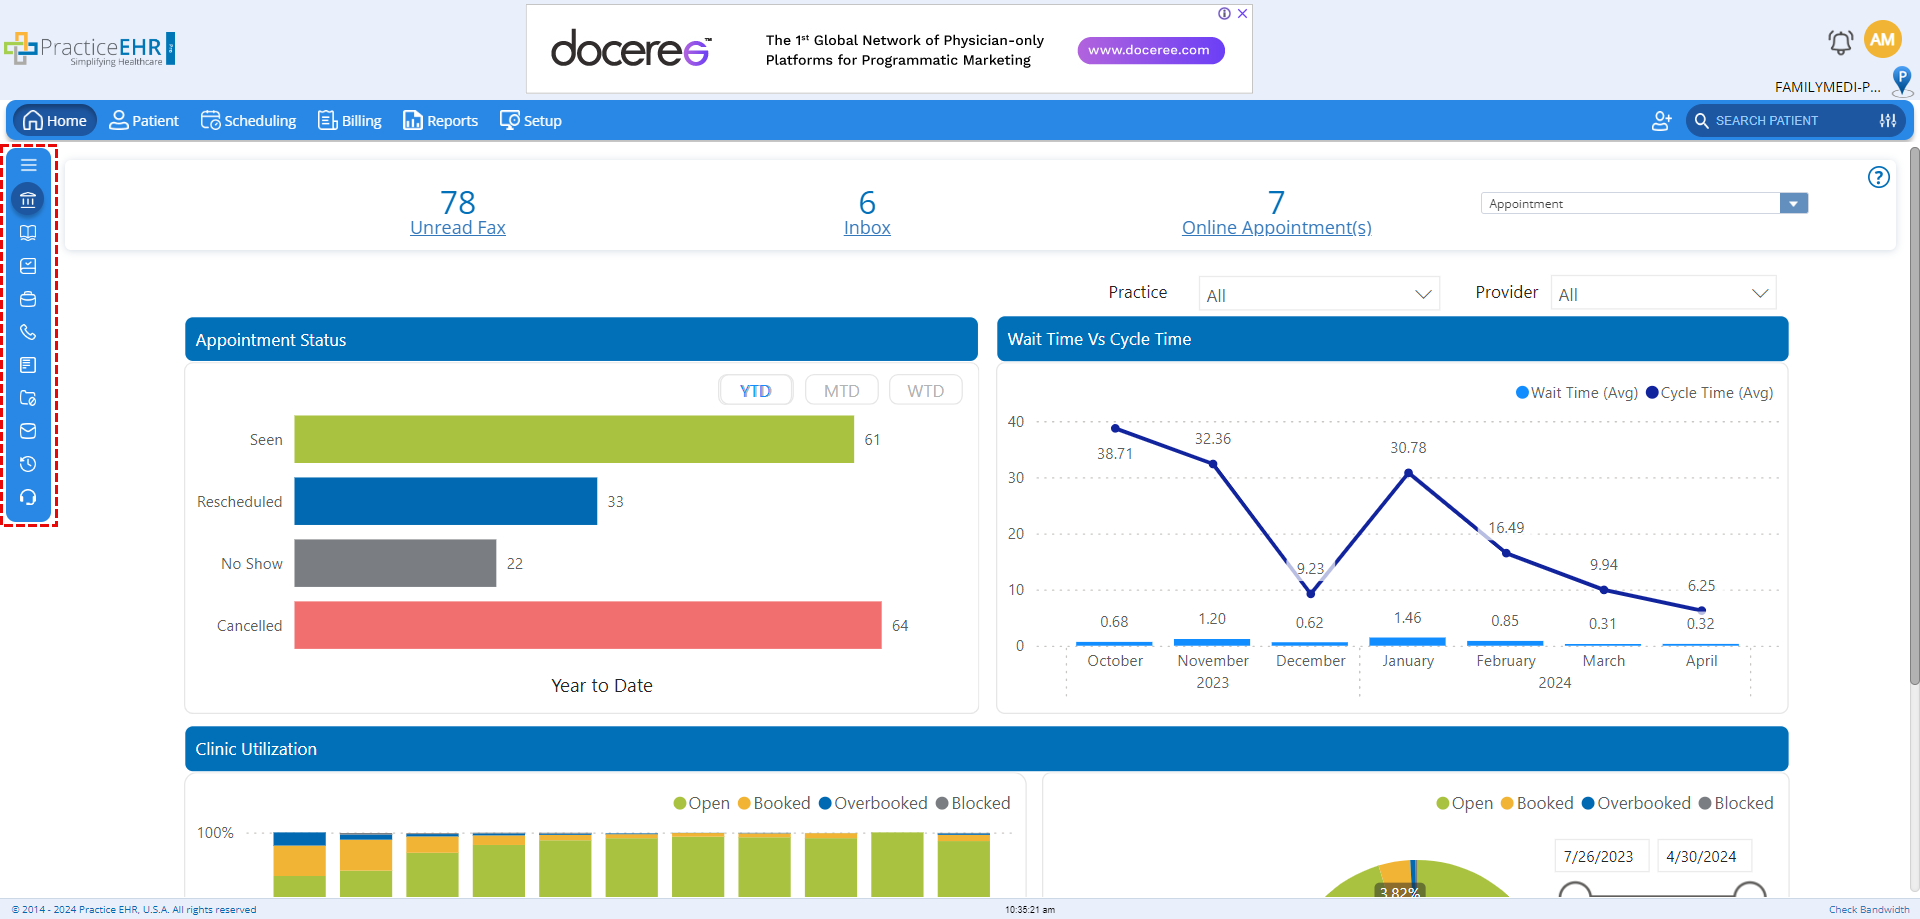
The side menu bar for the "Home", "Report" and "Setup" tabs has been upgraded.

The side menu bar now features the same color as the top menu bar with updated icons for each bucket. The side bar now has a single refresh icon that will refresh every bucket with a single click.
The side menu bar can now be collapsed by clicking on the collapse icon.
The buttons within Practice EHR have been redesigned for improved clarity and consistency. They now feature a modernized appearance, supporting rounder corners for a softer feel.

Alerts and pop-ups have undergone a refinement process to provide users with clearer and more actionable notifications. The updated design ensures that important messages are prominently displayed.
Successful completion of operations will display alerts in green.
Unsuccessful operations and warnings will display alerts in red.
Dialogue windows have been reimagined to prioritize usability and accessibility.
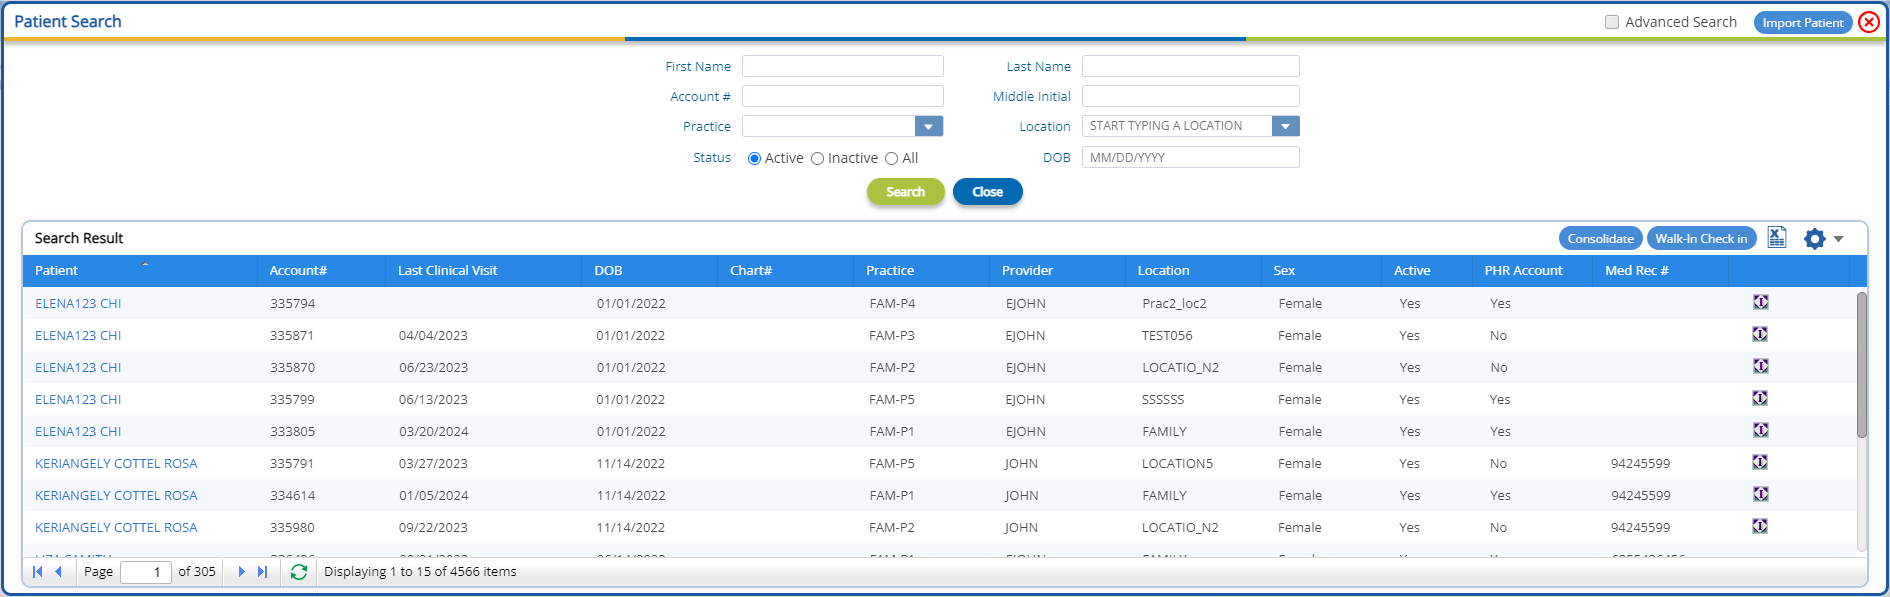
The search grid now supports a new look. The grid has been rounded and the header column made more prominent. The blue dropdown icon has been redesigned to fit the new UI.
Rows have been given alternating colors so that users can visually track each individual row with ease.
Question groups in the “Open Visit” tab have now been rounded and the headers made more prominent, keeping in step with the overarching visual improvements.
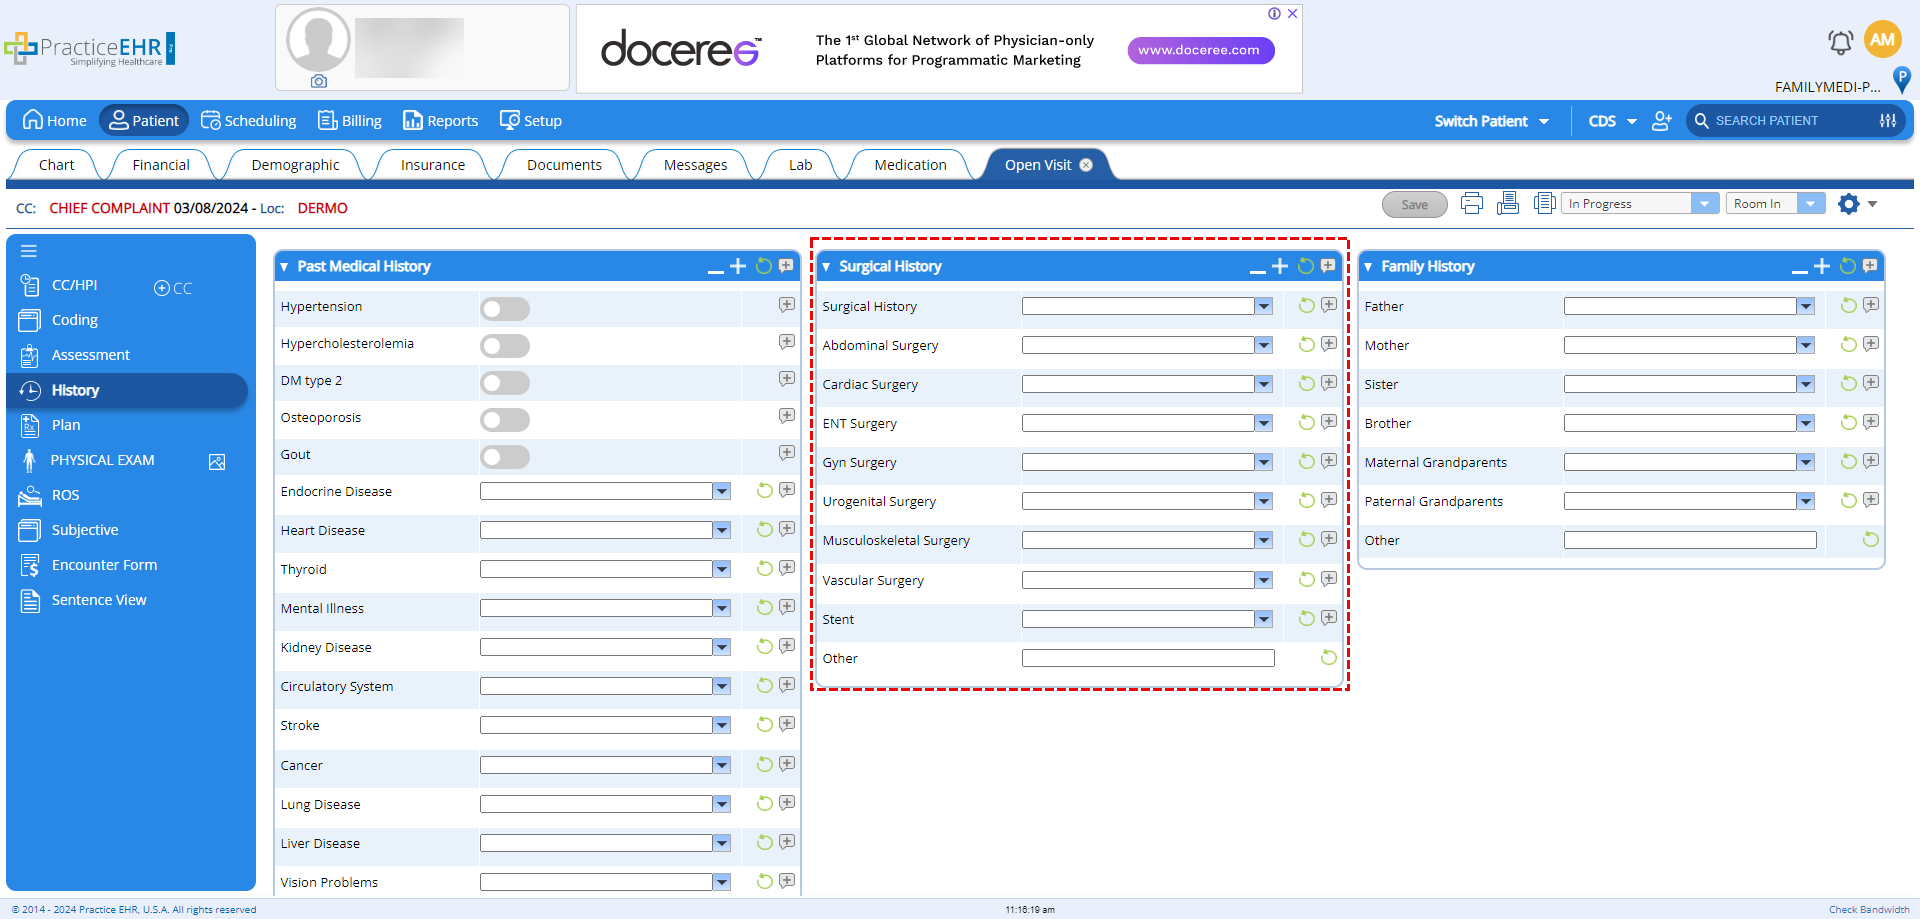
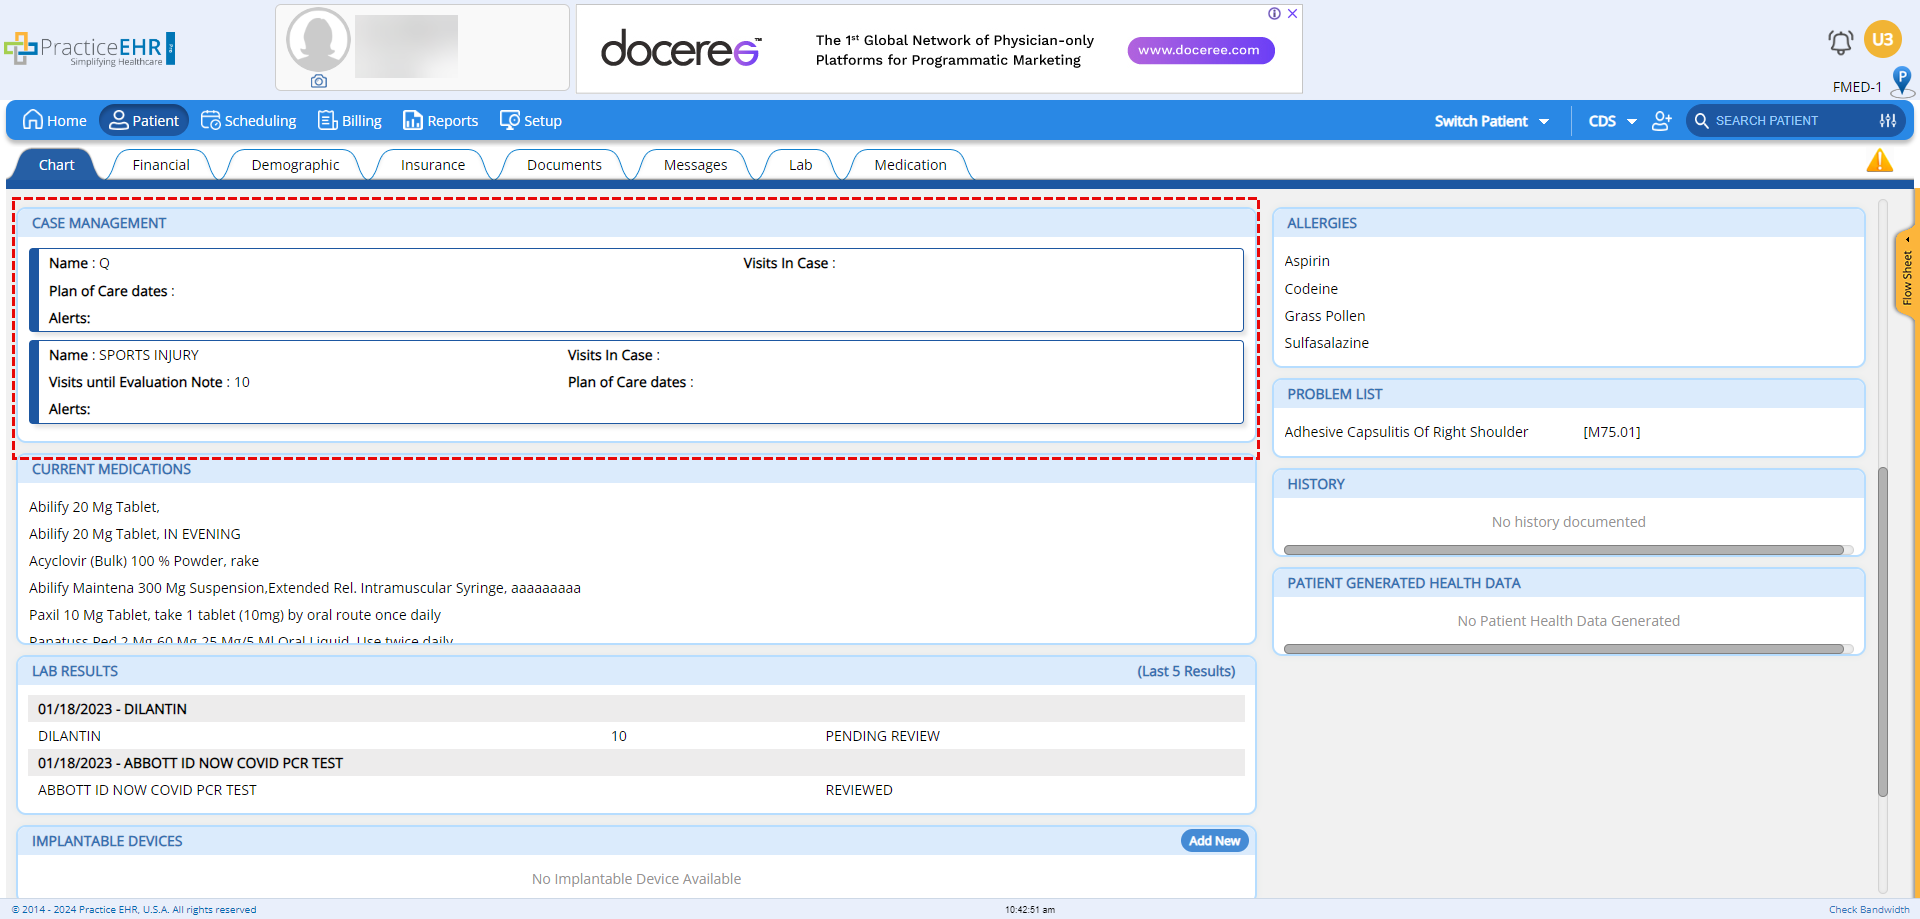
The cards in the patient chart tab have also undergone the same visual improvement showcasing rounded corners and a lighter blue color for the header background and borders.
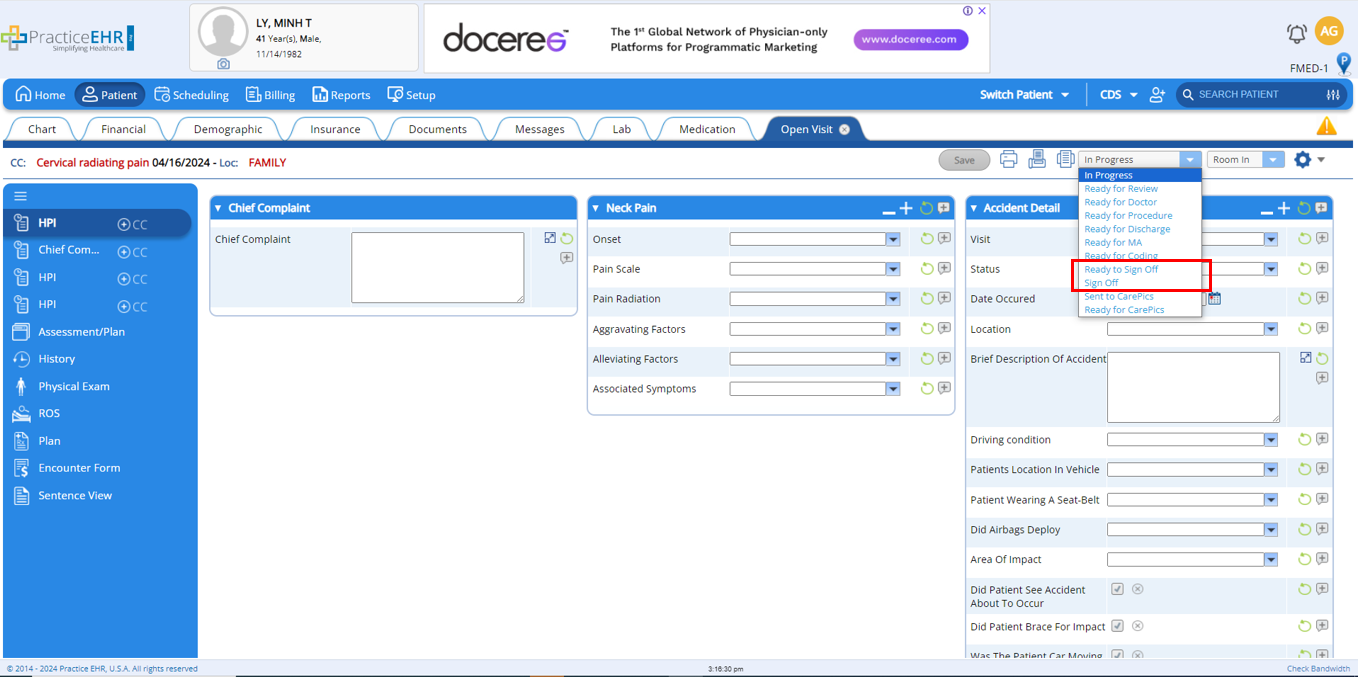
In the open visit status drop down following modifications have been made;
"Ready to Sign off" will now works as "Instant Signoff" and a new status named as “Signoff” will function as "Ready to Signoff"
We're pleased to inform that we've recently hosted a webinar showcasing latest changes in Practice EHR. To view the webinar and explore the updates firsthand, please follow the below link.


![]()
![]()


