
NOTE: The following information is provided only as an overview of the significant changes to the Practice EHR Scheduling system. It is strongly recommended that each user review the separate training videos available in our Help Center to best understand the improvements to the efficiency of your workflow. To view: Home > Scheduling > April 2020 Updates or click here.
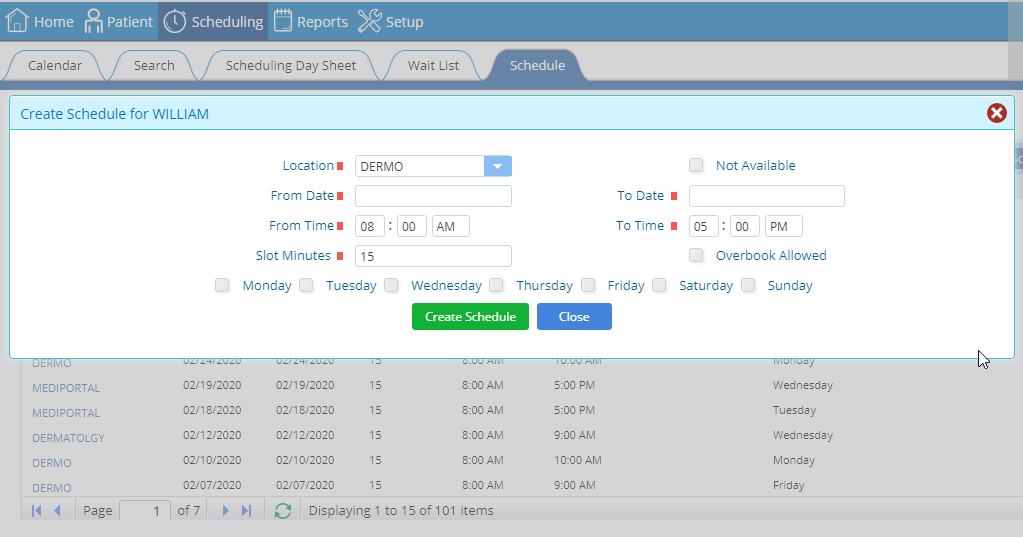
1. All Scheduling systems will now include the advanced features. Previously, there were two separate scheduling options within Practice EHR. A “basic version” which did not allow a schedule, for example, to be created by a specific date range, or allow for overbooking. With this update, the “advanced” scheduler has been included within all EHR systems. This screen shot shows the layout that may be new to some users. To view, go to Scheduling > Schedule > Create new schedule.
2. New workflow for revising existing schedules. Previously a provider’s existing schedule could not be deleted if there were future appointments tied to that schedule. Users can now delete a provider’s existing schedule even if there are future appointments booked without reaching out to Practice EHR support.
Now when a schedule is deleted, the system will move booked appointments to a separate, “Unlinked Appointments” grid. When a new schedule is created, all appointments for that same date/time will automatically be linked with the new slots. For example, a schedule was deleted due to the need to change the time slots. The original schedule offered appointments in 20 minute slots and the new schedule will offer appointments in 30 minute slots. An appointment for 10:00 will be automatically linked with the slot in the newly created schedule; however, the appointment at 10:40 will remain in the “unlinked appointment” grid as that slot doesn’t exist in the newly created schedule with 30 minute slots.
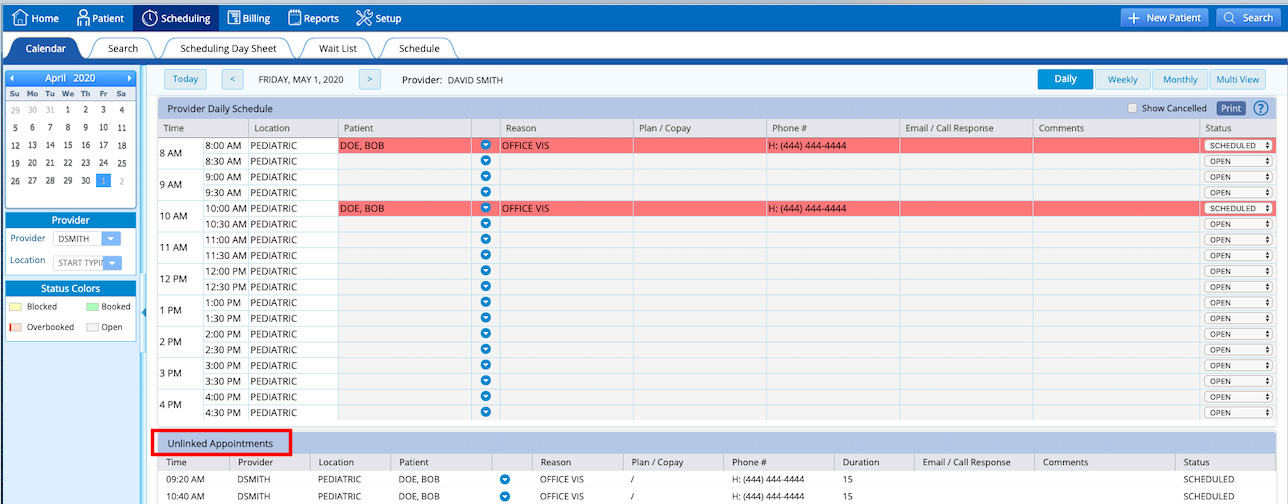
To move the unlinked appointment to a new slot, simply click the blue action menu on the appointment you would like to reschedule and then select “cut.” Click the blue action menu on the new appointment slot you would like to book the patient on and then select “paste.” This will successfully reschedule the patient into that slot while retaining the history of the original appointment.
In addition, a report can also be generated from the Scheduling Day Sheet to locate any unlinked appointments that could not automatically be linked with the new schedule. This list can be exported and used to call patients to discuss a new appointment time.
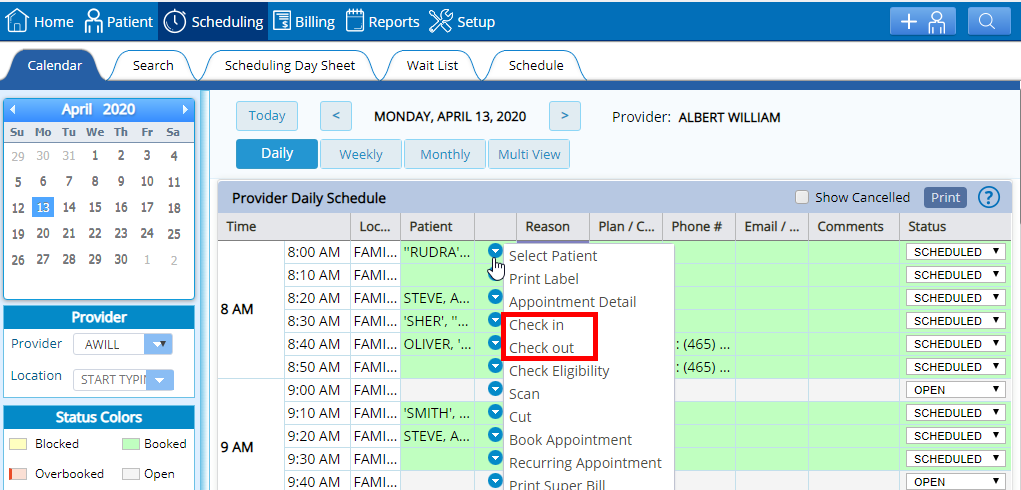
3. “Check In” / “Check Out” features are now available from the Calendar menu. “Check In” and “Check Out” have been added in the Daily, Weekly, and Muti User view of the Calendar. This improves the efficiency for those users who may not work directly from the Dashboard.
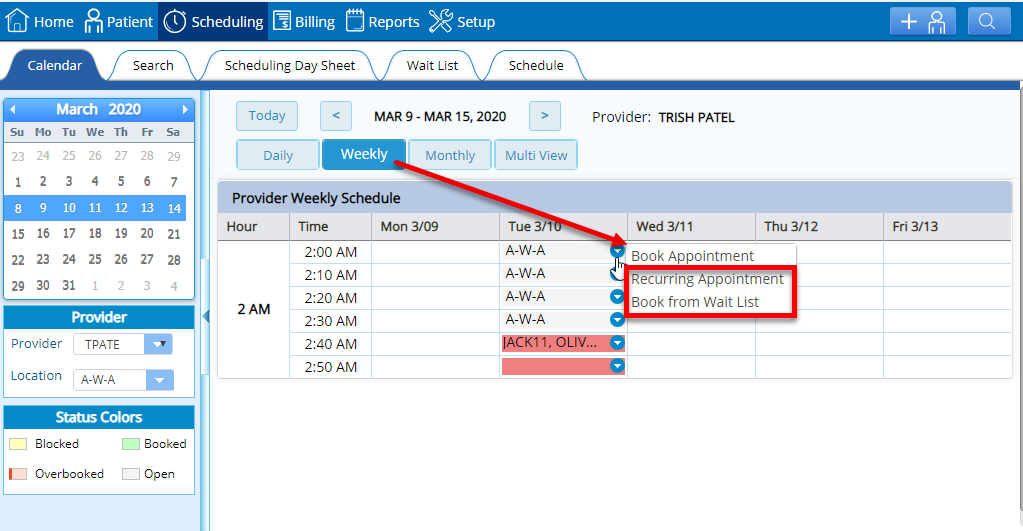
4. Additional scheduling options are now available from the Weekly and Multi View options. “Recurring Appointment” and “Book from Wait List” were only available in the provider’s daily schedule. Now both options have been added in the provider’s weekly schedule and the Multi View windows.
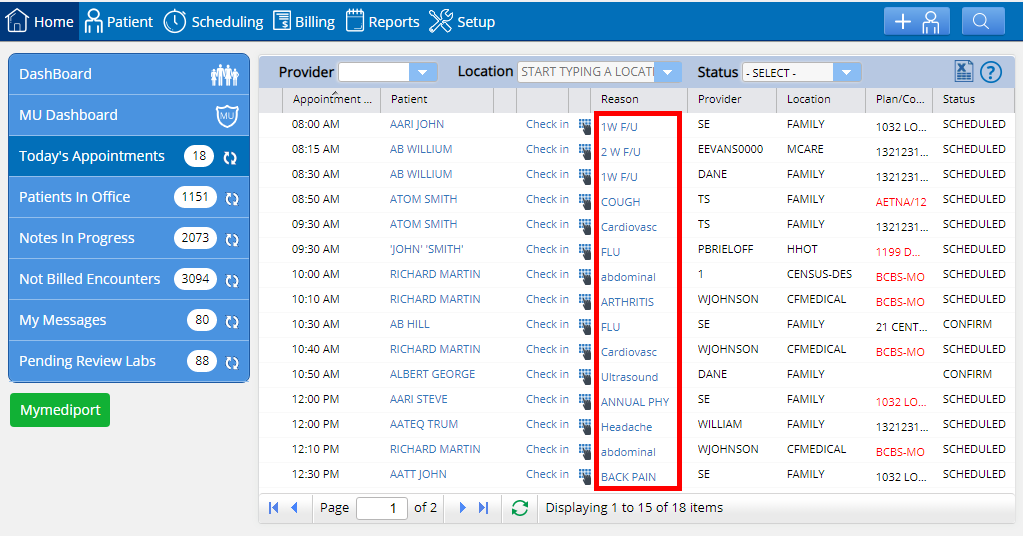
5. “Reason” in Today’s Appointments list offers new information. When you select / click the appointment “reason”, a separate window will display additional appointment details such as time, date, provider, case, etc. This will also offer a more efficient pathway to the history of the patient’s appointment detail. Each field is view-only to ensure that data is consistent with the visit detail.
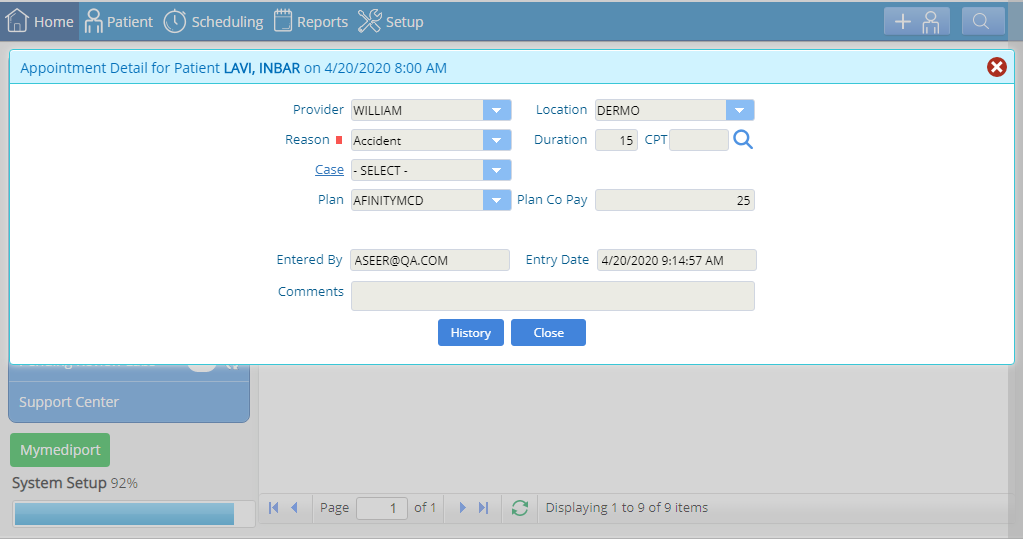
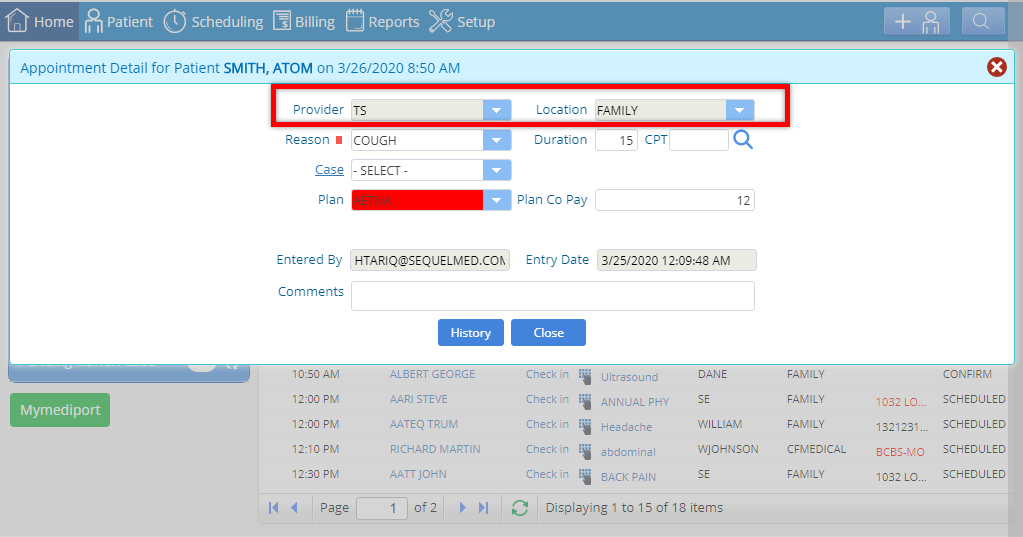
6. Appointment detail window has also been updated. Provider and location fields will now display in the appointment detail window. Both fields are view-only to ensure that data is consistent with the visit detail. Prior to this change the window had to be closed to view these options. To view, go to: Home > Today’s Appointments > Click on the “Reason” hyperlink and the appointment detail window will open.
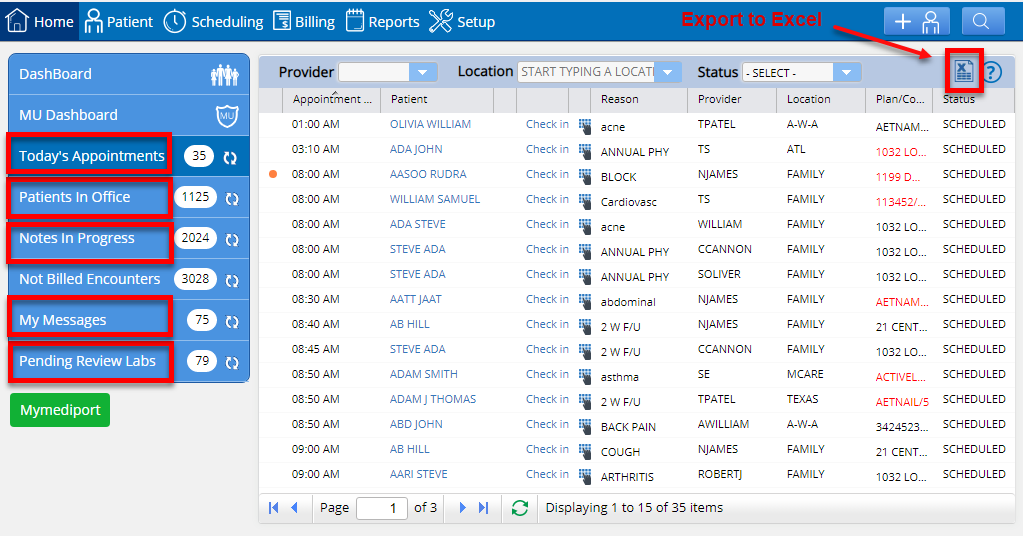
7. Ability to export to excel added to the Dashboard. Each list populated within the Dashboard on the home menu can now be exported to an excel list.
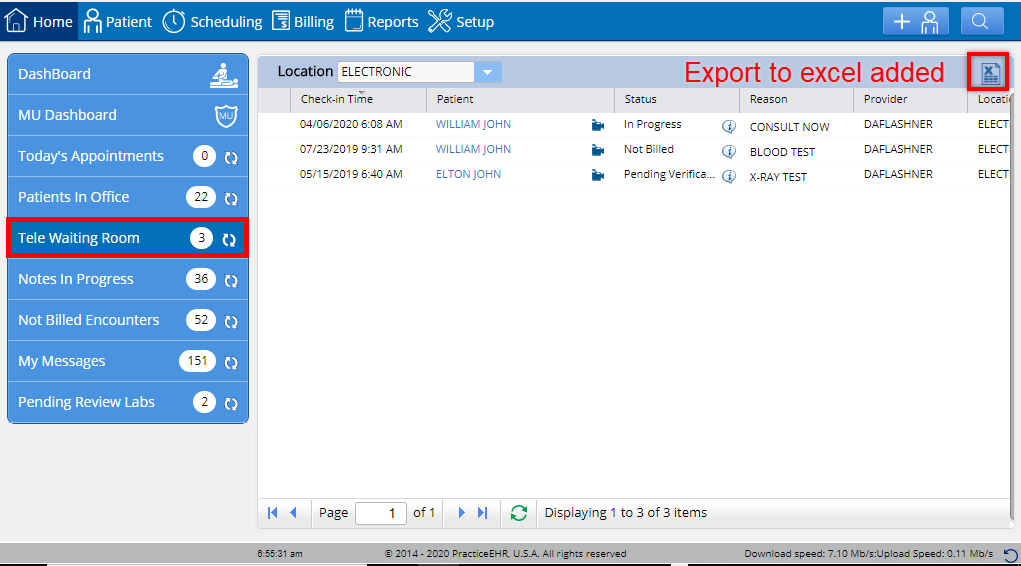
For those practices with a Tele Waiting Room, the same feature is now available there also.
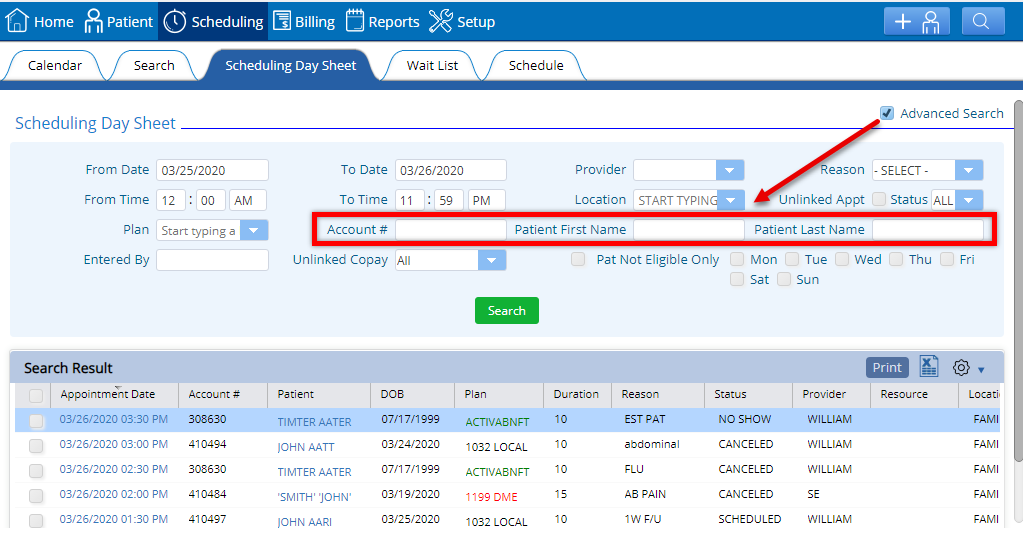
1. Three new fields added in the Scheduling Day Sheet. First name, last name and account # will now appear in the Scheduling Day Sheet when “Advanced Search” is selected. This new feature will assist in locating all future appointments for a single patient. The final list can also be printed/exported as an individual patient appointment list, and/or used to identify all future recurring appointments for an individual patient and then take action on that list such as move to another provider/location or delete.
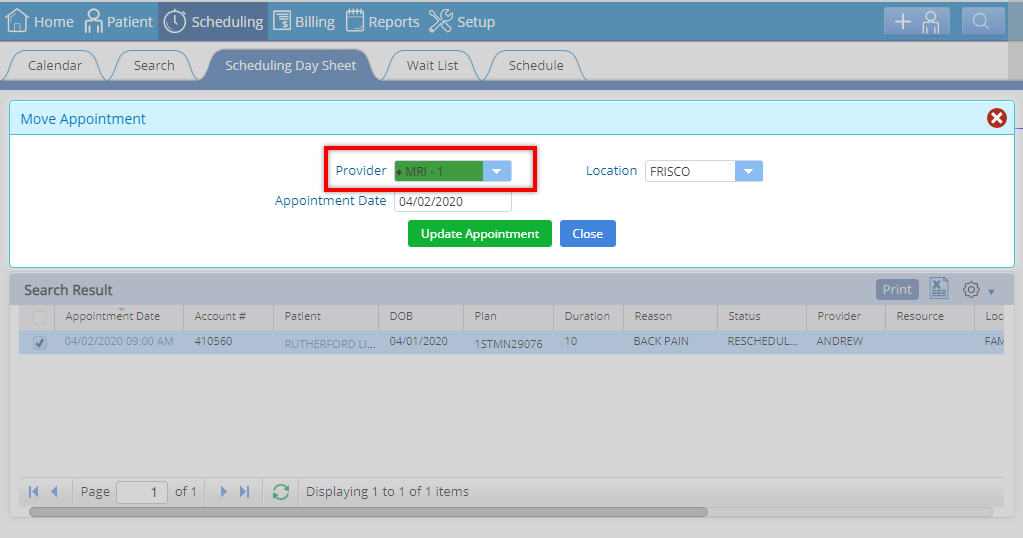
2. Appointment date is now optional when moving an appointment. Users can now move appointments by provider, location or appointment date. Prior to this change, the appointment date was a mandatory field and restricted the functionality.
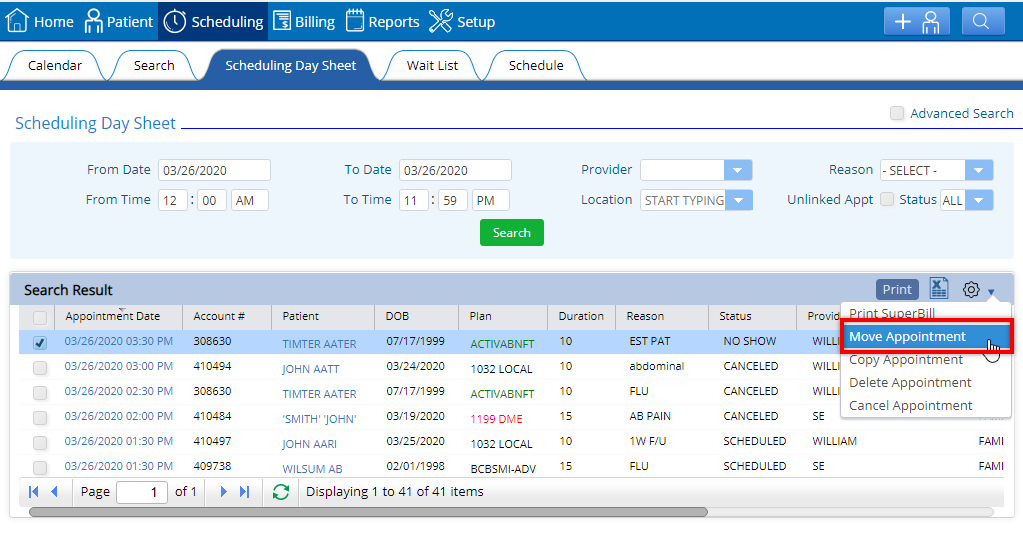
3. More flexibility for moving appointments. Users now have the ability to move a patient’s appointment from a provider’s schedule to a resource schedule. Before this, an appointment could only be moved between provider schedules. To move a patient’s appointment to a resource schedule, go to: Scheduling Day Sheet > Select patient > Click “Move Appointment” from the action menu. To set up a Resource, go to: Home > Setup > Practice > Resource > Click “Create Resource.”
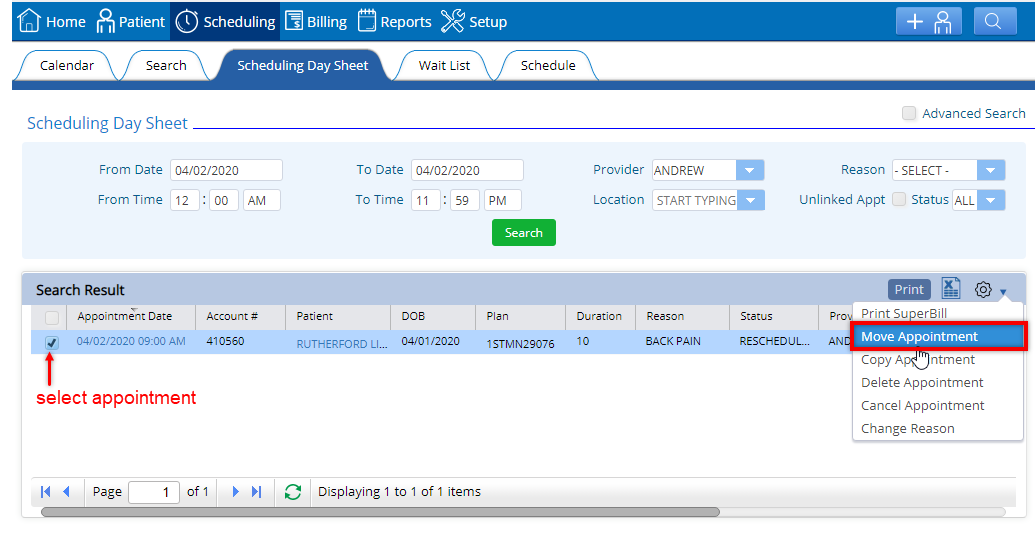
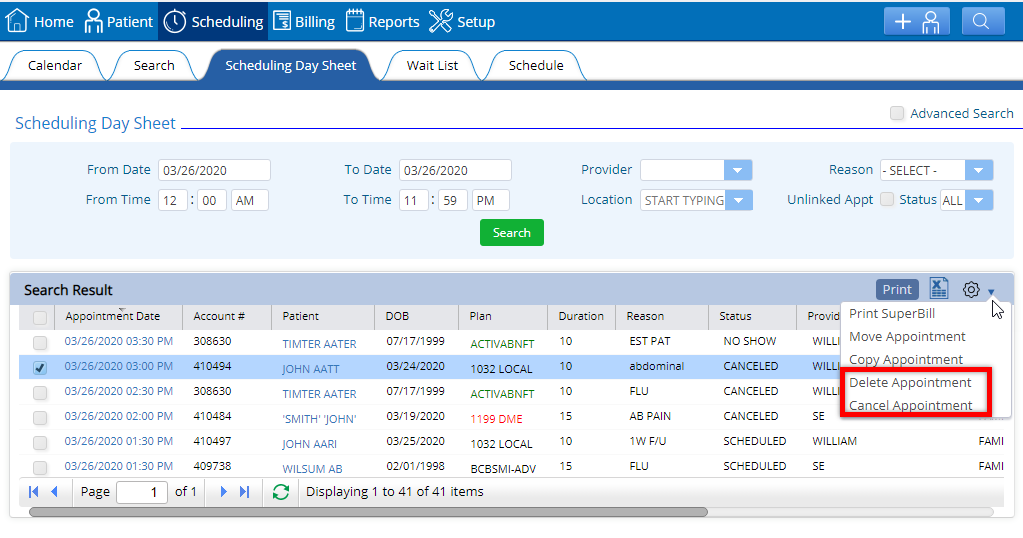
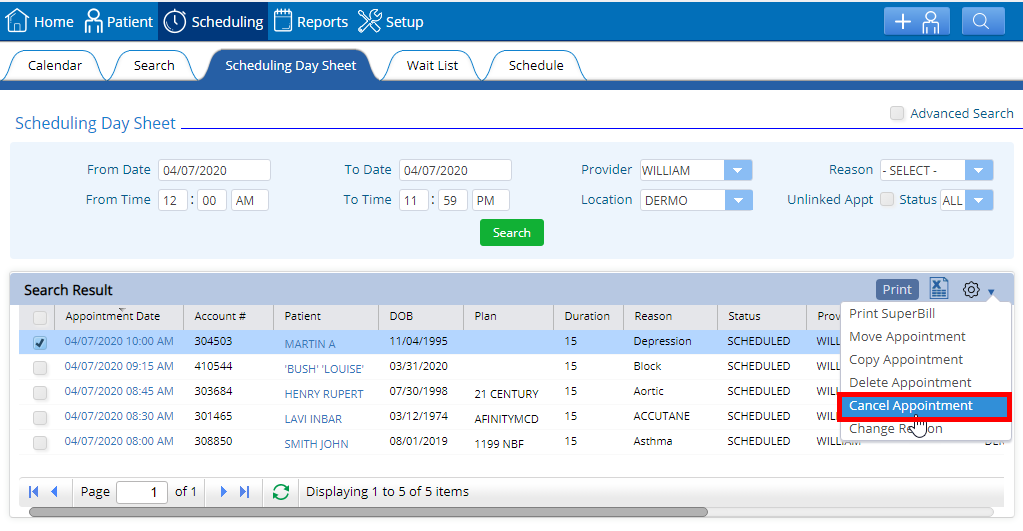
4. Delete or cancel bulk appointments from the Scheduling Day Sheet. Users can now delete and cancel multiple appointments from the Scheduling Day Sheet. Prior to the change, only one appointment at a time could be cancelled or deleted from the calendar. To delete or cancel appointment(s), select the patient and click on the action menu for these options. It is important to note that deleting appointments is a permanent action. NOTE: This cannot be reversed
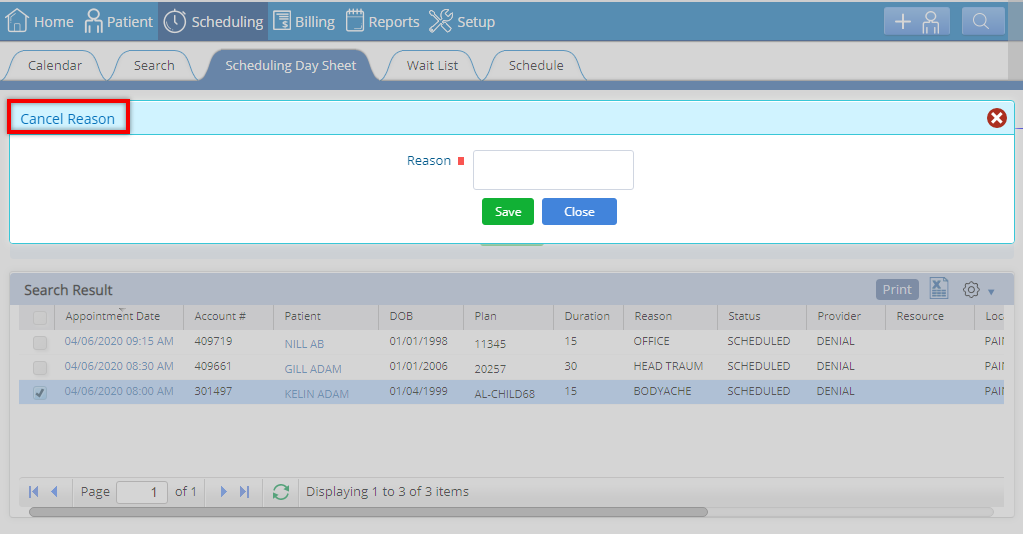
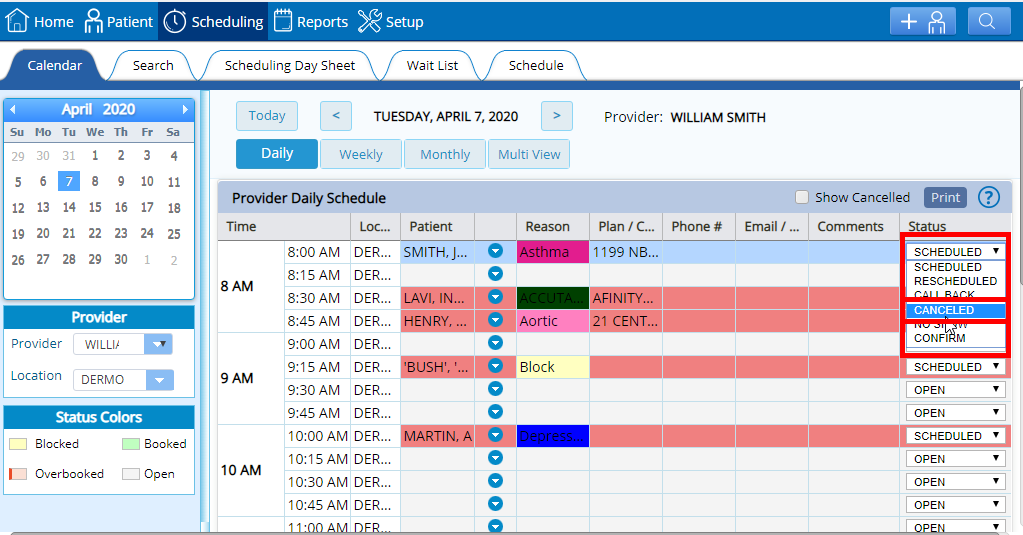
5. Reason now required for canceled appointments. The system has been updated to prompt a reason whenever an appointment is canceled. This feature has been included in both the Scheduling Day Sheet and Calendar.
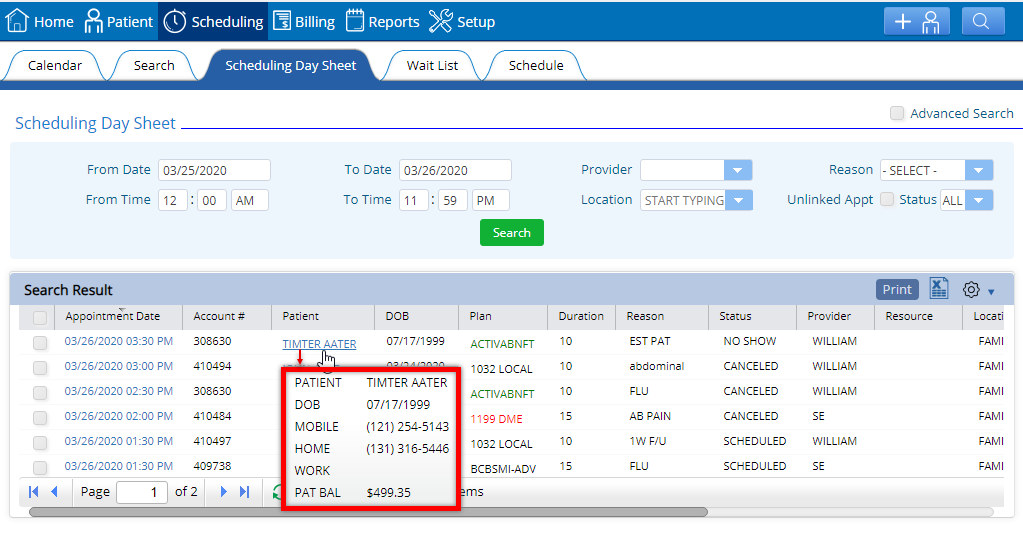
6. Patient contact information and balance have been added to the Scheduling Day Sheet. A tooltip provides the patient’s contact details at glance. For example, users can quickly view the contact information and patient balance. This is an efficient way to recall patients when appointments may need to be rescheduled, or if confirmation calls are made by the office, a quick way to reference an outstanding balance.
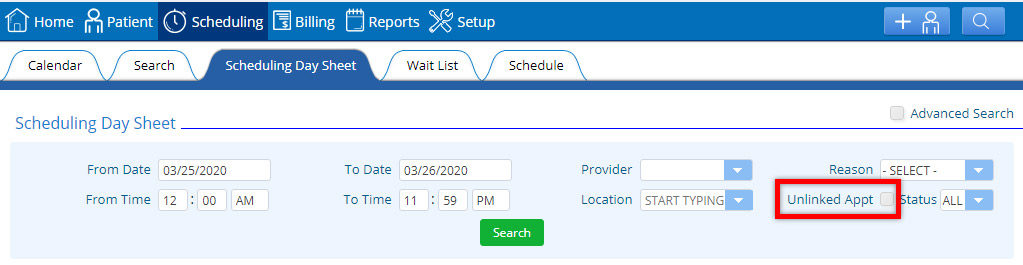
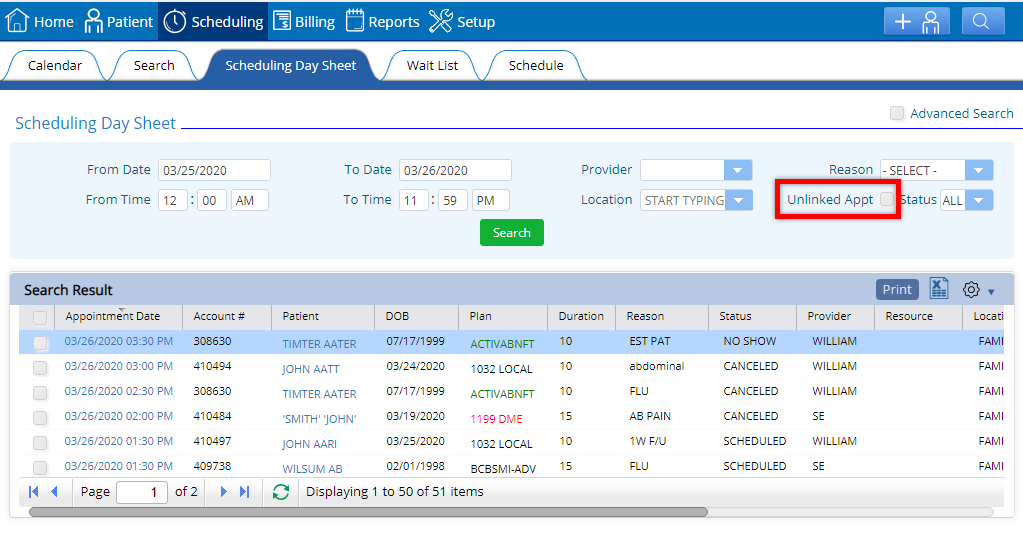
7. “Unlinked Appt” checkbox has been added to the Scheduling Day Sheet. An unlinked appointment checkbox has been added in the Scheduling Day Sheet. Users will be able to filter out and view all unlinked appointments by selecting the checkbox and then clicking on the “Search” button.
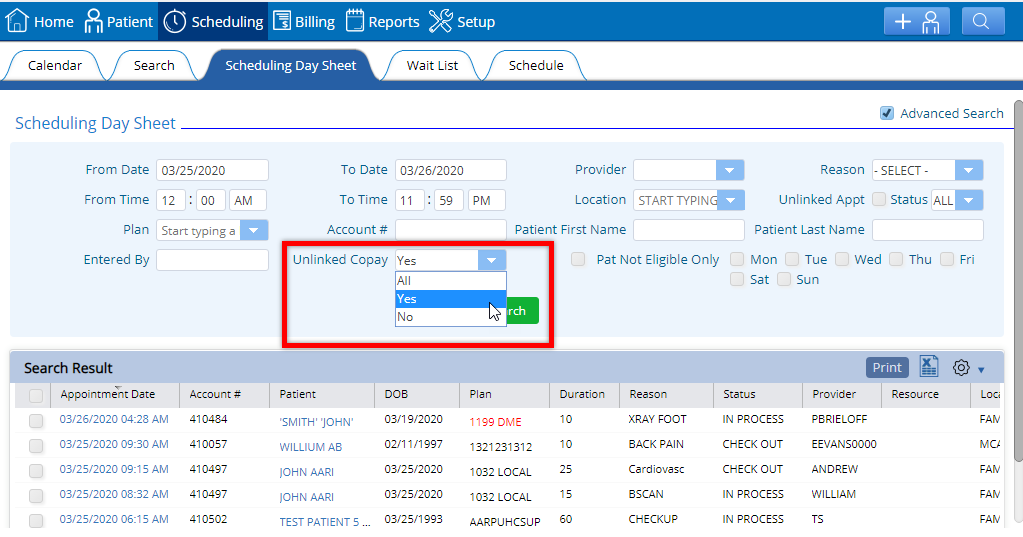
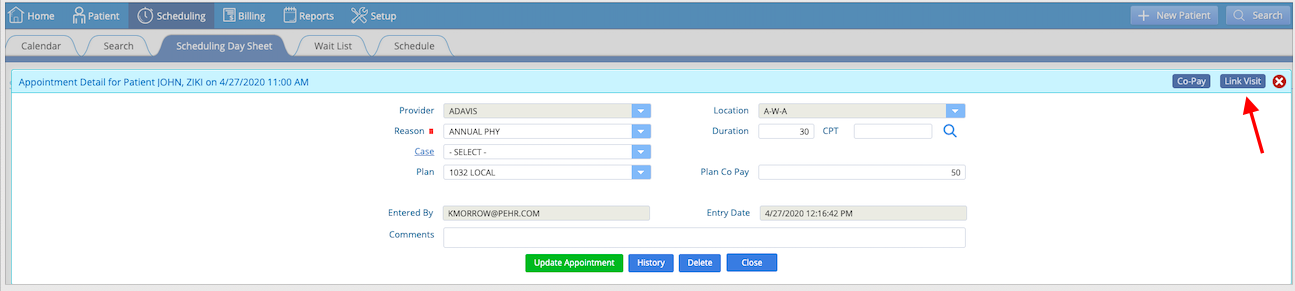
8. “Unlinked Copay” dropdown added in the Scheduling Day Sheet. Unlinked copay options (yes, no and all) will appear in the Scheduling Day Sheet when “Advanced Search” is selected. This allows users to easily identify copayments that may have been posted after the visit was started and were not then automatically associated with that visit. Users can then select the appointment date (hyperlink), and a second window will allow the user to “Link Visit”.
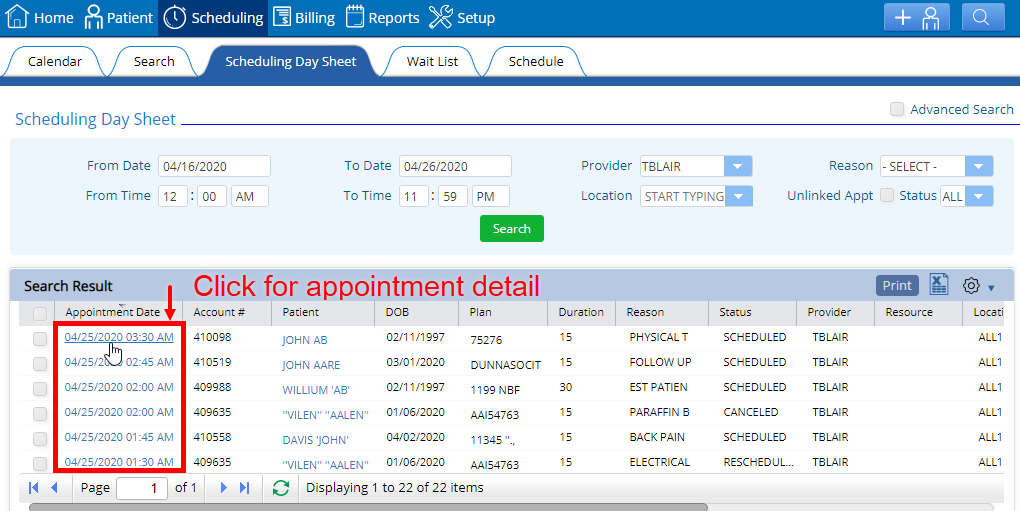
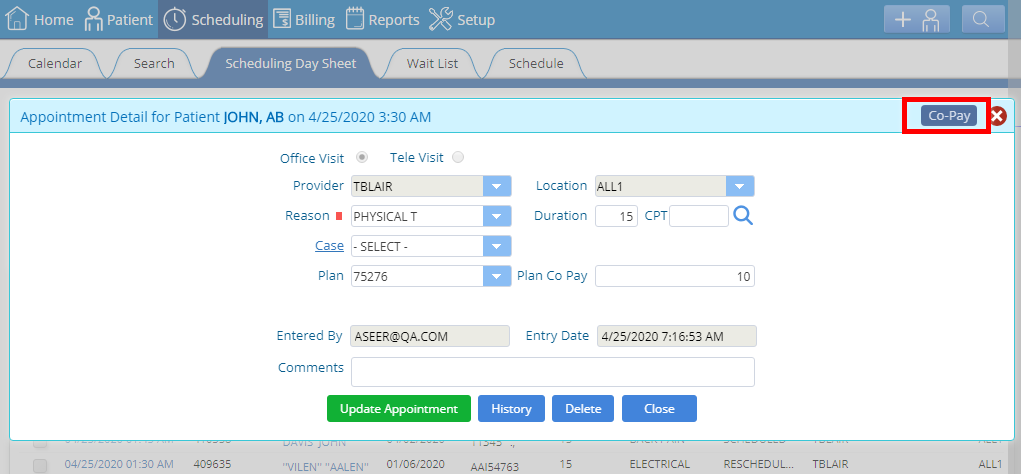
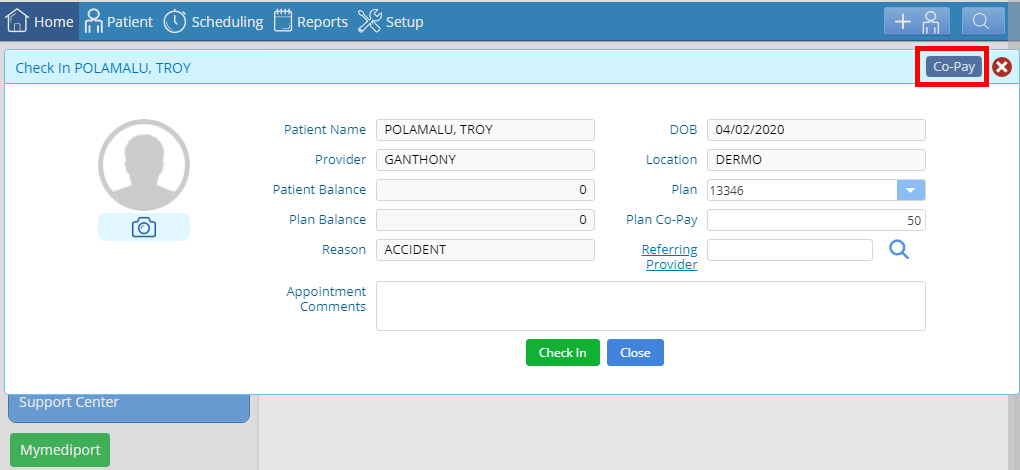
9. Co-pay button added in “Scheduling Day Sheet”. Users can now add the co-pay payment via the new button from the Appointment detail window in the scheduling day sheet. To view got to: Scheduling>Scheduling Day Sheet> click on Appointment Date hyperlink from search result grid. “Appointment Detail” window will appear with a co-pay button on the top right.
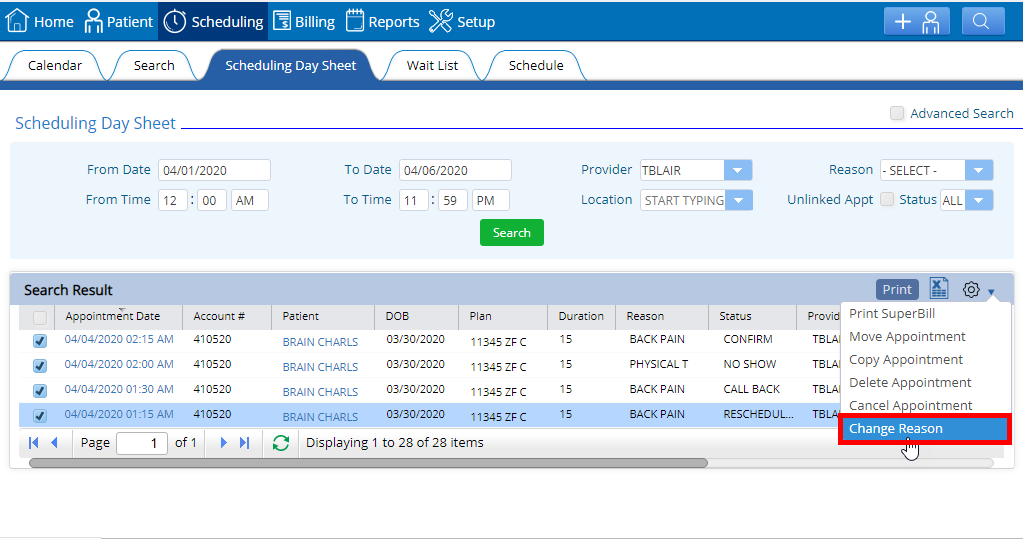
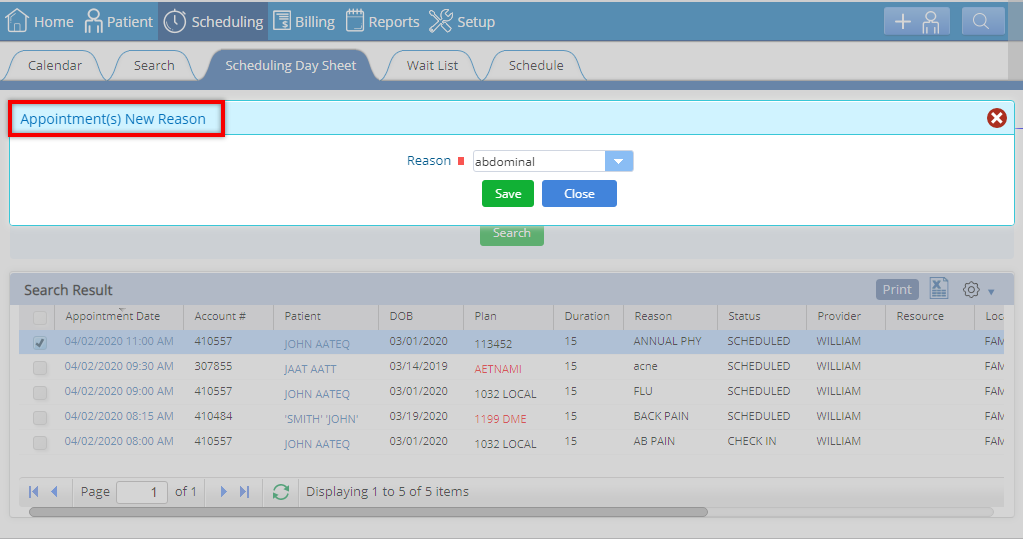
10. “Change Reason” added in the Scheduling Day Sheet. Users can now change the reason the patient is being seen for multiple appointments at a time, rather than just one at a time. To view, go to: Scheduling > Scheduling Day Sheet > Select appointment > Select “Change Reason” from the action menu.
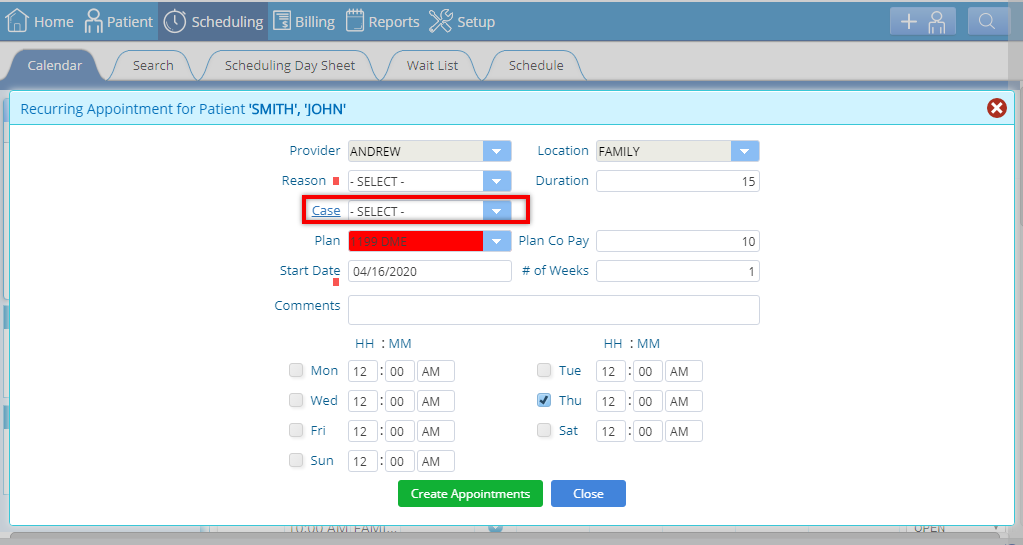
1. “Case” dropdown list added in recurring appointment window. A case dropdown has been added in the recurring appointment window to create consistency when scheduling appointments in the system. To view, go to: Calendar > Select “Recurring Appointment” from the dropdown in the Providers Daily Schedule > Recurring appointment window will appear.
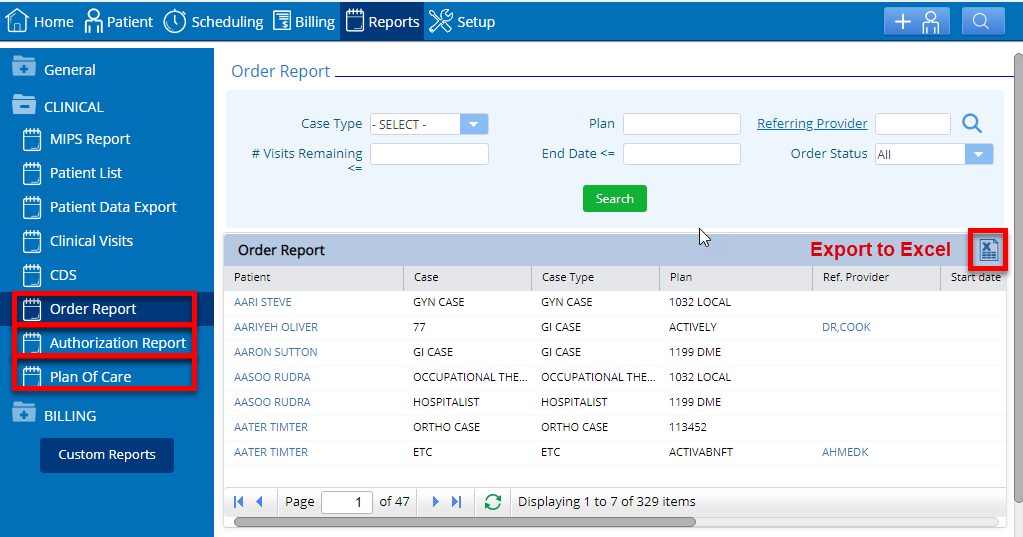
2. Export to excel icon added to Case Management Reports. Consistent with other export options, the export to excel icon has been added in the Reports tab for the following Case Management reports: order, authorization and plan of care.
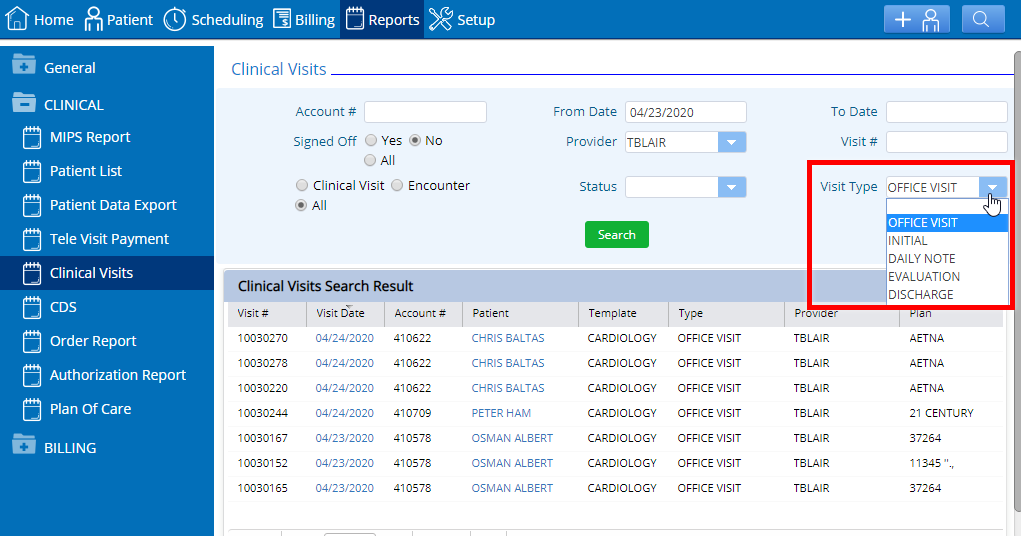
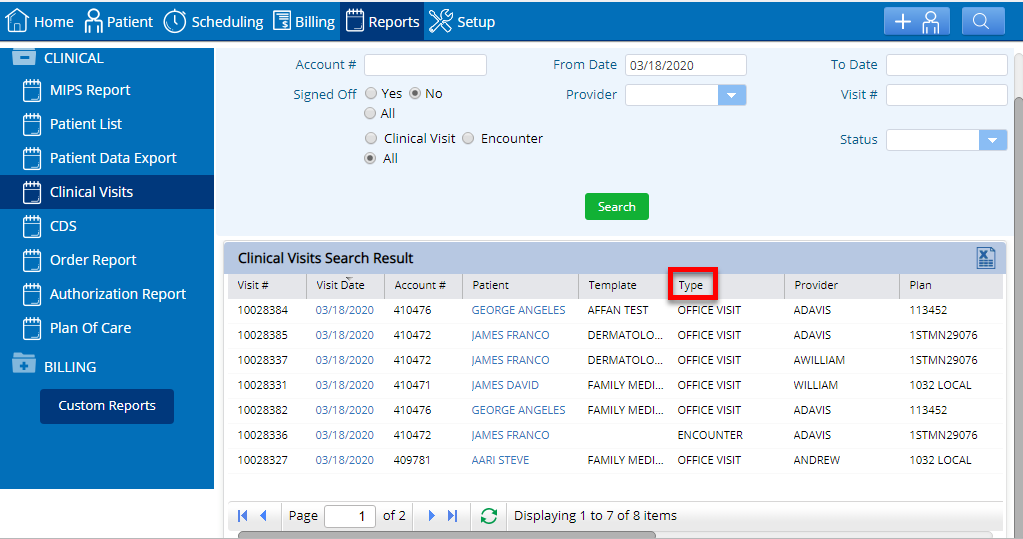
3. Visit type filter added in Clinical visits report. Users can now choose a specific visit type such as office visit and for chiro / PT. The available types are now Office Visit, Initial, Daily, Evaluation and Discharge. To view, go to: Reports> CLINICAL> select “Clinical Visits” “Visit Type” filter will appear.
4. Case and pending document drop down lists now optional when linking faxes. Prior to this change it was mandatory to select a case and pending document to link an unlinked document. Both options are now optional, unless there is a scenario where a process requires a case for an unlinked fax, then the pending document field will be mandatory. To view, go to: Reports > Fax Received > Search > Select a document to link.

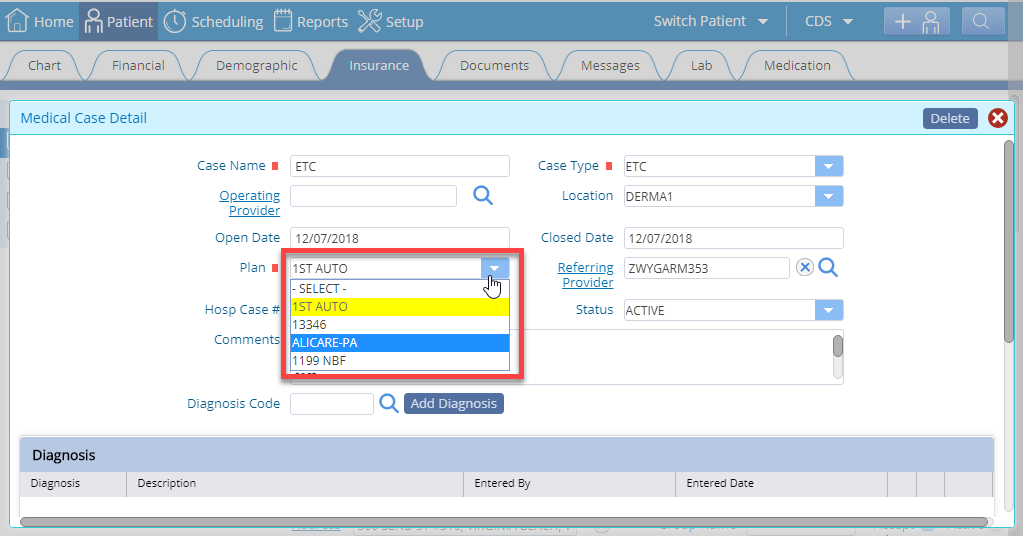
5. Case can be associated with another plan after the plan has been created. Users can now change plans in the medical case detail window even if they are deactivated. To view, go to: Insurance > Case Management > Click on the case # hyperlink > Medical case detail window will appear.
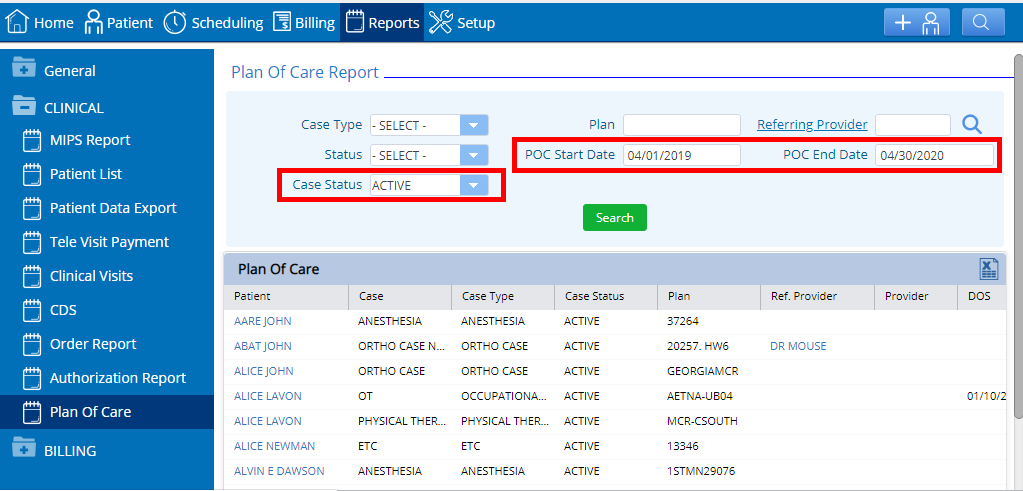
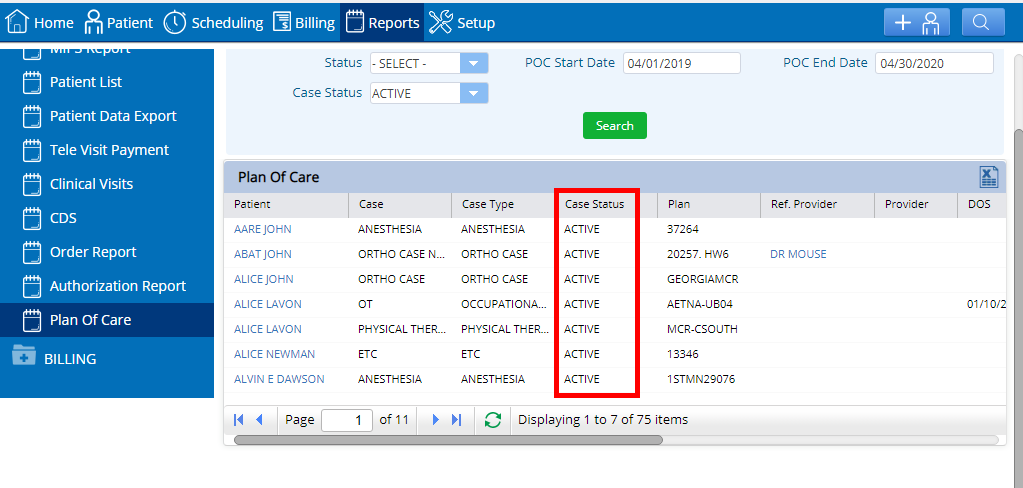
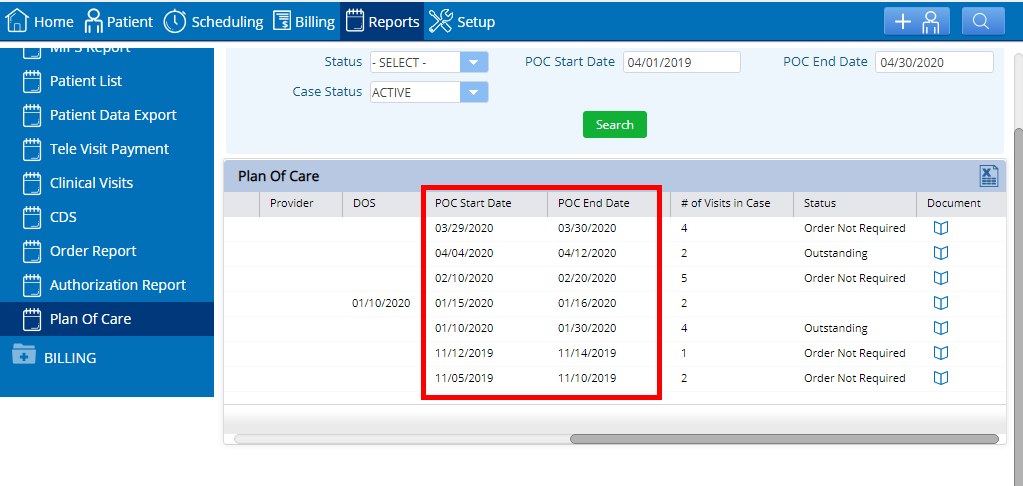
6. New fields added in the Plan of Care (POC) report. POC start date, end date and case status have been added in the POC report. To view, go to: Reports > Clinical > Plan of Care.
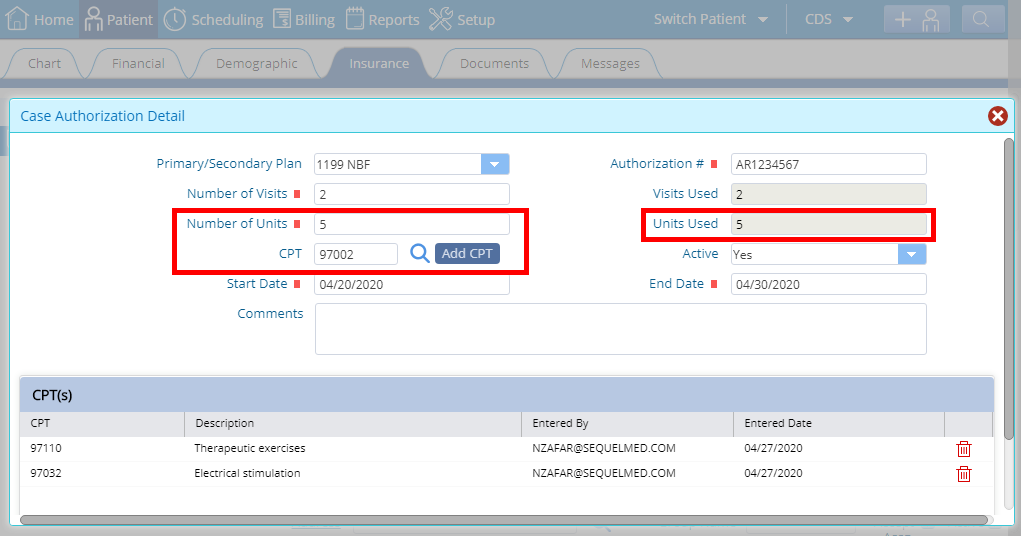
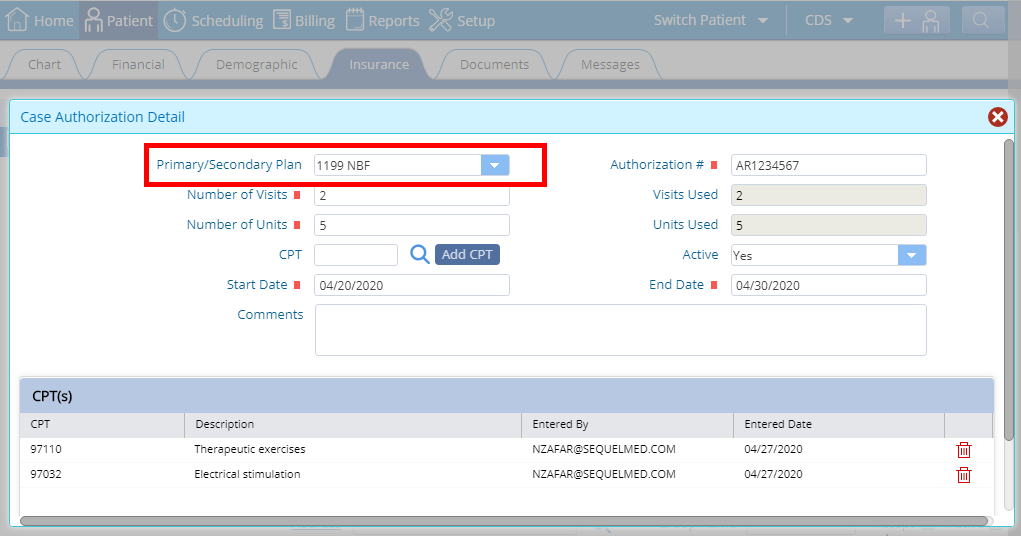
7. Authorizations can be tracked by Visits, Units, and/or CPT. New fields such as “Number of Units, Units Used and CPT search fields along with an “Add CPT” button have been added in the “Add New Authorization” window.To view, go to: Insurance> Case Management and click on the authorization icon> Authorization window will open and now click on add new, after which the window with the new fields will appear.
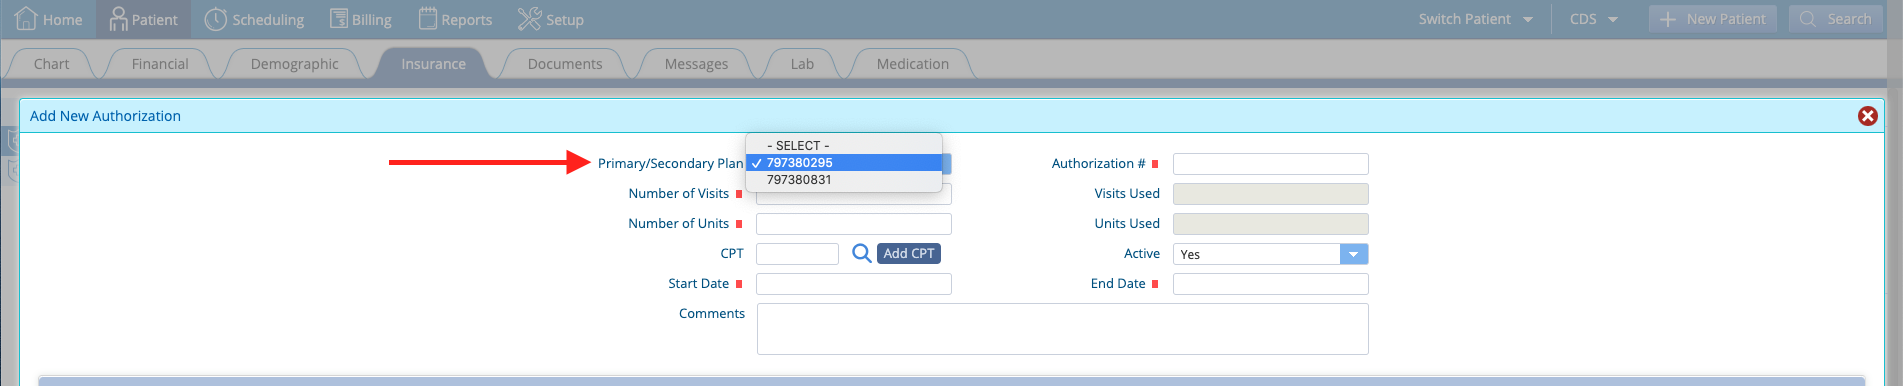
8. Authorizations can be added for a secondary plan. When an authorization is needed for a secondary insurance plan, the system will allow that 2ndry authorization to be added to the case on the primary insurance plan. This will ensure that each payor has the correct authorization for claim processing, and will track/count down the usage for both the primary and secondary payers.
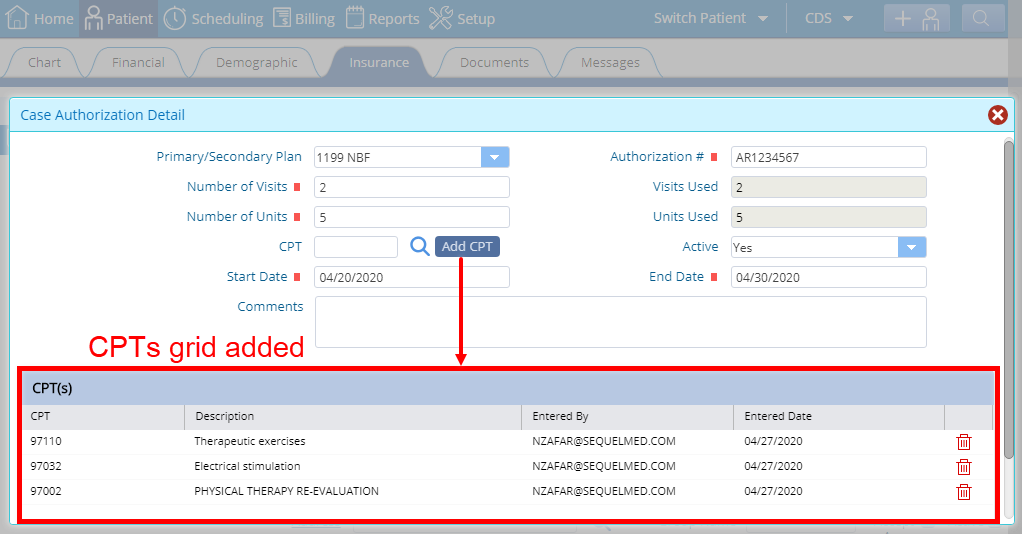
9. CPT(s) grid added in the case authorization. A new CPT(s) grid has been added in the authorization window within case management. This will display all the CPTs added via the ‘Add CPT’ button in the previous window. To view, go to: Insurance> Case Management click on the authorization icon> Authorization window will open and now click on add new button, after which the window with the CPT(s) grid will appear.
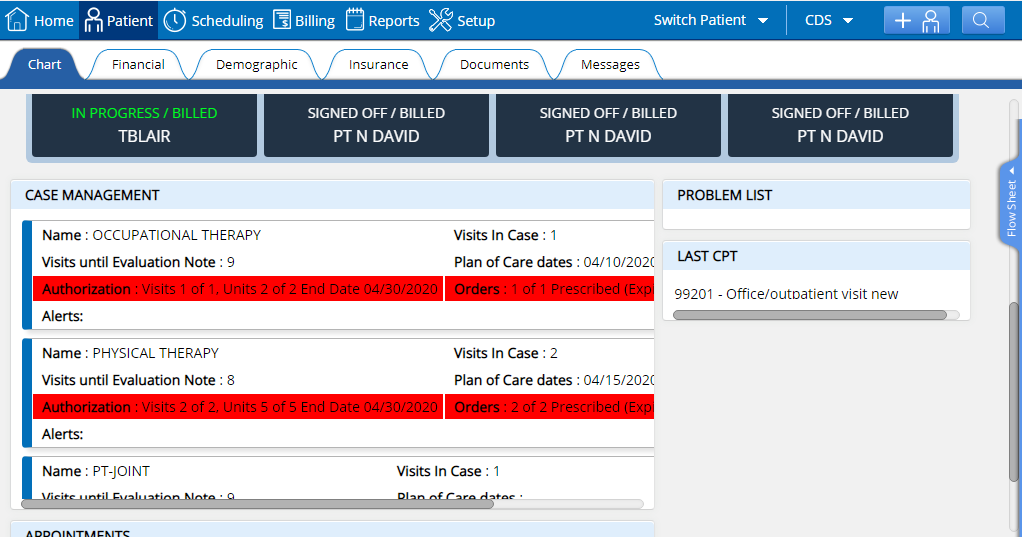
10. Alerts for expired “Authorization” and “Orders” are now removed. Prior to these enhancements, the system would automatically show expired authorizations and orders in front of the “Alerts” caption in case management in the patient Chart. Now the expired/ outdated data would simply be highlighted in red as shown in the image. To view, go to: Patient> open Chart and scroll down to the “CASE MANAGEMENT”.
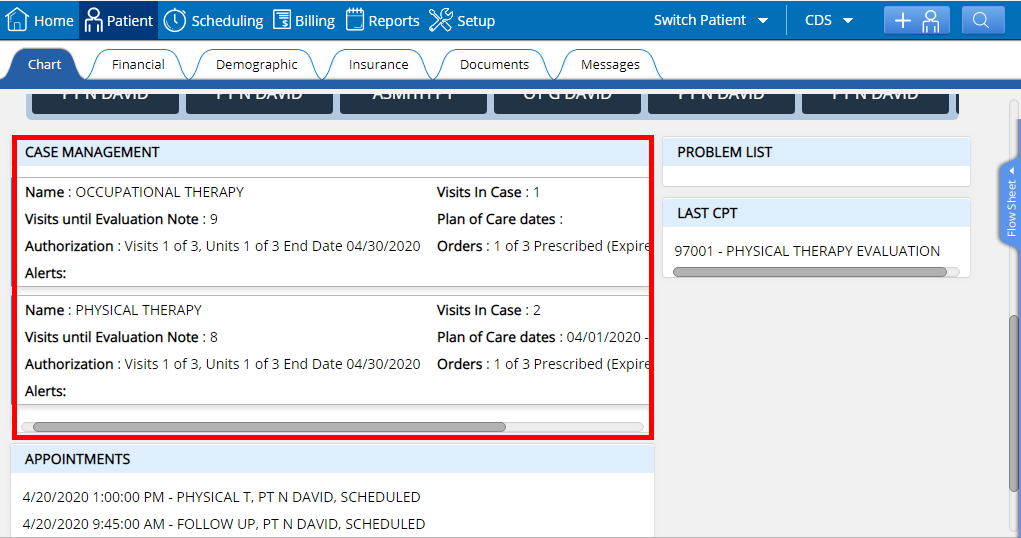
11. Improved visibility of case management box in patient chart. Prior to change, the “Case Management” box in the patient chart was only large enough for the user to be able to see a single case at a time, making scrolling a must. Now the viewable area has been increased so that a minimum of 2 cases per glance are shown, reducing the required scrolling. To view, go to: Patient> open Chart and scroll down to the “CASE MANAGEMENT”.
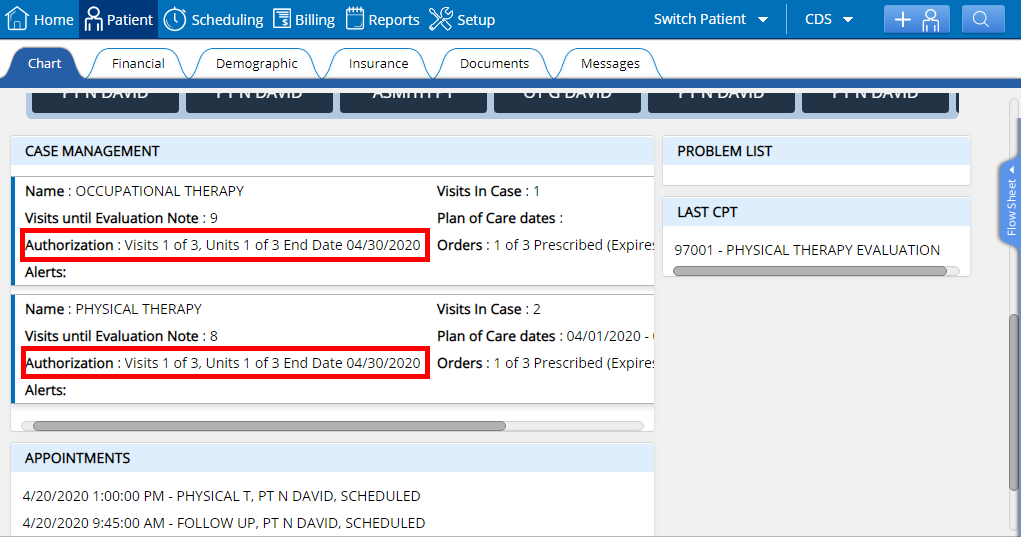
12. Captions have been updated in “CASE MANAGEMENT” in the patient chart. The caption Auth/Ins visits is now shown as “Authorization” and the message text has also been updated to show (as an example)“Visits 4 of 3, Units 2 of 4, End Date 04/05/2020″. To view go to: Patient> open Chart and scroll down to the “CASE MANAGEMENT”.
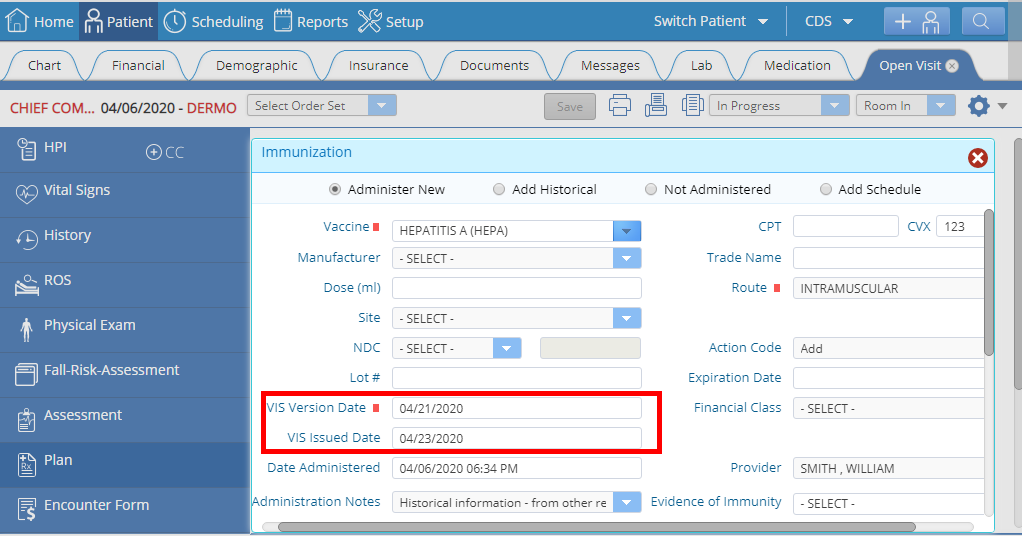
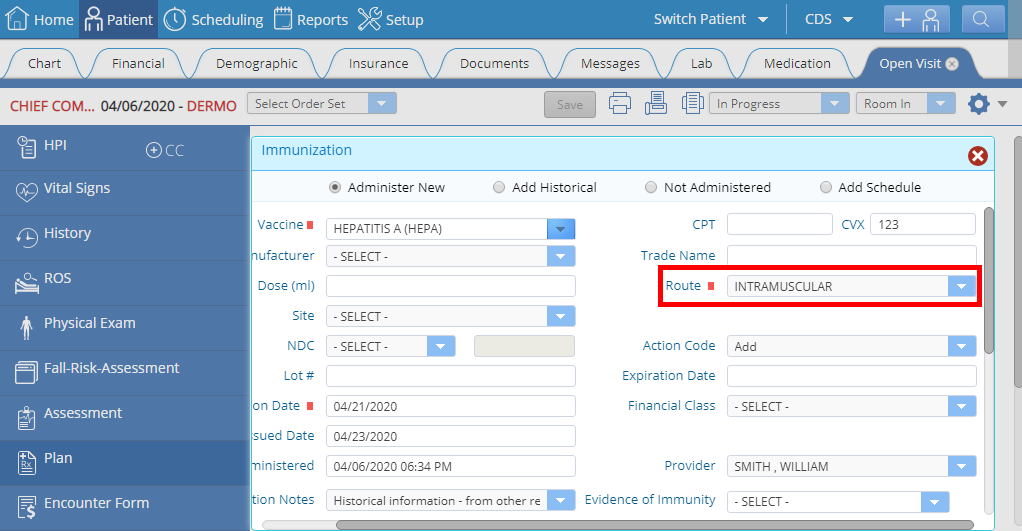
1. Vaccine Information Statements /Immunization captions updated. Two pre-existing fields “VIS Date” and “Vaccine Statement Presented” have been updated to “VIS Version Date” and “VIS Issued Date” respectively. The former (VIS Version Date) has also been made mandatory now along with the “Route” field.
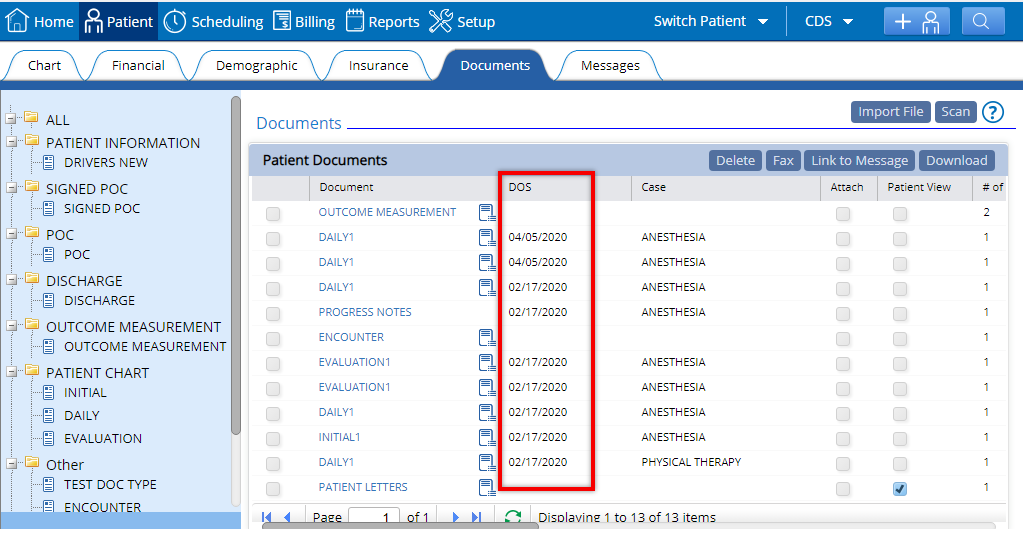
1. Date of service (DOS) can no longer be edited. Before, users could change the DOS for clinical visit documents from the document window. However, in order to protect the integrity of the data, this is no longer editable. To view, go to: Patient > Documents.
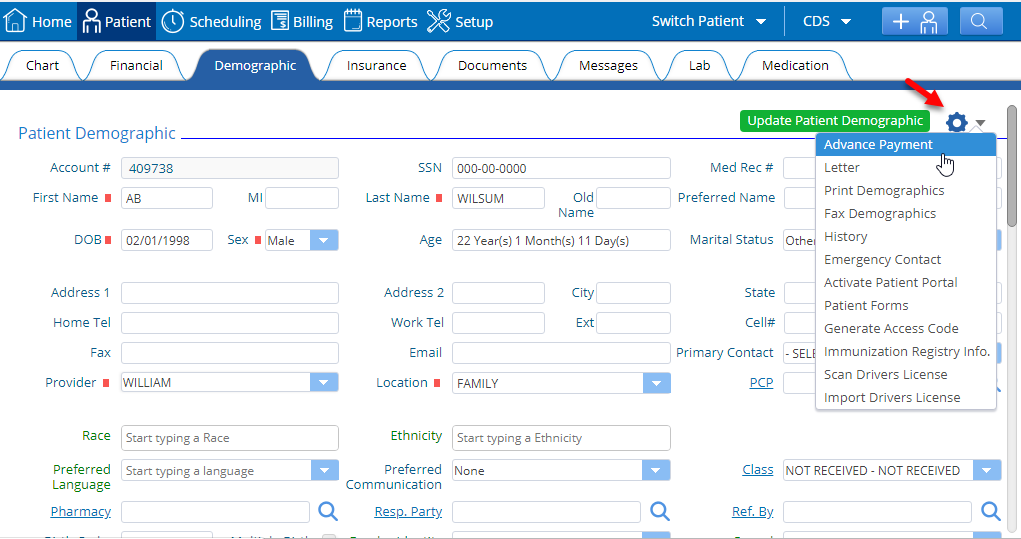
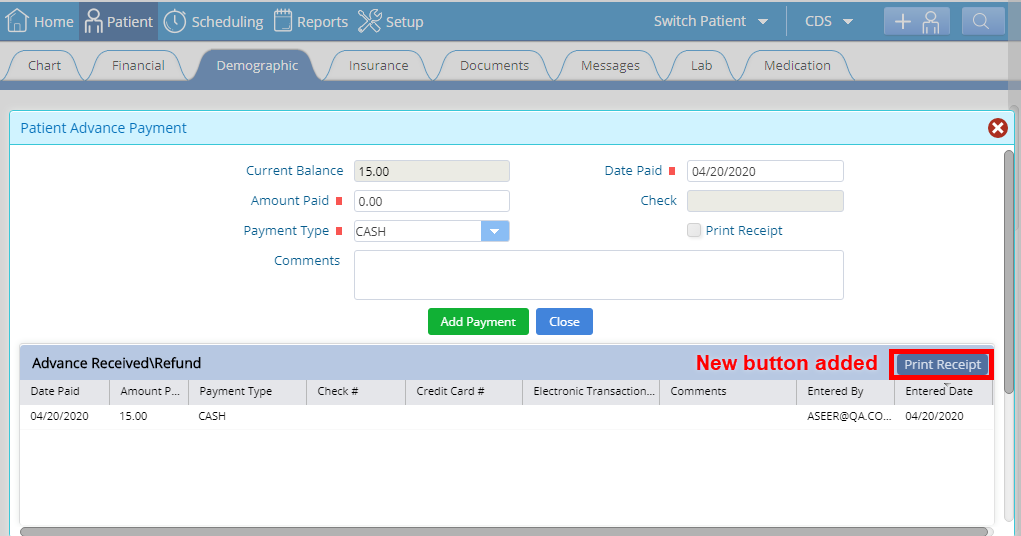
2. Print advance payment receipt. Printing an advance payment receipt was only possible by selecting the small checkbox “print receipt” before you added the payment. Now users will be able to print the receipt even after adding the payment with a quick click of a button. To print, go to: Demographics action menu > Click Advance Payment > Scroll down to Advance Received\Refund > Click “Print Receipt”.
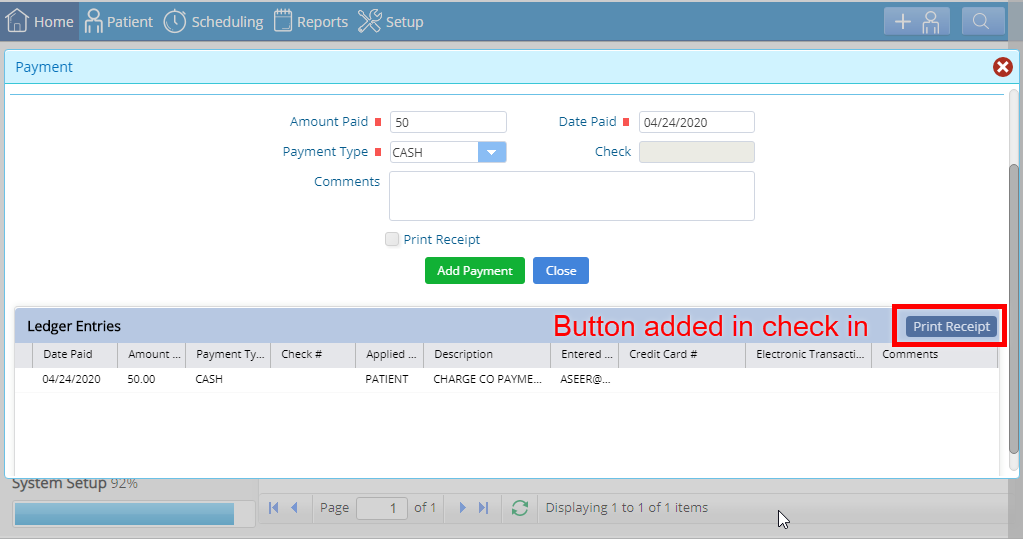
3. Print receipt button added in “Check-In” and “Walk In Check In” window. Users can now print the receipt of their copay payment even after the payment has been added, prior to which this was only possible before you clicked on add payment and had selected the checkbox “Print Receipt”.
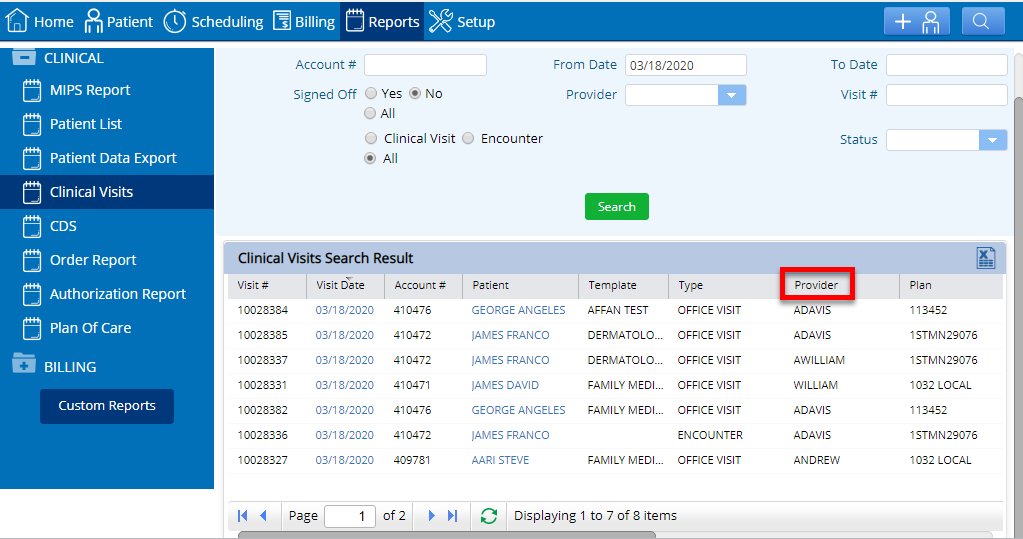
4. New and renamed columns for clinical visits. A “Type” column has been added in the clinical visits report to help users see the visit type at a glance. The “Visit Provider” column has been renamed to “Provider” to create consistent headings across the system. To view, go to Reports > Clinical > Clinical Visits > Search.
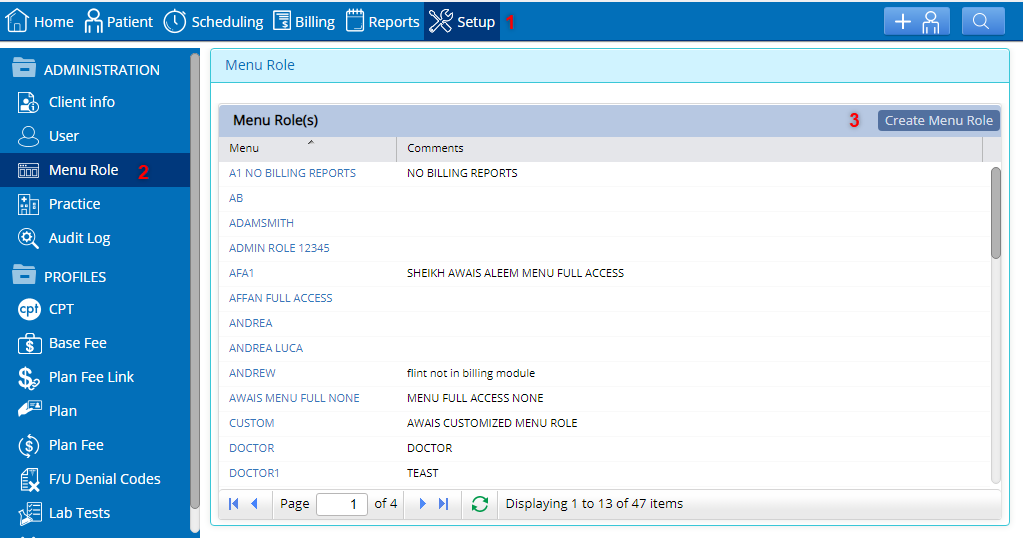
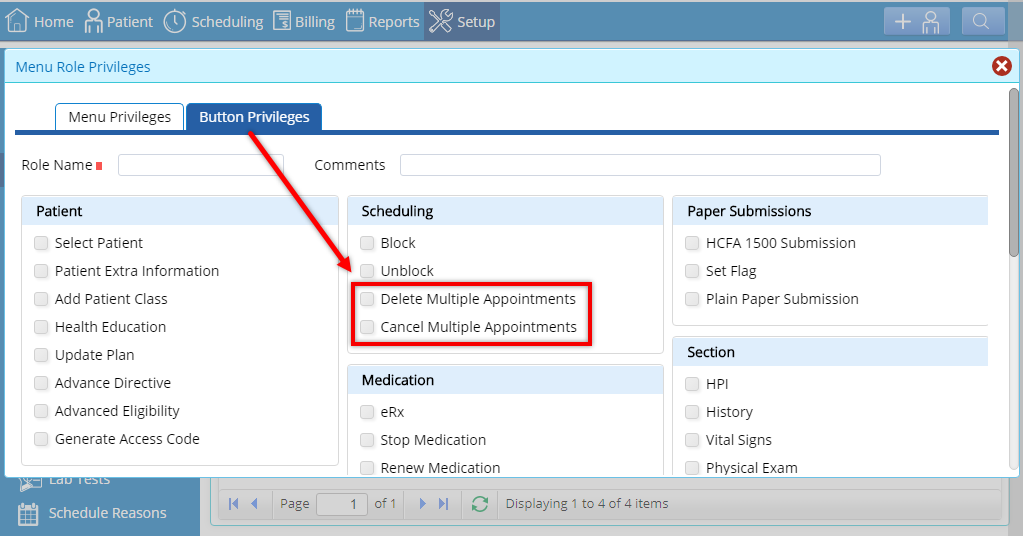
5. Scheduling privileges added. New scheduling privileges have been added to Menu Role settings. Under Menu Role, privileges can be set for deleting and/or cancelling multiple appointments. When these are selected for an existing menu role, both new and existing user’s privileges will be updated. To view, go to: Setup > Menu Role > Create Menu Role > Select Button Privileges tab > the new privileges will appear under Scheduling.
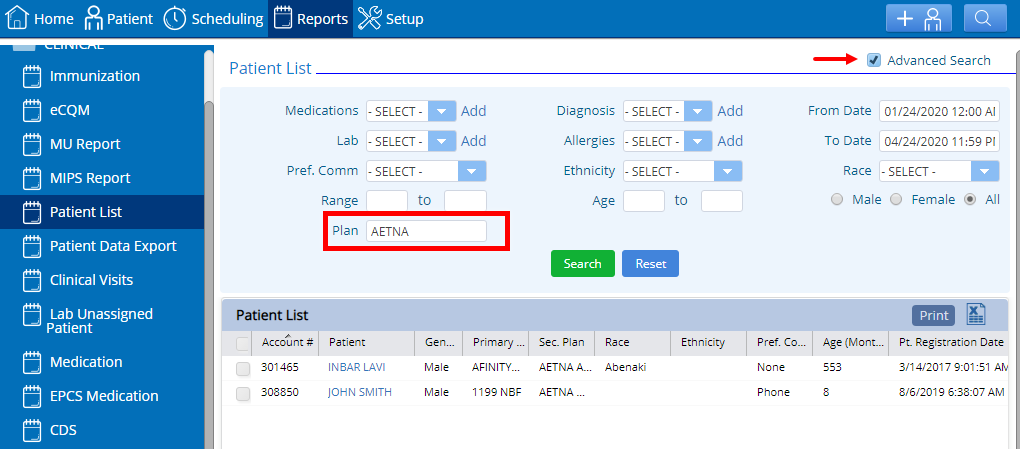
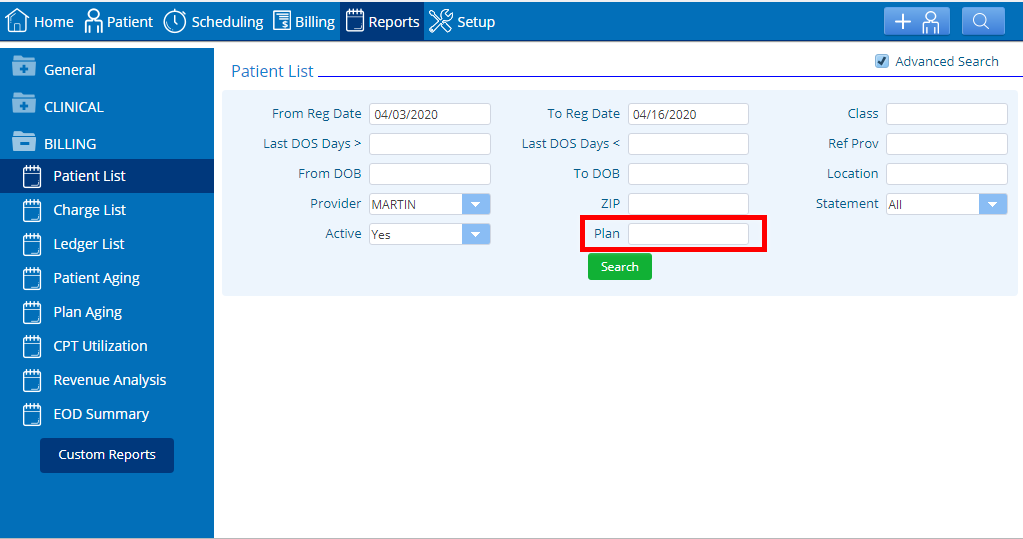
6. Plan filter added in Clinical patient list. Users can now filter the outcome as per patient plans in the “Patient List” by adding a specific plan name on selecting the advanced search checkbox . To view, go to: Reports> CLINICAL> select “Patient List”> check advanced search checkbox and the “Plan” filter will appear.
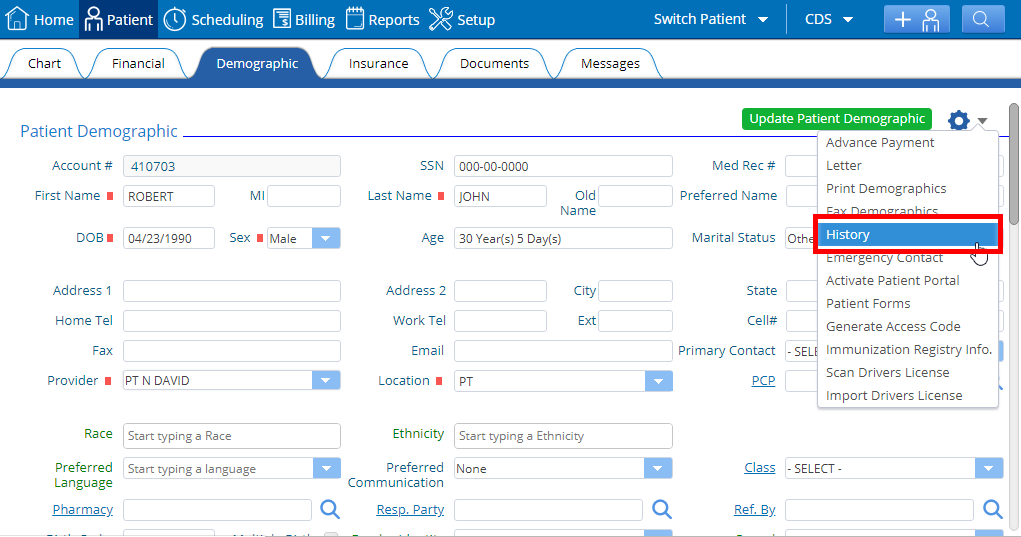
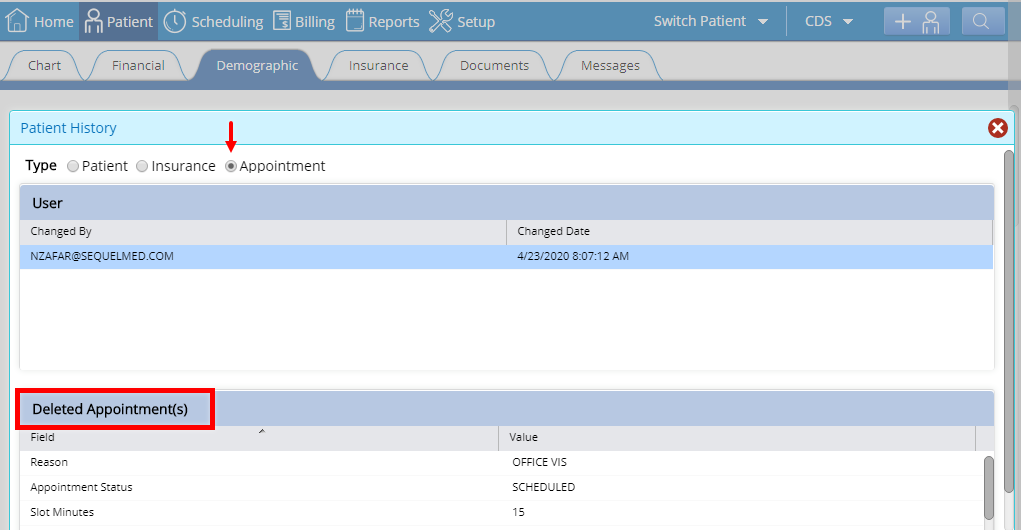
7. Added deleted appointments audit in patient history. The system will now make an audit of deleted appointments for the user to be able to view that data on the front end. Prior to change only cancelled appointments had an audit. To view deleted appointments audit, go to : Patient> Demographics> click on the action menu and select “History” the patient history window will appear> select the “Appointment” radio button and the window for deleted appointments will appear.
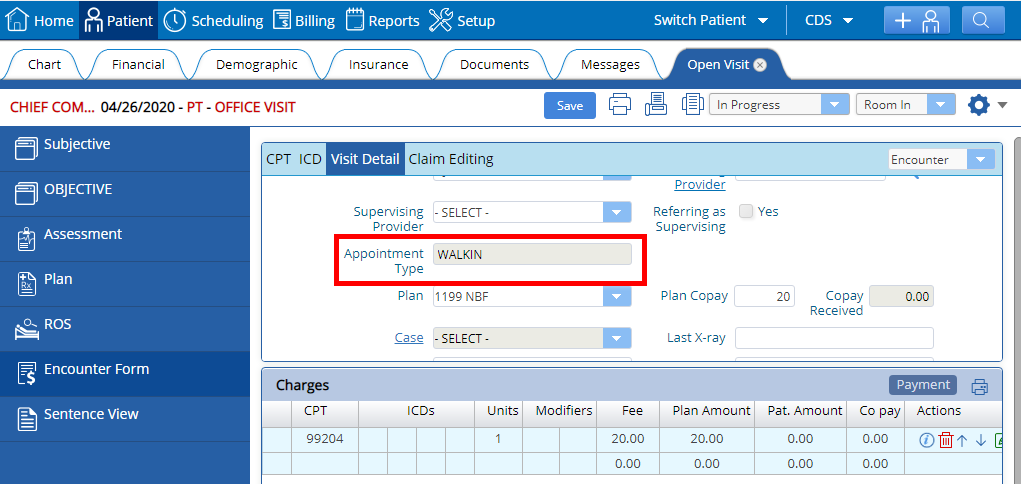
8. “Appointment Type” field added in visit detail. Users can now view the detail concerning the appointment types such as whether the patient is scheduled, walk-in, check-in, or new encounter. Data shown is only viewable and not editable as the field is disabled.
9. Option to book from wait list added to most scheduling views (daily, weekly, Multi view). Users can also now book appointments from the Wait List into an already booked appointment slot if overbook is allowed within the practice and selected within the master schedule. This option has now been provided in all three dependencies, Daily, Weekly and Multi view.

1. New plan field added in the Billing patient list report. The plan field will appear in the patient list report, when “Advanced Search” is selected. This allows users to search patients by their plan. To view, go to: Reports > Patient List > Click the “Advanced Search” checkbox and the plan field will appear.
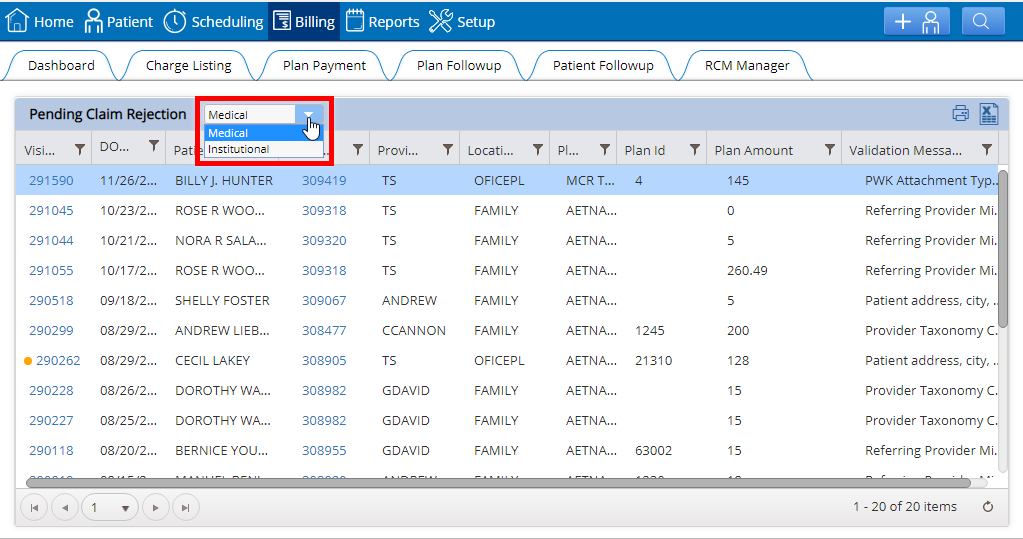
2. Improved categorization for pending claim rejections. Users now have the option to categorize pending claim rejections as medical or institutional. To view, go to: Billing > Dashboard > Click on the billing activities bucket for pending claim rejections (“Visit(s) need to be fixed before submission) > Select medical or institutional claim.
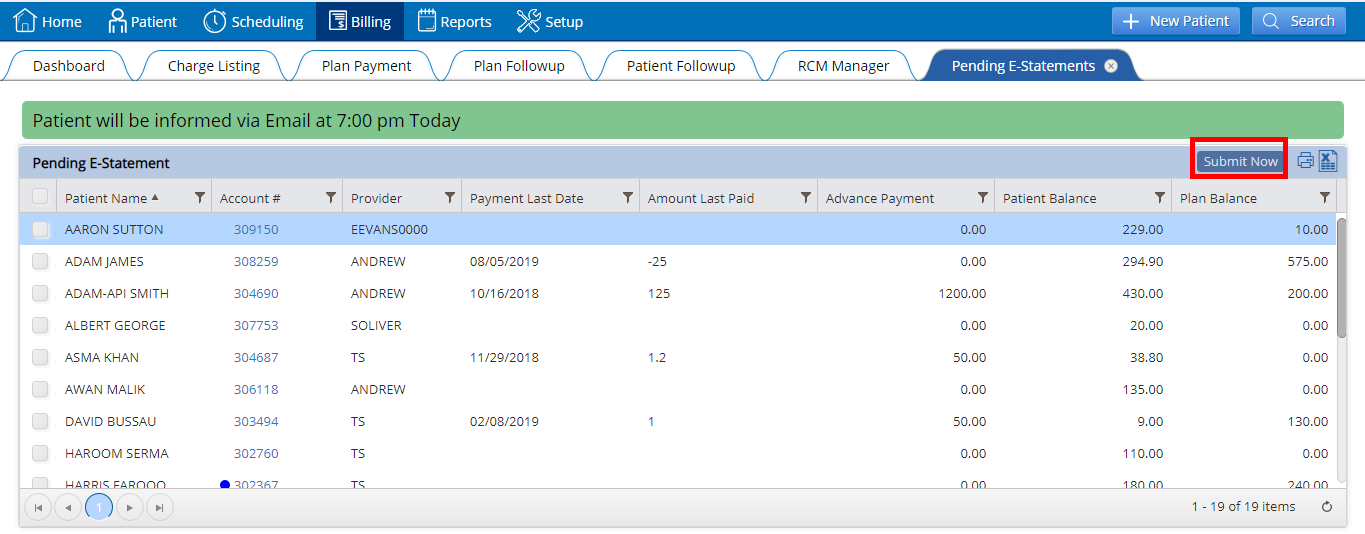
3. “Submit now” button added for pending e-statements. The “Submit Now” button has been added as an option for pending e-statements. Pending e-statements are scheduled to be submitted at a designated time, but this button allows users to override that time and select/submit pending items as needed. To submit statements, go to: Billing > Pending e-Statements > Select statements > Click Submit Now.
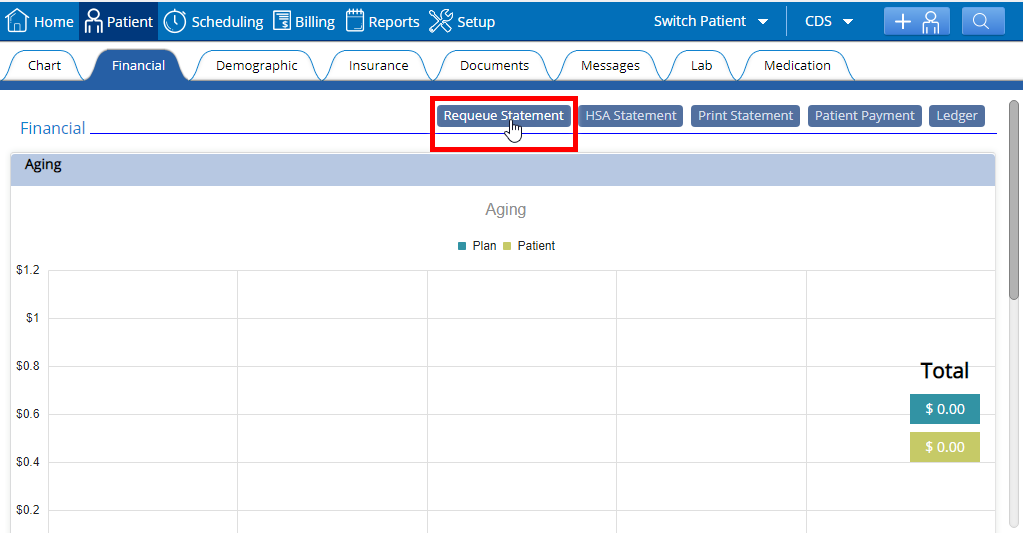
4. Requeue statement button added in the Financial tab. This button gives users the ability to reque a patient’s statement (essentially pull it back to the pending statements window before the statement cycle starts) to add a new or remaining statement instead of waiting for the next statement cycle. To view, go to the Financial tab.


![]()
![]()


